background image

28 

After 15 seconds the microphone will beep 5 times, and will continue beeping 

every 30 seconds to indicate that it is out of range.  
Move the Countryman Adapter closer to the Base Station and the connection 

will automatically be re-established to its original state, and the beeping will 

cease. If not, the Countryman Adapter will continue beeping until it turns off in 

about 15 minutes. 

Pairing Wireless Microphones to Base Station 

Pairing creates a link between the HD Wireless Microphone and the Base 

Station, with a unique electronic serial number. When the microphone and 

Base Station have been previously paired, the mic will automatically try to 

connect to the same Base Station whenever it is lifted from the Charger Base. 

Note: 


Microphones in new systems must be paired to the Base Station with 

each microphone assigned to a unique channel on the Base Station.


Remember, microphones are always muted (flashing RED LED) when they are 

removed from the Charger Base and the Mute button needs to be pressed to 

make it “live” (flashing GREEN LED).  

A microphone that is not paired will be indicated by a  cycling RED-GREEN 

LED pattern. A Base Station channel that is not paired to a microphone will 

not show any activity on the channel LED (make sure unit is first powered on 

by observing GREEN backlit front panel display).  

When channels are paired, both microphone and channel LEDs will flash RED 

as microphones are removed from the Charger Base and flash GREEN when 

un-muted. Remember that only one  microphone can be paired to any single 

Base Station channel. 

To pair an individual microphone to the Base Station:


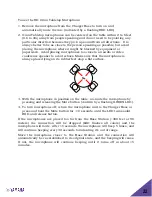
1. Turn the microphone OFF (no LED activity). If the microphone is ON, press

and hold the Mute button for 10 seconds until the LED turns solid RED

then release the button to turn the unit off. (do not release the button when

you hear two beeps).

2. Place the microphone unit into pairing mode by holding the Mute button

down for seven seconds. The LED will turn solid RED. Release the Mute

button. The microphone is now in pairing mode.

3. Within one minute, push and hold the button for the desired channel on the

Base Station for seven seconds until the LED turns solid red then release.

The LED for that channel will be solid red until pairing starts, as indicated

by a quick GREEN flash, then switching to flashing RED on both the

microphone and the Base Station (muted audio). Pairing is now complete.

Содержание Revolabs HD Venue 01-HDVENU

Страница 1: ...REVOLABS HD Venue Wireless Microphone System User and Set up Guide Models 01 HDVENU 03 HDVENUEU 03 HDVENUCN 03 HDVENUJP 1 ...

Страница 2: ...this document may be reproduced in any form or by any means without express written permission from Yamaha Inc Product specifications are subject to change without notice Revolabs HD Venue User and Set up Guide 01 HDVNUMAN PAP 11 September 2018 Rev 2 6 1 ...

Страница 3: ...16 Revolabs HD Microphones and HD Microphone Adapters 19 Using the HD Wearable Wireless Microphones 19 Using the HD Omni Directional Tabletop Wireless Boundary Microphones 21 Using the HD Directional Tabletop Wireless Boundary Microphones 23 Using the HD XLR Microphone Wireless Adapter 25 Using the HD Wireless Adapter for Countryman Microphone 27 Pairing Wireless Microphones to Base Station 28 Rev...

Страница 4: ... These limits are designed to provide reasonable protection against harmful interference in a residential installation This equipment generates uses and can radiate radio frequency energy and if not installed and used in accordance with the instructions may cause harmful interference to radio communications However there is no guarantee that interference will not occur in a particular installation...

Страница 5: ...bs HD Microphone RF Exposure This equipment complies with FCC radiation exposure limits set forth for an uncontrolled environment The antenna s used for this equipment must be installed to provide a separation distance of at least eight inches 20 cm from all persons This equipment must not be operated in conjunction with any other antenna This device complies with RF exposure requirements in Indus...

Страница 6: ...s controlled under the export regulations of the United States of America and Canada The Governments of the United States of America and Canada may restrict the exportation or re exportation of this product to certain destinations For further information contact the U S Department of Commerce or the Canadian Department of Foreign Affairs and International Trade The use of wireless devices and thei...

Страница 7: ...mber Description 03 HDVENUEU NM HD Venue 2 Channel Rack mount System w o mics 03 HDEXEMICEU 11 HD Microphone Wearable 03 HDTBLMICEU OM 11 HD Microphone Tabletop Omni directional 03 HDTBLMICEU DR 11 HD Microphone Tabletop Directional 03 HDXLRMICEU 11 HD XLR Wireless Adapter for Dynamic Handheld Microphone 03 HDCOMANEU 11 HD Wireless Adapter for Countryman Microphone Any unauthorized modification of...

Страница 8: ...ates that this product must not be disposed of with your other household waste Instead it is your responsibility to dispose of your waste equipment by handing it over to a designated collection point for the recycling of waste electrical and electronic equipment The separate collection and recycling of your waste equipment at the time of disposal will help conserve natural resources and ensure tha...

Страница 9: ...nts requiring clear audio capture The Revolabs HD Venue Wireless Microphone System has high definition audio which allows the system to pick up the entire human voice spectrum The HD Venue System combines innovative technology and ergonomic design employing Multi Carrier Time Division Multiple Access and Time Division Duplex MC TDMA TDD radio transmissions both to and from the microphone This tech...

Страница 10: ... PCB diversity antennae and offers individual line level or mic level audio in out for each microphone channel This allows for external audio processing such as Mixing Acoustic echo cancellation AEC Feedback elimination Level control Equalization Noise cancellation The system is designed to optimize audio capture reproduction by providing Consistent audio input from all participants Minimum room n...

Страница 11: ...ase Station The Revolabs HD Venue Base Station is designed to be installed into a standard 19 AV rack using the attached rack ears 1 Install the HD Venue System into the rack 2 Plug the power cord into an appropriate outlet 3 Connect the necessary outputs and inputs ...

Страница 12: ...d Connections 1 Channel LED indicators Displays microphone mute and pairing states 2 Pairing Push Buttons For pairing microphones to Base Station 3 Antennae 4 Female XLR and Balanced Combo Input Connectors 5 Female Balanced Output Connectors 6 Male XLR Balanced Output Connectors 7 Mini USB Serial Interface firmware updates only 8 Configuration DIP Switches see Section Using the Rear Panel Configur...

Страница 13: ...m is full duplex the input connections provide the ability to hear program audio using a 2 5mm earpiece attached to the microphone supplied with the wearable microphone Depending on the application it is possible to feed a single audio feed back to each earpiece This would allow for translation personal hearing assistance or other services to be incorporated into an application NOTE The USB port m...

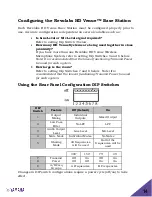
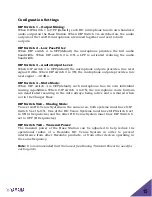
Страница 14: ...ing Transmit Power be used for each system How large is the room Refer to setting Dip Switches 7 and 8 below Note It is recommended that the lowest functioning Transmit Power be used for each system Using the Rear Panel Configuration DIP Switches DIP Switch Feature Off Default On 1 Output Mixing Individual Outputs Mixed Output 2 Low Pass Filter No LPF LPF 3 Audio Output Level Line Level Mic Level ...

Страница 15: ...te Mode When DIP switch 4 is OFF default each microphone has its own individual muting capabilities When DIP switch 4 is ON the microphone mute buttons are deactivated resulting in the mics always being active and un muted when not in the Charger Base DIP Switch 5 6 Sharing Mode To use two HD Venue Systems in the same area both systems must have DIP Switch 5 set to ON One of the HD Venue Systems m...

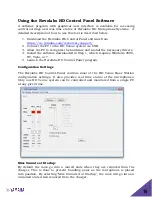
Страница 16: ...stall the software downloaded in Step 1 which requires Windows 2000 NT Vista or 7 5 Launch the Revolabs HD Control Panel program Configuration Settings The Revolabs HD Control Panel controls most of the HD Venue Base Station configuration settings It also provides real time status of the microphones Only one HD Venue system can be controlled and monitored from a single PC at any given time Mics Un...

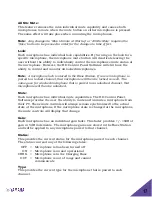
Страница 17: ... as well The same goes for a locked microphone that is paired to an unlocked channel that microphone will then be unlocked Mute Each microphone has individual mute capabilities The HD Control Panel Software provides the user the ability to mute and unmute a microphone from their PC These mute controls will always remain synchronized to the actual state of the microphone If the microphone state is ...

Страница 18: ...ery level is between 87 100 Pairing This provides the ability to activate pairing mode for the respective base station channel It also provides the pairing status of any base station channel already in pairing mode Firmware This window provides the current firmware versions found in the Base Station and microphones as well as provides the HD Firmware Loader for loading the firmware to the base sta...

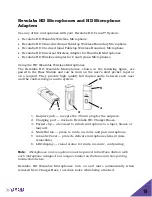
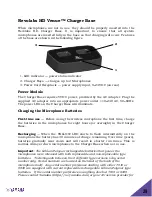
Страница 19: ...et lapel or on a lanyard They provide high quality full duplex audio between each user and the conferencing or audio system 1 Earpiece jack accepts the 2 5mm plug for the earpiece 2 Charging port docks to Revolabs HD Charger Bases 3 Pocket clip also used to attach microphone to a lapel blouse or lanyard 4 Mute Button press to mute un mute and pair microphone 5 Acoustic Cover protects delicate micr...

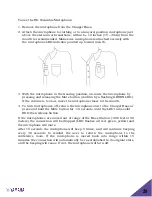
Страница 20: ...phone closer to the mouth 4 To turn microphones off return the microphone unit to the Charger Base or press and hold the Mute button for 10 seconds until the LED turns solid RED then release button If the microphones are moved out of range of the Base Station 300 feet or 90 meters the connection will be dropped LED flashes all red green yellow and the microphone will mute After 15 seconds the micr...

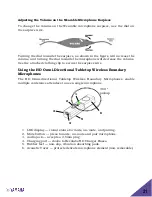
Страница 21: ...e earpiece wire Using the HD Omni Directional Tabletop Wireless Boundary Microphones The HD Omni directional Tabletop Wireless Boundary Microphones enable multiple conference attendees to use a single microphone 1 LED display visual status for mute un mute and pairing 2 Mute button press to mute un mute and pair microphone 3 Audio jack accepts a 2 5mm plug 4 Charging port docks to Revolabs HD Char...

Страница 22: ... on its rubber feet atop a flat surface 3 With the microphone in position on the table un mute the microphone by pressing and releasing the Mute button confirm by a flashing GREEN LED 4 To turn microphone off return the microphone unit to the Charger Base or press and hold the Mute button for 10 seconds until the LED turns solid RED and release button If the microphones are placed too far from the...

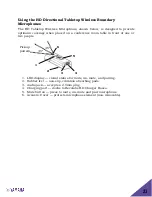
Страница 23: ...e room table in front of one or two people 1 LED display visual status for mute un mute and pairing 2 Rubber feet non slip vibration absorbing pads 3 Audio jack accepts a 2 5mm plug 4 Charging port docks to Revolabs HD Charger Bases 5 Mute button press to mute un mute and pair microphone 6 Acoustic Cover protects microphone element non removable 1 2 3 4 5 6 45º 45º Pickup pattern ...

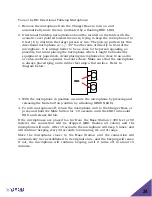
Страница 24: ...re that the microphone is always placed lying on its rubber feet atop a flat surface Refer to diagram below 3 With the microphone in position un mute the microphone by pressing and releasing the Mute button confirm by a flashing GREEN LED 4 To turn microphone off return the microphone unit to the Charger Base or press and hold the Mute button for 10 seconds until the LED turns solid RED and releas...

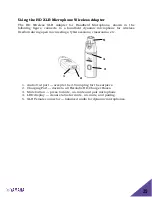
Страница 25: ... microphone for wireless freedom during open mic meetings Q A sessions classrooms etc 1 Audio Out port accepts the 2 5mm plug for the earpiece 2 Charging Port docks to all Revolabs HD Charger Bases 3 Mute button press to mute un mute and pair microphone 4 LED display visual status for mute un mute and pairing 5 XLR Female connector balanced audio for dynamic microphones ...

Страница 26: ... un muted prior to use 3 To turn the Adapter off return the microphone unit to the Charger Base or press and hold the Mute button for 10 seconds until the LED turns solid RED then release button Important Always remove the microphone from the Adapter by pressing the latch switch and separating the parts before returning the Adapter to the Charger Base If the Adapter is moved too far from the Base ...

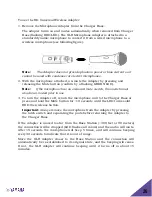
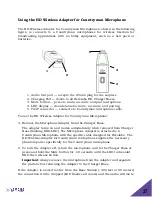
Страница 27: ...4 Remove the Microphone Adapter from the Charger Base The adapter turns on and mutes automatically when removed from Charger Base flashing RED LED The Microphone Adapter is attached to a Countryman Microphone with the specific cable designed for Revolabs The HD Wireless Adapter for Countryman microphone supplies the necessary phantom power specifically for the Countryman microphone 5 To turn the A...

Страница 28: ... cycling RED GREEN LED pattern A Base Station channel that is not paired to a microphone will not show any activity on the channel LED make sure unit is first powered on by observing GREEN backlit front panel display When channels are paired both microphone and channel LEDs will flash RED as microphones are removed from the Charger Base and flash GREEN when un muted Remember that only one micropho...

Страница 29: ...rge the batteries in the microphones for eight hours or overnight in the Charger Base Recharging When the YELLOW LED starts to flash intermittently on the microphone the battery has 30 minutes of charge remaining Over time years batteries gradually wear down and will result in shorter run times This is normal Always return microphones to the Charger Base when not in use Important The Lithium Polym...

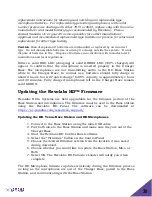
Страница 30: ... normal use batteries should fully charge in about 2 hours but will quick charge to 80 capacity in approximately 1 hour and 20 minutes Fully charged microphones left in the Charger Base remain solid GREEN Updating the Revolabs HDTM Firmware Revolabs HDTM Systems are field upgradable for the firmware portion of the Base Station and microphones The firmware must be sent to the Base station using the...

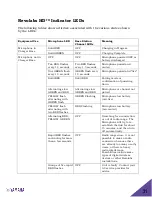
Страница 31: ...EN and RED Alternating slow GREEN and RED Microphone or channel not paired YELLOW flash alternating with GREEN flash GREEN Flashing Microphone low battery mic live YELLOW flash alternating with two RED flashes RED Flashing Microphone low battery mic muted Alternating RED YELLOW GREEN OFF Searching for a connection or out of radio range The Microphone will try to re establish the link for about 15 ...

Страница 32: ...quipment damaged by negligence accident or Acts of God voids this warranty The Seller shall not be liable for any consequential damage resulting from the malfunction of this product Should the user experience unsatisfactory performance from this equipment contact the Seller to obtain instructions for return or replacement as deemed necessary This warranty is not transferable by the original end us...

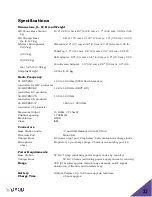
Страница 33: ...03 HDVENUEU 1 88 to 1 90 GHz DECT EU and other EU products 03 HDVENUCN 1 90 to 1 92 GHz and other CN products 03 HDVENUJP 1 895 to 1 903 GHz and other JP products Maximum Output 15 7dBm 37 15mW Channel spacing 1 728 MHz Modulation GFSK Class ISM Connectors Base Station Audio and XLR Balanced 2 In 2 Out Firmware Port Mini USB Charger Base DC power input port Proprietary 4 pin microphone charge jack...

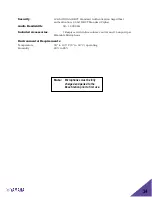
Страница 34: ...er Audio Bandwidth 50 14000 Hz Included Accessories 1 Earpiece with inline volume control and 1 Lanyard per Wearable Microphone Environmental Requirements Temperature 40 to 105 F 5 to 40 C operating Humidity 20 to 85 Note Microphones must be fully charged and paired to the Base Station prior to first use ...

Страница 35: ...unications Inc 144 North Road 3250 Sudbury MA 01776 USA 1 800 326 1088 uc sales music yamaha com Yamaha UC EMEA 190 High Street Tonbridge Kent TN9 1BE UK 44 0 1732 366535 uc salesemea music yamaha com Yamaha UC APAC 852 8108 8820 uc salesapac music yamaha com Copyright 2018 Yamaha Unified Communications Inc ...

Отзывы: