CABLE ROUTING
2-48
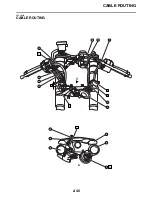
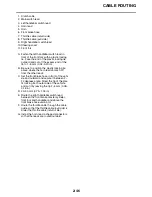
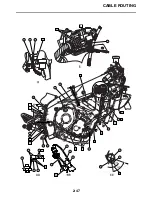
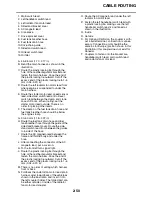
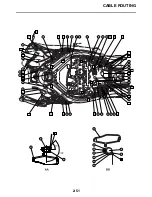
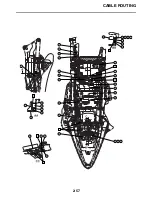
1. Coolant reservoir breather hose
2. Clutch cable
3. Hose clamp
4. EXUP cable
5. O
2
sensor lead
6. Rear brake light switch lead
7. Footrest bracket
8. EXUP servo motor lead
9. Pickup coil lead
10.Ignition coil lead
11.Frame
12.Main harness
13.Guide bars
14.Radiator outlet hose
15.Bracket
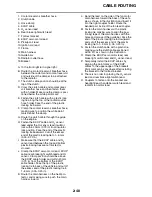
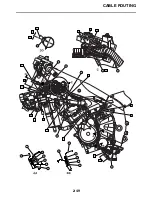
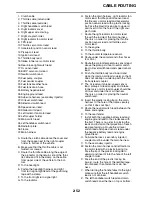
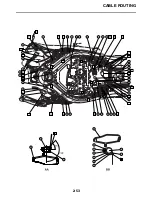
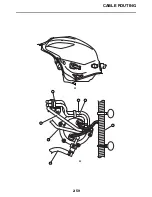
A. To the front right turn signal light.
B. Route the coolant reservoir breather hose
between the radiator and coolant reservoir
and outside of the damper to be attached
to the radiator.
C. The clutch cable position should be at the
top of the clutch.
D. Cross the clutch cable and coolant reser-
voir breather hose and then fasten them
with a holder. Make sure the clamp is posi-
tioned below the white paint mark.
E. Fasten the clutch cable with a plastic lock-
ing tie along the top of the radiator outlet
hose holder. Face the end of the plastic
locking tie inward.
F. Clamp the coolant reservoir breather hose,
making sure to position the white paint
mark behind the clamp.
G. Route the clutch cable through the guide
on the engine.
H. Fasten the EXUP cable and O
2
sensor
lead under the O
2
sensor lead insulator
lock within 20mm (0.79 in) from insulator
lock position. Face the end of the plastic
locking tie backward. Cut off the excess
end of the plastic locking tie to 1–5 mm
(0.04–0.20 in).
I. Make sure that the EXUP cable and O
2
sensor lead between the top and bottom
plastic locking ties are not twisted or
crossed.
J. Clamp the EXUP servo motor lead, EXUP
cable, rear brake light switch lead and O
2
sensor. Clamp position should be above
the EXUP cable holder and within 20mm
(0.79 in) from the bottom of the EXUP
cable holder. Face the tip of the plastic
locking tie to back of the vehicle and cut off
the excess end of the plastic locking tie to
1–5 mm (0.04–0.20 in).
K. Route the main harness on the heat pro-
tector, and making sure to push the main
harness inward.
L. Bend the lead on the side of the fan motor
main harness toward the back of the vehi-
cle as shown in the illustration and insert it
into the right coupler holder. Route the
bended part inside of the fan lead coupler.
M. Fasten the main harness with a plastic
locking tie, making sure to align the posi-
tioning tape of the main harness with the
holes and groove of the guide bar. Face the
end of the plastic locking tie to downward
and cut off the excess end of the plastic
locking tie to 1–5 mm (0.04–0.20 in).
N. Fasten the clutch cable with a plastic tie,
making sure the clutch cable positioned
within 20
°
as shown in the illustration.
O. Clamp the EXUP servo motor lead, rear
brake light switch lead and O
2
sensor lead.
P. Temporally install the EXUP cables by
aligning the paint marks of the EXUP
cables to the upper edge of the brackets.
Paint mark can by anywhere after installing
the bracket to the footrest bracket.
Q. There is no order for placing the O
2
sensor
lead and rear brake light switch lead.
R. Couplers to fasten onto the bracket are
headlight lead, handlebar switch lead and
radiator fan motor lead.
Содержание R6 2009
Страница 1: ...SERVICE MANUAL YZFR6Y C 13S 28197 11 LIT 11616 22 51 2009 ...
Страница 6: ......
Страница 8: ......
Страница 60: ...LUBRICATION SYSTEM CHART AND DIAGRAMS 2 29 EAS20410 LUBRICATION DIAGRAMS 1 2 3 4 ...
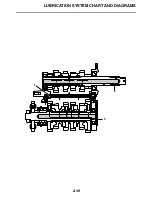
Страница 62: ...LUBRICATION SYSTEM CHART AND DIAGRAMS 2 31 1 2 3 4 8 7 6 5 ...
Страница 64: ...LUBRICATION SYSTEM CHART AND DIAGRAMS 2 33 1 2 3 4 5 ...
Страница 65: ...LUBRICATION SYSTEM CHART AND DIAGRAMS 2 34 1 Oil cooler 2 Oil filter 3 Oil pipe 4 Oil pump 5 Oil strainer ...
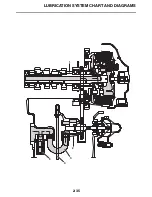
Страница 66: ...LUBRICATION SYSTEM CHART AND DIAGRAMS 2 35 1 5 4 3 2 ...
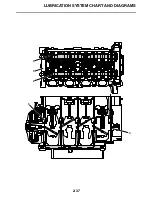
Страница 68: ...LUBRICATION SYSTEM CHART AND DIAGRAMS 2 37 3 1 2 5 4 ...
Страница 70: ...LUBRICATION SYSTEM CHART AND DIAGRAMS 2 39 1 3 2 ...
Страница 71: ...LUBRICATION SYSTEM CHART AND DIAGRAMS 2 40 1 Oil pipe 2 Main axle 3 Drive axle ...
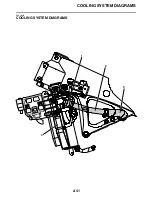
Страница 72: ...COOLING SYSTEM DIAGRAMS 2 41 EAS20420 COOLING SYSTEM DIAGRAMS 1 2 3 4 ...
Страница 73: ...COOLING SYSTEM DIAGRAMS 2 42 1 Radiator inlet hose 2 Radiator inlet pipe 3 Thermostat outlet hose 4 Radiator ...
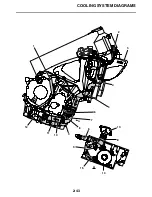
Страница 74: ...COOLING SYSTEM DIAGRAMS 2 43 A A 2 1 3 4 5 6 7 8 6 13 8 9 15 14 9 10 11 12 ...
Страница 76: ...CABLE ROUTING 2 45 EAS20430 CABLE ROUTING ...
Страница 78: ...CABLE ROUTING 2 47 ...
Страница 80: ...CABLE ROUTING 2 49 ...
Страница 82: ...CABLE ROUTING 2 51 ...
Страница 84: ...CABLE ROUTING 2 53 ...
Страница 86: ...CABLE ROUTING 2 55 ...
Страница 88: ...CABLE ROUTING 2 57 ...
Страница 90: ...CABLE ROUTING 2 59 A A ...
Страница 92: ...CABLE ROUTING 2 61 ...
Страница 95: ......
Страница 135: ......
Страница 206: ...CHAIN DRIVE 4 71 1 2 3 a a New ...
Страница 209: ......
Страница 240: ...PICKUP ROTOR 5 31 ...
Страница 286: ...TRANSMISSION 5 77 ...
Страница 290: ...RADIATOR 6 3 b Apply 100 kPa 14 50 psi 1 0 kg cm2 of pressure c Measure the indicated pressure with the gauge ...
Страница 300: ...WATER PUMP 6 13 ...
Страница 316: ...AIR INDUCTION SYSTEM 7 15 EAS27040 AIR INDUCTION SYSTEM 2 1 2 4 3 4 3 6 4 5 A A ...
Страница 323: ......
Страница 324: ...IGNITION SYSTEM 8 1 EAS27090 IGNITION SYSTEM EAS27110 CIRCUIT DIAGRAM ...
Страница 330: ...ELECTRIC STARTING SYSTEM 8 7 EAS27160 ELECTRIC STARTING SYSTEM EAS27170 CIRCUIT DIAGRAM ...
Страница 336: ...CHARGING SYSTEM 8 13 EAS27200 CHARGING SYSTEM EAS27210 CIRCUIT DIAGRAM ...
Страница 337: ...CHARGING SYSTEM 8 14 1 AC magneto 2 Rectifier regulator 6 Main fuse 7 Battery 11 Engine ground ...
Страница 339: ...CHARGING SYSTEM 8 16 ...
Страница 340: ...LIGHTING SYSTEM 8 17 EAS27240 LIGHTING SYSTEM EAS27250 CIRCUIT DIAGRAM ...
Страница 344: ...SIGNALING SYSTEM 8 21 EAS27270 SIGNALING SYSTEM EAS27280 CIRCUIT DIAGRAM ...
Страница 351: ...SIGNALING SYSTEM 8 28 ...
Страница 352: ...COOLING SYSTEM 8 29 EAS27300 COOLING SYSTEM EAS27310 CIRCUIT DIAGRAM ...
Страница 355: ...COOLING SYSTEM 8 32 ...
Страница 356: ...FUEL INJECTION SYSTEM 8 33 EAS27330 FUEL INJECTION SYSTEM EAS27340 CIRCUIT DIAGRAM ...
Страница 395: ...FUEL INJECTION SYSTEM 8 72 ...
Страница 396: ...FUEL PUMP SYSTEM 8 73 EAS27550 FUEL PUMP SYSTEM EAS27560 CIRCUIT DIAGRAM ...
Страница 399: ...FUEL PUMP SYSTEM 8 76 ...
Страница 400: ...ELECTRICAL COMPONENTS 8 77 EAS27970 ELECTRICAL COMPONENTS ...
Страница 402: ...ELECTRICAL COMPONENTS 8 79 1 5 4 3 2 6 7 8 9 10 12 13 11 14 15 16 17 18 ...
Страница 404: ...ELECTRICAL COMPONENTS 8 81 EAS27980 CHECKING THE SWITCHES ...
Страница 431: ......
Страница 432: ...YAMAHA MOTOR CO LTD 2500 SHINGAI IWATA SHIZUOKA JAPAN ...

