background image

F-

6

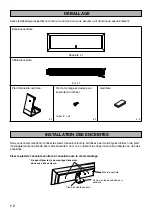
Cette enceinte est conçue comme enceinte avant ou comme enceinte surround.
Installer les enceintes comme indiqué ci–dessous.

* Les caractéristiques techniques sont modifiables sans préavis aux fins d’amélioration.

Type

Suspension acoustique 3 voies, type à blindage anti-magnétique 

Excitateur

Woofer à cône de 10 cm, tweeter à dôme souple de 1.9 cm

Réponse en fréquence

100 Hz à 40 kHz

Impédance

6 ohms

Puissance d’entrée nominale

35 W

Puissance d’entrée maximale

120 W

Sensibilité

83 dB/2,83 V/m

Fréquence de recouvrement

600 Hz • 6 kHz

Dimensions (L x H x P)

605 x 187 x 99,3 mm

Poids

3,6 kg

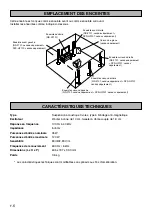
EMPLACEMENT DES ENCEINTES

Enceinte centrale
(NS-CF101)

Enceinte avant gauche
(NS-F101: vendue séparément + 
SPS-HF101: vendus séparément)

Enceinte avant droite
(NS-F101: vendue séparément + 
SPS-HF101: vendus séparément)

Enceinte surround gauche
(NS-F101: vendue séparément + SPS-HF101: vendus séparément)

Enceinte surround arrière 
(NS-F101: vendue séparément + SPS-HF101: 
vendus séparément)

Enceinte surround droite 
(NS-F101: vendue séparément 
+ SPS-HF101: vendus 
séparément)

Caisson de grave 
(vendu séparément)

CARACTÉRISTIQUES TECHNIQUES

Содержание NS-CF101

Страница 1: ... shock Do not place the speakers where foreign objects such as water drips might fall It might cause a fire damage to this unit and or personal injury Do not place the speakers where they are liable to be knocked over or struck by falling objects Stable placement will also ensure better sound performance Secure placement or installation is the owner s responsibility Yamaha shall not be liable for ...

Страница 2: ...ing the key holes on the rear of the speakers Attach the center speaker stand to the speaker with the mounting screw Center speaker Speaker x 1 Speaker cable 4 m x 1 Center speaker stand x 1 Exclusive speaker mounting screw inch size size 1 4 x 3 4 x 1 Fastener x 2 UNPACKING SETTING UP THE SPEAKER Center speaker Exclusive speaker mounting screw Center speaker stand Do not use speaker mounting scre...

Страница 3: ... hang the holes of the rear of the speaker on the protruding screws Make sure that the screws are securely caught by the narrow sections of the key hole opening Peel off the seal Fastener TV Rack TV Rack Center speaker TV set Center speaker inside the TV rack Flat TV a b 412 mm 16 7 32 Use the key holes Tapping screw Available at the hardware store a Min 38 mm 1 1 2 b 5 5 mm 7 32 Wall wall support...

Страница 4: ...NECTIONS TO YOUR AMPLIFIER REAR CENTER REAR SURROUND SUB WOOFER OUT CENTER MAIN A B R R R L L L SPEAKERS Front speakers NS F101 sold separately Right Left Center speaker Subwoofer system sold separately Amplifier or receiver Back Left Surround speakers NS F101 sold separately Right ...

Страница 5: ... terminal knob 3 Insert the banana plug into the terminal The front cover is fastened to the enclosure at four points and can be removed if desired To remove the cover hold on to both sides and slowly pull straight away from the speaker To reattach line up the four holes on the inner surface of the cover with the four corresponding pegs on the speaker and push gently Note When the cover is removed...

Страница 6: ...0W Sensitivity 83dB 2 83V m Crossover Frequency 600Hz 6kHz Dimensions W x H x D 605 x 187 x 99 3 mm 23 27 32 x 7 3 8 x 3 15 16 Weight 3 6 kg 7 92 lbs SPEAKER PLACEMENT Center speaker NS CF101 Front left speaker NS F101 sold separately SPS HF101 sold separately Front right speaker NS F101 sold separately SPS HF101 sold separately Surround left speaker NS F101 sold separately SPS HF101 sold separate...

Страница 7: ...cer l appareil dans un endroit où des corps étrangers comme des gouttes d eau peuvent tomber à l intérieur Ceci peut causer un incendie des dommages à l appareil et ou une blessure corporelle Ne pas placer l enceinte à un endroit où elle risque d être renversée ou percutée par des objets tombants Un endroit bien stable améliorera aussi la qualité du son Le propriétaire du système est entièrement r...

Страница 8: ...nt les trous de serrure pratiqués au dos des enceintes Fixer le pied de l enceinte centrale à l enceinte avec la vis de montage Enceinte centrale Enceinte x 1 Câble d enceinte 4 m x 1 Pied d enceinte centrale x 1 Vis de montage exclusive pour enceinte en inches Taille 1 4 x 3 4 x 1 Garniture x 2 DÉBALLAGE INSTALLATION DES ENCEINTES Enceinte centrale Vis de montage exclusive pour enceinte Pied d en...

Страница 9: ...les vis en saillie dans les orifices du panneau arrière S assurer que les vis sont bien solidement insérées dans la section étroite de l orifice en forme de trou de serrure Retirez la feuille de protection Garniture Téléviseur plat Téléviseur plat Enceinte centrale Téléviseur Enceinte centrale à l intérieur de l étagère TV Etagère TV a b 412 mm Utiliser ces trous de serrure Vis auto taraudeuse en ...

Страница 10: ... A L AMPLIFICATEUR REAR CENTER REAR SURROUND SUB WOOFER OUT CENTER MAIN A B R R R L L L SPEAKERS Enceintes avant NS F101 vendue séparément Droite Gauche Enceinte centrale Système de caisson de grave vendu séparément Amplificateur ou récepteur Arrière Gauche Enceintes surround NS F101 vendue séparément Droite ...

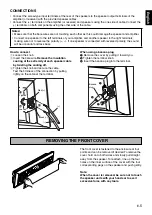
Страница 11: ... dans la borne Le couvercle avant fixé à l enceinte en quatre points peut être retiré si désiré Pour retirer le couvercle le saisir par les deux côtés et le tirer lentement droit vers soi Pour le remettre en place aligner les quatre orifices de la surface interne du couvercle sur les quatre fiches correspondantes de l enceinte et appuyer doucement Remarque Lorsqu on retire le couvercle faire atten...

Страница 12: ...entrée maximale 120 W Sensibilité 83 dB 2 83 V m Fréquence de recouvrement 600 Hz 6 kHz Dimensions L x H x P 605 x 187 x 99 3 mm Poids 3 6 kg EMPLACEMENT DES ENCEINTES Enceinte centrale NS CF101 Enceinte avant gauche NS F101 vendue séparément SPS HF101 vendus séparément Enceinte avant droite NS F101 vendue séparément SPS HF101 vendus séparément Enceinte surround gauche NS F101 vendue séparément SP...

Страница 13: ...usw in das Gerät gelangen können Dadurch kann ein Brand ein Geräteschaden und oder Personenschäden verursacht werden Stellen Sie die Lautsprecher nicht dort auf wo sie leicht umfallen oder wo Gegenstände auf sie fallen könnten Ein stabiler Aufstellungsort trägt auch zu einer besseren Tonwiedergabe bei Eine sicher Aufstellung oder Installation liegt in der Verantwortung des Besitzers YAMAHA kann ke...

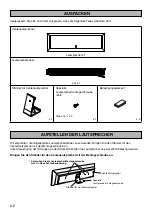
Страница 14: ...er an einer Wand befestigt werden Bringen Sie den Ständer für den Centerlautsprecher mit der Montageschraube an Centerlautsprecher Lautsprecher x 1 Lautsprecherkabel 4 m x 1 Ständer für Centerlautsprecher x 1 Spezielle Lautsprechermontageschraube Zoll Größe 1 4 x 3 4 x 1 Befestigungselement x 2 AUSPACKEN AUFSTELLEN DER LAUTSPRECHER Centerlautsprecher Spezielle Lautsprechermontageschraube Ständer f...

Страница 15: ...n Stelle in die Wand oder einen Träger dass sie etwas herausstehen und befestigen Sie die Lautsprecher daran Achten Sie darauf dass die Schraubenköpfe richtig im Schlitz der schlüssellochförmigen Öffnungen sitzen Ziehen Sie die Schutzfolie ab Befestigungselement TV Regal TV Regal Centerlautsprecher TV Regal Centerlautsprecher im TV Regal Flachfernseher a b 412 mm Diese Öffnung verwenden Blechschra...

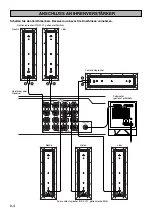
Страница 16: ...HREN VERSTÄRKER REAR CENTER REAR SURROUND SUB WOOFER OUT CENTER MAIN A B R R R L L L SPEAKERS Frontlautsprecher NS F101 getrennt erhältlich Rechts Links Centerlautsprecher Subwoofer getrennt erhältlich Verstärker oder Receiver Hinten Links Surroundlautsprecher NS F101 getrennt erhältlich Rechts ...

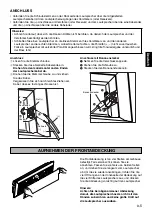
Страница 17: ...gt Falls erwünscht können Sie sie abnehmen Fassen Sie sie hierzu an beiden Seiten an und ziehen Sie sie langsam vom Lautsprecher ab Um die sie wieder anzubringen richten Sie die vier Öffnungen an der Innenseite der Abdeckung auf die vier Stifte des Lautsprechers aus und drücken Sie die Abdeckung vorsichtig auf den Lautsprecher Hinweis Achten Sie bei abgenommener Abdeckung darauf die Lautsprecherch...

Страница 18: ...it 83dB 2 83V m Übernahmefrequenz 600Hz 6kHz Abmessungen B x H x T 605 x 187 x 99 3 mm Gewicht 3 6 kg AUFSTELLEN DER LAUTSPRECHER Centerlautsprecher NS CF101 Linker Frontlautsprecher NS F101 getrennt erhältlich SPS HF101 getrennt erhältlich Rechter Frontlautsprecher NS F101 getrennt erhältlich SPS HF101 getrennt erhältlich Linker Surroundlautsprecher NS F101 getrennt erhältlich SPS HF101 getrennt ...

Страница 19: ...ad en un lugar donde puedan caer objetos extraños como gotas de agua Podría causarse un incendio daños a esta unidad y o lesiones personales No instale el altavoz en un lugar donde pueda golpearse y caerse o pueda recibir el impacto de un objeto que caiga encima Un lugar estable también producirán sonidos mejores La instalación en un lugar seguro es responsabilidad del propietario YAMAHA no se hac...

Страница 20: ...agujeros para colgado de la parte posterior del altavoz Fije el soporte al altavoz central con el tornillo de montaje Altavoz central Altavoz x 1 Cable de altavoz 4 m x 1 Soporte del altavoz central x 1 Tornillo de montaje de altavoz exclusivo tamaño en pulgadas tamaño 1 4 x 3 4 x 1 Fiador x 2 DESEMBALAJE COLOCACIÓN DEL ALTAVOZ Altavoz central Tornillo de montaje de altavoz exclusivo Soporte del a...

Страница 21: ...u parte posterior en los tornillos salientes Cerciórese de que los tornillos hayan quedado enganchados con seguridad en las secciones estrechas de las aberturas de los agujeros de colgado Quite el papel adhesivo Fiador Televisor plano Televisor plano Altavoz central Televisor Altavoz central en el interior de un bastidor para televisor Bastidor para televisor a b 412 mm Utilice los agujeros para c...

Страница 22: ...R CENTER REAR SURROUND SUB WOOFER OUT CENTER MAIN A B R R R L L L SPEAKERS Altavoces delanteros NS F101 vendido por separado Derecho Izquierdo Altavoz central Sistema de altavoz de subgraves vendido por separado Amplificador o receptor Posterior Izquierdo Altavoces envolventes NS F101 vendido por separado Derecho ...

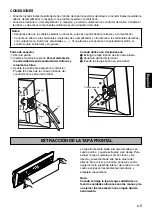
Страница 23: ...Inserte la clavija banana en el terminal La tapa frontal está fijada a la caja del altavoz en cuatro puntos y puede extraerse si se desea Para extraer la tapa sujétela por ambos lados y tire directa y suavemente de ella hacia afuera del altavoz Para volver a colocarla alinee los cuatro agujeros de la superficie interior de la tapa con las cuatro espigas correspondientes del altavoz y empújela suav...

Страница 24: ...AHA SCANDINAVIA A B J A WETTERGRENS GATA 1 BOX 30053 400 43 VÄSTRA FRÖLUNDA SWEDEN YAMAHA MUSIC AUSTRALIA PTY LTD 17 33 MARKET ST SOUTH MELBOURNE 3205 VIC AUSTRALIA Printed in China WE14620 IP This product mainly uses lead free solder Cet appareil utilise principalement de la soudure sans plomb Dieses Produkt verwendet hauptsächlich bleifreies Lot Este producto utiliza principalmente soldadura sin...

Отзывы: