background image

Example 2) High audio quality system with XMV and YDIF connections (digital connections)

MTX Setup Manual    

46

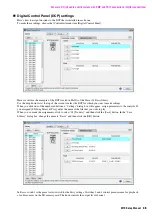
Digital Control Panel (DCP) settings

Here’s how to assign functions to the DCP that is installed in each zone.
To make these settings, choose the [Controller] menu item [Digital Control Panel].

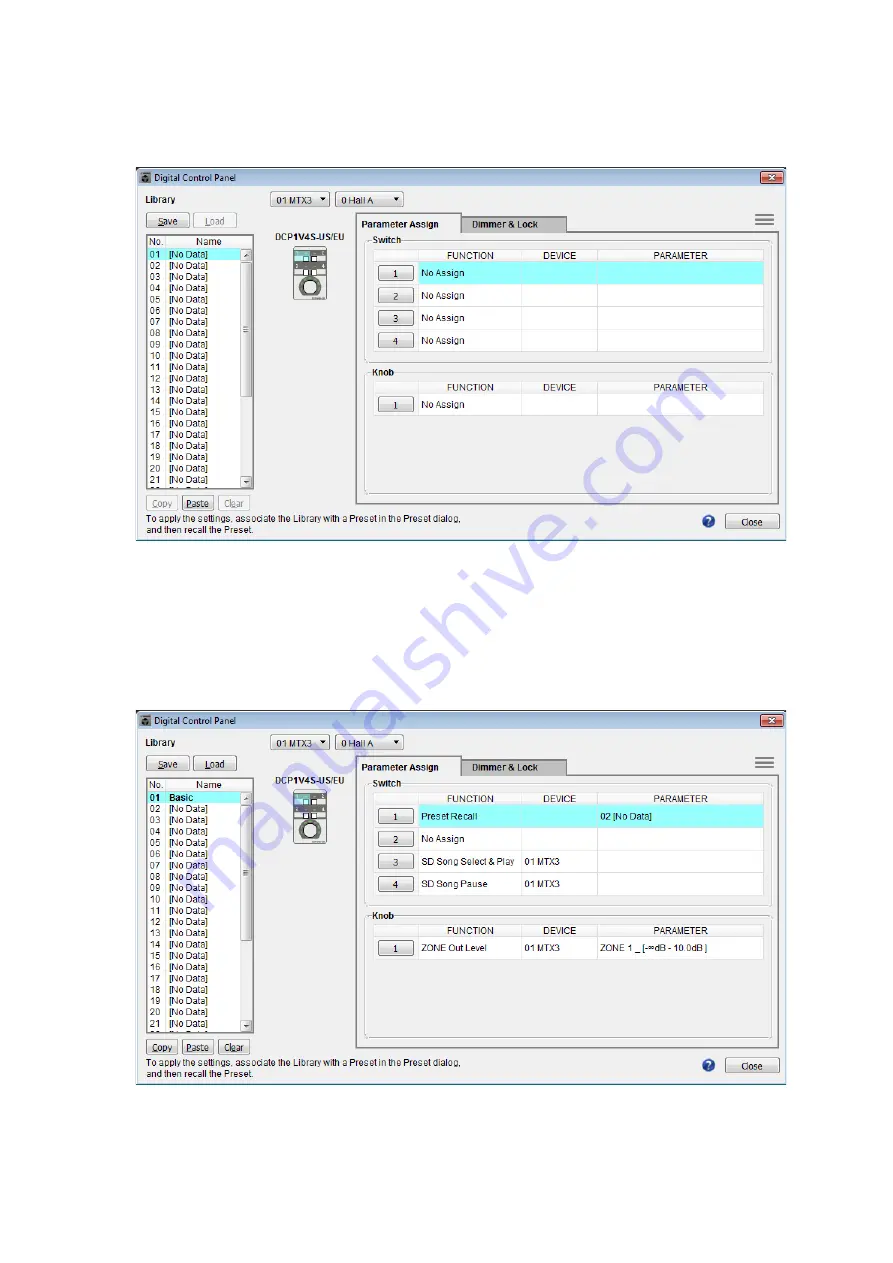
Here we will use the example of the DCP located in Hall A of the Preset 01 Basic library.
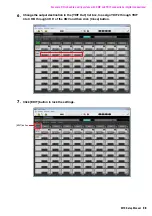
Use the drop down list at the top of the screen to select the DCP for which you want to make settings.
When you click one of the numbered buttons, a “Settings” dialog box will appear; assign parameters to the controls. If 
you assigned [SD Song Select & Play], enter the name of the file that you want to play.
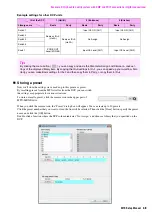
When you’ve made the assignments, click to select “01 [No data]” and then click the [Save] button. In the “Save 
Library” dialog box, change the name to “Basic” and then click the [OK] button.

In Basic, switch 1 is the preset select switch for the Party settings. Switches 3 and 4 control pause/resume for playback 
of audio sources on the SD memory card. The knob controls the output level of zone 1.

Содержание MTX Series

Страница 1: ...manual and the software Future upgrades of application and system software and any changes in specifications and functions will be announced at the following web site http www yamahaproaudio com The s...

Страница 2: ...3 MCP1 cascade example mtx Example 4 MTX5 D Dante system mtx Example 5 MTX5 D PGM1 Shopping mall mtx is a management number In some cases there will be no Example 1 Basic MTX3 system example analog co...

Страница 3: ...1 Background music source such as a CD player 1 Network switch 1 Paging microphones with switch 2 Wireless microphone receivers 2 channels Wireless microphones 2 The number of speakers is not specifie...

Страница 4: ...network switch 1 Microphone with switch for the MC or chair 1 Wireless microphone receivers 11 channels Wireless microphones 11 The number of speakers is not specified choose amps that are suitable f...

Страница 5: ...vides IGMP snooping functionality The number of speakers is not specified choose amps that are suitable for your speaker setup You will also need to provide the appropriate number of cables System A M...

Страница 6: ...ing the following equipment MTX5 D 1 XMV8280 D 2 PGM1 1 PGX1 1 PoE gigabit network switch such as a SWR2100P 5G 1 Speakers the number needed SD memory card 1 Background music source such as a Blu Ray...

Страница 7: ...single operation Page 72 Digital Control Panel DCP settings Page 21 Page 46 MCP1 settings Page 73 Storing a preset Presets and recall filter settings Page 23 Page 48 Page 74 Page 117 Page 148 Dante s...

Страница 8: ...use specific examples to explain Using the Device Configuration Wizard to create your device setup and subse quent steps NOTE If the computer you re using does not have Bonjour installed a screen ask...

Страница 9: ...vice setup before actually connecting your equipment After you ve made basic settings you ll be able to print information about system cabling and ID numbers Use the following procedure to make basic...

Страница 10: ...ecify the number of units that will be connected in your MTX MRX System and click Next In YDIF Connected specify 1 as the number of MTX3 units 3 Verify that the MTX s UNIT ID is 1 and then click Next...

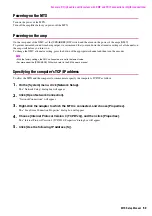
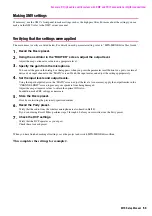
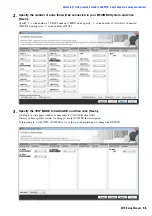
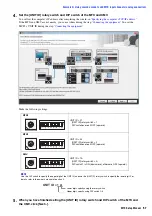
Страница 11: ...s IP address after completing the wizard in Specifying the computer s TCP IP address If the MTX is not nearby make settings during the step Connecting the equipment Make the following settings 5 When...

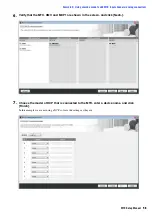
Страница 12: ...connections MTX Setup Manual 12 6 Verify that the MTX is shown and click Next 7 Choose the model of DCP that is connected to the MTX enter a device name and click Finish Since four DCP1V4S units will...

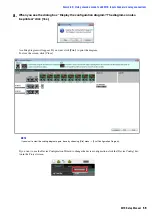
Страница 13: ...ram To close the screen click Close Set the DIP switches of the DCP units as shown in the Digital Control Panel section of the schematic diagram For the last DCP ID 3 set DIP switch 4 ON upward If you...

Страница 14: ...ll specify how the MTX s inputs and outputs will be handled Move to the System screen by clicking the tab of the system name you specified in step 1 of Using the Device Config uration Wizard to create...

Страница 15: ...Settings in the MAIN screen In the MAIN screen you can make overall settings for each channel For details on each parameter refer to MTX MRX Editor User Guide Here you ll make the following settings C...

Страница 16: ...microphones are connected to CH3 and 4 lower the gain to 0 dB EQ HPF High Pass Filter Click this to switch to the CHANNEL EDIT screen Adjust the EQ and HPF appropriately for the microphone you re usi...

Страница 17: ...screen where you can set delay and room EQ Speaker processor Click this to move to the CHANNEL EDIT screen Make the appropriate set tings for the speakers that will be connected ON button This button...

Страница 18: ...ire building in the event of an emergency and is therefore assigned in the ZONE screen described next as 1st PRIORITY If channel 1 is turned on in the matrix the signal from the matrix attenuated and...

Страница 19: ...e microphone in the entrance CH1 will be used to speak to the entire building Therefore we select CH1 as the 1st PRIORITY SOURCE for zone 1 through zone 4 and click the ON button located at the right...

Страница 20: ...MTX Setup Manual 20 Settings in the ROUTER screen In the ROUTER screen you can assign zones to outputs In this example we will leave the default settings unchanged since the assignments are ZONE1 OUT...

Страница 21: ...P for which you want to make settings When you click one of the numbered buttons a Settings dialog box will appear assign parameters to the controls If you assigned SD Song Select Play enter the name...

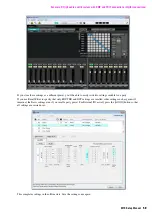
Страница 22: ...ill be copied After changing the PARAMETER of switch 1 to 01 double click Basic in 02 Basic located in the left of the screen and change the name of the library item to Party After you ve entered the...

Страница 23: ...Then click the Store button specify the preset name and click the OK button Double click a location where the DCP column indicates No Assign and choose a library that you specified on the DCP 1 Hall B...

Страница 24: ...e settings for zone 1 and zone 2 However in some cases such as a party you might want to remove the boundary between zone 1 and zone 2 so that they can be a single meeting area In this case make setti...

Страница 25: ...set you ll be able to easily switch to settings suitable for a party If you use Recall Filter to specify that only ROUTER and DCP settings are recalled other settings such as gain will remain at the B...

Страница 26: ...ter use a CAT5e or higher cable with all eight pins connected Powering on the MTX Turn on the power of the MTX Turn off the amplifier before you power off the MTX Powering on the amp Turn on the power...

Страница 27: ...he MTX is connected and choose Properties The Local Area Connection Properties dialog box will appear 4 Choose Internet Protocol Version 4 TCP IPv4 and then click Properties The Internet Protocol Vers...

Страница 28: ...button When the unit has successfully come online the indica tor 1 will light blue When the Synchronization dialog box appears select To Device and click the OK button When the indication in the dial...

Страница 29: ...y 4 Set the input levels and output levels Using the input output faders in the MAIN screen adjust the levels As necessary apply the output limiter in the CHANNEL EDIT screen to prevent your speakers...

Страница 30: ...re actually connecting your equipment After you ve made basic settings you ll be able to print information about system cabling and ID numbers Use the following procedure to make basic settings 1 Type...

Страница 31: ...X MRX System and click Next Specify 1 as the number of MTX3 units in YDIF Connected and specify 1 as the number of XMV4280 units to be connected 3 Specify the UNIT ID of each device and click Next Unl...

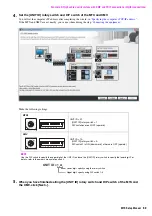
Страница 32: ...Make the following settings 5 When you have finished setting the UNIT ID rotary switch and DIP switch of the MTX and the XMV click Next MTX3 UNIT ID 01 UNIT ID rotary switch 1 DIP switches are all OF...

Страница 33: ...fy that the MTX and XMV are shown in the screen and click Next Since there is only one MTX unit and one XMV unit there s no need to change the order 7 Choose the model of DCP that is connected to the...

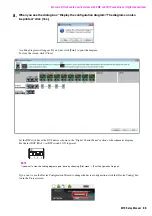
Страница 34: ...o print the diagram To close the screen click Close Set the DIP switches of the DCP units as shown in the Digital Control Panel section of the schematic diagram For the last DCP ID 3 set DIP switch 4...

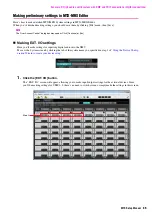
Страница 35: ...ll make settings for inputting digital audio into the XMV Move to the System screen by clicking the tab of the system name you specified in step 1 of Using the Device Config uration Wizard to create...

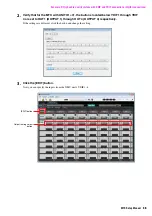
Страница 36: ...e MTX with UNIT ID 01 the buttons located below YDIF 1 through YDIF 4 are set to OUT1 OUTPUT 1 through OUT 4 OUTPUT 4 respectively If the settings are different click the button and change the setting...

Страница 37: ...nnections digital connections MTX Setup Manual 37 4 Click the XMV4280 s output routing select button for YDIF 1 The YDIF Out Patch dialog box will appear 5 For CHANNEL click A button The screen indica...

Страница 38: ...connections digital connections MTX Setup Manual 38 6 Change the output destination in the YDIF Out list box to assign YDIF 2 through YDIF 4 to CH B through CH D of the XMV and then click Close button...

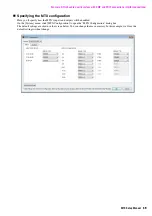
Страница 39: ...e MTX configuration Here you ll specify how the MTX s inputs and outputs will be handled On the System menu click MTX Configuration to open the MTX Configuration dialog box The default settings are sh...

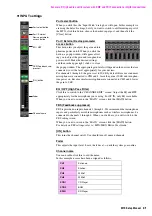
Страница 40: ...the MAIN screen In the MAIN screen you can make overall settings for each channel Click the 01 MTX3 button to access the MTX MAIN screen For details on each parameter refer to MTX MRX Editor User Guid...

Страница 41: ...Because wireless microphones are connected to CH3 and 4 lower the gain to 0 dB EQ HPF High Pass Filter Click this to switch to the CHANNEL EDIT screen Adjust the EQ and HPF appropriately for the micro...

Страница 42: ...e set tings of these parameters When you click this button the MTX output connector parameter edit screen will appear as a popup Verify that GAIN is set to 0 0 dB DELAY Room EQ Click this to move to a...

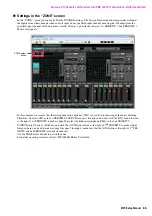
Страница 43: ...cast to the entire building in the event of an emergency and is therefore assigned in the ZONE screen described next as 1st PRIORITY If channel 1 is turned on in the matrix the signal from the matrix...

Страница 44: ...assume that the microphone in the entrance CH1 is used for broadcasting to the entire building Therefore we select CH1 as the 1st PRIORITY SOURCE for zone 1 through zone 4 and click the ON button loca...

Страница 45: ...tal connections MTX Setup Manual 45 Settings in the ROUTER screen In the ROUTER screen you can assign zones to outputs In this example we will leave the default settings unchanged since the assignment...

Страница 46: ...o select the DCP for which you want to make settings When you click one of the numbered buttons a Settings dialog box will appear assign parameters to the controls If you assigned SD Song Select Play...

Страница 47: ...ated as Basic will be copied After changing the PARAMETER of switch 1 to 01 double click Basic in 02 Basic located in the left of the screen and change the name of the library item to Party After you...

Страница 48: ...ill be selected Then click the Store button specify the preset name and click the OK button Double click a location where the DCP column indicates No Assign and choose a library that you specified on...

Страница 49: ...ou made separate settings for zone 1 and zone 2 However in some cases such as a party you might want to remove the boundary between zone 1 and zone 2 so that they can be a single meeting area In this...

Страница 50: ...switch to settings suitable for a party If you use Recall Filter to specify that only ROUTER and DCP settings are recalled other settings such as gain will remain at the Basic settings even if you rec...

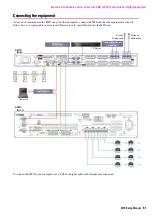
Страница 51: ...nd the other equipment as shown below If you ve copied audio sources to an SD memory card insert the card into the MTX now To connect the MTX to your computer use a CAT5e or higher cable with all eigh...

Страница 52: ...n turn the encoder Specifying the computer s TCP IP address To allow the MTX and the computer to communicate specify the computer s TCP IP as follows 1 On the System menu click Network Setup The Netwo...

Страница 53: ...r 1 at the left will light blue When the Synchronization dialog box appears select To Device and click the OK button When the indication in the dialog box has switched select the system that you want...

Страница 54: ...ternal device of an input channel in the MAIN screen Watch the input meter and adjust the setting appropriately 4 Set the input levels and output levels Using the input output faders in the MAIN scree...

Страница 55: ...p before actually connecting your equipment After you ve made basic settings you ll be able to print information about system cabling and ID numbers Use the following procedure to make basic settings...

Страница 56: ...f YDIF Connected MTX3 units specify 1 as the number of ANALOG Connected XMV4280 and specify 1 as the number of MCP1 3 Specify the YDIF MODE to CASCADE and then click Next A dialog box will appear when...

Страница 57: ...following settings 5 When you have finished setting the UNIT ID rotary switch and DIP switch of the MTX and the XMV click Next MTX3 UNIT ID 01 UNIT ID rotary switch 1 DIP switches are all OFF upward...

Страница 58: ...ection MTX Setup Manual 58 6 Verify that the MTX XMV and MCP1 are shown in the screen and click Next 7 Choose the model of DCP that is connected to the MTX enter a device name and click Finish In this...

Страница 59: ...o be printed click Yes A cabling diagram will appear If you want click Print to print the diagram To close the screen click Close If you want to use the Device Configuration Wizard to change the devic...

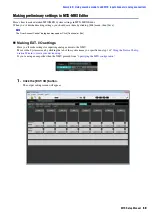
Страница 60: ...u then Save Making EXT I O settings Here you ll make settings for inputting analog audio into the XMV Move to the System screen by clicking the tab of the system name you specified in step 1 of Using...

Страница 61: ...e to add MTX input channels analog connection MTX Setup Manual 61 2 Click the ANALOG button The MTX analog output setting screen will appear 3 Click the button located below OUT1 The Line Out Patch di...

Страница 62: ...ck the CHANNEL A button The screen will show that with these settings analog output 1 of the ID 01 MTX is connected to the CH A analog input of the XMV 5 Change the output destination in the Out list...

Страница 63: ...configuration Here you ll specify how the MTX s inputs and outputs will be handled On the System menu click MTX Configuration to open the MTX Configuration dialog box The default settings are shown in...

Страница 64: ...the MAIN screen you can make overall settings for each channel For details on each parameter refer to MTX MRX Editor User Guide You ll make these settings for both MTX units UNIT ID 01 and UNIT ID 02...

Страница 65: ...Example 3 Using cascade mode to add MTX input channels analog connection MTX Setup Manual 65 ID 02...

Страница 66: ...icrophone you re using For ST IN only EQ is available When you want to return to the MAIN screen click the MAIN button FBS Feedback suppressor FBS is provided on input channels 1 through 4 We recommen...

Страница 67: ...fy that GAIN is set to 0 0 dB DELAY Room EQ Click this to move to a screen where you can set delay and room EQ Speaker processor Click this to move to the CHANNEL EDIT screen Make the appro priate set...

Страница 68: ...put channels analog connection MTX Setup Manual 68 Settings in the MATRIX screen Here you can specify which input channel will be sent to which zone For details on send level and other parameters refe...

Страница 69: ...ignals it is assigned to 1st Pri ority in the following ZONE screen When CH8 is turned on in MATRIX the signal from the matrix attenuated will be combined with the signal from Priority and output toge...

Страница 70: ...is given in the order of 1st PRIORITY 2nd PRIORITY Matrix Out signals In this example the chairman s microphone assigned to CH8 of UNIT ID 01 has the highest priority Thus we select CH8 as the PRIORI...

Страница 71: ...els analog connection MTX Setup Manual 71 Settings in the ROUTER screen In the ROUTER screen you can assign zones to outputs In this example since ZONE1 will be output to OUTPUT1 through 4 set the MTX...

Страница 72: ...In the DCA screen you can make level and mute settings for multiple channels in a single operation ID 01 ID 02 In this example press the INPUT CH MUTE button on the digital control panel at the chair...

Страница 73: ...display to indicate the role that each button will perform When you ve made the assignments and display settings click to select 01 No data and then click the Save button In the Save Library dialog bo...

Страница 74: ...te for various situ ations To store or recall a preset click the camera icon in the upper part of MTX MRX Editor When you click the camera icon the Preset dialog box will appear You can create up to 5...

Страница 75: ...of the microphones connected to MTX units of UNIT ID 01 and 02 but there might be cases in which you want to use a different number of microphones In such cases you can limit the number of microphones...

Страница 76: ...gs as a different preset you ll be able to easily switch to settings with a limited number of microphones In the example above wireless microphones 9 through 11 are not used so FBS is used on all of t...

Страница 77: ...he other equipment as shown below If you ve copied audio sources to an SD memory card insert the card into the MTX now To connect the MTX to your computer use a CAT5e or higher cable with all eight pi...

Страница 78: ...T ID About setting the UNIT ID refer to the MCP1 Installation Manual Specifying the computer s TCP IP address To allow the MTX and the computer to communicate specify the computer s TCP IP as follows...

Страница 79: ...will light blue When the Synchronization dialog box appears select To Device and click the OK button When the indication in the dialog box has switched select the system that you want to place online...

Страница 80: ...u can set the gain in the dialog box that appears when you press the parameter recall button for a port or external device of an input channel in the MAIN screen Watch the input meter and adjust the s...

Страница 81: ...80 XMV4280 D EXo8 Main Microphone CH1 OUTPUT 1 YDIF INPUT 1 YDIF OUTPUT 1 4 Analog OUTPUT 5 8 YDIF INPUT 9 10 Dante Channel 9 is the main microphone for System B OUTPUT 9 10 Dante Channel 9 is the mai...

Страница 82: ...about system cabling and ID numbers Make basic settings for System A and then make basic settings for System B Use the following procedure to make basic settings 1 Enter a name for the MTX MRX System...

Страница 83: ...so that the MTX5 D is 01 the EXi8 is 02 and the EXo8 is 03 4 Set the UNIT ID rotary switch and DIP switch of the devices You will set the computer s IP address after completing the wizard in Specifyin...

Страница 84: ...switch and DIP switch of the devices click Next 6 Verify that the devices are shown in the screen and click Next MTX5 D UNIT ID 01 UNIT ID rotary switch 1 DIP switches are all OFF upward EXi8 UNIT ID...

Страница 85: ...and click NEXT In this example we are not using a Mini YGDAI card so leave the setting at No Assign and click Next 8 Choose the model of DCP that is connected to the MTX enter a device name and click...

Страница 86: ...s A cabling diagram will appear If you want click Print to print the diagram To close the screen click Close If you want to use the Device Configuration Wizard to change the device configuration click...

Страница 87: ...ake basic settings for System B click the system select tab 2 No Assign 11 Click Device Config The Device Configuration Wizard for System B will appear 12 Enter a name for the MTX MRX System that we a...

Страница 88: ...RX System and click Next In the YDIF Connected area specify 1 each as the number of MTX5 D and XMV4280 units in the Dante Con nected area specify 1 as the number of XMV4280 D devices 14 Specify the UN...

Страница 89: ...mputer s TCP IP address If the devices are not nearby you can set them during the step Connecting the equipment Make the following settings MTX5 D UNIT ID 04 UNIT ID rotary switch 4 DIP switches are a...

Страница 90: ...17 Verify that the devices are shown in the screen and click Next NOTE On the XMV4280 the higher digit of the UNIT ID is set by the DIP switch and the lower digit is set by the UNIT ID rotary switch...

Страница 91: ...and click NEXT In this example we are not using a Mini YGDAI card so leave the setting at No Assign and click Next 19 Choose the model of DCP that is connected to the MTX enter a device name and click...

Страница 92: ...s A cabling diagram will appear If you want click Print to print the diagram To close the screen click Close If you want to use the Device Configuration Wizard to change the device configuration click...

Страница 93: ...ou ve finished making settings you should save them by clicking File menu then Save To switch between System A and System B use the system select tabs in the Project screen The currently selected MTX...

Страница 94: ...ck the EXT I O button The EXT I O screen will appear allowing you to make input output settings for the external devices Since you ll be making settings for YDIF 1 8 there s no need to switch screens...

Страница 95: ...routing select button shows that CH1 of the EXi8 whose UNIT ID 02 has been assigned to YDIF 1 5 Verify that for the MTX5 D with UNIT ID 01 the buttons located below YDIF 5 through YDIF 8 are set to OU...

Страница 96: ...nte MTX Setup Manual 96 6 Click the EXo8 s output routing select button for YDIF 5 The YDIF Out Patch dialog box will appear 7 For CHANNEL click 1 button The screen indicates that the YDIF 5 signal is...

Страница 97: ...nte MTX Setup Manual 97 8 Change the output destination in the YDIF Out list box to assign YDIF 6 through YDIF 8 to CH 2 through CH 4 of the EXo8 and then click Close button 9 Click EDIT button to loc...

Страница 98: ...screen you can make overall settings for each channel Click the 01 MTX5 D button to access the MTX MAIN screen For details on each parameter refer to MTX MRX Editor User Guide Here you ll make the fol...

Страница 99: ...H1 leave the gain at 30 dB and turn phantom power on ON button This turns the channel on off You should turn off unused channels Fader This adjusts the input level Leave the fader at until the system...

Страница 100: ...on to System B do not make settings ON button This button turns the channel on off Turn off unused channels Channel name You can double click this to edit the name In this example names have been assi...

Страница 101: ...which zone For details on send level and other parameters refer to MTX MRX Editor User Guide When making settings for System A this MTX MRX System refers to System A and the other MTX MRX Sys tem ref...

Страница 102: ...s When you turn CH1 and CH9 on in the matrix the attenuated signal from the matrix will be combined with the signal from Priority and output Zone 2 This is for broadcasting the voice from the main mic...

Страница 103: ...ix Out signals In this example we are assuming that the main A mic CH1 and the other MTX MRX System s mic CH9 will be used for broadcast to the entire building Thus for 1st PRIORITY we set the PRIORIT...

Страница 104: ...ugh 8 ZONE2 OUTPUT 9 and ZONE3 OUTPUT 10 With these settings this MTX MRX System will broadcast all of its own audio as well as all audio of the other MTX MRX System the main mic of this MTX MRX Syste...

Страница 105: ...settings as System A For the System B settings we will explain settings made in the EXT I O screen and settings made in the MAIN screen Other settings will be the same as previously explained If you v...

Страница 106: ...button The EXT I O screen will appear allowing you to make input output settings for the external devices Since you ll be making settings for YDIF 1 8 there s no need to switch screens simply make the...

Страница 107: ...For CHANNEL click A button The screen indicates that the YDIF 1 signal is output to CH A of the XMV 5 Change the output destination in the YDIF Out list box to assign YDIF 2 through YDIF 4 to CH B th...

Страница 108: ...e 4 A system using Dante MTX Setup Manual 108 6 Click EDIT button to lock the settings 7 Click DANTE button The Dante setting screen will appear Here you will specify the output to the XMV4280 D EDIT...

Страница 109: ...lick the EDIT button Now you can make Dante input output settings If the Preserve the Dante settings configured by Dante Controller check box is selected clear the check box 9 Click 04 MTX5 D in Trans...

Страница 110: ...g Dante MTX Setup Manual 110 10 Click the grid locations where 5 through 8 of the MTX5 D intersect with A through D of the XMV4280 D A symbol is shown on the grid 11 In the upper left click EDIT butto...

Страница 111: ...screen you can make overall settings for each channel Click the 04 MTX5 D button to access the MTX MAIN screen For details on each parameter refer to MTX MRX Editor User Guide Here you ll make the fol...

Страница 112: ...connected to CH1 leave the gain at 30 dB and turn phantom power on ON button This turns the channel on off You should turn off unused channels Fader This adjusts the input level Leave the fader at un...

Страница 113: ...speakers that will be connected Since OUT9 and OUT10 are for transmission to System A do not make settings ON button This button turns the channel on off Turn off unused channels Channel name You can...

Страница 114: ...stems Here you ll make Dante settings for between System A and System B Regardless of whether you make these settings in System A or in System B the settings will be applied to each other For this exa...

Страница 115: ...Now you can make Dante input output settings If the Preserve the Dante settings configured by Dante Controller check box is selected clear the check box 3 Click MTX5 D in Receivers and Transmitters to...

Страница 116: ...system using Dante MTX Setup Manual 116 4 Click the grid locations where 9 and 10 of the respective MTX5 D units intersect A symbol is shown on the grid 5 In the upper left click EDIT buttons to lock...

Страница 117: ...rt of MTX MRX Editor When you click the camera icon the Preset dialog box will appear You can create up to 50 presets Click the preset number that you want to store the line will be selected Then clic...

Страница 118: ...memory card insert the card into the MTX now Here we will explain an example of redundant Dante connections If you re using daisy chain connections refer to the Q A System A connections ON ON Main Mi...

Страница 119: ...5e or higher cable with all eight pins connected 1 2 3 4 5 6 7 8 ON ON ON 1 2 3 4 5 6 7 8 ON Main Microphone Network Switch for Primary Network Switch for Secondary Computer MTX5 D ID 04 XMV4280 ID 30...

Страница 120: ...ng the computer s TCP IP address To allow the MTX and the computer to communicate specify the computer s TCP IP as follows 1 On the System menu click Network Setup The Network Setup dialog box will ap...

Страница 121: ...lick OK NOTE The IP address of each device is set as follows System A MTX5 D 192 168 0 1 EXi8 192 168 0 2 EXo8 192 168 0 3 System B MTX5 D 192 168 0 4 XMV4280 192 168 0 48 XMV4280 D 192 168 0 49 NOTE...

Страница 122: ...hronization dialog box appears select To Device and click the OK button When the indication in the dialog box has switched select the system that you want to place online and click the Online button T...

Страница 123: ...AIN screen 2 Specify the gain from the microphone You can set the gain in the dialog box that appears when you press the parameter recall button for a port or external device of an input channel in th...

Страница 124: ...units within the Paging Device Group is the 1st Priority Mic this unit can broadcast taking priority over the other PGM1 units There are three ways to use the PGM1 Broadcast from the mic 1 Use the zon...

Страница 125: ...matically turns off If specified the Closing Chime is heard Use the scheduler to play back a pre recorded message from SD card By issuing a Paging event the specified message is played back to the spe...

Страница 126: ...ted in your MTX MRX system and click Next Set the number of YDIF Connected MTX5 units to 1 set the number of DANTE Connected PGM1 units to 1 and set the number of XMV8280 D units to 2 3 Specify the UN...

Страница 127: ...s MTX5 D UNIT ID 01 UNIT ID rotary switch 1 DIP switches all OFF upward XMV UNIT ID 30 UNIT ID rotary switch 0 DIP switches 1 and 2 ON downward others OFF upward XMV UNIT ID 31 UNIT ID rotary switch 1...

Страница 128: ...PGM1 for paging MTX Setup Manual 128 5 When you ve finished setting the device s UNIT ID rotary switch and DIP switch click Next 6 Verify that the devices are shown in the screen and click Next 7 Set...

Страница 129: ...p Connecting the equipment Make the following settings 9 When you ve finished setting the PGM1 s UNIT ID rotary switch and DIP switch click Next 10 Select the Mini YGDAI card and click Next Since a Mi...

Страница 130: ...ose the model of DCP that will be connected to the MTX enter a device name and click Finish Since a DCP is not used in this example leave the setting without change 12 When you see the dialog box Disp...

Страница 131: ...ant click Print to print the diagram To close the screen click Close If you want to use the Device Configuration Wizard to change the device configuration click the Device Config but ton in the Projec...

Страница 132: ...ing File menu then Save EXT I O settings Here you ll make settings for inputting and outputting digital audio Click the SYSTEM tab to access the setting screen Move to the setting screen by clicking t...

Страница 133: ...Example 5 A system using the PGM1 for paging MTX Setup Manual 133 2 Click the DANTE button The Dante setting screen appears 3 Click the EDIT button Now you can specify Dante input output settings...

Страница 134: ...anual 134 4 Click the MTX5 D in Receivers and Transmitters and the XMV8280 D in Receivers so that they are expanded If they are already expanded leave them as they are 5 Click the location where the 1...

Страница 135: ...135 6 Scroll so that the XMV inputs are visible 7 By clicking the grid locations where the XMV s inputs and the MRX s outputs intersect set the UNIT ID 30 XMV unit s A and B to 1 its C and D to 2 and...

Страница 136: ...on Here you ll specify how the MTX s input jacks and output jacks will be handled On the System menu click MTX Configuration to open the MTX Configuration dialog box For this example apply the followi...

Страница 137: ...le 5 A system using the PGM1 for paging MTX Setup Manual 137 OUTPUT In the MATRIX BUS SETUP area change MATRIX7 8 from STEREO to MONO 2 After making the settings click the OK button to confirm the set...

Страница 138: ...overall settings for each channel Click the 01 MTX5 D button to access the MTX MAIN screen For details on each parameter refer to MTX MRX Editor User Guide Here you ll make the following settings Inpu...

Страница 139: ...e using For ST IN only EQ is available When you want to return to the MAIN screen click the MAIN button FBS Feedback suppressor FBS is provided on INPUT CH1 through CH8 We recommend that mic inputs an...

Страница 140: ...or the speakers that will be connected ON button This button turns the channel on off Turn off unused channels Fader This adjusts the output level Channel name You can double click this to edit the na...

Страница 141: ...asual 3 area BGM1 is sent to the Food Court area and BGM2 is sent to the Entrance area and the Restrooms area The PGM1 which is assigned to CH1 is specified in the following ZONE screen If CH1 is turn...

Страница 142: ...etup Manual 142 Settings in the ZONE screen In the ZONE screen you can make PGM1 settings Click the PAGING button to switch to the setting screen for pag ing broadcast 1 In the PAGING SOURCE area choo...

Страница 143: ...through Restrooms In the same way rename Group 2 to Exclude Evt Spc and turn on ZONE1 through ZONE8 with the exception of ZONE5 Event Space All ZONE is the zone group for broadcast to the entire buil...

Страница 144: ...ons In this example make the following assignments PGM1 1 Zone 1 Luxury 2 2 Casual 1 3 3 Casual 2 4 4 Casual 3 5 5 Event Space 6 6 Food Court 7 7 Entrance 8 8 Restrooms 0 PGX1 1 Zone Group 1 All ZONE...

Страница 145: ...button to create labels for the PGM1 PGX1 The PGM1 Label Creator application starts Here you can create a print image to use as a label for the PGM1 PGX1 units 6 Design the label that you want to pri...

Страница 146: ...int button to print or click the Export button to save as a file then click the OK button 8 Click the Properties tab You ll switch to a screen where you can make settings that specify how the PGM1 wil...

Страница 147: ...ample 5 A system using the PGM1 for paging MTX Setup Manual 147 10 Select the Opening Chime and Closing Chime check boxes and select the chime audio files 11 Click the OK button to close the dialog bo...

Страница 148: ...Preset dialog box will appear You can create up to 50 presets Click the preset number that you want to save the line will be selected Then click the Store button specify the preset name and click the...

Страница 149: ...he MTX and the other equipment as shown below If you ve copied audio sources to an SD memory card insert the card into the MTX now Computer MTX5 D BGM Casual 2 PGM1 BGM Casual 1 BGM Laxury BGM2 BGM1 E...

Страница 150: ...attenuator settings of all channels on the amp or powered speaker itself before you turn it on Specifying the computer s TCP IP address To allow the MTX and the computer to communicate specify the co...

Страница 151: ...in the Subnet mask box enter 255 255 255 0 7 Click OK NOTE The IP address of each device is set as follows MTX5 D 192 168 0 1 XMV8280 D 192 168 0 48 PGM1 192 168 0 96 NOTE When you make these setting...

Страница 152: ...alog box appears select To Device and click the OK button When the indication of the dialog box has changed select the check box es of the system s that you want to bring online and then click the Onl...

Страница 153: ...2 Specify the gain from the mics Specify the gain in the dialog box that is recalled by the port external device parameter recall button in the input chan nel area of the MAIN screen Watch the input m...

Страница 154: ...ions when daisy chaining the Dante network connections in example 4 A Make connections as follows Do not route the connection from the System B network switch to the System B XMV4280 D via the System...

Страница 155: ...ystem B 1 2 3 4 5 6 7 8 ON ON ON 1 2 3 4 5 6 7 8 ON Network Switch for Primary Computer MTX5 D ID 04 XMV4280 ID 30 XMV4280 D ID 31 Main Microphone BGM Player CD Player from the System A Network Switch...

Страница 156: ...llows This example change to a PoE injector from a PoE network switch Connect the PGM1 to a port that supplies power Computer MTX5 D BGM Casual 2 BGM Casual 1 BGM Laxury BGM2 BGM1 Event Microphone 1 E...

Страница 157: ...o uninstall and then click Uninstall A dialog box will appear follow the instructions in the screen to uninstall the software If the User Account Control dialog box appears click Continue or Yes Unins...

Отзывы: