mLAN Driver/mLAN Tools Installation Guide
19
When connecting the mLAN16E (MOTIF ES/S90ES)
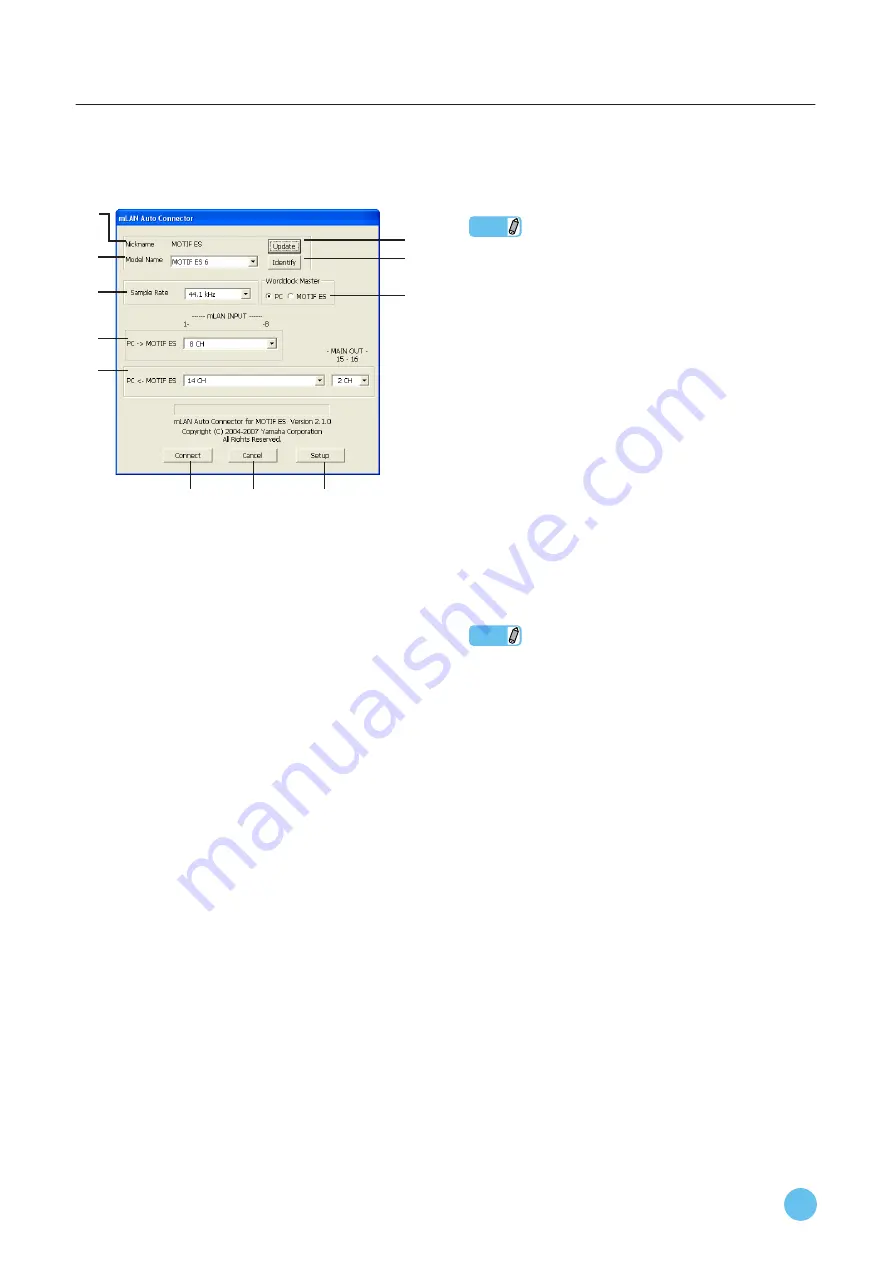
3
On mLAN Auto Connector, set up the word-
clock and specify the number of audio chan-
nels (see below).
q
Nickname
This field indicates the nickname of the connected
mLAN16E. To change the nickname, refer to “Node Infor-
mation” in the mLAN Graphic Patchbay Manual.
w
Model Name
This parameter enables you to select an mLAN device to
which you wish to make an mLAN connection in a multiple
mLAN device network. When the mLAN16E is connected,
select the name of the device equipped with an mLAN16E.
e
[Update] button
Clicking this button updates the information on the mLAN
devices connected to the mLAN network. Use this button
when you add an mLAN device to the network while mLAN
Auto Connector is running.
r
[Identify] button
Clicking this button causes the mLAN16E ACTIVE indicator
to flash for a few seconds.
t
Sample Rate
This parameter enables you to specify the sampling fre-
quency (wordclock frequency).
y
Wordclock Master radio buttons
These buttons enable you to specify the computer or
mLAN16E as the wordclock master.
u
PC
→
MOTIF ES
This parameter enables you to specify the number of chan-
nels of audio data input into the mLAN16E from the com-
puter’s audio output (mLAN driver’s audio output).
i
PC
←
MOTIF ES
This parameter enables you to specify the number of chan-
nels of audio data input into the computer from the
mLAN16E’s output.
NOTE
• The number of audio transmission channels and MIDI ports var-
ies on different mLAN16E-compatible devices.
• For more information on audio and MIDI connections for a
MOTIF ES or an S90ES with an mLAN16E installed, refer to
“System Examples” in the mLAN16E Owner’s Manual.
o
[Connect] button
Click this button to connect the mLAN16E to the computer
via mLAN. When the connection is completed, the mLAN
Auto Connector window will close automatically.
!0
[Cancel] button
Click this button to cancel the settings and close mLAN Auto
Connector.
!1
[Setup] button
Click this button to open the mLAN16E Control Panel win-
dow, which enables you to set the wordclock transition speed.
4
Click [Connect]. If the connections have
been made properly, the mLAN Auto Con-
nector completes operation and the mLAN
data communication starts.
NOTE
• If for some reason connection fails, right- click the mLAN Driver
in the task bar to restart the mLAN Auto Connector and click
[Connect] again. You need not restart your computer.
q
w
e
r
t
y
u
i
o
!0
!1


