Yamaha LS9 Editor Скачать руководство пользователя страница 16

Network Setup

In order to use the LS9 Editor software it is necessary to make the appropriate settings on the LS9 console, the computer (the 
DME-N Network Driver), and the LS9 Editor software�


(1) Computer Settings

Set up the computer’s internet protocol (TCP/IP) by following the procedure outlined below�

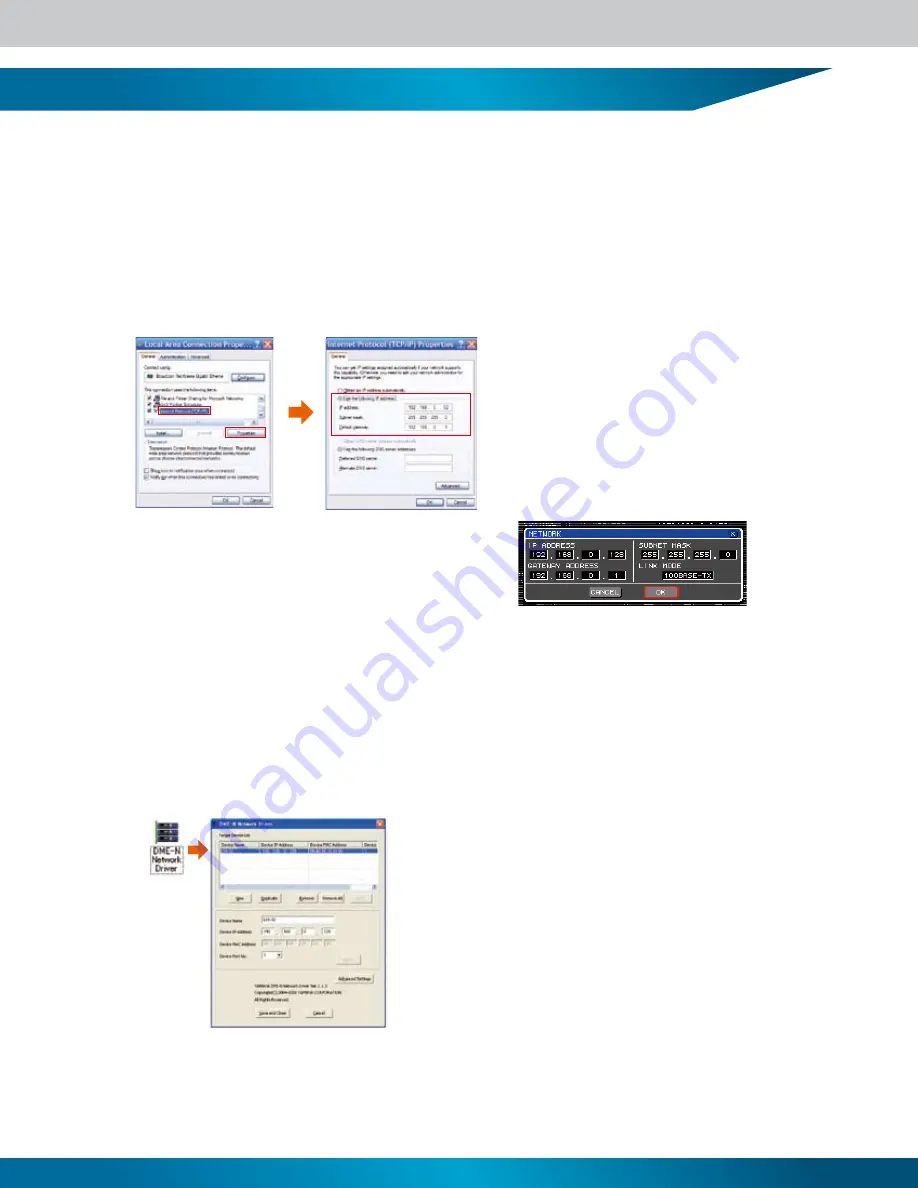
From the computer’s START menu select [Settings] -> [Control Panel] -> [Network Connection] -> [Local Area Connection] 
-> [Properties]� In the “Local Area Properties” window select “Internet Protocol (TCP/IP)” from the list, then click the 
[Properties] button�

• IP Address
The first three 3-digit groups (from left to right) should be matched to 
those of the LS9 IP address. The last 3-digit group should be set to a 
different, unique number. In this example the IP address is 
192.168.000.052 (or 192.168.0.52).

• Subnet Mask
This should be set to 255.255.255.000

• Default Gateway
It is only necessary to change this setting when connecting to a 
separate network. In most cases the default setting can be left as-is.


(2) LS9 Settings

Set the LS9 network settings as shown in the NETWORK 
pop-up window illustration to the right�


(3) Computer Settings

The driver used to connect a computer to the LS9 was originally developed for use with Yamaha DME series Digital Mixing 
Engines, thus the “DME” in the name� But through successive versions it has grown to provide TCP/IP functionality for a 
wide range of Yamaha products�

From the computer’s START menu select [Control Panel] -> [DME-N Network Driver] to launch the DME-N Driver� 
Depending on the way your computer is set up you might be able to launch the driver directly from the START menu, or 
you might have to open the Control panel folder and double click it’s icon�

• Device Name
Specify a name for the device.

• Device IP Address
This should be set the same address as the “IP ADDRESS” in the LS9 NETWORK pop-up 
window. The Device IP Address should be different from the computer’ s IP address.

• Device MAC Address
The same address as shown in the LS9 MISC SETUP window MAC ADDRESS (Media 
Access Control address) should appear here. This value is automatically read from the LS9 
when an Ethernet cable is connected and the network is set up properly with the 
appropriate IP addresses.

• Device Port No.
Set to 1 to allow communication with the LS9.

When all four device settings have been made, click the [APPLY] button and the device will appear in the Target Device List at 
the top of the window� This indicates that the MAC address has been successfully read and the network is operating properly� 
Click the [Save and Close] button to exit from the DME-N Driver�

16

Содержание LS9 Editor

Страница 1: ...use and operation of scenes the virtual rack and other useful functions The Quick Start Guide is provided for first time users of the Yamaha LS9 Digital Mixing Console and provides a streamlined intr...

Страница 2: ...EQ Channel Assignment 8 GEQ Selection and Editing 9 Recalling and Saving Scenes 10 Scene Data 11 Recall Safe 12 BGM Playback from USB Memory 13 USER DEFINED KEY Assignment 14 Connecting the LS9 to a C...

Страница 3: ...annel section and all default settings are stored in scene number 000 So all you have to do to normalize or reset the entire console is to recall scene 000 Check Your Connections This document presume...

Страница 4: ...AUX and EFF controls as the LS9 it should be referred to only as an example The Selected Channel section is located to the right of the LCD panel Module Comparison The channel module controls the par...

Страница 5: ...s you want to edit press the button once The selected MIX bus button will light 3 Press the same button a second time and all buttons in the MIX MATRIX section while light while the selected button fl...

Страница 6: ...k spaces and you cal select either the single channel 31 band GEQ type or the dual channel 15 band Flex15 GEQ type Effect units can only be mounted in rack spaces 5 through 8 You can change the type o...

Страница 7: ...window to open the EFFECT LIBRARY pop up window Use the dial to select an effect from the list that appears in the pop up window You can click the RECALL button to load the selected effect Edited eff...

Страница 8: ...fect returns to channels In scene 000 the effect return are assigned to STEREO input channels 1 4 but these assignments can be changed Either click the button to the right of the effect unit in the ra...

Страница 9: ...ex15 GEQ unit is being edited the number of remaining available bands will be displayed Although you can boost and cut the EQ bands via the display you can also use the channel faders to directly cont...

Страница 10: ...been reset you can begin to edit the various parameters for your mix But of course you can edit parameters from any scene number When any changes have been made to the currently selected scene an Edit...

Страница 11: ...off position Direct out settings on off position level EQ settings all parameters including HPF ATT digital attenuator Dynamics 1 and 2 settings all parameters Rack settings all parameters MIX send s...

Страница 12: ...ene is recalled This is known as Partial Safe Select specific parameters for Recall Safe by using the SAFE PARAMETER field buttons any button other than ALL Partial Safe and engage the SAFE button in...

Страница 13: ...nsupported formats will not be recognized Playback will begin at the selected song and all checked songs up to the end of the title list will be played in sequence Playback will stop automatically whe...

Страница 14: ...pened is actually specified by pressing and holding the USER DEFINED KEY for more than 2 seconds while the target display page is showing Once assigned you can instantly open the assigned display page...

Страница 15: ...ub using a high quality CAT5 Ethernet cable Either a straight or cross Ethernet cable can be used when connecting the LS9 directly to the computer Press the SETUP key in the DISPLAY ACCESS section as...

Страница 16: ...oped for use with Yamaha DME series Digital Mixing Engines thus the DME in the name But through successive versions it has grown to provide TCP IP functionality for a wide range of Yamaha products Fro...

Страница 17: ...be matched to the settings you made in the Studio Manager LS9 32 in this example If an administrator password has been set for the LS9 enter the password in the Administrator Password field When all...

Страница 18: ...at has been specifically designed to provide open ended expansion capability Input and output expansion in a variety of analog and digital audio formats is provided via Mini YGDAI cards that install e...

Страница 19: ...visual feedback and confirmation This type of centralized operation and display allows the engineer to concentrate more fully on the job at hand while providing operating ease that allows extra leewa...

Страница 20: ...l to be varied for AUX type operation while the send level of the FIXED type is fixed at nominal for BUS type operation The MATRIX buses are used to further group the MIX bus signals MATRIX buses have...

Страница 21: ...etween the MIX bus PRE and POST settings After pressing the HOME key position the cursor at the target MIX bus and press the ENTER key A pop up window will appear in which you can select PRE or POST A...

Страница 22: ...Block Diagram 22...

Страница 23: ...23...

Отзывы: