1
The LS9 features a USM memory recorder function that makes it easy to record the console’s internal signals to a USB
memory, and play back audio files that have been saved to a USB memory. Files can be recorded to USB memory in MP3
(MPEG-1 Audio Layer 3) format. In addition to MP3 files, files in WMA (Windows Media Audio) and AAC (MPEG-4 AAC)
format can be played back� The USB memory recorder function supports 44,1 kHz and 48 kHz sampling rates� The output
from the console’s STEREO bus or MIX buses can be recorded to USB memory, and BGM or sound effect files saved on a
USB memory can be assigned to and played back via any of the console’s input channels�
●
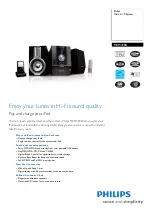
Assigning the USB Memory Recorder Inputs and Outputs to Channels
With the console reset to it’s default state (scene 000), no routing assignments are set up for the USB memory recorder
function. To use the USB memory recorder it is necessary to first make the appropriate input and output channel assignments.
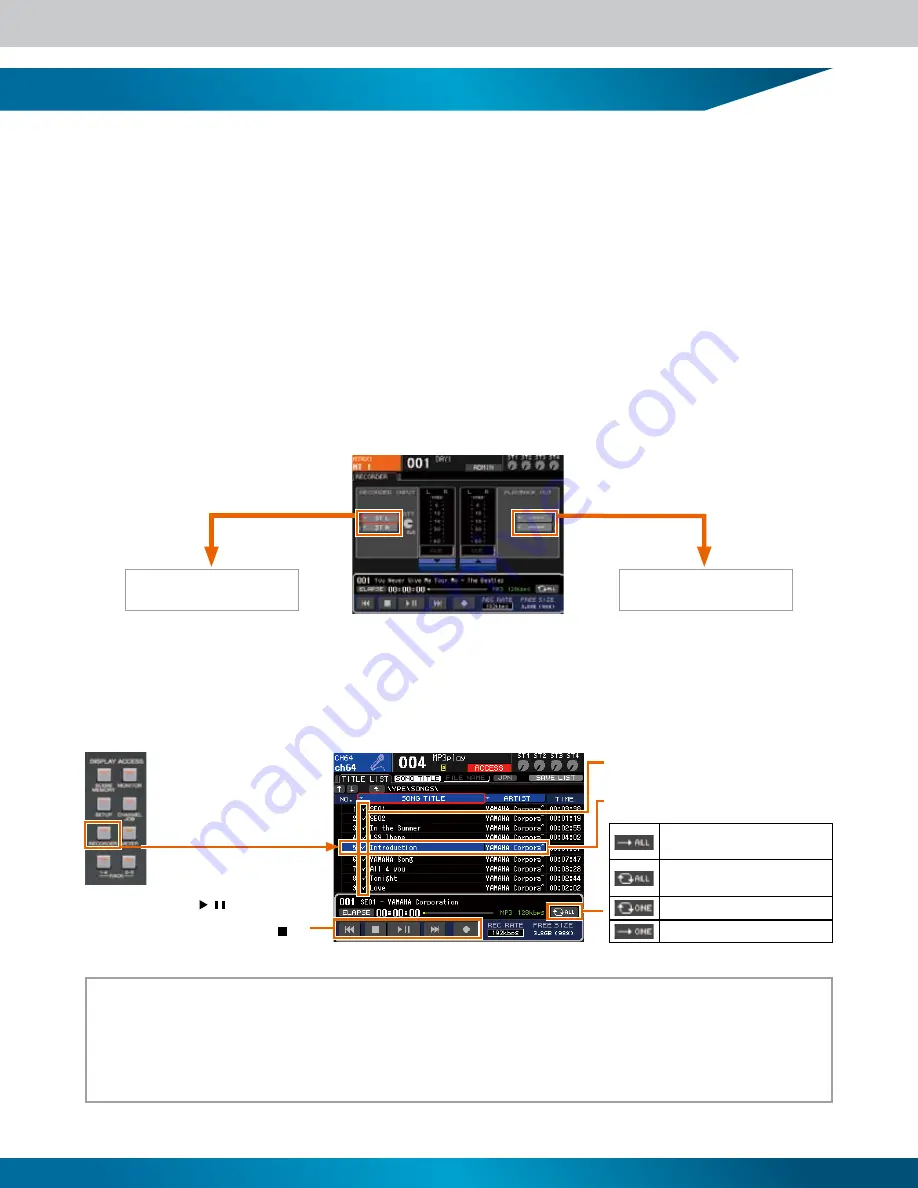
(1) Press the RECORDER key in the DISPLAY ACCESS section as many times as necessary until the RECORDER display appears.
() Assign the required channels to the USB memory recorder inputs via the category tabs and port select buttons. When the selections have been made,
position the cursor at the [CLOSE] button and press the ENTER key. Assign a channel to the other input in the same way.
When the input channels have been assigned, assign the L and R PLAYBACK OUT channels in the same way.
BGM Playback from USB Memory
Position the cursor here and
press the ENTER key to
assign the recorder outputs.
Position the cursor here and press
the ENTER key to assign the recorder
inputs.
●
Play Audio Files from a USB Memory
Save audio files in the SONGS folder inside the YPE folder on the USB memory, or in further folders contained within the SONGS
folder. Files saved in other folders as well as files in unsupported formats will not be recognized.
Playback will begin at the selected song, and all checked
songs up to the end of the title list will be played in
sequence. Playback will stop automatically when the songs
have been played through once.
Playback will begin at the selected song, and all checked
songs up to the end of the title list will be played in
sequence, then playback will begin again from the first
song. Playback will repeat until the STOP button is clicked.
The selected song will play and repeat until the TOP
button is clicked.
The selected song will play once and then playback
will stop automatically.
Plug the USB memory containing
the audio files into the console’s USB
connector, then press the RECORDER
key in the DISPLAY ACCESS section
as many times as necessary until the
TITLE LIST display appears.
Select the file you want to play from the list by
using the dial or DEC/INC keys.
When playing multiple files in sequence, the
checked files in the list will play.
Position the cursor at the [
/
] (PLAY/PAUSE)
button and press the ENTER key to start playback.
To stop playback position the cursor at the [ ]
(STOP) button and press the ENTER key.
New Features
The following features have been added or changed as of firmware version 1.1.
• A SCENE PLAYBACK LINK display has been added. This allows a specified audio file on the USB memory to be played back automatically when a specific scene is recalled. This is handy for automatically playing
sound effects or BGM when a scene is recalled.
• A DIRECT PLAY function can be assigned to the USER DEFINED KEYS. This allows playback of a specified file on the USB memory to be started by simply pressing the assigned USER DEFINED KEY. This
assignment can be made via the PARAMETER field in the USER DEFINED KEY SETUP pop-up window.
• In the TITLE LIST display it is possible to switch between song title and file name display: position the cursor at the [SONG TITLE/FILE NAME] button and press the ENTER key to switch.
The INPUT CH SELECT pop-up
window will appear.
The OUTPUT CH SELECT pop-up
window will appear.
Содержание LS9 Editor
Страница 22: ...Block Diagram 22...
Страница 23: ...23...