background image

E-19

English

1

1

2

2

3

3

4

4

5

5

6

6

7

7

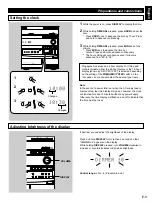
8

8

9

0

TIME

PROG

R. TIME

C

EDIT

D

PRESET

+

I0

E

MODE

REPEAT

RANDOM

TUNER

DISC SKIP

DIRECTION

CENTER/

REAR/DELAY

TEST

PROGRAM

BASS 

BOOST

MUSIC

POWER

SLEEP

INPUT

VOLUME

A

B

TAPE

LEVEL

/I

KEY/ECHO

SELECT

RETURN

TIME INDEX

DIGEST

KARAOKE

INTRO

TUNER

VCD

/

CD

REC/PAUSE

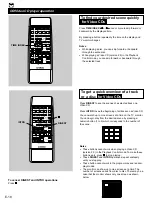
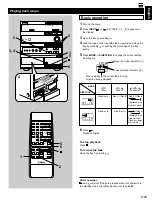
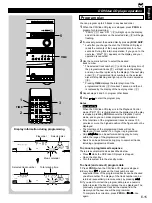
CD/Video CD player operation

Basic operation

Use the remote control for making Playback Control
operations.

Note
Disc play in the Playback Control mode depends on the data
of the disc used. The operations and buttons to be used may
vary for each disc.

1

Select a Video CD (version 2.0) by pressing DISC SKIP on
the remote control.
* “PBC” (

5

) lights up on the display.

2

Press 

.

* A screen menu, a series of short movies, or the like

appears on the TV monitor. It differs with each disc.

3

In the Playback Control mode, the following buttons on the
remote control can be used.
However, the usable buttons and their functions differ with
each disc.

SELECT: Used to select the desired movie when short

movies are sequentially played instead of a
menu

RETURN: Used to return to the previous screen menu or

picture

:

Used to advance to the next menu or picture when

” or “NEXT” is displayed on the TV monitor.

Used to change play direction from reverse to
advance.

:

Used to return to the previous menu or picture
when “

” or “PREV” is displayed on the TV

monitor.

Used to change play direction from advance to
reverse.

Numeric buttons: Used to select the desired item on a

screen menu.

Notes

In the Playback Control mode, TIME and REPEAT will not
work.

PROGRANDOMDIGEST and INTRO can work when the
CD/Video CD player is in the Playback Control mode and
stopped. In this state, pressing one of these buttons
cancels the Playback Control mode.

To return to the previous screen mode during play

Press RETURN once.
* To return to the first screen mode, press RETURN

repeatedly until the first screen mode appears.

To stop play

Press  .

To play a Video CD (version 2.0) without Playback
Control operation

Press   while the CD/Video CD player is stopped. “PBC” (

5

)

disappears from the display, and the normal play mode is
restored.
To restore the Playback Control mode again, press SELECT.

1

2

RETURN

Playback Control of Video CD
(version 2.0)    

for Video CDs

This function is available for a Video CD (version 2.0) only.
“PBC” will light up on the display when a version 2.0 disc is
used. The Playback Control differs with each disc. Refer to the
instructions of the disc for details.

You can enjoy the following functions.
Selection on a screen menu
You can select pictures, music and information to play by
selecting items on a screen menu.
High quality pictures (for discs including still pictures)
You can enjoy still pictures which are four times as high in
quality as moving pictures.

Numeric
buttons

SELECT

Содержание GX-700VCD

Страница 1: ...TANDBY ON AUTO REVERSE CASSETTE DECK DOLBY B NR PRESET TUNING BAND A B C D E DISC 1 DISC 2 DISC 3 DISC CHANGE OPEN CLOSE PROGRAM B BOOST MUSIC INPUT INPUT DIRECTION PUSH OPEN MINI COMPONENT SYSTEM GX 700 OWNER S MANUAL 3 DISC VCD CHANGER ...

Страница 2: ... APE LEVEL I KEY ECHO SELECT RETURN TIME INDEX DIGEST KARAOKE INTRO TUNER VCD CD REC PAUSE DISC 1 DISC 2 DISC 3 3 DISC VCD CHANGER STANDBY TIMER DOWN UP VOLUME STANDBY ON AUTO REVERSE CASSETTE DECK DOLBY B NR DIRECTION PROGRAM B BOOST MUSIC INPUT INPUT PRESET TUNING BAND A B C D E DISC CHANGE OPEN CLOSE MINI COMPONENT SYSTEM GX 700VCD Unpacking After unpacking check that the following parts are co...

Страница 3: ...y object on top of the main unit to prevent the ventilation holes from being obstructed Otherwise it may cause fire or damage to the main unit Note When placing the speakers apart from the main unit be sure to allow a space of at least 20 cm 3 15 16 above behind and on both sides of the main unit If the main unit is put in a rack the front of it must be fully opened The values must be applied to C...

Страница 4: ...OLBY B NR DIRECTION PROGRAM B BOOST MUSIC INPUT INPUT PHONES MIN PRESET TUNING BAND A B C D E DISC CHANGE OPEN CLOSE TREBLE BASS AUTO MANUAL TIMER MEMORY TIME ADJ REC PAUSE DOLBY NR HOUR RANDOM REPEAT TIME DISPLAY MODE MIC MIXING KARAOKE MIN MAX 1 MIC 2 2 3 4 5 6 8 0 B N M L K J I H G F E D C 9 A 7 1 a Front panel ...

Страница 5: ... 21 22 D A B C D E p 22 E PRESET TUNING BAND p 21 F VOLUME p 32 G MUSIC p 33 H INPUT p 12 21 25 31 I HOUR p 9 39 J MIN p 9 39 K DISPLAY p 9 39 L MEMORY p 22 23 TIME ADJ p 9 M STANDBY ON p 10 N AUTO MANUAL p 21 TIMER p 39 R OPEN CLOSE p 12 S p 14 19 T p 12 U p 12 V RANDOM p 17 WTIME p 17 X REPEAT p 16 Y Tray p 25 Z MODE p 25 p 25 DIRECTION p 25 p 26 p 25 a p 25 b REC PAUSE p 27 c DOLBY NR P 24 27 C...

Страница 6: ...RETURN TIME INDEX DIGEST KARAOKE INTRO TUNER VCD CD REC PAUSE DIRECTION CENTER REAR DELAY TEST PROGRAM BASS BOOST MUSIC POWER SLEEP INPUT VOLUME TAPE LEVEL I KEY ECHO REC PAUSE 1 1 2 2 3 3 4 4 5 5 6 6 7 7 8 8 9 0 TIME PROG R TIME C EDIT D PRESET I0 E MODE REPEAT RANDOM TUNER DISC SKIP A B SELECT RETURN TIME INDEX DIGEST KARAOKE INTRO TUNER VCD CD 2 3 4 6 5 8 9 F E D B A 0 C 1 7 J H G L M Y Z X NOP...

Страница 7: ...EPEAT p 16 8 POWER p 10 9 SLEEP p 40 0 PRESET p 22 ATUNER p 21 B PROGRAM p 35 C BASS BOOST p 32 D MUSIC p 33 EVOLUME p 32 F INPUT p 12 21 25 31 L DISC SKIP p 13 M p 14 19 N INTRO p 18 OTIME INDEX p 18 P DIGEST p 18 Q RETURN p 19 R SELECT p 19 S p 12 T EDIT p 29 30 U R TIME p 29 V RANDOM p 17 W p 12 X p 26 Y REC PAUSE p 27 Amplifier tuner CD Video CD player Tape deck Z DIRECTION p 25 p 25 p 25 TUNE...

Страница 8: ...shooting 41 Specifications 43 Page Precautions 1 Features 3 Preparations and connections 4 Installing batteries in the remote control 4 Remote control operation range 4 Setting the video output format selector TV MODE switch 4 Setting up the speakers 5 Connections 7 Setting the clock 9 Adjusting brightness of the display 9 Speaker balance adjustment 10 CD Video CD player operation 11 Basic play 12...

Страница 9: ...ly scratch or damage the head s mirror smooth finish it may change the magnetic characteristics of the heads causing a deterioration in reproduction performance quality Although the tape deck s record playback heads are high quality heads with outstanding reproduction characteristics they can become dirty through the use of old tapes or from dust accumulation over time This can have a serious effe...

Страница 10: ...re 110 120 220 240 V AC 50 60 Hz FREQUENCY STEP switch China and General models only Because the interstation frequency spacing differs in different areas set the FREQUENCY STEP switch located at the rear according to the frequency spacing in your area Be sure to change the setting of this switch with the AC supply lead of this system disconnected from the AC outlet This system is not disconnected...

Страница 11: ...e 2 Microphone Connecting Capability Mic Mixing Echo Level and Key Control Capability Karaoke Sound Recording Capability Recording Your Singing Voice and Karaoke Effects with the Music Source Features General 5 Speaker Multichannel Audio System Two front One Center and Two Rear Speakers High Power Output Front L R 100W 100W 6Ω RMS 10 THD 1 kHz Center 100W 6Ω RMS Output Power 10 THD 1 kHz Rear 30W ...

Страница 12: ... this position if your TV monitor employs the PAL format AUTO Set to this position if your TV monitor can be switched in between the PAL and NTSC formats automatically NTSC Set to this position if your TV monitor employs the NTSC format 1 Turn the remote control over and remove the battery compartment cover by pulling it up while pressing the edge of the cover in the direction of the mark 2 Insert...

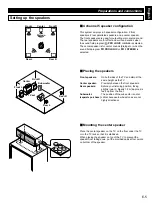
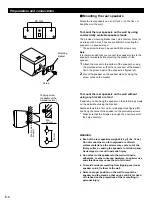
Страница 13: ...speakers Front speakers On both sides of the TV and almost the same height as the TV Center speaker Precisely between the front speakers Rear speakers Behind your listening position facing slightly inward Nearly 1 8 m approx six feet up from the floor Subwoofer The position of the subwoofer is not so separate purchase critical because low bass tones are not highly directional m Mounting the center...

Страница 14: ...r stand If desired you can hang the speaker on the protruding screws on the wall without using the bracket Fasten screws into a firm wall or wall support as figured left and hang the holes of the speaker on the protruding screws Make sure that the screws are caught by a narrow part of the holes securely WARNING Each of the rear speakers weighs 0 8 kg 1 lbs 12 oz Do not mount them on thin plywood o...

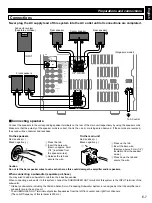
Страница 15: ... are designed so that the amplifier and subwoofer are in the same unit The SUBWOOFER OUT terminal outputs low frequencies from the left front center and right front channels The cut off frequency of this terminal is 200 Hz m Connecting speakers Connect the speakers to the corresponding speaker terminals on the rear of the main unit respectively by using the speaker cords Make sure that the polarit...

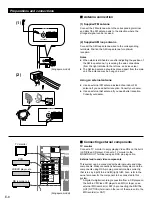
Страница 16: ... or DAT by connecting the DIGITAL OUT OPTICAL terminal on the rear of the main unit to the MD recorder or DAT m Antenna connection 1 Supplied FM antenna Connect the FM antenna wire to the corresponding terminal and direct the FM antenna wire to the direction where the strongest signal can be received 2 Supplied AM loop antenna Connect the AM loop antenna wires to the corresponding terminals Positi...

Страница 17: ...sed press MIN and set the minute Press MIN once to advance the time by 1 minute Press and hold to advance continuously The hour setting will not advance even if minute is advanced from 59 to 00 Singapore model uses a 24 hour display For China and General models either the 24 hour display or the 12 hour display shown by AM PM 12 00 is selected depending on the setting of the FREQUENCY STEP switch o...

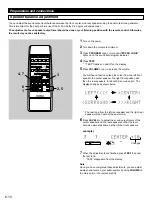
Страница 18: ...ple 7 When the adjustments are finished press TEST to cancel the test tone TEST disappears from the display Note Once you have completed these adjustments you can adjust whole sound level on your audio system by using VOLUME on the main unit or the remote control Speaker balance adjustment You can adjust the sound output level balance between the front center and rear speakers using the built in t...

Страница 19: ...endar Track numbers on the currently selected disc will be illuminated up to the number 15 0 OVER 15 This indicator will be illuminated when the currently selected disc has more than 15 tracks A PROG program B S F REP single full repeat Each indicator mentioned with a number on pages 12 19 corresponds to the indicator with the same number on this page 100 350 1K 3 5K 10K MUSIC PROG S F REP VOLUME ...

Страница 20: ...racks 1 and the total playing time of the disc 2 will be displayed for several seconds If the disc contains more than 15 tracks the OVER 15 indicator 0 will light up If the disc tray is closed by pushing the front edge of the tray play will begin automatically If the selected disc is a Video CD VCD 4 lights up on the display 6 Press to begin play If a Video CD version 2 0 is selected PBC 5 lights ...

Страница 21: ... Single disc play mode Only the designated disc is played All disc play mode All discs on the disc tray are played sequentially To select the desired track directly By using the numeric buttons on the remote control any track you wish to listen to can be played directly Use the numeric buttons to select the desired track number Play will begin automatically A For example to choose track 5 Press 5 ...

Страница 22: ... DISPLAY MODE KARAOKE CD Video CD player operation To play the desired track Skip Press to skip forward or to skip backward Press once for each track to be skipped Note This function can also be performed while the CD Video CD player is stopped Press when the desired track number appears on the track number display Play will begin from the beginning of the track To advance or reverse play rapidly ...

Страница 23: ...CD Video CD player is in the Playback Control mode PBC 5 is illuminated on the display and the play is stopped pressing PROG cancels the Playback Control mode and so you can make programming operations If the total time of the programmed tracks becomes 100 minutes or more the highest position of the figure will not be displayed The total time of the programmed tracks will not be displayed if track...

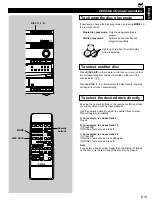
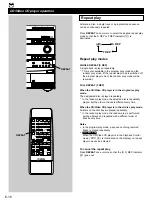
Страница 24: ...tedly This is also available in the program play mode and the random play mode If the repeat play mode is switched off the program play mode or the random play mode will be resumed FULL REPEAT F REP When the CD Video CD player is in the single disc play mode The designated disc is played repeatedly In the random play mode the selected disc is repeatedly played but the order of tracks is different ...

Страница 25: ...y can be played randomly 1 If necessary switch the disc play mode by pressing MODE If the single disc play mode is selected select the desired disc by pressing DISC SKIP 2 Press RANDOM to begin random play The RANDOM indicator 8 will light up To cancel the random play Press or press RANDOM so that the RANDOM indicator 8 will go out Notes This feature will not function during programming or program...

Страница 26: ...splay and TV monitor changes Notes While playing a disc you can skip forward or backward through the entire disc While playing a Video CD version 2 0 in the Playback Control mode you can skip forward or backward through the selected track To get a quick overview of a track or a disc for Video CDs Press DIGEST to see the scenes of a selected track on a Video CD Press INTRO to see the beginning of a...

Страница 27: ... menu or picture when or PREV is displayed on the TV monitor Used to change play direction from advance to reverse Numeric buttons Used to select the desired item on a screen menu Notes In the Playback Control mode TIME and REPEAT will not work PROG RANDOM DIGEST and INTRO can work when the CD Video CD player is in the Playback Control mode and stopped In this state pressing one of these buttons c...

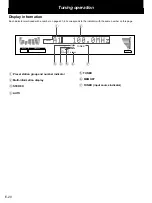
Страница 28: ...number indicator 2 Multi information display 3 STEREO 4 AUTO Display information Each indicator mentioned with a number on pages 21 23 corresponds to the indicator with the same number on this page 100 350 1K 3 5K 10K PROGRAM MUSIC KARAOKE VOLUME PRESET STEREO AUTO TUNED MEMORY TUNER 2 1 7 3 4 5 6 ...

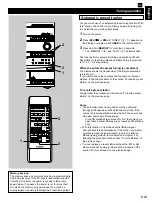
Страница 29: ...o tune to a higher frequency or press to tune to a lower frequency When tuned in to a station TUNED 5 will light up on the display 6 If the station where tuning search stopped is not the desired one follow step 5 again If the tuning search does not stop at the desired station change to the Manual tuning method as described below STEREO 3 will light up when an FM stereo broadcast with sufficient si...

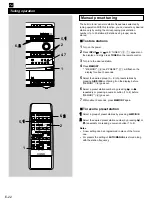
Страница 30: ...0 stations 8 stations x 5 groups can be stored m To store stations 1 Turn on the power 2 Press INPUT or until TUNER 2 7 appears on the display or simply press TUNER on the remote control 3 Turn in to the desired station 4 Press MEMORY MEMORY 6 and PRESET 1 will flash on the display for about 5 seconds 5 Select the desired group A E of preset stations by pressing A B C D E confirming it on the disp...

Страница 31: ... you want to check the contents and the number of preset stations follow the procedure of the section To recall a preset station on the previous page To recall a preset station Simply follow the procedure of the section To recall a preset station on the previous page Notes The automatic preset tuning search will be performed through all frequencies until 40 stations are stored If the number of rec...

Страница 32: ...stem DOLBY NR is useful to both recording and playback be sure that the same noise reduction is used on recording and playback Dolby noise reduction manufactured under license from Dolby Laboratories Licensing Corporation DOLBY and the double D symbol are trademarks of Dolby Laboratories Licensing Corporation General information About the tape counter The tape deck is equipped with a tape counter ...

Страница 33: ...tape Basic operation 1 Turn on the power 2 Press INPUT or until TAPE 1 5 appears on the display 3 Open the tray by pressing 4 Load the tape on the tray with side A upward and close the tray by pressing or pushing the front edge of the tray gently 5 Press MODE or DIRECTION to change the current setting if necessary 5 2 3 4 6 5 4 6 Press Playback begins To stop playback Press To remove the tape Open...

Страница 34: ...utomatically starts from the reverse side If the winding direction is the tape stops at the end When the tape reaches the end playback automatically starts from the reverse side Searching for the beginning of the desired selection Press or during playback To listen to the same selection Press if the direction of the current playback is Press if the direction of the current playback is To listen to...

Страница 35: ... for how to cancel the sound field program If you want to make a recording using Dolby NR press DOLBY NR so that NR 2 lights up on the display If not turn NR 2 off For details refer to Dolby B Type Noise Reduction on page 24 Basic recording 1 Turn on the power 2 Press INPUT or once or more to select the source you want to record 3 Load a tape on the tray with side A upward 4 Press DIRECTION or MOD...

Страница 36: ...pe deck to resume recording To stop recording Press of the tape deck To change the disc and track when recording from a CD or Video CD 1 Press of the CD Video CD player The recording stops temporarily 2 Select the disc by pressing DISC SKIP if necessary 3 Choose the track you want to record next by using or and then press of the CD Video CD player to resume recording or simply press the correspond...

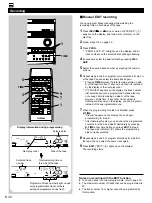
Страница 37: ...shown below When using tapes other than C 46 C 54 C 60 or C 90 After pressing R TIME input the tape length by using the numeric buttons on the remote control 6 Press EDIT EDIT 8 lights up on the display The following operations are carried out automatically 1 Tracks on the disc are automatically divided into side A and side B You can check the process by watching the display The tape side indicato...

Страница 38: ...ber just selected cannot be programmed because there is not enough time remaining on side A of the tape However at this time if any other track number is flashing continuously on the display you can program it instead of the unprogrammable one 7 When the programming for side A is finished press R TIME Side B appears on the display You can begin programming for side B After following this step you ...

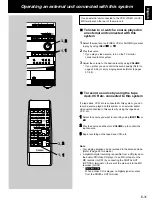
Страница 39: ...he desired level by using VOLUME If you prefer you can control the sound quality Refer to pages 32 36 or enjoy singing karaoke Refer to pages 37 38 Use an external unit connected to the VCR VIDEO or AUX MD terminals on the rear of the main unit m To record a source by using the tape deck VCR etc connected to this system If a tape deck VCR etc is connected to this system you can record a source pla...

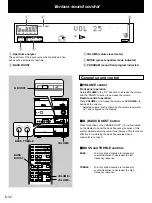
Страница 40: ...ng overall tonal balance This function is effective for reinforcing the bass frequencies when a subwoofer is not used m BASS and TREBLE controls BASS Turn this knob clockwise to increase or counterclockwise to decrease the low frequency response TREBLE Turn this knob clockwise to increase or counterclockwise to decrease the high frequency response 1 1 2 2 3 3 4 4 5 5 6 6 7 7 8 8 9 0 TIME PROG R TI...

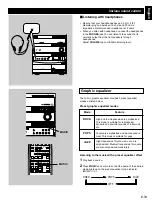
Страница 41: ...LAY TEST PROGRAM BASS BOOST MUSIC POWER SLEEP INPUT VOLUME T APE LEVEL I KEY ECHO SELECT RETURN TIME INDEX DIGEST KARAOKE INTRO TUNER VCD CD REC PAUSE DISC 1 DISC 2 DISC 3 DOWN UP VOLUME PROGRAM B BOOST MUSIC INPUT INPUT MIN PRESET TUNING BAND A B C D E DISC CHANGE OPEN CLOSE AUTO MANUAL TIMER MEMORY TIME ADJ REC PAUSE DOLBY NR HOUR RANDOM REPEAT TIME DISPLAY MODE G KARAOKE X MUSIC MUSIC Graphic e...

Страница 42: ...ic and dynamic sound effects two main channels left and right a center channel for dialog and a rear channel for special sound effects The rear channel reproduces sound within a narrow frequency range This program is used for simplified play of Dolby Surround encoded sources With this program sound effects are output from the left and right front speakers and no sound from the rear speakers YMERSI...

Страница 43: ...ou press PROGRAM the program changes and is displayed as follows 3 If desired adjust the delay time and the output level of each speaker For details refer to the corresponding descriptions on pages 35 to 36 Notes When YMERSION is selected no sound is heard from the center speaker and rear speakers If you play a source not encoded with Dolby Surround when PRO LOGIC is selected the source may not be...

Страница 44: ...s CENTER REAR DELAY once or more until CENTER appears on the display 2 By continuously pressing LEVEL or the level value changes continuously Notes This adjustment can be made only when the sound field program PRO LOGIC or 3 STEREO is selected Once the output level is adjusted the level value will be the same in the PRO LOGIC and 3 STEREO programs REAR LEVEL Control range 10 to 21 1 Press CENTER R...

Страница 45: ...elected For a karaoke source without vocals For a multisound source For a normal music source Mode L R KARAOKE L L ONLY R R ONLY VOCAL CUT Feature Signals on the left channel and the right channel are output from the left and right speakers respectively Only signals on the left channel of the source are output from the left and right speakers Only signals on the right channel of the source are out...

Страница 46: ...0 Press to stop play m Recording your vocal onto a tape You can record your vocal input from the microphone s along with the source onto a tape or MD etc in the karaoke mode In addition the effects of adjusting MIC MIXING ECHO and KEY can be recorded with the vocal and the source Recording sound will be monitored by the speakers To record them follow the basic recording procedures Note The sound e...

Страница 47: ...t the current time is correct and press TIMER so that TIMER lights up on the display 2 Source selecting mode Select the source to be played with INPUT or 3 ON TIME time setting mode ON TIME appears on the display and soon it is changed to a time setting mode Set the time when you want to begin the timer play Press HOUR and set the hour Press MIN and set the minute 4 OFF TIME time setting mode If n...

Страница 48: ...TUNER and then press REC PAUSE REC TAPE and the frequency will flash alternately on the display In step 3 set the time when you want to begin recording In step 4 set the time when you want to finish recording 4 Press TIMER This system will be set to the standby mode The STANDBY and TIMER indicators light up To cancel the setting of timer recording Press DISPLAY once or more so that REC TAPE flashe...

Страница 49: ...omponent connected to the AUX MD OUT or VCR OUT terminals on the rear of the main unit is turned off There is an influence of magnet in the center speaker Interference from starting motor of nearby car Interference from thermostat of nearby electrical appliance Antenna input is too weak due to obstructions or excessive distance from broadcasting station Insufficient antenna input Preset memory has...

Страница 50: ...e is creased or torn Endless tape is being used Silent gaps between selections are too short Excessively soft passages in middle of selections Conversation etc is recorded Batteries are dead Remote control is too far away or tilted too much Direct sunlight or lighting of an inverter type of fluorescent lamp etc is striking the remote control sensor of the main unit Remote control is being used nea...

Страница 51: ...rse stereo cassette deck Frequency Response 20 dB Type 1 Normal 50 to 15 000 Hz Type 2 High 50 to 16 000 Hz Wow and Flutter 0 09 W RMS Signal to Noise Ratio 58 dB Dolby NR OFF 66 dB Dolby B NR ON Harmonic Distortion 0 8 n Speaker section Type Magnetic shielding type Front speaker 3 way bass reflex 13 cm 5 woofer 5 cm 2 tweeter 2 cm 3 4 super tweeter Center speaker 8 3 cm full range x 2 Rear speake...

Страница 52: ...V380830 ...
Отзывы: