DVR-S100/NX-SW100
16
DVR-S100/NX-SW100
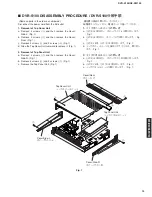
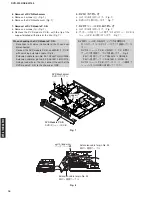
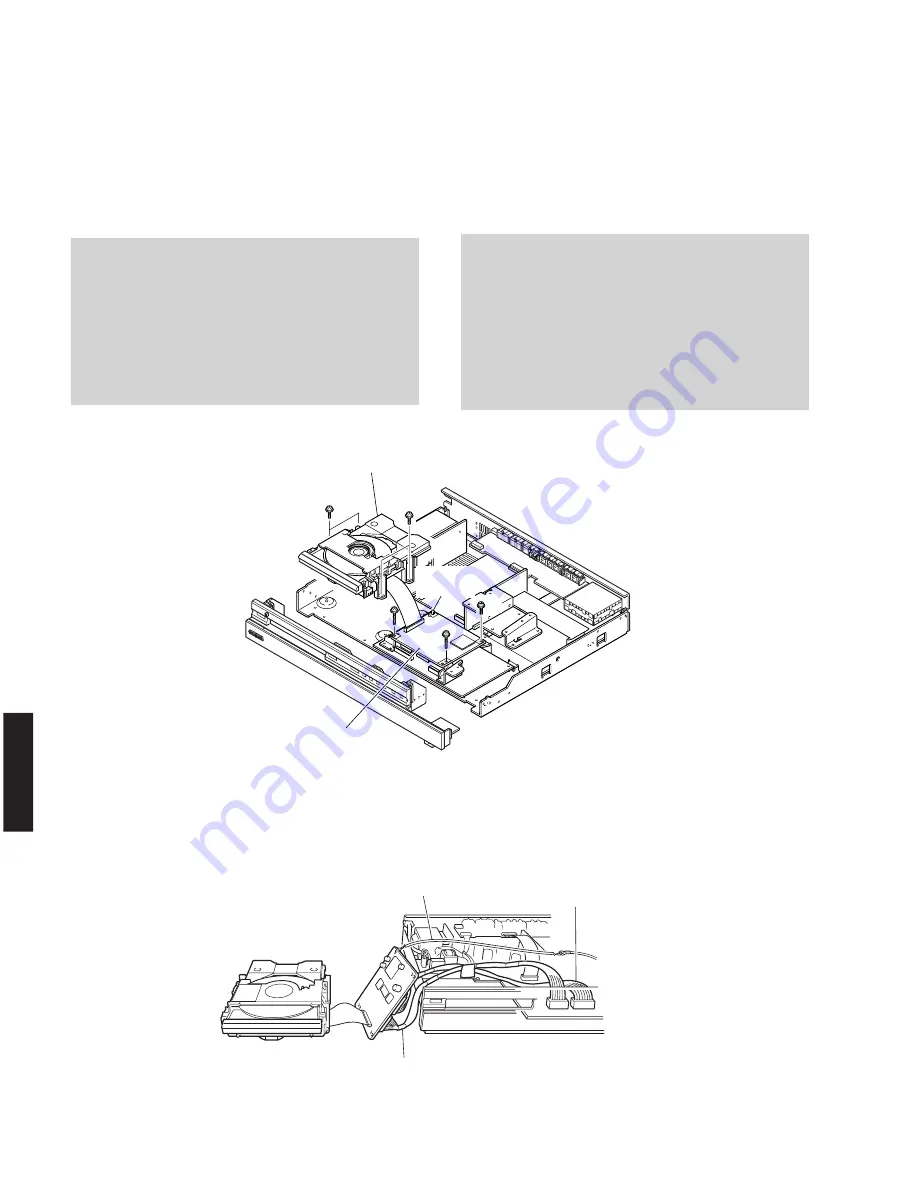
6. Removal of DVD-Mechanism
a. Remove 4 screws (
C
). (Fig. 7)
b. Remove the DVD-Mechanism. (Fig. 7)
7. Removal of DVD Module P.C.B.
a. Remove 3 screws (
D
). (Fig. 7)
b. Remove the DVD module P.C.B. with the tip of the
support pinched with pliers or the like. (Fig. 7)
6. DVDメカの外し方
a.
C
のネジ4本を外します。(Fig. 7)
b. DVDメカを取り外します。(Fig. 7)
7. DVDモジュールP.C.B.の外し方
a.
D
のネジ3本を外します。(Fig. 7)
b. サポートの先をペンチ等でつまみながら、D V D モ
ジュールP.C.B.を取り外します。(Fig. 7)
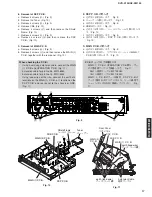
DVDモジュールP.C.B.をチェックする場合には
・ 外したケーブル
(コネクター)
をすべて接続してくだ
さい。
・ DVDモジュールP.C.B.とMAIN (1) P.C.B.間を、
サービス用延長ケーブルで接続します。(Fig. 8)
26ピン延長ケーブル: TX946370 (JGS0098)
22ピン延長ケーブル: AAX16610 (JGS0116)
・ DVDモジュールP.C.B.のアースを、リード線等で
シャーシまたはGNDに接続してください。
When checking the DVD Module P.C.B.:
• Reconnect all cables (connectors) that have been
disconnected.
• Connect the DVD module P.C.B. and MAIN (1) P.C.B.
with servicing extension cable. (Fig. 8)
Extension cable for pin No. 26: TX946370 (JGS0098)
Extension cable for pin No. 22: AAX16610 (JGS0116)
• Using a lead wire or the like, connect the earth of the
DVD module P.C.B. to the chassis or GND.
Fig. 7
Fig. 8
C
C
D
D
Support
サポート
DVD Module P.C.B.
DVDモジュールP.C.B.
DVD Mechanism
DVDメカニズム
D
earth (lead wire)
アース(リード線)
Extension cable for pin No. 26
26ピン延長ケーブル
Extension cable for pin No. 22
22ピン延長ケーブル
Содержание DVR-S100
Страница 144: ...DVR S100 NX SW100 本资料由OKXIA视听皮带资源库www okxia cn提供 ...


