background image

A

CCESS


CONTROL


39

English

Rating 0 (displayed as ‘– –’):

Parental Control is not active. The disc will play in full.

Ratings 1 to 8 (1 = childsafe - 8 = adults only):

The disc contains scenes not suitable for children. If you 
set a rating for the Recorder, all scenes with the same 
rating or lower will play. Higher rated scenes will not play 
unless an alternative is available on the disc. The alternative 
must have the same rating or a lower one. 
If no suitable alternative is found, play will stop and you 
must enter the 4-digit code.

9

Press 

ENTER/OK

 or 

t

 (left cursor) to confirm and 

press 

SYSTEM MENU

 to move the menu.

Country

See the disc case for details on whether it has Parental 
Level settings for specific countries. If it does not, this 
procedure is not necessary.

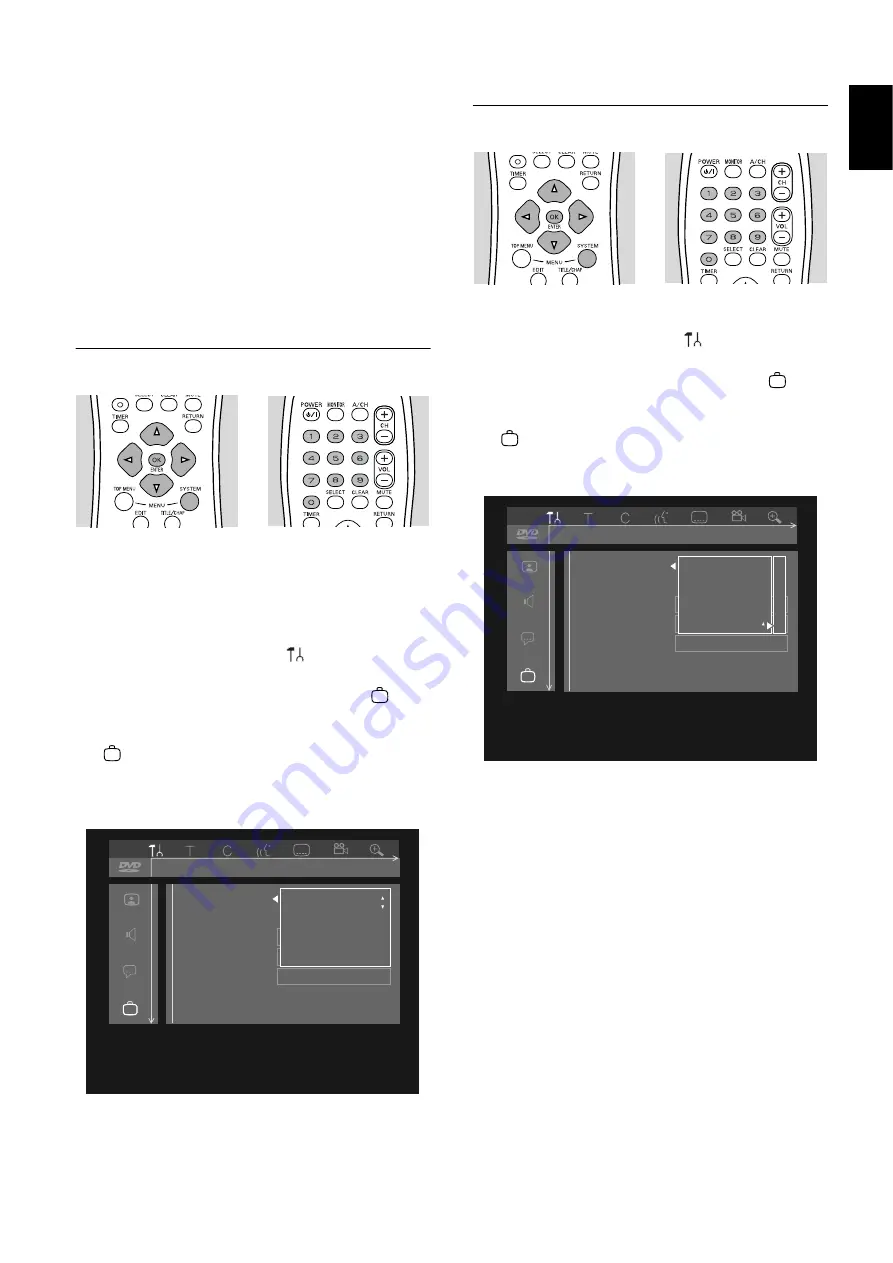
1

Press 

SYSTEM MENU

.

2

Press 

(left cursor) to select 

 in the system menu 

bar.

3

Press 

w

 (down cursor) repeatedly to select 

, then 

press 

u

 (right cursor).

4

‘Access control’ will be selected in the features menu 

. Press 

u

 (right cursor).

5

Enter the four digit code using the 

0-9

 buttons.

6

Move to ‘Change country’ using 

w

 (down cursor).

7

Press 

u

 (right cursor).

8

Select the country for which your disc is coded using 

w

/

v

 (down/up cursor). 

9

Press 

ENTER/OK

 or 

t

 (left cursor) to confirm. 

Press 

SYSTEM MENU

 to exit the menu.

Changing the 4-digit code

1

Press 

SYSTEM MENU

.

2

Press 

(left cursor) to select 

 in the system menu 

bar.

3

Press 

w

 (down cursor) repeatedly to select 

, then 

press 

u

 (right cursor).

4

‘Access control’ will be selected in the features menu 

. Press 

u

 (right cursor).

5

Enter the old 4-digit code using the 

0-9

 buttons.

6

Move to ‘Change code’ using 

w

 (down cursor).

7

Press 

u

 (right cursor).

8

Enter the new 4-digit code using the 

0-9

 buttons.

9

Enter the exact same code a second time and recon-
firm by pressing 

ENTER/OK

.

10

Press 

SYSTEM MENU

 to exit the menu.

Access control

Status box

Auto resume

Low power standby

1

5

off

1en

no

off

St. Pierre and Miquelon

United States

U.S.Minor Outlying Is.

Virgin Islands (U.S.)

Access control

Status box

Auto resume

Low power standby

Features

1

5

off

1en

no

off

Child lock

Parental level

Change country

Change code

[ ]

[ ]

[ ]
[ ]

Содержание DRX-1

Страница 1: ...DVD Recorder Enregistreur de DVD DRX 1 OWNER S MANUAL MODE D EMPLOI U ...

Страница 2: ...ing electrode See Fig A Fig A 14 Lightning For added protection for this product during a lightning storm or when it is left unattended and unused for long periods of time unplug it from the wall outlet and disconnect the antenna or cable system This will prevent damage to the product due to lightning and power surges 15 Power lines An outside antenna system should not be located in the vicinity o...

Страница 3: ...ON please try to eliminate the problem by using one of the following measures Relocate either this product or the device that is being affected by the interference Utilize power outlets that are on different branch circuit breaker or fuse circuits or install AC line filter s In the case of radio or TV interference relocate reorient the antenna If the antenna lead in is 300 ohm ribbon lead change t...

Страница 4: ...side down It may over heat possibly causing damage 9 Do not use excessive force on switches knobs and or cords 10 When disconnecting the power cord from the wall outlet grasp the plug do not pull the cord 11 Do not clean this unit with chemical solvents this might damage the finish Use a clean dry cloth 12 Use only the voltage specified on this unit Using this unit with a higher voltage than speci...

Страница 5: ...________________ 31 Special DVD RW R features _______________________________ 34 Special DVD Video features _________________________________ 34 Special VCD features ______________________________________ 35 Playing an Audio CD_______________________________________ 36 Access control_______________________________37 Child Lock DVD and VCD _________________________________ 37 Parental Level DVD Vid...

Страница 6: ...n your DVD Recorder and recordings made on your DVD Recorder can play on most DVDVideo players and DVD ROM drives With it you will be able to record TV programs or edit and archive your own video camera recordings Superb digital picture and sound quality quick access to the tracks you have recorded and extensive playback features contribute to a completely new video experience From now on you will...

Страница 7: ...dentifies edges at any angle in moving video images and interpolates along the edge pixel by pixel to produce smooth natural looking images To obtain the highest possible picture and sound quality from your TV use the Progressive Scan video jacks on the DVD Recorder and TV Progressive Scan connection Connect the PROG SCAN OUT YPBPR jacks on the Recorder to the corresponding IN jacks on the TV usin...

Страница 8: ...s on the front of the receiver Connect one of the DVD Recorder s DIGITAL AUDIO OUT jacks to the corresponding IN jacks on the receiver Use a digital coaxial cable 6 or a digital optical audio cable 7 Connect the recorder s component video S Video or Video CVBS OUT jack to the corresponding IN jack of your amplifier Then make the same connection between your amplifier and your TV 8 You can connect ...

Страница 9: ...of the DVD Recorder to the corresponding AUDIO IN jacks on your receiver amplifier or stereo system Use the audio cable supplied 4 Step 4 Connecting to other equipment optional To connect other devices to the Recorder use the available IN jacks on the back of the Recorder Set top box cable box or satellite receiver VCR DVDVideo player Most pre recorded video cassettes and DVD discs are copy protec...

Страница 10: ...plied 4 If your video camera has mono sound use only the left audio connector In this case the sound will be recorded on both audio channels Notes You will need only one video connection and one audio connection only the i link DV connection carries both video and audio You may not use all the jacks on the DVD Recorder Step 6 Power supply Make sure all necessary connections are made before connect...

Страница 11: ...isplayed in the language you choose Audio language The sound of DVD Video discs will be in the language you choose if it is available on the current disc If not speech will revert to the first spoken language on the disc Also the DVD disc menu will be in the language you choose if it is available on the disc Subtitle language The subtitles of DVD Video discs will be in the language you choose if i...

Страница 12: ...re found Press ENTER OK to confirm Automatic search and installation starts This can take several minutes WhenAutomatic search and installation is complete Auto ch search complete XXX Channels found appears on the TV screen Press SYSTEM MENU to exit the Auto channel programming menu Initial setup is now complete You can still adjust the settings See User preferences Please wait Auto Ch Programming...

Страница 13: ...h forward RECVOLUME AUTO MAN to adjust the recording volume level automatically or manually MANUAL 3 4 to increase decrease the recording volume level CHANNEL to select TV channels manually When the Recorder is in monitor mode TITLE selects previous title chapter track index or beginning of current title chapter track index selects next title chapter track index AUDIO In Left Right CAM1 2 Audio le...

Страница 14: ...eo output signal of the Recorder PROG SCAN Progressive Scan for connection to a TV with progressive scan 480p input AUDIO OUT L R connection to an amplifier receiver stereo system or to a TV AUDIO IN L R connection to the audio output of a video source of which the video output is connected to the rear CVBS video input EXT2 or to the rear S Video input EXT 1 OUT OPTICAL connection to an amplifier ...

Страница 15: ...s Extended Play or Extended Play Plus CHAPTER DVD chapter number STEREO The current channel is broadcasting in stereo SAP A second audio program is available on the current channel dB scale indicates recording volume when using manual controls Disc bar Displays disc content recording level or formatting progress MANUAL Appears when you manually adjust the recording level MPEG DIGITAL DTS PCM Activ...

Страница 16: ... TOP MENU displays DVD disc menu or Index Picture Screen for a DVD RW SYSTEM MENU displays Recorder system menu bar wvt u move cursor down up left right RETURN go back to previous menu step CLEAR delete last entry clear a timer TIMER displays the timer menu SELECT switches between different values in a menu ENTER OK acknowledge menu selection 0 9 numerical buttons to enter information or select ch...

Страница 17: ...or erase protected playback will start automatically You can unload a disc by pressing again or by pressing and holding 9 for two seconds Note If Child Lock is On and the disc inserted is not in the child safe list not authorized the PIN code must be entered and or the disc has to be authorized see Access control Disc types You will recognize the different types of discs that can be used in your D...

Страница 18: ...Access the system menu bar by pressing any of the following buttons on the remote control SYSTEM MENU TITLE CHAP ANGLE SUBTITLE AUDIO and ZOOM Widescreen 16 9 TV sets may show only part of the system menu bar in certain screen modes Select a different screen mode on the TV to see the full menu A number of Recorder functions can be controlled via the system menu bar You can move between the two par...

Страница 19: ... to select in the system menu bar then press w down cursor The user preference menu appears 3 Use t u v w left right up down cursor to move through the menus sub menus and sub menu options When a menu item is selected the cursor buttons on the remote control to operate the item are displayed next to the item 4 Press ENTER OK repeatedly if necessary to con firm and return to the main menu The follo...

Страница 20: ... mode see Manual recording Checking input It displays the currently selected signal or which device you are viewing or recording from When TV channel is selected it shows the channel number and or channel name For example if the tuner info box shows EXT 1 you are viewing or recording the material that is playing on the equipment that is connected to the EXT 1 AUDIO andVIDEO IN jacks on the back of...

Страница 21: ... a timer is set it shows a timer indication and the start time or date of the first recording Timer event due today Timer event due on another day When an OTR is in progress the end time appears End time of the OTR When no timer recording is scheduled the current time appears Current time Note TheTuner info box andTimer info box will disappear automatically am 10 15pm ...

Страница 22: ...row the disc pointer indicates your current position on the disc From this point you may resume playback or recording If you move through the list of titles with w v down up cursor or the disc pointer will move Press to put the disc pointer at the beginning of the disc To move the disc pointer to the end of the last title press and hold If you move from an Index Picture to the box beside it contai...

Страница 23: ...scan if you used the PROG SCAN OUT jacks on the DVD Recorder for video connection Otherwise select Interlaced Sound settings Digital output Factory setting All means that both coaxial and optical outputs are switched on and that Dolby Digital Multi channel or DTS is fed to the outputs as such MPEG audio is converted to PCM If your equipment doesn t include a digital Multi channel decoder set the d...

Страница 24: ...tion of DVD Video discs rated according to country information Change Code To change the 4 digit code Adapt disc format This option is only available when a DVD RW R disc recorded on a different brand of recorder is loaded You can adapt the menu to your own recorder A DVD RW R disc recorded on a different type of Recorder can play but may not provide all features commonly available such as the on ...

Страница 25: ...it was recorded 1 In the Record settings menu select Record mode 2 Select the recording mode by pressing t or u left or right cursor 3 Confirm your selection by pressing the ENTER OK 4 Press SYSTEM MENU to return to the previous menu You can also select record mode on the Index Picture Screen and in monitor mode or by pressing the REC MODE button on the remote control Press SELECT The new record m...

Страница 26: ...end to use theVCR Plus system you need to manually assign channel numbers to Guide channel numbers 1 In the Installation menu select VCR Plus ch using the w v down up cursor Then press ENTER OK or the u right cursor 2 Select aVCR Plus Guide channel with w v down up cursor 3 Enter the correct channel number with t u left right cursor or 0 9 Refer to a channel mapping list in your newspaper or TV gu...

Страница 27: ... AM PM Year Month Date and Day light saving if required Select w v down up cursor Change values with t u left right cursor or the 0 9 digit buttons 5 When the information is all correct press ENTER OK 6 Press SYSTEM MENU repeatedly to remove all menus Cable Antenna The Cable Antenna option allows you to overrule the Auto Cable Defect feature in case misdetection took place 1 In the Installation me...

Страница 28: ... shown with the option to erase or eject the disc You can only record on this disc after erasing it with the REC A disc can hold up to 48 titles including empty titles When this maximum is reached the on screen message Too many titles appears if you want to make a new recording You have to erase a title first See Managing Disc Content Erasing a Title Notes You can not access the system menu while ...

Страница 29: ...hort recording on a new disc a few minutes will be needed to complete the formatting of the disc POST FORMAT Safe Recording When you start recording on a DVD RW disc by briefly pressing REC a recording on DVD RW will be made from the current position of the disc pointer To prevent this do the following Hold the REC for about two seconds until SAFE RECORD appears on the display The recorder automat...

Страница 30: ...and on the Index Picture Screen indicate what part of the disc will be overwritten by the programmed recording from the current disc position When all timer blocks are full timer programming and VCR Plus system cannot be accessed For clearing a timer block see Cleaning a Timer block When using timer recording We recommend that you set the timer recording at least 1 2 minutes ahead of the actual pu...

Страница 31: ...specific month and date with w v down up cursor or with the digit 0 9 buttons 5 If desired select recording at daily or weekly intervals in the field Date with SELECT Select Mo Fr for recording to be made from Mondays to Fridays inclu sive Select an individual day of the week for recording at weekly intervals on the same day of the week 6 Press u right cursor to move to Ch Channel 7 Enter the chan...

Страница 32: ...d programming not possible Date was incorrectly entered Daily programming can only be used for recordings from Mondays to Fridays Memory full All the timer blocks are in use Solution Delete one of the Timer recordings Clock not set check Clock channel The clock is not set Set it manually See Time Date Manually or adjust the Clock channel See Time Date Automatic Data error Solution Make sure all in...

Страница 33: ...d will appear alone on the screen 6 Confirm with ENTER OK Timer Cleared will appear at the bottom of the screen briefly Then the Timer List will reappear 7 Remove the menus by pressingTIMER repeatedly if necessary Note IfTimer Recordings overlap or conflict with each other they will be highlighted in red in theTimer List How to stop aTimer Recording in progress ATimer Recording that is already in p...

Страница 34: ...pped the last time by pressing shortly while appears in the top left corner of the TV screen When pressing at beginning of disc playback an X may show on the screen The currently playing title and chapter number will appear on the Recorder display The elapsed playing time appears also Notes DVD movies are released at different times in different regions of the world All players have region codes a...

Страница 35: ...reen make sure the W is selected If it is not press t u left right cursor to select W Moving to another chapter index When a title on a disc has more than one chapter or a track has more than one index you can move to another chapter index in one of the following ways Press during play to select the next chapter index Press during play to return to the beginning of the current chapter index Rapidl...

Страница 36: ...m menu bar 2 Press t u left right cursor to select frame by frame in the system menu bar 3 Use w down cursor to enter the frame by frame menu Playback will pause 4 Use t u left right cursor to move the picture back ward or forward one frame at a time 5 Press to resume regular playback 6 Press SYSTEM MENU to remove the system menu bar You can also advance the picture forward one frame at a time by ...

Страница 37: ...play repeatedly 3 To exit the sequence and return to normal playback press A B Scan Play the first 10 seconds of each chapter index on the disc 1 Press SCAN The first 10 seconds of each chapter will play beginning with the current chapter 2 To continue play at your chosen chapter index press SCAN again or press Time search Time Search allows you to start playing a disc at a specific time 1 Press S...

Страница 38: ...n a disc if the disc has more than one tracks 1 Press SHUFFLE during playback 2 To return to normal playback press SHUFFLE again Special DVD RW R features Recording date and time If a recording was made from a digital video camera using the i LINK DV input the original recording date and time are automatically stored as DVD subtitles Press SUBTITLE to display the recording date and time The record...

Страница 39: ... 2 Within five seconds press AUDIO or w v down up cursor repeatedly to see the different languages You can enter the required language number directly using the numerical buttons 0 9 Subtitles 1 Press the SUBTITLE to select Z Subtitle in the system menu bar 2 Within five seconds press SUBTITLE or w v down up cursor repeatedly to see the different sub titles or to switch the subtitles off You can e...

Страница 40: ...o return to the beginning of the current track Rapidly press repeatedly to step back to previous tracks To go directly to any track enter the track number using the numerical buttons 0 9 Repeat track disc To repeat the currently playing track press REPEAT Repeat track appears on the TV screen in the Audio Disc Mode box To repeat the entire disc press REPEAT a second time Repeat disc appears on the...

Страница 41: ...ng u right cursor 9 Select Ç using v up cursor if you want to lock the disc Select É to deactivate the Child Lock 10 Press ENTER OK or t left cursor to confirm Press SYSTEM MENU to remove the menu If you locked the disc unauthorized discs will not be played unless the 4 digit code is entered The disc will be locked and the Recorder will ask for your 4 digit code the next time you try to play the d...

Страница 42: ...o play the disc You must turn the Recorder power Off then On for the Lock to take effect Parental Level DVD Video only Movies on pre recorded DVD discs may contain scenes not suitable for children Therefore some discs may contain Parental Control rating information that applies to the complete disc or to certain scenes on the disc If the disc is rated scenes are rated from 1 to 8 alternative more ...

Страница 43: ...he features menu Press u right cursor 5 Enter the four digit code using the 0 9 buttons 6 Move to Change country using w down cursor 7 Press u right cursor 8 Select the country for which your disc is coded using w v down up cursor 9 Press ENTER OK or t left cursor to confirm Press SYSTEM MENU to exit the menu Changing the 4 digit code 1 Press SYSTEM MENU 2 Press t left cursor to select in the syst...

Страница 44: ...may simply erase a title by recording over it but if you want to erase the whole title instantly do the following Perform steps 1 2 and 3 as explained above 4 Press u right cursor to select Erase this title then press ENTER OK The message This will completely erase this title Press OK to confirm is shown 5 Press ENTER OK a second time Erasing title is shown until the action is completed After the ...

Страница 45: ...isc manipulation screen entries as well as the complete edit menu Future editing or recording is only possible after resetting the Protection feature to Unprotected again Erase disc Perform steps 1 2 3 and 4 as explained above 5 With Erase disc selected press ENTER OK The message This will erase all titles is displayed Press ENTER OK again to confirm and begin erasing or press t left cursor to can...

Страница 46: ...rkers are inserted automatically every five to six minutes This setting can be changed in the record settings menu See User preferences Record Settingss Auto chapters After the recording is finished you can manually add and remove chapter markers via the Edit menu Both automatically generated and manually inserted chapter markers can be removed After editing the modified version of a title is the ...

Страница 47: ...chapter Perform steps 1 and 2 to call up the Edit menu 3 Select Delete chapter marker 4 Press ENTER OK on the remote control to confirm Delete markers will appear You can delete all chapter markers manually and automatically generated fin the current title Perform steps 1 and 2 to call up the Edit menu 3 Select Delete all markers in this title 4 Press ENTER OK on the remote control to confirm This...

Страница 48: ...ording to an earlier recorded title do the following 1 On the Index Picture Screen select the title to which you want to add a video recording 2 Press 3 At the point where you want to append the new recording press 4 Press MONITOR then press CH to select the channel or source you want to record 5 Press REC The new video recording will be appended at the point you selected Video material beyond thi...

Страница 49: ...nnections If using a HiFi amplifier try another sound source Distorted sound from HiFi amplifier Check to make sure that no audio connections are made to the amplifier s phono input Check to make sure that analog input of the amplifier is not connected to the digital output of the DVD Recorder Distorted or black and white picture with DVD orVideo CD disc The disc format does not match the color sy...

Страница 50: ...a special procedure the recorder will solve this problem for some players Proceed as follows 1 Put the disc in the drawer do not close the tray 2 Press and hold the 2 key on the remote control for several seconds until the tray closes The disc is now modified 3 If the change has no effect you may perform the same procedure with the 3 key on the remote control Note Modifying the disc can solve the ...

Страница 51: ...will display twice as many titles as there are on the disc This is due to the DVD RWVideo Format Specifications and the DVD RVideo Format Specifications It is not a malfunction A DVD RW R disc may not play on certain DVDVideo players A DVD RW R disc recorded on a different type or brand of Recorder can play but may not provide all features commonly available to it such as the on screen disc bar th...

Страница 52: ...deo NTSC See TV system NTSC is the most common color system in the U S OSD On screen Display The menus by which you can control the DVD Recorder via theTV screen OTR One Touch Recording With this feature you can easily start a recording by pushing just one button and select the switch off time in intervals of 30 minutes PAL See TV system PBS Public Broadcast Service The channel that transmits data...

Страница 53: ...Recorder s remote control reprogram your remote control Below are the remote control codes for variousTV brands Follow these steps to reprogram the remote control 1 Look up the setup code for yourTV in the code list in the following pages 2 Pointing the remote control at the TV press and hold t and u left and right cursor simultaneously for at least three seconds 3 Release both buttons 4 Within 30...

Страница 54: ...1021 1056 Motorola 1013 1079 MTC 1003 1005 1009 1010 1046 Multitech 1019 1023 NAD 1017 1021 NEC 1003 1005 1009 1079 Nikko 1005 1012 1021 NTC 1012 Onwa 1023 Optimus 1016 1019 1025 Optonica 1013 1018 Orion 1022 1024 1028 Panasonic 1007 1025 1060 1077 1079 Penney 1003 1004 1005 1006 1007 1009 1010 1017 1021 1036 1046 1060 1063 1064 1066 1076 Philco 1000 1003 1005 1014 1028 1049 1057 1058 1059 1059 10...

Страница 55: ...z 20 kHz Signal Noise 1kHz 105 dB Dynamic Range 1kHz 100 dB Crosstalk 1kHz 110 dB Distortion Noise 1kHz 90 dB FRONT CONNECTIONS i LINK DV IEEE 1394 4 pin S video Input Hosiden 4 pin Video Input Cinch yellow Audio Left Right Input Cinch white red REAR CONNECTIONS ComponentVideo In Cinch green blue red ComponentVideo Out Cinch green blue red Progressive Scan Out Cinch green blue red S video In Hosid...

Страница 56: ... R OF GERMANY YAMAHA ELECTRONIQUE FRANCE S A RUE AMBROISE CROIZAT BP70 CROISSY BEAUBOURG 77312 MARNE LA VALLEE CEDEX02 FRANCE YAMAHA ELECTRONICS UK LTD YAMAHA HOUSE 200 RICKMANSWORTH ROAD WATFORD HERTS WD1 7JS ENGLAND YAMAHA SCANDINAVIA A B J A WETTERGRENS GATA 1 BOX 30053 400 43 VÄSTRA FRÖLUNDA SWEDEN YAMAHA MUSIC AUSTRALIA PTY LTD 17 33 MARKET ST SOUTH MELBOURNE 3205 VIC AUSTRALIA YAMAHA CORPORA...

Отзывы: