INSTALLING THE INCLUDED PARTS
– 10 –
7
9
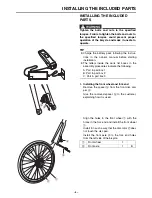
9. Installing the rear reflector
Install the rear reflector
1
as shown in the illus-
tration, then tighten it together with the stay
2
and screw
3
.
After tightening the screw, attach the cap nut
4
to the tip of the screw.
TIP
Adjust the rear reflector
1
so that it is facing
straight backward, then tighten it.
8
Insert the seat post far enough that the raise
limit
b
is not visible. If installed at a posi-
tion at which the raise limit
b
is visible, the
seat post, clamp, or even frame may break,
which could cause the rider to lose control
and fall.
8
Always tighten fasteners to the correct
torque. Bolts that are too tight can stretch
and deform. Bolts that are too loose can
move and fatigue. Either mistake can lead
to a sudden failure of the bolt, causing the
rider to lose control and fall.
Do not insert the seat post completely when
lowering the saddle. The bottom edge of the
seat post could touch parts inside the seat
pipe, breaking the seat post or the parts inside
the seat pipe. If the seat post is inserted fully,
lift it slightly then fasten it.
WARNING
NOTICE
1
4
3
2
1
1
Rear reflector
1
B
2
Stay
1
B
3
Screw
1
B
4
Cap nut
1
B
Содержание CROSS CORE 2018
Страница 1: ...2018 ASSEMBLY MANUAL CROSS CORE PW70CRL PW70CRM PW70CRS LIT 15666 00 03 X1M 28107 12 ...
Страница 5: ...INCLUDED PARTS 3 7 9 1 2 0 q w 6 7 8 9 3 4 5 r t e ...
Страница 17: ......
Страница 18: ......


