background image

84

YDP-184 Owner’s Manual

Song Menu

Quantize Supplementary

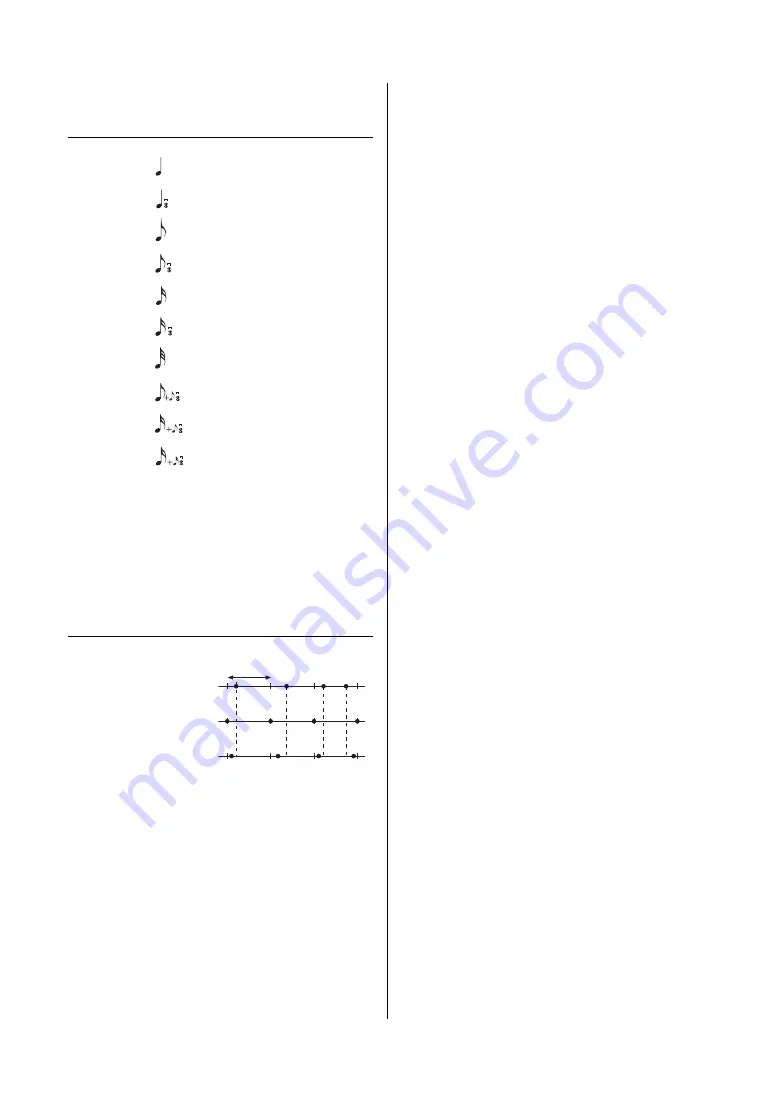
Quantize setting range

The three Quantize settings marked with asterisks (*) are exceptionally 
convenient, since they allow you to quantize two different note values 
at the same time. For example, when the straight eighth notes and 
eighth notes triplet are contained in the same part, if you quantize by 
straight eighth notes, all notes in the part are quantized to straight 
eighth notes—completely eliminating any triplet feel. However, if you 
use the eighth note + eighth note triplet setting, both the straight and 
triplet notes will be quantized correctly.

Strength setting range

1/4................

1/

8

................

1/16..............

1/6................

1/12..............

1/24..............

1/

8

+1/12.......

1/16+1/24.....

1/32..............

1/16+1/12.....

quarter note

quarter note triplet

eighth note

eighth note triplet

sixteenth note

sixteenth note triplet

thirty-second note

eighth note + eighth note triplet*

sixteenth note + eighth note triplet*

sixteenth note + sixteenth triplet*

Original data 

Quantizing strength = 100 

Quantizing strength = 50

Quarter-note length

Содержание Arius YDP-184

Страница 1: ...mbling the instrument refer to the instructions at the end of this manual Avant d utiliser l instrument lisez attentivement la section PRÉCAUTIONS D USAGE aux pages 5 et 6 Pour plus d informations sur l assemblage de l instrument reportez vous aux instructions figurant à la fin de ce manuel English Français FR EN YDP 184 ...

Страница 2: ...he unit is operating as designed are not covered by the manu facturer s warranty and are therefore the owners responsibility Please study this manual carefully and consult your dealer before requesting service ENVIRONMENTAL ISSUES Yamaha strives to produce products that are both user safe and environmentally friendly We sincerely believe that our products and the production methods used to produce...

Страница 3: ...ces Compliance with these requirements provides a reasonable level of assurance that your use of this product in a residential environment will not result in harmful interference with other electronic devices This equipment generates uses radio frequencies and if not installed and used according to the instructions found in the users manual may cause interference harmful to the operation of other ...

Страница 4: ...0 Protect the power cord from being walked on or pinched particularly at plugs convenience receptacles and the point where they exit from the apparatus 11 Only use attachments accessories specified by the manufacturer 12 Use only with the cart stand tripod bracket or table specified by the manufacturer or sold with the apparatus When a cart is used use caution when moving the cart apparatus combin...

Страница 5: ...7 only Using the wrong adaptor can result in damage to the instrument or overheating Use only the supplied power cord plug Check the electric plug periodically and remove any dirt or dust which may have accumulated on it This instrument contains no user serviceable parts Do not open the instrument or attempt to disassemble or modify the internal components in any way If it should appear to be malf...

Страница 6: ...e instrument to set the desired listening level Do not insert a finger or hand in any gaps on the key cover or instrument Also take care that the key cover does not pinch your finger Never insert or drop paper metallic or other objects into the gaps on the key cover panel or keyboard This could cause physical injury to you or others damage to the instrument or other property or operational failure...

Страница 7: ...age 68 To protect against data loss through USB flash drive damage we recommend that you save your important data onto spare USB flash drive or an external device such as a computer as backup data Information About copyrights Copying of the commercially available musical data including but not limited to MIDI data is strictly prohibited except for your personal use This product incorporates and bu...

Страница 8: ...ctional materials Included Documents Owner s Manual this book This document explains how to use the instrument Introduction This section explains how to set up and start using your instrument Setup is so simple you can start playing right away Main Operations This section explains various functions useful for your practice such as Preset Song playback and Song recording Detailed Settings This sect...

Страница 9: ...DI Reference Contains the MIDI related information To obtain these manuals access the Yamaha Downloads Yamaha Downloads http download yamaha com The model number serial number power requirements etc may be found on or near the name plate which is at the bottom of the unit You should note this serial number in the space provided below and retain this manual as a permanent record of your purchase to...

Страница 10: ...ly variegated and rich sounds that are faithful to actual acoustic pianos Also built into this instrument are 50 classical music for mastering the piano You can simply enjoy listening to these built in Songs or use them for separate right hand left hand practicing With simple arrangements original compositions and everything in between all levels of ability are covered We have also assigned one of...

Страница 11: ...and Part Part Cancel Function 41 Playing Back a Song Repeatedly 42 Adjusting the Volume Balance 45 Useful Playback Functions 47 Playing the Keyboard along with Rhythm Playback 48 Recording Your Performance 49 Recording Methods 49 Quick MIDI Recording 50 MIDI Recording Independent Tracks 52 MIDI Recording to the USB Flash Drive 54 Other Recording Techniques 56 Handling Song Files 60 Song Types and ...

Страница 12: ...ing the Strings Voice 8 VOICE button page 23 Calls up the Voice list display 9 DUAL SPLIT button pages 29 30 For playing two Voices simultaneously or different Voices on the left and right hand sections of the keyboard PIANO ROOM button page 24 Calls up the Piano Room display where you can select an optimum piano sound and adjust the touch response SONG DEMO button page 36 Calls up Song List for s...

Страница 13: ... A2 B2 C3 D3 E3 F3 G3 A3 B3 C4 D4 E4 F4 G4 A4 B4 C5 D5 E5 F5 G5 A5 B5 C6 D6 E6 F6 G6 A6 B6 C7 1 1 2 2 Music rest page 16 Key cover page 14 Pedals page 19 USB TO DEVICE terminal page 68 PHONES jacks page 18 Terminal panel page 66 DC IN jack page 14 Terminal panel page 66 ...

Страница 14: ...cedure in reverse order AC adaptor AC outlet DC IN jack page 13 Power cord DC plug AC plug 1 1 1 2 1 3 CAUTION Do not place objects such as pieces of paper or metal on top of the key cover Small objects placed on the key cover may fall inside the unit when the cover is opened and may be nearly impossible to remove This could cause electric shock short circuit fire or other serious damage to the in...

Страница 15: ...cond to turn the power off The display and the power indicator are turned off 7 Close the key cover Slide the cover toward you and gently lower the cover over the keys NOTICE Press only the P Standby On switch when turning the power on Any other operations such as pressing the keys buttons or pedals may cause the instrument to malfunction P Standby On switch The power indicator lights up CAUTION E...

Страница 16: ... the music rest toward yourself as far as it will go 2 Raise the two metal supports at the rear of the music rest 3 Gently lower the music rest backward until it is all the way down NOTICE Any data which are not saved will be lost if the power automatically turns off Make sure to save your data before this happens Depending on the instrument status the power may not turn off automatically even aft...

Страница 17: ...IAC is effective only from the sound output of the instrument speakers You can set the IAC setting On or Off via the System menu display Press the FUNCTION button repeatedly to call up the System menu display Sound IAC The default setting for this function is On Setting the Volume MASTER VOLUME Decreases the level Increases the level Master Volume The volume level of the entire keyboard sound Adju...

Страница 18: ... Headphones CAUTION Do not use headphones at a high volume for an extended period of time Doing so may cause hearing loss Standard stereo phone plug Underside of keyboard NOTE Voices in the Piano group are those contained in the Piano category in the Preset Voice List page 94 For details about selecting Voices refer to page 22 When headphones are connected the Voices in the Piano group automatical...

Страница 19: ...pedal here the notes you play before you release the pedal have a longer sustain NOTE Voices in the Piano group are those contained in the Piano category in the Preset Voice List page 94 For details about selecting Voices refer to page 22 NOTE You can assign other functions to each pedal by using Pedal Assign in Voice menu display page 80 Half pedal function This instrument also has a Half pedal f...

Страница 20: ...as previously shown While the pop up window is shown pressing the EXIT button returns to the previously shown display Select from the list or change the display Selecting Voices Press the VOICE button to call up the Voice List display Press the u or d button to select a Voice group Selecting Song Demo Pressthe SONG DEMO button to call up the Song category list Detailed Settings Select from the lis...

Страница 21: ...to select the first Voice in the Voice group Voice display r to select a Song l to return r to select a Song u to return Press the u or d button to select a Song Press the R K Play Pause button to playback the Song Use the l or r button to select the previous or next bars Song display r to detailed settings EXIT to return to the previous display r to detailed settings l to return Adjusting the val...

Страница 22: ...Grand Yamaha s CFX concert grand piano sound with a wide dynamic range for maximum expressive control Suitable for playing in any music genre and style Strings Stereo sampled large scale strings ensemble with realistic reverb Try combining this Voice with piano in the Dual mode page 94 2 Play the Keyboard Selecting Voices from the panel directly 1 Voice display Voice name Voice name Voice display ...

Страница 23: ... group name you want to use 3 Press the r button The Voices in the selected group are listed in the display Selecting Voices NOTE To hear and experience the characteristics of the Voices listen to the Demo Songs for each Voice page 37 NOTE Touch Response page 87 will not be applied to some Voices For information about the Voices to which Touch Response can be applied refer to the Preset Voice List...

Страница 24: ...ct items page 25 3 Press the l r buttons to change the settings page 25 4 Press the EXIT button to exit from the Piano Room display Voice display NOTE You can specify the Touch Response how the sound responds to the way you play the keys You should adjust this setting according to the specific Voice you re playing or the particular Song you re performing as desired You can make the settings via th...

Страница 25: ...e 94 Listening to the VRM Demo You can hear the difference of VRM On Off by pressing the R K Play Pause button while VRM On Off display is being displayed If you press the R K Play Pause button while VRM is On the Demo Song of VRM On will play back If you press the R K Play Pause button while VRM Off the Demo Song of VRM Off will play back On On Off Damper Res Determines the depth of the string re...

Страница 26: ...strument reproduces the complicated interaction of both string and soundboard resonance faithfully using a virtual musical instrument physical modeling and makes the sound more like a real acoustic piano Since instantaneous resonance is made at the moment according to the state of the keyboard or pedal you can vary the sound expressively by changing the timing of your pressing the keys and the tim...

Страница 27: ...llow 1 3 Soft and mellow tone The sound becomes more mellow and rounder as the number increases Normal Standard tone Bright 1 3 Bright tone The sound becomes brighter as the number increases Enhancing and Customizing the Sound 1 1 System menu display 1 1 Use the u d buttons to select Sound 1 2 Press the button to call up the next display 1 3 Use the u d buttons to select Brilliance 1 4 Press the b...

Страница 28: ...u can select any of the available Chorus types To select a desired Chorus type use the Voice menu display Chorus page 78 This setting is applied commonly to all parts keyboard Voices Song MIDI Effects This instrument features a wide variety of Effects letting you apply enhancements such as Echo or Tremolo to the selected Voice for your keyboard performance You can select any of the available Effec...

Страница 29: ...ices for layering 2 1 Use the u d buttons to highlight Voice 1 in the display 2 2 Use the l r buttons or the VOICE button to select the desired Voice If you use the VOICE button to call up the Voice List display press the r button to select a Voice and then return to the previous display Use the u d buttons to highlight Voice 2 select a Voice in the same way 3 Play the keyboard 4 To exit from the ...

Страница 30: ... and then return to the previous display Use the u d buttons to highlight Voice L and select a Voice in the same way 3 Play the keyboard Changing the Split Point You can change the Split Point the border between the right and left hand ranges from the default setting F 2 to any other key While in the Split mode hold down the DUAL SPLIT button and press the key you wish to assign as the Split Point...

Страница 31: ...Use the buttons or the VOICE button to select the desired Voice If you use the VOICE button to call up the Voice List display press the r button to select a Voice and then return to the previous display Use the u d buttons to highlight Voice R2 and Voice L and select Voices in the same way 3 Play the keyboard 4 Press the DUAL SPLIT button to exit from the Dual and Split mode The lamp of the DUAL S...

Страница 32: ...pedal function changes as follows Playing Duo 1 2 1 4 System menu display 1 1 Use the u d buttons to select Keyboard 1 2 Press the button to call up the next display 1 3 Use the u d buttons to select Duo 1 4 Press the button to select On Keyboard display NOTE While Duo is on the Reverb VRM and Stereophonic Optimizer functions are disabled page 18 NOTE The specified Split Point key is included in t...

Страница 33: ...e by following either of the instructions below Press any of the CFX GRAND STRINGS PIANO ROOM buttons Repeat the same procedure from step 1 to set it to Off The instrument has a built in metronome a device that keeps an accurate tempo a convenient tool for practice 1 Press the METRONOME button to start the metronome This calls up the Tempo display from which you can adjust the tempo For details se...

Страница 34: ...s To reset the tempo to the default setting press the and buttons simultaneously 3 Press the EXIT button to close the Tempo display Setting the metronome time signature 1 Press the FUNCTION button repeatedly to call up the Metronome Rhythm menu display 2 Use the u d buttons to select Time Sig and then press the r button 2 3 1 Metronome NOTE For information on setting the time signature refer to pa...

Страница 35: ...ing range Note type will be fixed to quarter note as long as the BPM parameter in the Metronome Rhythm menu display is set to Crotchet regardless of the Time Signature you set 4 Turn the Bell setting on For details refer to Bell in the Metronome Rhythm menu page 85 The Metronome plays back according to the selected Time Signature with the Bell sound on the first beat of each measure 5 Press the EX...

Страница 36: ...e MIDI Song data SMF Standard MIDI File The maximum size for playback on this instrument is approx 500KB per single MIDI Song MIDI Songs A MIDI Song is comprised of your keyboard performance information and is not a recording of the actual sound itself The performance information refers to which keys are played at what timing and at what strength just as in a musical score Based on the recorded pe...

Страница 37: ...tton to call up the next display 3 Use the u d buttons to select the desired Voice Demo and then press the r button to call up the Demo display The currently selected Voice Demo name is shown in the display 4 Press the R K Play Pause button to start playback 5 Press the R K Play Pause button again to stop playback The Piano Demo stops automatically when Piano Demo playback reaches the end Selectin...

Страница 38: ...ons refer to USB Autoload on page 90 2 5 6 2 3 4 NOTE Before using a USB flash drive be sure to read Connecting USB Devices USB TO DEVICE terminal on page 68 Demo Voice Demos let you experience the characteristics of the Voices MIDI Song page 37 50 Classics 50 classical Preset Songs MIDI Songs For these Songs see the music book 50 Classical Music Masterpieces included with this instrument For deta...

Страница 39: ...ition of the Song playback will be shown You can play the keyboard along with Song playback You can also change the Voice for your keyboard performance To adjust the volume balance between your keyboard performance and MIDI Song playback set the appropriate Volume parameters individually in the Song menu display page 45 NOTE Press the button to return to the category folder Icon Song List icon Dat...

Страница 40: ...po of a Song 1 Press the TEMPO button to call up the Tempo display Press the TEMPO button during Song playback or while the Song display is shown 2 Change the Tempo value using the buttons The original tempo of the current Song can be recalled by pressing the and buttons simultaneously The tempo range differs depending on the Time Signature for a selected Song Available setting values may only inc...

Страница 41: ...select Off for the selected part 4 Press the R K Play Pause button to start playback Play and practice the part you just muted 5 Press the R K Play Pause button again to stop playback Even if you don t press the R K Play Pause button the Song stops automatically when Song playback reaches the end Playing a One hand Part Part Cancel Function 4 5 2 2 3 NOTE The parts can be turned on or off even dur...

Страница 42: ...s saved in a designated folder repeatedly in order or in random order The explanations here apply only to AB Repeat and Song Repeat For Phrase Repeat refer to page 82 1 Select a Song to be played back For instructions refer to page 38 2 Call up the Repeat display Press the FUNCTION button repeatedly to call up the Song menu display Select Repeat then press the button 3 In the Repeat display select...

Страница 43: ... is highlighted or select another Song A B display Specifying the top of a Song as Point A Specify Point A before starting playback then start playback and specify Point B Specifying the end of a Song as Point B Specifying only Point A results in repeat playback between Point A and the Song end as Point B NOTE You can also specify the repeat range by the following procedure 1 Highlight the measure...

Страница 44: ...nge in order Random Continuously plays back all Songs within a designated range in random order 4 2 Press the R K Play Pause button to start Repeat playback Icons corresponding to each Repeat setting are shown on the Song display While the Repeat setting is on Single All or Random is shown in the upper right corner of the Song display 5 To turn off the Repeat function press the R K Play Pause butt...

Страница 45: ...ect Volume and then press the button 2 Select Song Keyboard or Song L R using the u d buttons then press the button to call up the setting display Song Keyboard Adjust the Volume balance between the MIDI Song playback and the sound you are playing on the keyboard Song L R Adjust the Volume balance between the Right and Left parts of the selected MIDI Song Adjusting the Volume Balance 4 1 1 2 3 Son...

Страница 46: ...ard selecting another Song will not reset the value The Song playback volume will be lower The volume of your playing will be lower R part volume will be lower L part volume will be lower NOTE The selected parameters of Song Keyboard will be maintained Backup Setting even when the power is turned off Make sure not to set the volume levels to minimum Otherwise the sound of keyboard or songs will no...

Страница 47: ...the System menu display and then select Pedal Play Pause to make the assignment This is convenient for starting or pausing playback when you are performing and can t take your hands from the keyboard Transposing the pitch of a Song You can shift the pitch of Song playback up or down in semitone intervals You can change the settings via the Song menu display Press the FUNCTION button repeatedly to ...

Страница 48: ...ed 5 Press the EXIT button to exit from the Rhythm display 5 2 1 4 About the Rhythm Tempo The Rhythm tempo is equivalent to that set for the Metronome page 33 Although you set the Rhythm tempo selecting a MIDI Song will change the tempo value to that specified in the selected MIDI Song data Detailed Settings for the Rhythm From the Metronome Rhythm menu display page 85 you can set detailed paramet...

Страница 49: ...ecording most quickly Your performance will be recorded and saved to the User category in this instrument s internal memory MIDI Recording Independent Tracks page 52 This lets you record the right left and extra parts separately Since you can record the left part while playing back the right this is useful for recording both parts of a duet Since you can record up to sixteen parts separately recor...

Страница 50: ... both the left and right parts are being recorded together Using the Metronome Rhythm You can use the Metronome Rhythm while recording While the Metronome sound cannot be recorded the Rhythm sound can Make sure to start enter the Recording mode before starting Rhythm playback since entering the Recording mode during playback of the Rhythm stops its playback NOTE The Song Keyboard Volume Balance pa...

Страница 51: ...ht Cancel then press the button 6 To hear the recorded performance press the R K Play Pause button NOTICE The recorded MIDI Song will be lost if you change to another Song or you turn the power off without executing the Save operation Renaming the recorded Song The recorded Songs are named automatically but you can rename Songs as you like page 65 Data that can be recorded to MIDI Songs Data for e...

Страница 52: ...splay for saving the recorded performance data MIDI Recording Independent Tracks NOTE If you want to record your performance to the USB flash drive or you want to add the recording to the MIDI Song in the USB flash drive refer to MIDI Recording to the USB flash drive page 54 NOTE Rhythm cannot be added to a recorded Song When you want to record Rhythm make sure to record the Rhythm playback first ...

Страница 53: ...Press and hold the REC Record button for a second The Recording Target Songs will be listed on the display 7 2 Use the d button to select existing MIDI Song at the bottom of the list then press the button You can check whether or not each Track contains recorded data by the mark appears in upper right of each Track Track Data Status 8 Record your performance to another track by repeating steps 2 6...

Страница 54: ...the Recording mode Can be selected only when the USB flash drive is connected to the USB TO DEVICE terminal Will not be shown when an already recorded MIDI Song is not selected in step 2 1 above or when a Preset Song or Protected Song is selected in step 2 1 MIDI Recording to the USB Flash Drive NOTE To connect a USB flash drive be sure to read the section Connecting USB Devices USB TO DEVICE term...

Страница 55: ...fied track on a blank MIDI Song Execute steps 2 8 in MIDI Recording Independent Tracks on page 52 When you want to quick record to a blank MIDI Song Execute steps 3 6 in Quick MIDI Recording on page 50 NOTICE Note that recording your performance to a Track containing data will overwrite the previously recorded data NOTE The time signature and tempo cannot be changed when replacing the part of an e...

Страница 56: ...he button Normal The already recorded data will be replaced with the new one as soon as recording starts KeyOn The already recorded data will be maintained until you press a key and actual recording starts as soon as you press a key 1 3 Use the u d buttons to select RecEnd then select the value which determines how recording stops by using the button Replace The data after the point you stop recor...

Страница 57: ...esired settings if you wish to change the previous ones 5 Press and hold the REC Record button for a second to call up the display which lists the Recording Target Songs then select the Song selected in step 3 then press the button to enter the recording mode 6 Use the buttons to select a Track for re recording 7 Play the keyboard or press the R K Play Pause button to start recording 8 Press the R...

Страница 58: ...tedly to call up the Song menu display then select the highlighted item in each display as illustrated below 4 Apply the selected Tempo value to the current MIDI Song data Press the d button to highlight Execute then press the button to apply the new Tempo value to the current MIDI Song data When this operation is completed Completed is shown on the display and the Tempo Change display will be res...

Страница 59: ...u d buttons 5 Apply the Voice selected in step 2 for the Track selected in step 4 to the current MIDI Song data Press the button to return to the Voice Change display Press the d button to highlight Execute then press the button to apply the new Voice to the current MIDI Song data When this operation is completed Completed is shown on the display and the Voice Change display will be restored after...

Страница 60: ...al and edited Original and edited Songs should be saved in the same folder If not playback cannot be done Operation File menu Page Deleting files Delete pages 61 62 Copying files Copy pages 61 63 Moving files Move pages 61 64 Renaming files Rename pages 61 65 File A file contains a group of data On this instrument a Song file includes Song data and a Song name Restrictions for protected Songs Comm...

Страница 61: ...ed operation from Delete Copy Move or Rename From here if you wish to close the File mode press the EXIT button once or twice 4 Execute the selected operation For specific instructions refer to the corresponding section Delete page 62 Copy page 63 Move page 64 Rename page 65 During operation messages information confirmation etc may be shown on the display For explanations and details refer to Mes...

Страница 62: ...tailed procedure of step 4 on that page 4 1 While Delete is highlighted press the button to call up the setting display 4 2 Highlight Execute by pressing d button and then press the button After the Song is deleted the display returns to the Song List display Deleting Files Delete NOTICE Do not turn off the power or eject the USB flash drive while Executing is shown in the display ...

Страница 63: ...ES folder one will be created automatically when you format or record a Song to that device The recorded Song will then be saved in that folder NOTE Please note that the copy features are intended for your personal use only NOTE Folders cannot be copied Root The highest level of a hierarchical structure This indicates an area which does not belong to a folder Instrument USB flash drive User Can be...

Страница 64: ...ove destination USB will be shown when the move destination is the USB flash drive or User when the instrument is the move destination A file moved to the USB flash drive is stored to the USER FILES folder on it NOTE A message appears when a Song with same name already exists in the move destination Select Overwrite when you want to overwrite the selected Song or Cancel to cancel by using the u d ...

Страница 65: ...ition Pressing both buttons simultaneously will delete the character at the current cursor position A Song name can contain up to 46 characters Characters which extend beyond the display capacity and are not visible can be viewed by moving the highlight by using the buttons 4 3 Press the FUNCTION button After the Song is renamed the display returns to Song List display where the renamed Song can b...

Страница 66: ...electronic components turn off the power of all the components Also before turning any components on or off make sure to set all volume levels to minimum 0 Otherwise damage to the components electrical shock or even permanent hearing loss may occur 1 2 3 4 6 5 Terminals under the keyboard Bottom rear view Right higher key side Left lower key side NOTE There are two different types of USB terminals...

Страница 67: ...al device NOTICE To avoid possible damage first turn on the power to the instrument then to the external device When turning off the power first turn off the power to the external device then to the instrument Since this instrument s power may automatically be turned off due to the Auto Power Off function page 16 turn off the power to the external device or disable Auto Power Off when you do not i...

Страница 68: ...and file management operations such as Save Copy Delete and Format or when accessing the USB device Failure to observe this may result in freezing of the operation of the instrument or corruption of the USB device and the data When connecting then disconnecting the USB device and vice versa make sure to wait a few seconds between the two operations NOTE If you intend to connect two or three device...

Страница 69: ...puter USB TO HOST Terminal NOTICE Use an AB type USB cable of less than 3 meters USB 3 0 cables cannot be used NOTE The instrument will begin transmission a short time after the USB connection is made When using a USB cable to connect the instrument to your computer make the connection directly without passing through a USB hub For information on setting up your sequence software refer to the owne...

Страница 70: ...nection according to the instructions in the iPhone iPad Connection Manual on the website then make sure to make appropriate setups from the following instructions Display the Networks and connecting to the access point Automatic Setup by WPS Manual Setup or Connecting by the Accesspoint Mode Refer to pages 73 76 in this Owner s Manual then set up as required Connecting to an iPhone iPad USB TO DE...

Страница 71: ...DNS Server1 DNS Server2 can be set when DHCP is set to Off while cannot be set when DHCP set to On Use the buttons to select each octet in the entry display then enter the value using the u d buttons To finalize the setting press the FUNCTION button On On Off IP Address 0 0 0 0 0 0 0 0 255 255 255 255 Subnet Mask 0 0 0 0 0 0 0 0 255 255 255 255 Gateway 0 0 0 0 0 0 0 0 255 255 255 255 DNS Server1 0...

Страница 72: ...K TKIP WPA PSK AES WPA2 PSK AES WPA WPA2 mixed PSK Password Set the Password as an access point 00000000 Up to 64 characters half size alphanumeric characters marks Channel Set the channel as an access point 11 Differs depending on the USB wireless LAN adaptor models Models for United States and Canada 1 11 Others 1 13 When no USB wireless LAN adaptor is connected setting range is channels 1 13 DH...

Страница 73: ...etwork without a lock icon Connecting starts For a network with a lock icon You need to enter the proper password For details on how to enter characters refer to the Renaming files on page 65 After entering the password press the FUNCTION button to finalize the setting This operation starts connecting automatically When connection is done successfully Completed is shown in the display and returns ...

Страница 74: ...ess LAN adaptor sold separately to the USB TO DEVICE terminal otherwise the displays for setup will not be shown 1 To call up the network list perform steps 1 2 in the Displaying the Wireless LAN Networks and connecting to a Network page 73 2 Select Other at the bottom of the network list then press the button 3 Set the SSID Security and Password to the same as the settings on the access point 3 1...

Страница 75: ...s for setup will not be shown 1 Switch the instrument to the Accesspoint Mode Press the FUNCTION button repeatedly to call up the System menu display then select the highlighted item in each display as illustrated below When mode change is done successfully Completed is shown in the display operation returns to the Wireless LAN Mode display NOTE The password cannot be set when you select none for ...

Страница 76: ... in Manual Setup For the setting range for each item refer to the table on page 72 3 Save the setting Select Save at the bottom of the Wireless LAN display then press the button to start saving When saving is done successfully Completed is shown in the display and operation returns to the Utility display 4 Connect the iPhone iPad to the instrument as an access point Refer to the iPhone iPad Connec...

Страница 77: ...der according to the vertical menu at the left of the display Voice menu page 78 Song menu page 82 Metronome Rhythm menu page 85 Recording menu page 86 System menu page 87 3 Use the u d buttons to select the desired parameter While referring as needed to the parameter list on each page listed in step 2 use the u d buttons to navigate through the display vertically and use the buttons to navigate t...

Страница 78: ...ition Setting display Determines how much the Lid is opened Full Full Half Close VRM Turns the VRM effect on off For the information about the function of VRM refer to page 26 For details about the Piano Voices compatible with VRM refer to the Preset Voice List on page 94 On On Off Damper Res Setting display Determines the depth of the string resonance effect which is applied when the damper pedal...

Страница 79: ...ck setting for a Song part is used priority order Ch 1 Ch 2 Ch 16 while the setting for a keyboard part is used when Song playback is stopped priority order R1 L and R2 Voices Differs depending on the Voice or Voice combination 0 127 Effect In addition Reverb and Chorus another Effect can be applied to the R1 R2 L Voices of the keyboard independently Note that this Effect type can be selected for ...

Страница 80: ...ul when you want to ensure for example that the pedal function affects the right hand performance but does not affect the left hand performance Differs depending on the Voice or Voice combination On Off Pedal Assign Right Setting display Assigns one of various functions other than the original one to the Right pedal SustainCont Refer to the Pedal Function List page 81 Center Setting display Assign...

Страница 81: ...ays cross each other in alternation Symphonic Adds a rich and deep acoustic effect Rotary Adds the vibrato effect of a rotary speaker Tremolo The volume level changes in rapid cycles VibeRotor The vibrato effect of a vibraphone AutoPan The sound pans left to right and back and forth Phaser The phase changes periodically swelling the sound AutoWah The center frequency of the wah filter changes peri...

Страница 82: ...On repeat playback Off no repeat Song Setting display By setting this parameter you can play back only a specific Song or specific Songs in order repeatedly or randomly For details refer to page 42 Off Off Single All Random Volume Song Keyboard Pop up window Adjusts the volume balance between the Song playback sound and keyboard performance 0 Key 64 0 Song 64 Song L R Pop up window Adjusts the vol...

Страница 83: ... Track Changes the Voice of a specific track in the current MIDI Song to the current Voice as data 1 Select a track of which the Voice will be changed 2 Move the highlight to Execute then press the button to actually change the Voice as MIDI Song data Track 1 Track 1 Track 16 Execute Others Quick Play This parameter enables you to specify whether a Song that starts from the middle of a bar or a So...

Страница 84: ...art are quantized to straight eighth notes completely eliminating any triplet feel However if you use the eighth note eighth note triplet setting both the straight and triplet notes will be quantized correctly Strength setting range 1 4 1 8 1 16 1 6 1 12 1 24 1 8 1 12 1 16 1 24 1 32 1 16 1 12 quarter note quarter note triplet eighth note eighth note triplet sixteenth note sixteenth note triplet th...

Страница 85: ...lance between the keyboard performance and Metronome Rhythm playback 82 0 127 BPM Determines whether the note type of the tempo indication is affected by the Metronome Time Signature page 34 or not crotchet When Time Sig is selected the denominator of the Time Signature is shown as the note type of the tempo indication The dotted quarter note is shown as the note type of the tempo indication only ...

Страница 86: ...the actual MIDI Recording starts after you execute the Recording Start operation When set to Normal actual recording will starts as soon as you execute the Recording Start operation When set to KeyOn actual recording starts as soon as you press any key after you execute the Recording Start operation Normal Normal KeyOn RecEnd This parameter which is used when you overwrite the already recorded MID...

Страница 87: ...es This setting is necessary when Scale Tune is set to something other than Equal Temperament NOTE When Scale Tune is set to Equal Temperament is shown on the display and this parameter cannot be edited C C C D E E F F G A A B B Keyboard Touch Setting display Determines how the sound responds to your playing strength This setting does not change the weight of the keyboard Soft2 Produces relatively...

Страница 88: ... On Off IAC depth Pop up window Determines the depth of the IAC The higher the value the more clearly the low high sounds at lower volume levels 0 3 3 SP Optimizer Turns the Stereophonic Optimizer function when headphones are connected on or off When the function is on and headphones are connected the sound enhanced with the Stereophonic Optimizer allowing you to enjoy more realistic sound page 18...

Страница 89: ...re you start recording your performance to a connected MIDI device or computer execute this operation to record the current panel settings at the beginning of your performance data It causes that the same panel settings are called up when the recorded performance is played back Operation Move the highlight to Execute then press the button to transmit the panel settings as MIDI messages Execute Bac...

Страница 90: ...ntrast Pop up window Adjusts the contrast of the display 0 5 5 Auto Power Off Setting display Lets you set the amount of time that elapses before the power is turned off by Auto Power Off function page 16 To disable Auto Power Off select Off Disabling Auto Power Off 30 minutes Off 5 10 15 30 60 120 minutes Version Displays the model name and the firmware version of this instrument Wireless LAN Wir...

Страница 91: ... collapsed into a single octave The 3rd in this tuning is slightly unstable but the 4th and 5th are beautiful and suitable for some leads MeanTone This scale was created as an improvement on the Pythagorean scale by making the major third interval more in tune It was especially popular from the 16th century to the 18th century Handel among others used this scale Werckmeister Kirnberger These scale...

Страница 92: ...ta on internal memory to the connected USB flash drive as a backup file named ydp 184 bup This backup file can be loaded to the instrument via the Restore function page 93 for future NOTICE It may take 1 2 minutes to complete this operation Never turn off the power during this operation while Executing is shown Doing so could result in damage to the data If the same backup file ydp 184 bup is alre...

Страница 93: ...factory default settings which refers to the initial setting preprogrammed when shipped from the factory and is called up when you first turn on the power to this instrument Note that the following points This operation resets the Backup Setting page 92 to the default setting This operation will not delete the Songs saved in the User folder NOTICE Never turn off the power during this operation whi...

Страница 94: ...Principal 2 This Voice features the combination of pipes 8 4 2 of a principal brass instrument organ It is suitable for Baroque church music Jazz Organ The sound of a tonewheel type electric organ Sampled with Rotary SP effect its rotation speed is slow Often heard in jazz and rock idioms Mellow Organ A mellow electric organ sound Ideal for calmer songs Strings Strings Stereo sampled large scale s...

Страница 95: ...itions All other Demo Songs are Yamaha original Yamaha Corporation Voice group Voice name Title Composer 1 Piano CFX Grand Impromptu No 1 op 29 F F Chopin 2 Organ Organ Principal Herr Christ der ein ge Gottes Sohn BWV 601 J S Bach 3 Others Harpsichord 8 Concerto a cembalo obbligato 2 violini viola e continuo No 7 BWV 1058 J S Bach ...

Страница 96: ...v W A Mozart 24 Turkish March W A Mozart 25 Piano Sonate op 13 Pathétique 2nd mov L v Beethoven 26 Für Elise L v Beethoven 27 Piano Sonate op 27 2 Mondschein 1st mov L v Beethoven 28 Impromptu op 90 2 F P Schubert 29 Frühlingslied op 62 6 J L F Mendelssohn 30 Fantaisie Impromptu F F Chopin 31 Etude op 10 3 Chanson de l adieu F F Chopin 32 Etude op 10 12 Revolutionary F F Chopin 33 Valse op 64 1 Pe...

Страница 97: ...s Rock 1 8Beat 2 16Beat 3 Shuffle1 4 Shuffle2 5 Shuffle3 6 8BeatBallad 7 6 8SlowRock Jazz 8 Swing 9 SwingFast 10 Five Four 11 JazzWaltz Latin 12 Samba 13 BossaNova 14 Rumba 15 Salsa 16 Tango Kids Holiday 17 2 4Kids 18 6 8March 19 ChristmasSwing 20 Christmas3 4 ...

Страница 98: ...ment FactorySet Completed Restart Factory set is completed The instrument is then restarted Incompatible device This message appears when an incompatible USB flash drive is connected Use a device whose compatibility has been confirmed by Yamaha page 68 Internal hardware error A malfunction has occurred in the instrument Contact your nearest Yamaha dealer or authorized distributor Last power off in...

Страница 99: ...ou attempted to load a Song of unsupported format to this instrument Refer to the page 36 about supported Song formats Unformatted device This message appears when you attempt to use an unformatted USB flash drive Format it page 89 and try again Unsupported device This message appears when an unsupported USB flash drive is connected Use a device whose compatibility has been confirmed by Yamaha pag...

Страница 100: ... function other than Expression to the pedal page 80 via the Voice menu display Pedal Assign Right page 80 The speakers do not switch off when a pair of headphones is connected to the PHONES jack The Speaker setting is On Set the speaker setting to Normal via the System menu display Utility Speaker page 90 Pedals do not function The pedal cord may not be securely connected to the PEDAL jack Be sur...

Страница 101: ...ough the USB wireless LAN adaptor is connected Disconnect the USB wireless LAN adaptor and connect it again Sound input via the AUX IN jack is interrupted The Noise Gate function of this instrument cuts unwanted noise from the input sound However this may result in wanted sounds also being cut such as the soft decay sound of a piano This is normal and not a sign of malfunction Problem Possible Cau...

Страница 102: ...trument make a rattling noise when you shake it Tighten all screws Does the pedal box rattle or give way when you step on the pedals Turn the adjuster so that it is set firmly against the floor Are the pedal and power cords inserted securely into the sockets Check the connection When Moving the Instrument After Assembly CAUTION When moving the instrument after assembly always hold the bottom of th...

Страница 103: ... on the model of digital piano you purchased the surface color of one side of B may be different from the other side If so position B so that the side similar in color to D and E faces the player Foamed styrol pads Remove foamed styrol pads from the package position them on the floor then place A on top of them Position the pads so that they will not hide the connectors on the bottom of A Bundled ...

Страница 104: ...e sure to place your hands at least 15 cm away from either end of the main unit when positioning it CAUTION Be extra careful not to drop the main unit or let your fingers be pinched by it Do not hold the main unit in any position other than the position specified above 4 Secure A 4 1 Adjust the position of A so that the left and right ends of A will project beyond D and E equally as seen from the ...

Страница 105: ... attach the hanger as shown in the illustration Insert the pedal cord securely until the metal part of the cord plug disappears from view Otherwise the pedal may not function properly P E D A L Transporting If you move to another location you can transport the instrument along with other belongings You can move the unit as it is assembled or you can disassemble the unit down to the condition it wa...

Страница 106: ...end Down Rotary Speed Vibe Rotor Song Play Pause Display Type Full Dots LCD Size 128 x 64 dots Language English Panel Language English Cabinet Key Cover Style Sliding Music Rest Yes Voices Tone Generation Piano Sound Yamaha CFX Piano Effects VRM Yes Key off Samples Yes Smooth Release Yes Polyphony 256 Preset Number of Voices 24 Effects Types Reverb 6 types Chorus 3 types Brilliance 7 types Effect ...

Страница 107: ...size approx 1 5MB External Device USB flash drive Connectivity DC IN 16V Headphones Standard stereo phone jack x 2 MIDI IN OUT THRU AUX IN Stereo Mini AUX OUT L L R R USB TO DEVICE Yes USB TO HOST Yes Sound System Amplifiers 30W x 2 Speakers 16 cm x 2 Acoustic Optimizer Yes Power Supply AC Adaptor PA 300C or an equivalent recommended by Yamaha Power Consumption 20W When using PA 300C AC adaptor Au...

Страница 108: ...s 25 Delete 62 Demo 37 Detailed Settings 77 Display 20 Dual 29 Duo 32 E Edit Song 83 Edit Voice 79 Effect 28 Effect Depth 79 Effect Type List 81 Ending 48 F Factory Set 93 Fast forward 40 File Operation 60 Format instrument 93 Format USB flash drive 89 H Half Pedal Point 25 Half pedal 19 Headphones 18 I IAC 17 Initial Setup 89 Intro 48 iPhone iPad 70 iPhone iPad Connection Manual 9 K Key cover 14 ...

Страница 109: ...g 36 60 Song category 38 Song List 96 Song menu 82 Song Repeat 44 Sostenuto pedal 19 Sound 88 Speaker 90 Split 30 Split Point 30 Stereophonic Optimizer 18 String Resonance String Res 25 System menu 87 T Tempo 34 Tempo Song 40 Time signature 34 Touch 25 Track 52 Transpose Keyboard 78 Transpose Song 82 Troubleshooting 100 Tuning 87 U USB Autoload 90 USB flash drive 68 USB Format 89 USB Properties 90...

Страница 110: ...Yamaha Global Site https www yamaha com Yamaha Downloads http download yamaha com Manual Development Group 2017 Yamaha Corporation Published 05 2017 MWZC A0 Printed in Indonesia ZW03800 ...

Отзывы: