background image

73

Feature Reference — Pattern Play Mode

"

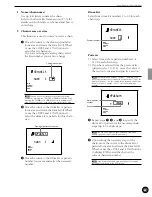
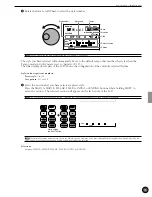
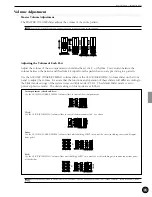
Rotate the Data Scroll Wheel to select the style number.

Section

MAIN A

DRUM KIT

PATTERN

MISC.

SNARE
KICK

CYMBAL

TEMPO

BEAT

MEASURE

CLICK

GM std 1

RP Hop

Style name

Style number

Tempo

Beat

Measure

Click

Data focus area

A

You can also switch the style number using the +1/YES and -1/NO buttons.

The style you have selected will automatically be set to the default tempo that matches the style when the
Tempo mode in Utility mode is set to “pattern” (P.123).
The data display (lower part of the LCD) shows the configuration of the currently selected rhythm.

Style (and user pattern)  numbers:

Preset style:

 1 to 110

User pattern:

 111 to 210

#

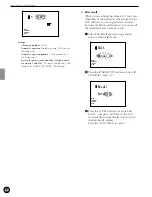
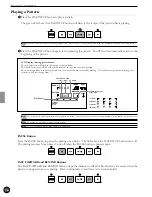
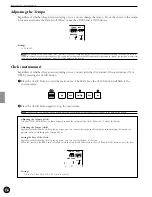
Select the section after you have selected a preset style.
Press the MAIN A, MAIN B, FILL AB, FILL BA, INTRO, or ENDING buttons while holding SHIFT to
select the section.  The selected section will appear on the far bottom of the LCD.

A

 The user pattern does not have a section.  Therefore, the section will not appear if you have selected user pattern.

DRUM KIT

PATTERN

MISC.

SNARE
KICK

CYMBAL

TEMPO

BEAT

MEASURE

CLICK

GM std 1

DA RaveQ

MAIN B

PAGE   

AGE   

ERASE

ERASE

SHIFT

SHIFT

+

1/YES

1/YES

1/NO

1/NO

TEMPO

TEMPO

MAIN  B

MAIN  B

FILL  BA

FILL  BA

ENDING

ENDING

MAIN  A

MAIN  A

FILL  AB

FILL  AB

INTRO

INTRO

PAGE   

AGE   

ERASE

ERASE

SHIFT

SHIFT

+

1/YES

1/YES

1/NO

1/NO

TEMPO

TEMPO

MAIN  B

MAIN  B

FILL  BA

FILL  BA

ENDING

ENDING

MAIN  A

MAIN  A

FILL  AB

FILL  AB

INTRO

INTRO

+

While holding 
the SHIFT button...

PAGE   

AGE   

PAGE   

AGE   

A

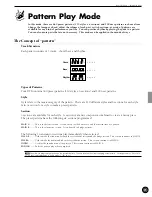
The Pattern Play mode automatically selects the MAIN A section.  However, if you have entered Pattern Play mode from Song Play mode, the

styles and sections used in the song you used in Song Play mode will be selected.

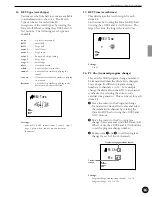
Selections

Sections: MAIN A, MAIN B, FILL AB, FILL BA, INTRO, or ENDING

Содержание 2.0

Страница 1: ...EMPO BEAT MEASURE INPUT QUANT CLICK DRUM DRUM KIT KIT BASS BASS TMP TR CHORD CHORD CHO TR RHYTHM RHYTHM PAT TR VOICE VOICE UTILITY UTILITY STORE STORE PATTERN TTERN SONG SONG CHAIN CHAIN CLICK PAGE AGE ERASE SHIFT SHIFT SOLO SOLO TR1 TR1 TR2 TR2 1 YES 1 YES 1 NO 1 NO TEMPO TEMPO CYMBAL MISC SNARE MAIN B FILL BA MAIN A FILL AB INTRO KICK PAGE AGE TRIGGER TRIGGER DRUM TRIGGER MODULE Version 2 0 YAMA...

Страница 2: ...nce that your use of this product in a residential environment will not result in harmful interference with other electronic devices This equipment generates uses radio frequencies and if not installed and used according to the instructions found in the user s manual may cause interference harmful to the operation of other electronic devices Compliance with FCC regulations does not guarantee that ...

Страница 3: ...external power supply adapter DO NOT connect this product to any power supply or adapter other than one described in the manual on the name plate or specifically recommended by Yamaha WARNING Do not place this product in a position where anyone could walk on trip over or roll anything over power or connecting cords of any kind The use of an extension cord is not recommended IF you must use an exte...

Страница 4: ......

Страница 5: ...al shocks can damage it Handle it with care Cleaning Clean the cabinet and panel with a soft dry cloth A slightly damp cloth may be used to remove stubborn grime and dirt Do not use solvents such alcohol benzine or thinner to clean the cabinet or panel Avoid placing vinyl objects on top of the instrument Vinyl can stick to and discolor the surface Electrical Interference The DTX contains digital c...

Страница 6: ... and play with a set up using the DTX A general explanation of the DTX is also available in the Overall Structure and Modes section P 18 Feature Reference This section describes each function in detail You can use it as a dictionary to look up functions or answers to your questions The Table of Contents P 4 or the Index P 140 will help you look up words features and functions Page references are a...

Страница 7: ... to edit the effect volume and pitch of each drum voice Complete sequencer functions to create or record the rhythm and backing patterns of your preference pattern record using a pad or a MIDI keyboard as well as to easily create an entire song using patterns or preset styles song record Chain functions to conveniently conduct live performances and rhythm practice effectively Large LCD and LED dis...

Страница 8: ...10 AlterGrp alternate group 57 11 Key Off 58 12 Out Port 58 13 REV Rtn reverb return 58 14 REV Type reverb type 59 15 REV Time reverb time 59 16 PC Ch transmit program change 59 17 BK CH transmit bank select 60 18 CC Ch transmit control change volume 60 19 CC Ch transmit control change pan 61 20 CC Ch transmit control change 61 21 Root Note 62 Chain Play Mode 63 Entering the Chain Play Mode 63 Sel...

Страница 9: ...ceiving program change data 118 16 RecvCh10 All receiving channel message through MIDI data from channel 10 118 17 RecvCh10 PC receive program change through channel 10 118 18 SendHH send hi hat control change 118 19 LocalClt local control 118 20 DumpTime 119 21 MergeOut 119 22 Dump Out bulk data send 119 23 P C KIT program change table 120 24 EQ equalizer 120 25Lo Mi Hi gain 121 26 Lo Freq low fr...

Страница 10: ... to the parameter you can adjust Use the Q cursor buttons to move the cursor to the focus area LED Light Emitting Diode Display P 31 The large two digit LED display shows the selected drum kit number so you can be sure of your selection especially during live performances with poor stage lighting MASTER Volume Slider P 31 This volume control slider adjusts the total volume of sound output from the...

Страница 11: ...7 This button sets a secondary function for example selecting a section or muting part of a rhythm by pressing another specific button while holding this buttn 7 TR1 MISC Button P 77 This button turns TR1 Track 1 of the song ON or OFF Press this button while holding the SHIFT button to mute the MISC other instruments part of the rhythm 8 TR2 CYMBAL Button P 77 This button turns TR2 Track 2 of the ...

Страница 12: ...ural phone plug when the power is ON may cause a reversed phase and the switch may malfunction In this case turn the power OFF reconnect the plug and turn the power ON again AUX OUT L and R Jacks This jack is used to separately output specific sound s such as the kick and snare To assign a sound to these output jacks select the Output Port on the 12th page in Drum Kit Voice Edit mode P 12 To assig...

Страница 13: ... 10 9 KICK 10 9 KICK AUX OUT AUX OUT 8 H HAT 8 H HAT 7 CRASH 7 CRASH 6 RIDE 6 RIDE 5 TOM4 5 TOM4 4 TOM3 4 TOM3 3 TOM2 3 TOM2 2 TOM1 2 TOM1 1 SNARE 1 SNARE DC IN 12V DC IN 12V POWER POWER R L R L MONO L MONO PHONES PHONES AUX IN AUX IN FOOT SW FOOT SW H HAT H HAT CONTROL CONTROL OUTPUT OUTPUT MIDI MIDI CONTRAST CONTRAST OUT OUT IN ATo further add a pad use a conversion cable which separates the ste...

Страница 14: ... Speaker AC Power Adaptor MIDI keyboard or other devices MIDI tone generator keyboard or other devices 12 11 12 11 INPUT ATTENUATION INPUT ATTENUATION 10 9 KICK 10 9 KICK AUX OUT AUX OUT 8 H HAT 8 H HAT 7 CRASH 7 CRASH 6 RIDE 6 RIDE 5 TOM4 5 TOM4 4 TOM3 4 TOM3 3 TOM2 3 TOM2 2 TOM1 2 TOM1 1 SNARE 1 SNARE DC IN 12V DC IN 12V POWER POWER R L R L MONO L MONO PHONES PHONES AUX IN AUX IN FOOT SW FOOT SW...

Страница 15: ...CLICK CLICK KICK MISC KICK MISC ACCOMP ACCOMP SNARE CYMBAL SNARE CYMBAL AUX IN AUX IN MIN MIN MAX MAX MASTER VOL MASTER VOL 5 TOM4 5 TOM4 4 TOM3 4 TOM3 3 TOM2 3 TOM2 PHONES PHONES AUX IN AUX IN FOOT SW FOOT SW AUX IN jack Mounting the Drum Trigger Series DT Bass Drum Mount the DT10 Sensor trigger on the batterhead of the bass drum close to yet not touching the edge of the rim Snare Mount the DT10 ...

Страница 16: ...ape may cause bad pick up response or double triggering The Power Supply Make sure the POWER switch is OFF and connect the power adaptor included to the DC IN jack on the rear panel of the DTX then plug the adaptor into a convenient wall AC outlet 12 11 INPUT ATTENUATION INPUT ATTENUATION 10 9 KICK AUX OUT AUX OUT DC IN 12V DC IN 12V POWER POWER R AC power adaptor Wall AC outlet CBe sure to use PA...

Страница 17: ...tting Started This chapter describes the basic operations of the DTX Use this to get an overall image of the DTX and master the basic uses Getting Started P 14 Overall Structure and Modes P 18 Basic Operation P 22 ...

Страница 18: ... selecting a kit You can create your own drum kit user drum kit from scratch P 32 AThe LCD illustrations in this manual are just examples used for the purpose of explanation The display is subject to change depending on the operation mode settings or usage Select a drum kit CLICK KICK MISC KICK MISC ACCOMP SNARE CYMBAL SNARE CYMBAL AUX IN MIN MAX MASTER VOL Press the Q cursor buttons and move the ...

Страница 19: ...coustic CityDogs PAGE ERASE SHIFT 1 YES 1 NO TEMPO MAIN B FILL BA ENDING MAIN A FILL AB INTRO PAGE Change the Volume of the Click Use the CLICK volume slider to adjust the volume of the metronome click CLICK CLICK KICK MISC KICK MISC ACCOMP ACCOMP SNARE CYMBAL SNARE CYMBAL AUX IN AUX IN MIN MIN MAX MAX MASTER VOL MASTER VOL A You can also adjust the beat or quantization by moving the cursor to the...

Страница 20: ...lume of the entire system Also use the ACCOMP volume slider to adjust the volume of the accompaniment of the pattern This is convenient when you want to listen only to the rhythm CLICK CLICK KICK MISC KICK MISC ACCOMP ACCOMP SNARE CYMBAL SNARE CYMBAL AUX IN AUX IN MIN MIN MAX MAX MASTER VOL MASTER VOL Start to play the pattern Press the START STOP button to play a pattern You can play the pads to ...

Страница 21: ...snare or kick part by muting the part and substitute it by playing the snare or kick pad by yourself The LCD will hide the Data indicators of the muted track and MUTE will appear on the right side of the rhythm track To cancel press the same button while holding SHIFT MUTE FILL AB MISC SNARE KICK CYMBAL BASS BASS TMP TR TMP TR CHORD CHORD CHO TR CHO TR RHYTHM PAT TR PAT TR SOLO SOLO TR1 TR1 TR2 TR...

Страница 22: ...e and play them back in this order This function is useful for live performances Your DTX also contains 128 normal keyboard voices These voices are used to add bass or chord parts to the DTX rhythm pattern It is also possible to play a melody or obbligato by changing a part MIDI channel The tone generator section complies to the GM standard level 1 and can be used to play back the commercially ava...

Страница 23: ...d and stored within the DTX In the same manner as the drum kit the patterns can also be played back in a specified order using the chain function These patterns arranged in a specific order and combind with suitable chord progression create a song Chords can be established by combining each root note with 25 chord types A maximum of 30 original songs can be created using preset or user patterns Yo...

Страница 24: ... It is also possible to enter the tempo changes Audit the backing track and record the necessary brass refrains string obligatos and melody to the sequence track TR 1 or TR2 P 105 To complete the song adjust the tones volume balance and pan position of each part Triggering The term triggering refers to drive a tone generated from the DTX The DTX is designed to produce a trigger signal when a pad o...

Страница 25: ...m Kit Trigger Edit mode P 32 To edit trigger input levels such as sensitivity Drum Kit Voice Edit mode P 50 To edit various drum and percussion sound settings Song Play mode P 93 To select and play a song Song Record mode P 99 To record a song Song Job mode P 107 To edit a song Utility mode P 112 To change the settings of the entire system such as MIDI reverb equalizer sequencer and multi timbre t...

Страница 26: ...NG CHAIN Drum Kit Play mode Press the DRUM KIT button DRUM KIT TEMPO BEAT GM std 1 DRUM KIT VOICE TRIGGER UTILITY STORE PATTERN SONG CHAIN Drum Kit Trigger Edit mode Press the TRIGGER button MISC SNARE KICK CYMBAL Kit Name GM std 1 DRUM KIT VOICE TRIGGER UTILITY STORE PATTERN SONG CHAIN Drum Kit Voice Edit mode Press the VOICE button MISC SNARE KICK CYMBAL VCE P 52 P SurdoM DRUM KIT VOICE TRIGGER ...

Страница 27: ...PATTERN button MAIN A PATTERN MISC SNARE KICK CYMBAL MEASURE CLICK DRUM KIT VOICE TRIGGER UTILITY STORE PATTERN SONG CHAIN RP Hop TEMPO BEAT Pattern Record mode Enter this mode by taking several steps in Pattern Play mode Refer to P 80 for details OFF PATTERN MISC SNARE KICK CYMBAL TEMPO BEAT MEASURE QUANT Realtime REC Mode Pattern Job mode To enter this mode press the PATTERN button twice or pres...

Страница 28: ... Song Job mode Press the SONG button twice or press the SONG button once while in Song Play mode SONG MISC SNARE KICK CYMBAL CopySong CityDogs DRUM KIT VOICE TRIGGER UTILITY STORE PATTERN SONG CHAIN Utility mode Press the UTILITY button MISC SNARE KICK CYMBAL UTILITY SYSTEM DRUM KIT VOICE TRIGGER UTILITY STORE PATTERN SONG CHAIN Store mode Press the STORE button while in Drum Kit Play Trigger Edit...

Страница 29: ... The Pattern Play mode and Song Play mode also share the common display focus area PATTERN SONG MISC SNARE KICK CYMBAL MEASURE CLICK Style or song number Mode Style or song name Two Play modes can be displayed on the LCD at one time For example the Drum Kit Play mode or Chain Play mode can be displayed at the same time with either the Pattern Play mode or Song Play mode Other modes are displayed o...

Страница 30: ...ges back and forth rotating the Data Scroll Wheel while holding the SHIFT button QCursor Buttons The Q cursor buttons allow you to move the cursor the blinking character or symbol to each focus area on the LCD and the parameters DRUM KIT MISC SNARE KICK CYMBAL TEMPO BEAT MEASURE CLICK CityDogs PAGE AGE ERASE SHIFT SHIFT 1 YES 1 YES 1 NO 1 NO TEMPO TEMPO MAIN B FILL BA ENDING MAIN A FILL AB INTRO P...

Страница 31: ...nome ON and OFF Refer to P 74 76 81 for details CLICK CLICK Initializing Process Problems due to program conflict may occur when internal settings have been changed while you are using the DTX It is possible to initialize your DTX if you need to set all of the settings back to factory preset conditions in one procedure for this reason or other COnce the initialization is executed the factory prese...

Страница 32: ...28 Getting Started ...

Страница 33: ...get to know the various ways to use a function Drum Kit Play mode P 30 Drum Kit Trigger Edit mode P 32 Drum Kit Voice Edit mode P 50 Chain Play mode P 63 Chain Edit mode P 65 Store mode P 69 Pattern Play mode P 71 Pattern Record mode P 80 Pattern Job mode P 88 Song Play mode P 93 Song Record mode P 99 Song Job mode P 107 Utility mode P 112 ...

Страница 34: ...M KIT VOICE TRIGGER UTILITY STORE PATTERN SONG CHAIN AThe Drum Kit Play mode is displayed in the same format as the Pattern Play mode or Song Play mode Selecting a Drum Kit Use the Q cursor buttons to select the drum kit number DRUM KIT PATTERN MISC SNARE KICK CYMBAL TEMPO BEAT MEASURE CLICK Acoustic Drum kit name Drum kit number PAGE ERASE ERASE SHIFT 1 YES 1 NO TEMPO MAIN B MAIN B FILL BA FILL B...

Страница 35: ...oice separately from other voices This is very handy at live performances where you can directly control the volume of SNARE KICK CLICK CLICK KICK MISC ACCOMP ACCOMP SNARE CYMBAL AUX IN AUX IN MIN MIN MAX MAX MASTER VOL MASTER VOL PAGE AGE ERASE SHIFT SHIFT 1 YES 1 NO 1 NO TEMPO TEMPO MAIN B FILL BA ENDING MAIN A FILL AB INTRO PAGE AGE AThese volume sliders are originally programmed to function as...

Страница 36: ...ata select a user drum kit and save the changes to the user drum kit A Use the blank chart provided at the end of this manual P 166 to memo the editing contents of the user drum kit Editing Procedures Choose the drum kit you want to edit in Drum Kit Play mode Enter Drum Kit Trigger Edit mode Name the drum kit if necessary Turn the page and set the necessary parameters AIt is necessary to choose th...

Страница 37: ...ry to choose the input jack number before changing the parameters for the 2nd through 18th and the 30th pages As a short cut set the Learn mode on the 4th page in Utility mode to always The input jack number will automatically be selected by playing a pad connected to the appropriate input P 115 Set the value by rotating the Data Scroll Wheel or using the 1 YES and 1 NO buttons A In this mode the ...

Страница 38: ... Vel RIM velocity P 45 18 PAD Func pad function P 45 19 FS Func FS function P 46 20 FS MIDI FS MIDI channel P 47 21 FS HHcls FS hi hat control P 47 22 FC Func hi hat control function P 47 23 FC MIDI hi hat control channel P 47 24 FC Sens hi hat control sensitivity P 48 25 HH Ctrl FS hi hat control P 48 26 In 9 to 10 input 9 to 10 P 48 27 In 11 to 12 input 11 to 12 P 48 28 Copy INP copy input P 48 ...

Страница 39: ...he Learn mode on the 4th page in Utility mode to ALWAYS The input jack number will automatically change to the connected input jack by playing a pad P 115 Move the cursor to the PAD TYPE parameter and rotate the Data Scroll Wheel or use the 1 YES and 1 NO buttons to select the pad type that suits the pad or drum connected to the input jack number Repeat steps and to set the proper pad type for eac...

Страница 40: ... steps and to set the input gain for each input jack number 4 PAD Gain This manually sets the input gain sensitivity of each input jack number Move the cursor to INPUT and rotate the Data Scroll Wheel or use the 1 YES and 1 NO buttons to choose the input jack number You can also enable the Learn mode P 115 to automatically select the input jack number by hitting each pad or drum then select the in...

Страница 41: ...t on the Velocity Range display page the 6th page of this mode Settings The following parameters can be set for input numbers 1 to 12 Minimum level 0 to 98 Maximum level 1 to 99 6 VelRange velocity range Set the Maximum and Minimum velocity of each input jack number This responds to the maximum and minimum input levels set on the 5th page and delivers each sound within the velocity range set in th...

Страница 42: ...AL INPUT VelCurve normal Settings The following velocity curves can be set for input numbers 1 to 12 VelCurve normal Velocity Input level VelCurve hard 1 Velocity Input level VelCurve hard 2 Velocity Input level VelCurve loud 1 Velocity Input level VelCurve loud 2 Velocity Input level Relationship between input level and velocity Case 1 This figure shows that the velocity will be output at an inpu...

Страница 43: ...Settings The following parameters can be set for input numbers 1 to 12 0 self rejection function disabled to 9 9 Reject rejection This function prevents cross talk mixed sounds and double triggering among the pads or drums connected to other input jacks When a sound is triggered shortly after another the voice will not be delivered if the input level is lower than the level set here Set the level ...

Страница 44: ...bles you to play 1 pad and deliver multiple up to 5 drum sounds The order of the 5 drum sounds to sound can be designated By setting the Key On Mode P 43 the sounds can be delivered simultaneously or one by one This feature can be applied to a wide range of ideas and enhance the efficiency of your performance The MIDI note number can also be transmitted from the MIDI OUT jack on the rear panel of ...

Страница 45: ...ers of the other input numbers MISC SNARE KICK CYMBAL INPUT Note 1st MIDI note number Note name Note 36 C 1 Settings The following parameters can be set for input numbers 1 to 12 Note 1st 2nd 3rd 4th 5th mut rim or Opn Cls FCl FOp rim MIDI note number off 13 to 84 Using chord names to set the MIDI note number Press the CHORD button while holding SHIFT to display the 31th page or SetChord chord set...

Страница 46: ...10 0 seconds settings by 1 10 seconds 13 Note MIDI channel Sets the 1st to 5th MIDI transmitting channels to the MIDI note number of each input jack number You can set an external device to trigger a keyboard normal voice using the DTX internal tone generator if you have the input jack number set to a MIDI note number that triggers a chord or bass voice in the DTX Move the cursor to the INPUT focu...

Страница 47: ...th notes P 40 simultaneously alter Triggers the 1st to 5th notes one by one each time the pad is played stackMN Triggers the 1st to 5th notes simultaneously but truncates the preceding sound when the pad is played alterMN Alternately triggers the 1st to 5th notes in order but truncates the preceding sound when the pad is played hold Triggers and maintains the 1st to 5th notes simultaneously when t...

Страница 48: ...a and rotate the Data Scroll Wheel or use the 1 YES and 1 NO buttons to turn the function on or off MISC SNARE KICK CYMBAL INPUT VelXFade off Settings The following parameters can be set for input numbers 1 to 12 VelXFade on off 16 RIMKeyOn This function sets the rim key on mode to define how the voice is triggered when the rim of the pad is played The single mode is used for the usual rim shot vo...

Страница 49: ...velocity changes according to the impact of the attack Move the cursor to the INPUT focus area and rotate the Data Scroll Wheel or use the 1 YES and 1 NO buttons to choose the input jack number You can also enable the Learn mode P 115 to automatically select the input jack number by hitting each pad or drum Move the cursor to the Velocity focus area and rotate the Data Scroll Wheel or use the 1 YE...

Страница 50: ...tween open and closed click Switches the click sound ON or OFF inc Selects the next drum kit number in Drum Kit mode or step in Chain mode dec Selects the previous drum kit number in Drum Kit mode or step in Chain mode bypass Truncates the voices of all other pads except the one selected when ON statStp Starts or stops the style pattern or song pause Pauses the style pattern or song do FILL Change...

Страница 51: ...ttings 1 to 127 22 FC Func hi hat control function This sets the function of the Foot Controller connected to the H HAT CONTROL jack on the rear panel Different assignments can be made to each drum kit Choose the function by rotating the Data Scroll Wheel or using the 1 YES and 1 NO buttons The following 2 functions are available HH ctrl Functions as a hi hat and a MIDI channel message transmittin...

Страница 52: ...an additional feature of DTX version 2 0 Please refer to the System Upgrade Information Guide included in this package 28 Copy INP copy input This copies the input data settings of any drumkit input currently being edited to another drumkit input number This is convenient in creating similar input settings Move the cursor to the Input Copy Source focus area and rotate the Data Scroll Wheel or use ...

Страница 53: ...lect other drum kits the edited settings will return to the default settings However the edited data is still stored in the edit buffer By using this Edit Recall function you can recall the data stored in the edit buffer and continue to edit This function is convenient in comparing the edited data with the original data AThis function is also effective in editing the voice in Drum Kit Voice Edit m...

Страница 54: ... parameter Filter Reverb Decay 13 15 17 18 20 22 24 15 16 19 21 23 73 75 77 78 80 82 84 75 76 79 81 83 AYou can create different voices for each note number of each drum kit by changing the parameters of the same drum voice AA blank chart is provided at the end of this Manual P 167 to memo the editing contents you have created AWhen you are assigning more than 2 pads input jacks to the same MIDI n...

Страница 55: ...ges The pages with asterisks will not appear when the Edit mode in Utility mode is set to easy MISC SNARE KICK CYMBAL Volume 110 Page number Function name Parameter Select the page using the PAGE or PAGE buttons Select the parameter using the Q cursor buttons Set the value by rotating the Data Scroll Wheel or using the 1 YES and 1 NO buttons ADepending on the voice you use the sound may not stop w...

Страница 56: ...cay P 56 9 Key Mode P 57 10 AlterGrp alternate group P 57 11 Key Off P 58 12 Out Port P 58 13 REV Rtn reverb return P 58 14 REV Type reverb type P 59 15 REV Time reverb time P 59 16 PC Ch transmit program change P 59 17 BK Ch transmit bank select P 60 18 CC Ch transmit control change volume P 60 19 CC Ch transmit control change pan P 61 20 CC Ch transmit control change P 61 21 Root Note P 62 ...

Страница 57: ...cted for MIDI note numbers 13 to 84 Group and voice number off K1 to 119 Kick S1 to 250 Snare T1 to 176 Tom C1 to 105 Cymbal P1 to 103 Percussion E1 to 115 Effect k1 to 21 Keyboard s1 to 8 Strings b1 to 19 Bass H1 to 12 additional hi hat in V2 Voice name BD DRY1 to Sy Bass 3H Refer to P 143 Drum Voice List for details on voice name and voice number A When you are assigning more than 2 pads input j...

Страница 58: ...e numbers 13 to 84 L7 far left to center center to R7 far right 4 Pitch This sets the pitch for each voice assigned to each MIDI note number Tune the pitch either by semitone or by approximately 1 2 cent increments or decrements Move the cursor to the MIDI note number focus area and rotate the Data Scroll Wheel or use the 1 YES and 1 NO buttons to choose the MIDI note number You can also enable th...

Страница 59: ...igned to each MIDI note number The Modify level defines the volume balance between the 2 waves that make the voice You can change the quality of the voice by setting the Modify level Move the cursor to the MIDI note number focus area and rotate the Data Scroll Wheel or use the 1 YES and 1 NO buttons to choose the MIDI note number You can also enable the Learn mode P 115 to automatically select the...

Страница 60: ...umber Settings The following parameters can be set for MIDI note numbers 13 to 84 64 to 0 standard to 63 8 Decay This sets the decay of each voice assigned to each MIDI note number The decay function controls the fading of a voice wave pattern You can increase or decrease the fading effect of a voice For example increase the decay value if you want to extend the lingering sound of a cymbal Move th...

Страница 61: ... a long release such as the cymbal is set to mono 2 hits with short intervals may cause an unnatural feel since the first sound is abruptly truncated Repeat steps and to set the Key mode for each note number MISC SNARE KICK CYMBAL Key Mode poly Key mode MIDI note number Settings The following parameters can be set for MIDI note number 13 to 84 poly semi 2 mono hi mono 10 AlterGrp alternate group T...

Страница 62: ...s the output of each voice assigned to each MIDI note number either to the main output or auxiliary output This is convenient when you want to output specific voice s to an external mixing device Move the cursor to the MIDI note number focus area and rotate the Data Scroll Wheel or use the 1 YES and 1 NO buttons to choose the MIDI note number You can also enable the Learn mode P 115 to automatical...

Страница 63: ...termines the reverb length for each drum kit Set the time by rotating the Data Scroll Wheel or using the 1 YES and 1 NO buttons The larger the value the longer the reverb time MISC SNARE KICK CYMBAL REV Time 18 Settings 0 to 69 16 PC Ch transmit program change This sets the MIDI program change number to be transmitted when the drum kit is changed You can specify different program change numbers to...

Страница 64: ... Repeat steps and to set the bank select for each of the 16 channels MISC SNARE KICK CYMBAL M 0L 0 BK Ch 1 Bank select LSB Bank select MSB Bank select transmission channel Settings Bank Select Transmission Channel 1 to 16 Bank Select MSB 0 to 127 Bank Select LSB 0 to 127 18 CC Ch transmit control change volume This sets the volume of the MIDI control change sent when the drum kit is switched It is...

Страница 65: ... control change number and value of the MIDI control change data transmitted when a drum kit is switched It is possible to set control change numbers individually to each of the channels 1 to 16 For example by switching a drum kit you can set the sound parameters of external synthesizers connected to the DTX The data can be set for each drum kit AAlso refer to P 131 for further details regarding c...

Страница 66: ...range of 71 keys and the default settings assign MIDI note numbers 13 to 84 For example by changing the minimum value from 13 to 10 the valid note numbers become 10 to 81 This setting is possible for each drum kit Set the Root note by rotating the Data Scroll Wheel or using the 1 YES and 1 NO buttons MISC SNARE KICK CYMBAL RootNote 13 Settings 0 to 56 ...

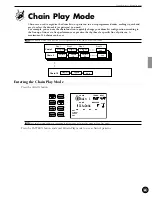
Страница 67: ...ns A maximum of 16 chains can be set AIf you want to use the Chain function you are required to build the chains in Chain Edit mode Pattern 1 Pattern 10 Pattern 20 END Chain 2 Drum kit 1 Drum kit 5 Drum kit 10 Step 1 Step 2 Step 3 Step 32 END Chain 1 Drum kit 3 Pattern 50 END Chain 16 Entering the Chain Play Mode Press the CHAIN button CHAIN MISC SNARE KICK CYMBAL TEMPO BEAT MEASURE CLICK Chain 1 ...

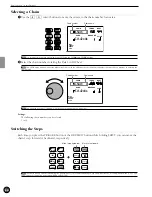
Страница 68: ...us to entering the Chain mode CHAIN MISC SNARE KICK CYMBAL TEMPO BEAT MEASURE CLICK Chain 1 CityDogs SONG Chain name Chain number AYou can also use the 1 YES and 1 NO buttons to change the chain number Settings The following chain numbers can be selected 1 to 16 Switching the Steps Each time you press the TRIGGER button or the DRUM KIT button while holding SHIFT you can move the chain 1 step forwa...

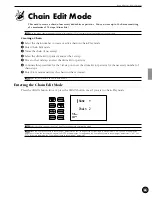
Страница 69: ...e 3rd step on to set the drum kit or pattern for the necessary number of chain steps Enter Store mode and store the chain you have created ARefer to P 69 for details on how to store a chain Entering the Chain Edit Mode Press the CHAIN button twice or press the CHAIN button once if you are in Chain Play mode MISC SNARE KICK CYMBAL Name Chain 2 DRUM KIT VOICE TRIGGER UTILITY STORE PATTERN SONG CHAIN...

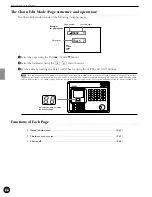
Страница 70: ...YES and 1 NO buttons A Once you have edited in this mode a small dot lights on the lower right hand corner of the drum kit number displayed on the LED to indicate that the edit results have not been stored See P 69 on how to store your edit The dot disappears when you go to Chain Play mode during an edit to select a different chain The edited settings will return back to the default settings but y...

Страница 71: ...o the drum kit or pattern number focus area and select the necessary number Drum Kit Select from drum kit numbers 1 to 64 for each chain step MISC SNARE KICK CYMBAL DrumKit num 1 Drum kit number Pattern 1 Select from style or pattern numbers 1 to 110 for each chain step 2 If you have selected from the preset styles pattern styles 1 to 110 move the cursor to the section focus area and specify a sec...

Страница 72: ...diting the drum kit if you enter Chain Play mode and select other drum kits the DTX will return to its original data However by using the Edit Recall function you can recall the edited data and continue to edit Select Edit Recall after selecting another chain in Chain Play mode MISC SNARE KICK CYMBAL Edit recall Press the START STOP button and the LCD will display Sure y n MISC SNARE KICK CYMBAL R...

Страница 73: ... or from Drum Kit Play mode MISC SNARE KICK CYMBAL Store DK to 1 DRUM KIT VOICE TRIGGER UTILITY STORE PATTERN SONG CHAIN DRUM KIT AThe storage method differs dependig on the settings in Link mode P 115 on the 3rd display page in Utility mode Link mode global Stores the edited drum kit both to the specified destination and drum kit number 1 Link mode indiv Stores the edited drum kit only to the spe...

Страница 74: ...r chain number The LCD will flash complete momentarily and the display will return to the Drum Kit or Chain Play mode Press the 1 NO button to cancel The display will return to the Drum Kit or Chain Play mode ATo enter a different mode without storing the data simply press the DRUM KIT CHAIN SONG or PATTERN buttons Copying the Drum Kit or Chain Use the store function to copy a drum kit or chain to...

Страница 75: ...each style Select a section for a style to make a preset pattern Section 6 sections are available for each style A section is a music component combined to create a music piece The preset patterns have the following six sections programmed MAIN A This is the default section It can be used for the basic verse and chorus structure of a pattern MAIN B This is the alternative section It can be used to...

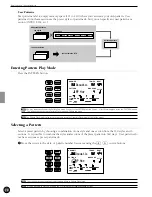
Страница 76: ...N button again This button switches between Pattern Play mode and Pattern Job mode AThe Pattern Play mode is displayed in the same format as Drum Kit Play mode or Chain Play mode Selecting a Pattern Select a preset pattern by choosing a combination of one style and one section from the 110 styles and 6 sections It is possible to combine the styles and sections of the preset pattern in 660 ways Use...

Страница 77: ... or ENDING buttons while holding SHIFT to select the section The selected section will appear on the far bottom of the LCD A The user pattern does not have a section Therefore the section will not appear if you have selected user pattern DRUM KIT PATTERN MISC SNARE KICK CYMBAL TEMPO BEAT MEASURE CLICK GM std 1 DA RaveQ MAIN B PAGE AGE ERASE ERASE SHIFT SHIFT 1 YES 1 YES 1 NO 1 NO TEMPO TEMPO MAIN ...

Страница 78: ... is playing this focus area will not change from 1 DRUM KIT PATTERN MISC SNARE KICK CYMBAL TEMPO BEAT MEASURE CLICK GM std 1 Cmin7 _ _ root type on bass Chord focus area Beat indicator Measure number focus area 1st beat 2nd beat 3rd beat 4th beat AYou can switch to a different pattern while a pattern is playing Switch the style or section to the beginning of a new pattern The tempo will not change...

Страница 79: ...YMBAL SNARE CYMBAL AUX IN AUX IN MIN MIN MAX MAX MASTER VOL MASTER VOL Click Use the CLICK KICK MISC volume slider to control the metronome click See above CLICK CLICK KICK MISC KICK MISC ACCOMP ACCOMP SNARE CYMBAL SNARE CYMBAL AUX IN AUX IN MIN MIN MAX MAX MASTER VOL MASTER VOL Snare Use the ACCOMP SNARE CYMBAL volume slider while holding SHIFT to control the snare including snare sounds input fr...

Страница 80: ...r OFF by pressing the CLICK button Press the CLICK button to start the metronome The LED above the CLICK button will flash to the current tempo CLICK CLICK Press the CLICK button again to stop the metronome AIf you press the CLICK button while a pattern is playing the metronome will automatically synchronize to the tempo of the pattern Adjusting the Volume click Use the CLICK KICK MISC volume slid...

Страница 81: ...O TR CHO TR RHYTHM RHYTHM PAT TR PAT TR SOLO SOLO TR1 TR1 TR2 TR2 CYMBAL CYMBAL MISC MISC SNARE SNARE KICK KICK Muting each Rhythm Part AYou can also mute the RHYTHM KICK SNARE CYMBAL or MISC other instruments This is convenient especially during rhythm practice where you can mute a snare or kick part and play your pad instead Press the SNARE KICK CYMBAL or MISC other instruments buttons while hol...

Страница 82: ...CYMBAL CYMBAL MISC MISC SNARE KICK BASS TMP TR TMP TR CHORD CHO TR RHYTHM RHYTHM PAT TR SOLO TR1 TR2 CYMBAL MISC MISC SNARE KICK Selecting the Chords You can select the chords of the accompaniment while playing a pattern Move the cursor to the root focus area using the Q cursor buttons PATTERN MISC SNARE KICK CYMBAL MEASURE CLICK Cmin7 _ _ Root Chord type On bass PAGE ERASE SHIFT 1 YES 1 NO TEMPO ...

Страница 83: ...hord List root C Name on the LCD mM7 Minor major seventh sus4 Suspended fourth 7su4 Seventh suspended fourth m7 5 Minor seventh flatted fifth min6 Minor sixth aug Augmented 7 5 Seventh augmented add9 Added ninth mad9 Minor added ninth 7th9 Seventh ninth 7 9 Seventh sharp ninth 7 13 Seventh added flatted thirteenth 7 11 Seventh added sharp eleventh m711 Major seventh added eleventh 7 13 Seventh add...

Страница 84: ...se before you record Standby P 81 Enter the Pattern Record mode Record ready Select a recording track P 81 Select the track chord bass rhythm you want to record Select the type of recording P 82 Select the type of recording real time or step recording when you are using a rhythm track AThis step is not required if you are only recording the chord or bass track where you can only record in real tim...

Страница 85: ... recorded through MIDI channel 5 and a bass track through MIDI channel 7 2 Stand by By pressing the RECORD button you will enter Pattern Record mode and the DTX will stand by for recording The red LED above the RECORD button will light up OFF PATTERN MISC SNARE KICK CYMBAL TEMPO BEAT MEASURE QUANT Realtime REC Mode CLICK AAn empty user pattern will automatically be selected even when a preset patt...

Страница 86: ...d track or bass track Step Rec step recording A type of recording where you specify each drum voice to a beat one at a time while checking the data focus area on the LCD OFF PATTERN MISC SNARE KICK CYMBAL TEMPO BEAT MEASURE QUANT Realtime REC Mode Recording method The following operations are necessary for real time recording If you have selected step recording skip to P 85 5 Setting the Tempo Set...

Страница 87: ...16 to 16 F 16 16 1 8 to 16 8 1 4 to 8 4 AYou can only set or record the beat of a pattern that does not contain any data 7 Setting the Number of Measures Set the length of the recorded pattern using measures as units Move the cursor to the MEASURE focus area and rotate the Data Scroll Wheel or use the 1 YES and 1 NO buttons to set the number of measures OFF PATTERN MISC SNARE KICK CYMBAL TEMPO BEA...

Страница 88: ...tization is OFF You can also assign the quantization afterwards P 91 Move the cursor to the QUANT focus area and rotate the Data Scroll Wheel or use the 1 YES and 1 NO buttons to set the quantization OFF PATTERN MISC SNARE KICK CYMBAL TEMPO BEAT MEASURE QUANT Realtime REC Mode Settings OFF quarter note 3 quarter note triplet eighth note 3 eighth note triplet 16th note 3 16th note triplet AThe fine...

Страница 89: ...recording can be used to record the rhythm track This allows you to input each beat one step at a time while checking the structure in the data focus area Follow steps 1 Getting Ready to Record P 81 and 4 Selecting the Type of Recording P 82 and press the START STOP button The LED above the button will light up and the DTX will enter Step Recording mode OFF PATTERN MISC SNARE KICK CYMBAL TEMPO BEA...

Страница 90: ...tion pointer a measure at a time by moving the cursor to the MEASURE focus area and rotating the Data Scroll Wheel or using the 1 YES and 1 NO buttons MISC SNARE KICK CYMBAL The quantization is set to the eighth note MISC SNARE KICK CYMBAL The quantization is set to the quater note A The cursor can also be moved by a quantization value at a time Play the pad or MIDI keyboard corresponding to the d...

Страница 91: ... button to exit Step recording and the display will return to Pattern Play mode Sample 8 beat drum pattern When an 8 beat drum pattern is entered the LCD will display MISC SNARE KICK CYMBAL 1st beat Hi hat Snare Kick 2nd beat 3rd beat 4th beat C Turning the power OFF while recording erasing or copying may cause irretrievable loss to ALL of the user data ...

Страница 92: ...t jump to recent page parameter on the 7th page in Utility mode is on the DTX will display the page you selected the last time you edited Your DTX will display the 1st page when the JumpRcnt jump to recent page parameter is off Refer to P 116 for details regarding the JumpRcnt jump to recent page parameter The Pattern Job Mode page structure and operation The Pattern Job mode consists of 7 display...

Страница 93: ...Copy Pat Dest Pattern copy P 90 2 Quantize Quantization P 91 3 CrTrNote Clears a specific note P 91 4 ClrTrack Clears a track P 92 5 ClearPat Clears a pattern P 92 6 Ch Ba Ry Voice Selects the voices of a chord bass or rhythm track P 92 7 Pat Name Pattern name P 92 ...

Страница 94: ... STOP button to select the CopyDest copy destination of the user pattern PATTERN MISC SNARE KICK CYMBAL CopyDest Init Pat Rotate the Data Scroll Wheel or use the 1 YES and 1 NO buttons to choose the number of the user pattern Press the START STOP button and the LCD will display Sure y n PATTERN MISC SNARE KICK CYMBAL Copy Pat Sure y n Press the 1 YES button to copy The display will return to the o...

Страница 95: ...tize Settings Quantize OFF quarter note 3 quarter note triplet eighth note 3 eighth note triplet 16th note 3 16th note triplet AOnce you quantize the track the data is revised and is irretrievable 3 CrTrNote clear specific note This clears the specific note from an entire track Press the CHORD BASS or RHYTHM button of the track containing the note you want to clear and the LED above will light up ...

Страница 96: ...ton to cancel clear 6 Pgm selects the voices of a chord bass or rhythm track This selects the voices of a chord bass or rhythm track for the currently selected pattern Move the cursor to the track display and select the track of the voice you want to set with the Data Scroll Wheel or use the YES or 1 NO buttons PATTERN Ocarina Track Pgm cho Program Change Number Voice Name Chord track voice select...

Страница 97: ...m Pattern 2 Pattern 3 C G F Record melody lines or obligatos using a MIDI keyboard Chord Bass Rhythm Chord Bass Rhythm Sequence Tracks You can record a melody or obligato to each sequence track in real time just as you would record a track on a sequencer Backing Tracks The backing consists of 3 tracks pattern PAT TR chord CHO TR and tempo TMP TR Create backing tracks by setting the pattern chord a...

Страница 98: ...umber PAGE AGE ERASE SHIFT SHIFT 1 YES 1 YES 1 NO 1 NO TEMPO TEMPO MAIN B FILL BA ENDING MAIN A FILL AB INTRO PAGE AGE A The song number focus area automatically blinks in Song Play mode AIt is also possible to move up and down the LCD using the PAGE or PAGE buttons Rotate the Data Scroll Wheel or use the 1 YES and 1 NO buttons to select the song number Song name DRUM KIT SONG MISC SNARE KICK CYMB...

Страница 99: ...n Press the PAUSE button to pause the song The LED above the START STOP button will turn off The song will start where it stopped when the PAUSE or the START STOP button is pressed again CLICK CLICK FORWARD and REWIND Buttons The FORWARD and REWIND buttons move the cursor to the measure where you want to start the song The FORWARD and REWIND buttons move the indicator forward or backward by a meas...

Страница 100: ...ether the song is playing or not you can change the tempo Press the TEMPO button or use the Q cursor buttons to move the cursor to the tempo focus area and rotate the Data Scroll Wheel or use the 1 YES and 1 NO buttons MAIN A DRUM KIT SONG MISC SNARE KICK CYMBAL TEMPO BEAT MEASURE CLICK GM std 1 CityDogs MISC SNARE KICK CYMBAL PAGE ERASE ERASE SHIFT 1 YES 1 NO TEMPO MAIN B MAIN B FILL BA FILL BA E...

Страница 101: ...ls respectively it is possible to mute each part by pressing the corresponding RHYTHM BASS and CHORD buttons The Mute Solo of each Rhythm Part AYou can also mute or solo play individually each rhythm part in the same manner as in Pattern Play mode Refer to P 77 for details AYou can also mute each part or play a single part of the rhythm in Track 1 when Track 1 is used as the rhythm track for MIDI ...

Страница 102: ... in advance Operating the Groove Check Mode Press the RECORD button while playing a song or pattern CLICK CLICK Move the cursor to the CLICK focus area and rotate the Data Scroll Wheel or use the 1 YES and 1 NO buttons to set the quantization which becomes the finest Groove Check level Settings Quantization quarter note 3 quarter note triplet eighth note 3 eighth note triplet 16th note 3 16th note...

Страница 103: ...umber to record your original song in Song Play mode Stand by P 100 Enter Song Record mode Select a recording track P 100 Select the track pattern chord tempo track 1 2 you want to record to The type of recording depends on the selected track Step Recording Recording to a Chord or Bass Track P 101 103 104 Input the data one step at a time while checking the LCD display of the DTX Real time Recordi...

Страница 104: ... Refer to P 110 for details on how to select the voices 2 Stand by Press the RECORD button to enter Song Record mode The DTX will stand by for recording and the red LED above the RECORD button will light up SONG MISC SNARE KICK CYMBAL TEMPO BEAT MEASURE STEP REC REC Mode SONG MISC SNARE KICK CYMBAL TEMPO BEAT MEASURE QUANT REALTIME REC Mode CLICK CLICK Step recording display Real time recording di...

Страница 105: ... measure Move the cursor to the style or pattern number focus area using the Q cursor buttons and select the style or pattern number by rotating the Data Scroll Wheel or using the 1 YES and 1 NO buttons Continue to specify the section if you have selected a preset style Press the MAIN A MAIN B FILL AB FILL BA INTRO or ENDING button while holding SHIFT to select the section The selected section wil...

Страница 106: ...NDING ENDING MAIN A MAIN A FILL AB FILL AB INTRO INTRO PAGE Sample Structure of a Song Each preset style consists of 6 sections which can be connected to create a smooth piece of music You can also create other patterns and store them as user patterns and insert them into the song structure to try out new ideas or create a new music piece MAIN A MAIN A MAIN A FILL AB MAIN B MAIN B MAIN B FILL BA P...

Страница 107: ...urrent locationpointer position Chord input Shows a when the current location pointer position contains a chord Location pointer Indicates the current input position Data focus area Shows the pattern data in this measure with dots Move the cursor to the root focus area using the Q cursor buttons and select the root of the chord by rotating the Data Scroll Wheel or using the 1 YES and 1 NO buttons ...

Страница 108: ...r position Tempo change quantity Shows the quantity of the tempo change entered into the current location pointer position Tempo change time Shows the time required to change the tempo entered in the current location pointer position Measure number Shows the measure number of the current location pointer position Data input Shows a when the current location pointer position contains tempo change d...

Страница 109: ...y from a MIDI keyboard connected to the DTX in real time You can record two sequence tracks track 1 and track 2 Select TR1 track 1 or TR2 track 2 according to step 3 Selecting a Recording Track P 100 and set the tempo or quantization value as required 1 Setting the Tempo Set the tempo for real time recording The value set here will be the initial tempo of the song Press the TEMPO button or move th...

Страница 110: ...l flash once The DTX will countdown two measures before beginning to record the MIDI data from the external MIDI keyboard CLICK AThe LCD above the CLICK button will flash to the tempo when the DTX is counting the beat The LEDs above both the CLICK button and the START STOP button will flash to the tempo when you are recording ARefer to P 110 on how to select the voice or MIDI channel for tracks 1 ...

Страница 111: ... mode AWhen the JumpRcnt jump to recent page parameter on the 7th page in Utility mode is on the DTX will display the page you selected the last time you edited Your DTX will display the 1st page when the JumpRcnt jump to recent page parameter is off Refer to P 116 for details regarding the JumpRcnt jump to recent page parameter The Song Job Mode page structure and operation The Song Job mode cons...

Страница 112: ...a different user song number This is convenient in creating a new song based on an existing song Choose the preset song or user song by rotating the Data Scroll Wheel or using the 1 YES and 1 NO buttons SONG MISC SNARE KICK CYMBAL CopySong CityDogs Press the START STOP button to select the CopyDest copy destination of the user song SONG MISC SNARE KICK CYMBAL CopyDest InitSong Rotate the Data Scro...

Страница 113: ...ised and is irretrievable 3 ClrTrack clear track This clears all the data on the specified track within the currently selected song Press the track button you want to clear TR1 TR2 TMP TR PAT TR or CHO TR and the LED above the track button will light up MISC SNARE KICK CYMBAL ClrTrack SetTrack SONG Press the START STOP button and the LCD will display Sure y n Press the 1 YES button to clear and th...

Страница 114: ...oice you want to set with the Data Scroll Wheel or use the YES or 1 NO buttons Settings Voice numbers 0 to 127 GM system level 1 ARefer to P 143 for details about the voice list 6 VolCh channel volume This is an additional feature of DTX version 2 0 Please refer to the System Upgrade Information Guide included in this package 7 PanCh channel pan This is an additional feature of DTX version 2 0 Ple...

Страница 115: ...e 1 YES or 1 NO buttons SONG MISC SNARE KICK CYMBAL B Lnr TR off Setting on off A Refer to P 132 for details on the relation between the MIDI channels and each part 10 Pat Mute pattern track mute mode This sets the pattern track mute mode ON or OFF By turning this mode ON the PAT TR pattern track is muted while the song is playing This is used when you do not want to play back the pattern track wh...

Страница 116: ...s to move the cursor to the display page within the sub mode you have selected Set the parameter by rotating the Data Scroll Wheel or using the 1 YES and 1 NO buttons AUse the Q cursor buttons to move the cursor to the appropriate focus area if there are multiple parameter focus areas on the diplay page AAny revision in Utility mode will directly change the settings of the DTX There is no confirma...

Страница 117: ...ive P 117 15 Receive PC receiving program change P 118 16 RecvCh10 All receiving MIDI data through channel 10 P 118 17 RecvCh10 PC receiving MIDI data through channel 10 P 118 18 SendHH send hi hat control change P 118 19 LocalClt local control P 118 20 DumpTime P 119 21 MergeOut P 119 22 Dump Out bulk data send P 119 23 P C KIT program change table P 120 Equalizer settings 24 EQ equalizer P 120 T...

Страница 118: ...em Select from 11 display pages using the PAGE or PAGE buttons to change the parameters which adjust the LCD display or panel sliders A Move from this page to other sub modes by rotating the Data Scroll Wheel or using the 1 YES and 1 NO buttons MISC SNARE KICK CYMBAL UTILITY SYSTEM 2 EditMode This mode enables you to hide the pages of the functions that are not frequently used in Drum Kit Trigger ...

Страница 119: ...input data set for each drum kit will be used MISC SNARE KICK CYMBAL LinkMode global Settings global indiv A When this parameter is set to global and you edit a drum kit other than drum kit number 1 in Drum Kit Trigger Edit Mode You will automatically change the contents of both that drum kit and drum kit number 1 4 Lrn Mode learn mode This function enables you to select the input jack number or M...

Страница 120: ...le to produce voices or transmit MIDI note numbers Use this function when you are setting your drum kit with trigger pick up devices or when you do not want to accidentally make a sound while you are playing a pattern or song Rotate the Data Scroll Wheel or use the 1 YES and 1 NO buttons to turn the Bypass on or off Be sure to turn the Bypass off when you are using the DTX as a regular drum kit tr...

Страница 121: ...contains various MIDI settings Select from 23 display pages using the PAGE or PAGE buttons The settings are to receive or send MIDI data between the DTX and an external MIDI device AMove from this title page to other sub modes by rotating the Data Scroll Wheel or using the 1 YES and 1 NO buttons MISC SNARE KICK CYMBAL UTILITY MIDI 13 DeviceNo device number This sets the MIDI device number The devi...

Страница 122: ...through MIDI channel 10 Channel 10 is the drum part of the DTX Set the parameters to switch the drum kits in the DTX automatically or by using an external MIDI device It is also necessary to set the program change receive parameter of the 15th display page on in order to enable the settings of this parameter AGo to the 23th display page to match the program change number to the drum kit you want t...

Страница 123: ...e Yamaha MIDI Data Filer MDF2 or an external device such as a sequencer that can receive exclusive messages use this function to store or backup the patterns songs chains drum kits or system data by sending the bulk data to the device A Properly connect the external MIDI device enabling it to receive the bulk data Read the manual to set up the device Rotate the Data Scroll Wheel or use the 1 YES a...

Страница 124: ...ary to match the device number of the external device to the device number of the DTX P 117 23 P C KIT program change table This determines the program change number that will be used to change the drum kit number from an external MIDI device or with in the DTX Move the cursor to the program change number using the Q cursor buttons and set the program change number by rotating the Data Scroll Whee...

Страница 125: ...low frequency This function sets the center frequency of the low frequency range of gain control Rotate the Data Scroll Wheel or use the 1 YES and 1 NO buttons to set the center frequency MISC SNARE KICK CYMBAL Lo Freq F 100Hz Settings 32Hz to 2 0 kHz 27 Mid Freq mid frequency This function sets the center frequency of the middle frequency range of gain control Rotate the Data Scroll Wheel or use ...

Страница 126: ...s Note number 0 127 ANote that the sounds used for the CLICK hi mid low may differ depending on the currently selected drum kit since the voices assigned to the MIDI note numbers are different Refer to the drum kit list P 148 for the voice assignment of each note number 31 Click Mid This function sets the sound of the normal click the click of each quarter note of the metronome Rotate the Data Scr...

Страница 127: ...R Settings mainL R aux L R main L main R aux L aux R 34 PlyClick play click This is an additional feature of DTX version 2 0 Please refer to the System Upgrade Information Guide included in this package 35 Tempo This function sets the tempo of a pattern to either change each time to its default tempo or remain unchanged at a set tempo when the pattern is switched in Pattern Play mode Rotate the Da...

Страница 128: ... be muted Set the length of the break by selecting the number of measures First select the pattern in Pattern Play mode and enter this page Move the cursor to T TOP and B BOTTOM using the Q cursor buttons and set the number of the measure to break mute by rotating the Data Scroll Wheel or using the 1 YES and 1 NO buttons T and B have the following functions T TOP Mutes the selected measures of the...

Страница 129: ...RE KICK CYMBAL MIDIctrl on Settings off on 40 SyncMode synchronization mode This synchronizes the DTX with the external MIDI devices such as the rhythm machine Rotate the Data Scroll Wheel or use the 1 YES and 1 NO buttons to set the SyncMode The following two modes are available int Enables you to start stop continue tempo and synchronize the playback of an external MIDI device from the DTX ext E...

Страница 130: ...tch to 63 unit 1 171875 cent 43 Program This assigns normal keyboard voices to each part 1 to 16 Each voice will correspond to the program change numbers 1 to 128 GM system level 1 AThe drum kit currently selected in Drum Kit Play mode is assigned to part 10 Move the cursor and select the part number by rotating the Data Scroll Wheel or using the 1 YES and 1 NO buttons Move the cursor to the voice...

Страница 131: ...MBAL Volume 100 Voice name Part number Settings The following volume parameters can be set for parts 1 to 16 0 to 127 45 Pan This sets the Pan position for each voice assigned to each part This defines the pan position of the voice between left and right in a stereo image Move the cursor to the part number focus area rotae the Data Scroll Wheel or use the 1 YES and 1 NO buttons to select the part ...

Страница 132: ...se tune 64 to 0 normal pitch to 63 unit semitone F fine tune 64 to 0 normal pitch to 63 unit Ca 1 2 cent 47 Rev Send Reverb Send This sets the reverb send level for each voice assigned to each part Move the cursor to the part number focus area and rotate the Data Scroll Wheel or use the 1 YES and 1 NO buttons to select the number Move the cursor to the level focus area and set the level by rotatin...

Страница 133: ...age and a system message A channel message refers to the data regarding a keyboard note or musical expression dumper pedal or volume that can be transmitted through each designated MIDI channel A system message refers to the data that enables multiple instruments linked together to function as a MIDI system The DTX is equipped with a MIDI OUT channel to send out these messages to other MIDI device...

Страница 134: ... The DTX contains drum voices and keyboard voices Each drum voice drum or percussion sound is assigned to MIDI note numbers 0 to 127 and each keyboard voice is assigned to the half notes of MIDI note numbers 0 to 127 For example if you play an external MIDI keyboard and send the key data of note number 60 you will hear the drum voice drum or percussion sound assigned to note number 60 on the DTX i...

Страница 135: ...details on the control change data of the DTX Pitch Bend This data sends the pitch bend data of a pitch bend wheel normally equipped on a synthesizer that bends the pitch up or down The DTX tone generator can receive pitch bend data You can also send pitch bend data to an external MIDI device using a foot controller P 47 System Message The DTX transmits the following system messages The system mes...

Страница 136: ...ith the functions of external keyboards or sequence software By connecting the DTX according to the following illustration it is possible to play the DTX using a programming keyboard to enter the MIDI data or use the DTX as a tone generator to play the MIDI data from a computer As mentioned above the DTX tone generator complies to the GM standards known as the standard of computer music The DTX is...

Страница 137: ...hows how to connect the DTX to external tone generator modules or sequencers to control them and create a large scale configuration for live performances For example by using a pad or foot switch connected to the DTX you can start or stop a MIDI real time message P 125 thereby being able to synchronize a music system on a personal computer to a song on the DTX and conduct a solo live performance B...

Страница 138: ...r 1 3 3 123 all note off Turns off all the notes of the specified channels currently on They will however not be muted unless hold 1 is turned off 1 3 4 124 omni off Executes the same process as all note off 1 3 5 125 omni on Executes the same process as all note off 1 3 6 126 mono Executes the same process as all sound off 1 3 7 127 poly Executes the same process as all sound off 1 4 Program Chan...

Страница 139: ...e chain F043 7D On ss ss DTX cuCH data csum F7 2 2 6 all pattern F043 7D On ss ss DTX alPA data csum F7 2 2 7 one pattern F043 7D On ss ss DTX cuPA data csum F7 2 2 8 all song F043 7D On ss ss DTX alSO data csum F7 2 2 9 one song F043 7D On ss ss DTX cuSO data csum F7 2 2 10 one stack F043 7D On ss ss DTX cuST data csum F7 2 2 11 QY pattern F043 7D On ss ss LM 0086 PT data csum F7 2 2 12 identify ...

Страница 140: ...on the DTX Turn the power OFF and ON again Make sure the output MIDI channel is set to Drum Voice ch 10 P 42 The Velocity Sound is Too Small Make sure the DT10 is securely fastened with new NOT old sticky tape P 11 Raise the gain setting P 36 If the pads have an output or velocity control volume adjust them by raising them Raise the velocity P 37 Try a different velocity curve P 38 Raise the volum...

Страница 141: ...ty curve P 38 If you are using a sensor made by other manufacturers it may be sending a large signal Reset the INPUT ATTENUATION switch on the rear panel P 8 The Hi hat Foot Controller or Footswitch Works Oppositely Turn the power switch on again with the foot controller or footswitch connected to the rear panel The DTX will automatically detect the polarization of the switch and enable regular op...

Страница 142: ...battery replaced ERROR Preset You are trying to edit preset data such as the preset drum kit preset style pattern or preset song or you are sending the bulk dump to a preset number Select a user data area and try again ERR Now Running Bulk dump data is being transmitted while the DTX is playing or recording a song or pattern Stop the playing or recording of the song or pattern and transmit the bul...

Страница 143: ... Store Chain Store Utility Mode System MIDI equalizer sequence multi timbre Effect Reverb hall1 2 room1 2 3 stage1 2 plate white tunnel canyon basement Chorus variation preset for each voice Controls Volume Slider MASTER AUX IN ACCOMP SNARE CYMBAL CLICK KICK MISC Data Scroll Wheel Mode buttons DRUM KIT CHAIN SONG PATTERN TRIGGER VOICE UTILITY STORE PAGE MAIN A B Q Cursor button FILL AB BA 1 NO INT...

Страница 144: ...ame 35 1 Name chain name 67 1 SNARE to 8 H HAT Inputs 8 1 SYSTEM 114 1 VCE voice 53 10 AlterGrp alternate group 57 10 Pat Mute pattern track mute mode 111 10 Spec Rej specific rejection 40 10 9 KICK Input 8 11 Key Off 58 11 Note note numbers settings 40 11 SongName 111 12 Note gate time 42 12 Out Port 58 12 11 Input 8 13 DeviceNo device number 117 13 Note MIDI channel 42 13 REV Rtn reverb return 5...

Страница 145: ...Mode 32 Drum Kit Trigger Edit mode 22 Drum Kit Voice Edit Mode 50 Drum Kit Voice Edit mode 22 Drum Kits 18 Drum or Percussion Sounds 18 Drum voice name 85 Dumper Pedal 131 dynamic 38 E E 53 ENDING 45 46 71 Exclusive Message 131 expand 38 Expression 131 ext 125 F F fine tune 54 128 FCl 40 42 FILL AB 45 46 71 FILL BA 45 46 71 fix1 to fix127 45 FOOT SW Jack 8 FOP 42 FOp 40 FORWARD and REWIND Buttons ...

Страница 146: ...CK Button 7 rim 40 room 1 59 room 2 59 room 3 59 Root 78 79 103 S S 53 s 53 Section 71 101 semi 2 57 Sequence Track 93 SHIFT Button 7 single 44 124 Single Mode 97 snare 35 Solo 78 SOLO Button 7 Song 19 song 93 SONG Button 6 Song Job Mode 107 Song Job mode 24 Song Play Mode 93 Song Play mode 24 Song Record Mode 99 Song Record mode 24 stack 43 stackMN 43 stage 1 59 stage 2 59 START STOP Button 7 sta...

Страница 147: ...O_S 28 K 28 BD Metal 86 K 86 BD Rave7 144 S 25 ToshL fi 202 S 83 S FT NZ3 29 K 29 BD GATE1 87 K 87 BD Rave8 145 S 26 Tosh Sn 203 S 84 S RuberS 30 K 30 BD GATE2 88 K 88 BD Rave9 146 S 27 Pilow Sn 204 S 85 BrshSlp 31 K 31 BD GATE3 89 K 89 BDRave10 147 S 28 Blaaaghf 205 S 86 S Brsh 32 K 32 BD GateM 90 K 90 BDRave11 148 S 29 ParadeS 206 S 87 S BrshTp 33 K 33 BD ELEC1 91 K 91 BDdance1 149 S 30 HiGateSn...

Страница 148: ... 433 T 64 Rock 4 260 S 141 Sticky 318 S 199 BrshHit2 376 T 7 Dry2 Lo 434 T 65 Rock 5 261 S 142 RIMfat1 319 S 200 Brsh2Rim 377 T 8 Dry2 Flr 435 T 66 Rock 6 262 S 143 Slappy 320 S 201 Brushup 378 T 9 Lite Hi 436 T 67 E Tom1 263 S 144 RIMnashy 321 S 202 BrsUpRim 379 T 10 Lite Mid 437 T 68 E Tom2 264 S 145 OldCan 322 S 203 BrshSwep 380 T 11 Lite Lo 438 T 69 E Tom3 265 S 146 RIM hipop 323 S 204 BrshAta...

Страница 149: ...sA 492 T 123 AnaTom1 550 C 5 Rider3 608 C 63 H OpnLA2 666 P 16 P Clvs 493 T 124 AnaTom2 551 C 6 Bell A 609 C 64 H OpnLX1 667 P 17 P BassDr 494 T 125 AnaTom3 552 C 7 Rocksizl 610 C 65 H OpnDWX 668 P 18 P CongaC 495 T 126 AnaTom4 553 C 8 RidesizA 611 C 66 H OpnNB 669 P 19 P CongaH 496 T 127 AnaTom5 554 C 9 RidesizB 612 C 67 H OPMu 670 P 20 P CongaM 497 T 128 AnaTom6 555 C 10 RidesizC 613 C 68 H Opn1...

Страница 150: ... 724 P 74 P ClapL 782 E 29 E DSqrm 840 E 87 RubbrOil 898 b 1 AcBass 725 P 75 P TalkD 783 E 30 E Door 841 E 88 BreakOut 899 b 2 SyBass1L 726 P 76 P TimpH 784 E 31 E Gun 2 842 E 89 OmenBass 900 b 3 SyBass1H 727 P 77 P TimpL 785 E 32 E BrsHit 843 E 90 TimbTimp 901 b 4 BassSAWL 728 P 78 P GranC 786 E 33 E OrcHt1 844 E 91 NoyzEB 902 b 5 BassSAWH 729 P 79 P GrnCRe 787 E 34 E Laugh 845 E 92 SlikRoad 903 ...

Страница 151: ...Orgn 2 67 TenorSax 1 115 SteelDrm 2 20 ChrchOrg 2 68 Bari Sax 1 116 WoodBlok 1 21 ReedOrgn 1 69 Oboe 1 117 TaikoDrm 1 22 Acordion 2 70 Eng Horn 1 118 MelodTom 1 23 Harmnica 1 71 Bassoon 1 119 Syn Drum 1 24 TangoAcd 2 72 Clarinet 1 120 RevCymbl 1 25 Guitar NylonGtr 1 73 Pipe Piccolo 1 121 Sound Effect FretNoiz 1 26 SteelGtr 1 74 Flute 1 122 BrthNoiz 1 27 Jazz Gtr 1 75 Recorder 1 123 Seashore 2 28 C...

Страница 152: ... HAT H Hat 46 42 44 20 0 16 0 21 P 46 P Mtron 20 1 0 0 1 PAD9 KICK 0 36 33 0 0 0 0 0 22 P 45 P MtBel 19 1 0 0 1 PAD10 0 53 0 0 0 0 0 0 23 P 71 P WBloc 38 11 0 0 1 PAD11 0 53 0 0 0 0 0 0 24 P 71 P WBloc 0 15 0 0 1 PAD12 0 56 0 0 0 0 0 0 25 S 95 BrshTap2 0 0 0 0 1 26 S 92 BrSwL 0 0 0 1 1 27 S 97 BrshSlpL 0 0 0 0 1 28 S 93 BrSwH 0 0 0 1 1 29 S 81 SnRoll2 0 0 0 1 1 30 P 10 P Castnt 0 0 0 0 1 31 S 9 Wo...

Страница 153: ...HipNs 0 0 2 1 1 82 P 49 P Shake1 0 0 0 0 1 83 E 108 NYCLoop 21 0 0 1 3 84 E 101 UptownL 10 0 0 1 3 Corse fine 34 Rock 1 Drum Voice ch10 PAD ASSIGNMENT Note Pitch Alt Key Key Trigger Input Key on Note Number 0 off Number Voice Name Grp Off mode Mode 1st 2nd 3rd 4th 5th RIM MUTE 13 T 173 Night H 0 1 3 0 1 PAD1 SNARE 0 38 40 0 0 0 34 0 14 T 174 Night M 0 1 3 0 1 PAD2 TOM1 0 48 0 0 0 0 13 0 15 T 175 N...

Страница 154: ... 3 77 P 71 P WBloc 0 6 0 0 1 78 P 31 P CuicaH 0 0 0 0 1 79 E 1 E CoolSA 0 1 0 0 1 80 P 64 P TriMut 0 0 2 0 1 81 P 65 P Triang 0 0 2 0 1 82 P 49 P Shake1 0 0 0 0 1 83 C 43 C Splsh1 0 0 0 0 1 84 E 20 E TV vo 37 0 0 0 0 Corse fine 37 N Y 1 Drum Voice ch10 PAD ASSIGNMENT Note Pitch Alt Key Key Trigger Input Key on Note Number 0 off Number Voice Name Grp Off mode Mode 1st 2nd 3rd 4th 5th RIM MUTE 13 K ...

Страница 155: ...0 7 2 1 3 81 s 1 STRNG 4 0 4 2 1 3 82 P 27 P CowB1 0 0 0 0 1 83 s 1 STRNG 4 0 5 0 1 3 84 P 64 P TriMut 0 0 0 0 0 Corse fine 39 Country Drum Voice ch10 PAD ASSIGNMENT Note Pitch Alt Key Key Trigger Input Key on Note Number 0 off Number Voice Name Grp Off mode Mode 1st 2nd 3rd 4th 5th RIM MUTE 13 P 52 P SurdoM 0 0 3 0 1 PAD1 SNARE 0 38 31 40 0 0 34 0 14 E 101 UptownL 0 1 0 1 3 PAD2 TOM1 0 48 0 0 0 0...

Страница 156: ... 71 P WBloc 0 6 0 0 1 78 P 31 P CuicaH 0 0 0 0 1 79 P 32 P CuicaL 0 1 0 0 1 80 P 64 P TriMut 0 0 2 0 1 81 P 65 P Triang 0 0 2 0 1 82 P 49 P Shake1 0 0 0 0 1 83 C 2 CrshDRK 0 0 0 0 1 84 P 86 Bell Tre 0 4 0 0 0 Corse fine 41 Rock 2 Drum Voice ch10 PAD ASSIGNMENT Note Pitch Alt Key Key Trigger Input Key on Note Number 0 off Number Voice Name Grp Off mode Mode 1st 2nd 3rd 4th 5th RIM MUTE 13 T 173 Nig...

Страница 157: ... Triang 0 0 2 0 1 82 P 49 P Shake1 0 0 0 0 1 83 C 43 C Splsh1 0 0 0 0 1 84 P 86 Bell Tre 0 4 0 0 0 Corse fine 43 X Fade Drum Voice ch10 PAD ASSIGNMENT Note Pitch Alt Key Key Trigger Input Key on Note Number 0 off Number Voice Name Grp Off mode Mode 1st 2nd 3rd 4th 5th RIM MUTE P 52 P SurdoM 0 0 3 0 1 PAD1 SNARE 0 38 31 40 0 0 34 0 13 C 2 CrshDRK 0 0 0 0 1 PAD2 TOM1 0 48 0 0 0 0 23 0 14 P 40 P HiQ ...

Страница 158: ... 0 6 0 0 1 78 P 31 P CuicaH 0 0 0 0 1 79 P 32 P CuicaL 0 1 0 0 1 80 P 64 P TriMut 0 0 2 0 1 81 P 65 P Triang 0 0 2 0 1 82 P 49 P Shake1 0 0 0 0 1 83 C 44 C Splsh2 0 7 0 0 1 84 P 86 Bell Tre 0 4 0 0 0 Corse fine 45 Dance 1 Drum Voice ch10 PAD ASSIGNMENT Note Pitch Alt Key Key Trigger Input Key on Note Number 0 off Number Voice Name Corse fine Grp Off mode Mode 1st 2nd 3rd 4th 5th RIM MUTE 13 P 52 P...

Страница 159: ... 2 0 1 82 P 49 P Shake1 0 0 0 0 1 83 P 85 JingBell 0 2 0 0 1 84 P 86 Bell Tre 0 4 0 0 0 Corse fine 47 HHpDncMX Drum Voice ch10 PAD ASSIGNMENT Note Pitch Alt Key Key Trigger Input Key on Note Number 0 off Number Voice Name Grp Off mode Mode 1st 2nd 3rd 4th 5th RIM MUTE 13 K 118 BDbass2 0 12 3 0 1 PAD1 SNARE 0 40 0 0 0 0 34 0 14 K 118 BDbass2 0 5 3 0 1 PAD2 TOM1 0 VoiceOoh ch14 0 0 0 0 0 15 K 118 BD...

Страница 160: ...P 71 P WBloc 0 6 0 0 1 78 P 31 P CuicaH 0 0 0 0 1 79 P 32 P CuicaL 0 1 0 0 1 80 P 64 P TriMut 0 0 2 0 1 81 P 65 P Triang 0 0 2 0 1 82 P 49 P Shake1 0 0 0 0 1 83 T 117 ETMooRXL 0 2 0 0 1 84 P 86 Bell Tre 0 4 0 0 0 Corse fine 49 IndustMX Drum Voice ch10 PAD ASSIGNMENT Note Pitch Alt Key Key Trigger Input Key on Note Number 0 off Number Voice Name Grp Off mode Mode 1st 2nd 3rd 4th 5th RIM MUTE 13 E 8...

Страница 161: ...0 0 2 0 1 82 P 49 P Shake1 0 0 0 0 1 83 off off 0 2 0 0 1 84 P 86 Bell Tre 0 4 0 0 0 Corse fine 51 LatinPer Drum Voice ch10 PAD ASSIGNMENT Note Pitch Alt Key Key Trigger Input Key on Note Number 0 off Number Voice Name Grp Off mode Mode 1st 2nd 3rd 4th 5th RIM MUTE 13 P 52 P SurdoM 0 0 3 0 1 PAD1 SNARE 0 64 0 0 0 0 20 0 14 P 53 P Surdo 0 2 3 0 1 PAD2 TOM1 0 65 0 0 0 0 56 0 15 P 6 P BongMu 0 2 0 0 ...

Страница 162: ...P WBloc 0 6 0 0 1 78 P 31 P CuicaH 0 0 0 0 1 79 P 32 P CuicaL 0 1 0 0 1 80 P 64 P TriMut 0 0 2 0 1 81 P 65 P Triang 0 0 2 0 1 82 P 49 P Shake1 0 0 0 0 1 83 P 85 JingBell 0 2 0 0 1 84 P 86 Bell Tre 0 4 0 0 0 Corse fine 53 Latin Drum Voice ch10 PAD ASSIGNMENT Note Pitch Alt Key Key Trigger Input Key on Note Number 0 off Number Voice Name Grp Off mode Mode 1st 2nd 3rd 4th 5th RIM MUTE 13 P 52 P Surdo...

Страница 163: ... 0 0 2 0 1 82 P 49 P Shake1 0 0 0 0 1 83 P 85 JingBell 0 9 0 0 1 84 E 82 TineDrum 0 13 0 0 0 Corse fine 55 World 2 Drum Voice ch10 PAD ASSIGNMENT Note Pitch Alt Key Key Trigger Input Key on Note Number 0 off Number Voice Name Grp Off mode Mode 1st 2nd 3rd 4th 5th RIM MUTE 13 P 23 P CongC7 0 13 3 0 1 PAD1 SNARE 0 31 0 0 0 0 34 0 14 P 23 P CongC7 0 8 3 0 1 PAD2 TOM1 0 48 0 0 0 0 37 0 15 P 55 P Tabla...

Страница 164: ...1 77 P 71 P WBloc 0 6 0 0 1 78 P 31 P CuicaH 0 0 0 0 1 79 P 32 P CuicaL 0 1 0 0 1 80 P 64 P TriMut 0 0 2 0 1 81 P 65 P Triang 0 0 2 0 1 82 P 49 P Shake1 0 0 0 0 1 83 P 85 JingBell 0 2 0 0 1 84 P 86 Bell Tre 0 4 0 0 0 57 GM std 2 Drum Voice ch10 PAD ASSIGNMENT Note Pitch Alt Key Key Trigger Input Key on Note Number 0 off Number Voice Name Grp Off mode Mode 1st 2nd 3rd 4th 5th RIM MUTE 13 P 52 P Sur...

Страница 165: ... 0 0 2 0 1 82 P 49 P Shake1 0 0 0 0 1 83 P 85 JingBell 0 2 0 0 1 84 P 86 Bell Tre 0 4 0 0 0 Corse fine 59 GM rock Drum Voice ch10 PAD ASSIGNMENT Note Pitch Alt Key Key Trigger Input Key on Note Number 0 off Number Voice Name Grp Off mode Mode 1st 2nd 3rd 4th 5th RIM MUTE 13 P 52 P SurdoM 0 0 3 0 1 PAD1 SNARE 0 31 0 0 0 0 34 0 14 P 53 P Surdo 0 2 3 0 1 PAD2 TOM1 0 48 0 0 0 0 37 0 15 P 40 P HiQ 0 2 ...

Страница 166: ...oc 0 6 0 0 1 78 P 47 P Scrach 0 1 0 0 1 79 P 47 P Scrach 0 4 0 0 1 80 P 64 P TriMut 0 0 2 0 1 81 P 65 P Triang 0 0 2 0 1 82 P 49 P Shake1 0 0 0 0 1 83 P 85 JingBell 0 2 0 0 1 84 P 86 Bell Tre 0 4 0 0 0 Corse fine 61 GM anal Drum Voice ch10 PAD ASSIGNMENT Note Pitch Alt Key Key Trigger Input Key on Note Number 0 off Number Voice Name Grp Off mode Mode 1st 2nd 3rd 4th 5th RIM MUTE 13 P 52 P SurdoM 0...

Страница 167: ...0 0 2 0 1 82 P 49 P Shake1 0 0 0 0 1 83 P 85 JingBell 0 2 0 0 1 84 P 86 Bell Tre 0 4 0 0 0 Corse fine 63 GM brush Drum Voice ch10 PAD ASSIGNMENT Note Pitch Alt Key Key Trigger Input Key on Note Number 0 off Number Voice Name Grp Off mode Mode 1st 2nd 3rd 4th 5th RIM MUTE 13 P 52 P SurdoM 0 0 3 0 1 PAD1 SNARE 0 28 0 0 0 0 39 0 14 P 53 P Surdo 0 2 3 0 1 PAD2 TOM1 0 48 0 0 0 0 31 0 15 P 40 P HiQ 0 2 ...

Страница 168: ... 0 0 0 55 54 20 P 36 P FSnap1 0 9 0 0 1 PAD8 H HAT H Hat 46 42 44 46 0 46 0 21 P 46 P Mtron 20 1 0 0 1 PAD9 KICK 0 35 0 0 0 0 0 0 22 P 45 P MtBel 19 1 0 0 1 PAD10 0 53 0 0 0 0 0 0 23 P 71 P WBloc 38 11 0 0 1 PAD11 0 76 0 0 0 0 0 0 24 P 71 P WBloc 0 15 0 0 1 PAD12 0 77 0 0 0 0 0 0 25 S 95 BrshTap2 0 0 0 0 1 26 S 92 BrSwL 0 0 0 1 1 27 S 97 BrshSlpL 0 0 0 0 1 28 S 93 BrSwH 0 0 0 1 1 29 S 80 SnrRoll 0...

Страница 169: ...7 WO Grass 120 108 WO Polka 126 109 WO Mrch 126 110 WO Waltz 180 No Name Repeat Play Recorded Track 1 CityDogs Linear Track TR1 TR2 2 Vee Bop 3 NYC BOYZ 4 Whirled 5 FeelNite 6 Straight 7 HR 01 Pattern Rhythm Bass Chord Pattern Rhythm Bass Chord 8 HR 02 9 HR 03 10 HR 04 11 HR 05 12 BA 01 13 BA 02 14 BA 03 15 BA 04 16 BA 05 17 BA 06 18 BA 07 19 RP 01 20 RP 02 21 RP 03 22 RP 04 23 RP 05 24 RP 06 25 R...

Страница 170: ...pec Rejection 1st Note Voice Gate Time MIDI 2nd Note Voice MIDI 3rd Note Voice MIDI 4th Note Voice MIDI 5th Note Voice MIDI RIM Note Voice MIDI MUTE Note Voice MIDI Key on Mode Vel X Fade RIM Mode RIM Velocity PAD Function FS Function FC Function HiHat Control FS MIDI FC MIDI FS HiHat Cls FC Sensitivity Drum Kit Trigger Edit Parameter Blank Chart ...

Страница 171: ... Key off Out Port No Name 13 14 15 16 17 18 19 20 21 22 23 24 25 26 27 28 29 30 31 32 33 34 35 36 37 38 39 40 41 42 43 44 45 46 47 48 49 50 51 52 53 54 55 56 57 58 59 60 61 62 63 64 65 66 67 68 69 70 71 72 73 74 75 76 77 78 79 80 81 82 83 84 Root Reverb Return Send Prog Change Send Pan Note Reverb Type Send Bank Select Send Cntrl Change Reverb Time Send Volume ...

Страница 172: ...1 assignable 0 1 6 7 10 11 64 71 72 73 74 84 91 100 101 120 121 1 119 Control Change 〇 1 〇 〇 〇 〇 〇 〇 〇 All sound off Reset All Controllers Default Changed Default Messages Altered True voice Note on Note off Key s Ch s Basic Channel Mode Note Number Velocity After Touch Pitch Bender Function Transmitted Recognized Remarks 1 16 1 16 3 3 0 127 0 127 〇 v 1 127 〇 5 6 7 10 1 16 0 127 0 127 〇 9nH v 1 12...

Страница 173: ...awa cho 10 1 Hamamatsu Japan 430 Tel 053 460 2314 MIDDLE EAST TURKEY CYPRUS Yamaha Musique France Division Export BP 70 77312 Marne la Valée Cedex 2 France Tel 01 64 61 4000 OTHER COUNTRIES Yamaha Corporation International Marketing Division Nakazawa cho 10 1 Hamamatsu Japan 430 Tel 053 460 2314 ASIA HONG KONG Tom Lee Music Co Ltd 11th Floor Tower 1 Silvercord 30 Canton Road Tsimshatsui Kowloon Ho...

Страница 174: ...D T M T YAMAHA DRUM TRIGGER MODULE DTX VERSION2 0 OWNER S MANUAL ...

Отзывы: