


3
4. How to Operate the Machine
WARNING
- When the machine is operated, electrostatic sparks may give a shock to the human body or cause
death or bodily injury due to a fire or explosion. Be sure to perform grounding securely by using a
grounding conductor according to the operating environment.
CAUTION
- The supply air pressure should be 0.7 MPa or less. If the primary pressure is more than 0.7 MPa,
install an air regulator on the air line and adjust the pressure to 0.7 MPa or less.
- After the end of daily work or when the machine is not operated for a long time, be sure to shut off the
supply air and open the discharge port valve to bleed the internal pressure of the pump and hose.
Any secondary accident such as pollution of installation, due to hose damage or leakage from the
valve without shutting off the supply air, shall be attributable to the user’s responsibility.
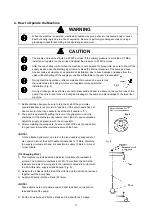
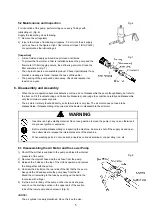
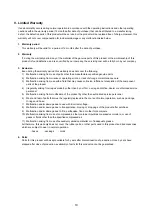
- During machine operation or after completion of movement, be sure to lock
the caster brake for locking. A turnover of equipment may pollute the
installation. (Fig. 3)
- During oil change, take extreme care not to allow sand and dust to adhere on the suction tune of the
pump. If sand is mixed in the oil, it will give breakage to the pump and also damage to the important
machine.
1
)
Before starting oil supply, be sure to turn the knob of the grip meter
counterclockwise to reset to the “0” position. (If the short needle has not
been reset, turn the long needle to reset the short needle to “0”.)
2
)
The pump is operated by pulling the lever of the grip meter, and oil is
discharged. If the discharge oil pressure is so high as to cause splashes,
adjust the supply air pressure with the air regulator.
3
)
After completing the oiling work, be sure to shut off the air chuck and pull
the gun lever to bleed the internal pressure of the hose.
<NOTE>
On the attached grip meter, one turn of the long needle corresponds to 1
liter, and one turn of the short needle corresponds to 10 liters. Watching
the supply oil volume at hand, it is possible to supply 10 liters or more of
oil per minute.
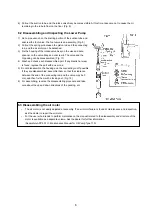
[Oil Changing Work]
1) This machine is provided with an indicator to indicate the residual oil
volume. The indicator is positioned at 10 to 15 mm from the lid. As the
residual oil volume is running short, the indicator comes into contact with
the lid. At this time, supply oil additionally. (Fig. 5)
2) Release the 3 clasps on the top of the oil tank, and the lid can be removed
together with the pump Assy.
3) Supply oil directly into the oil tank (50 liters).
<NOTE>
Take extreme care not to allow sand and dust to adhere on the suction
tube and float of the pump.
4) Put the lid as it was and fix the oil tank and the lid with the 3 clasps.
Fig.3
Содержание 880635
Страница 2: ......


