background image

7

An ASSA ABLOY Group brand

P/N AYRT-220-INST-FUL Rev B

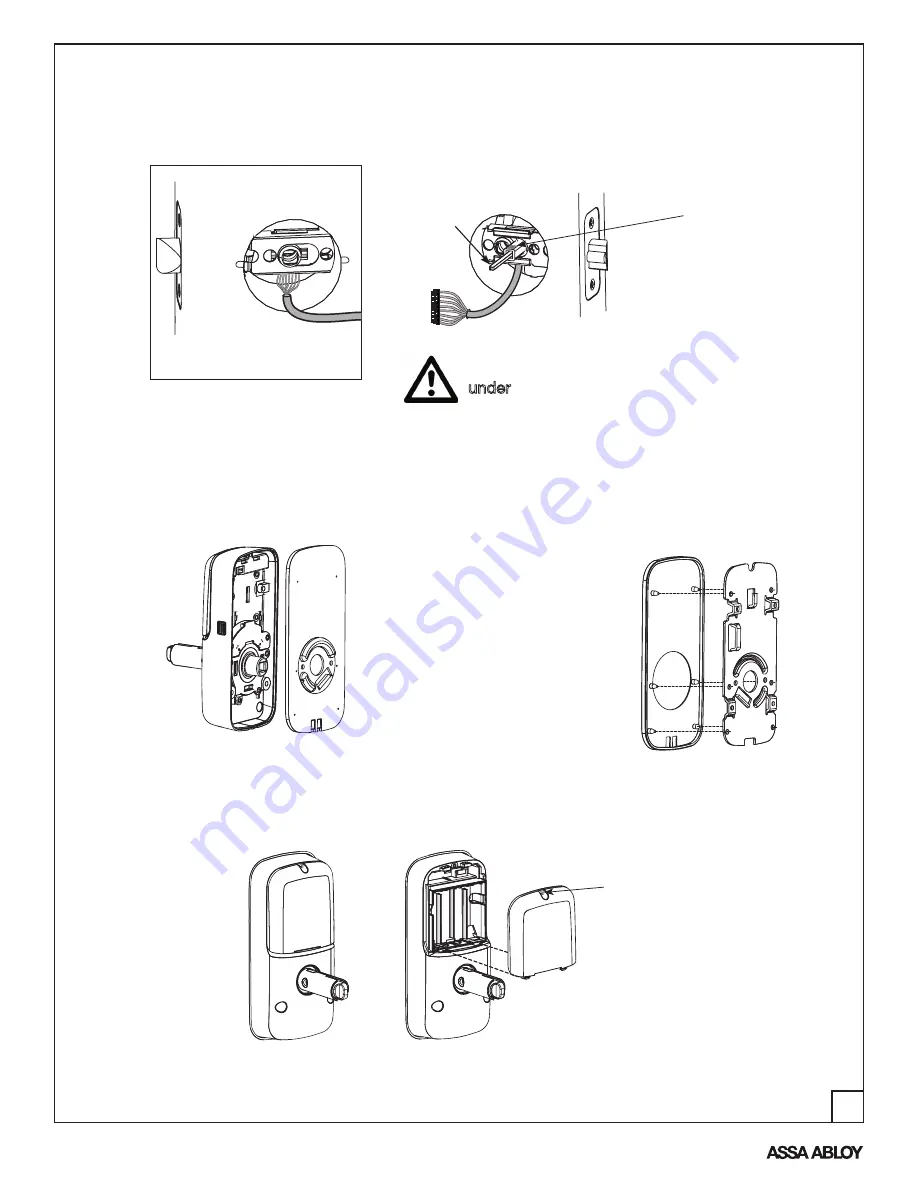
Figure 4

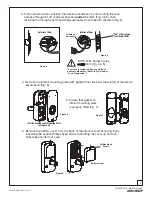
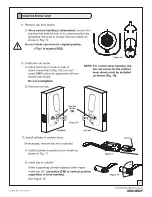
3. From outside of door, position the exterior escutcheon by first routing the wire     
    harness through 2-1/8" diameter hole and 

under

 the latch (Fig. 4 & 5), then            

    inserting the through posts

*

 and tailpiece/square drive tube into the latch (Fig. 5).   

 NOTE: Wire harness goes    
 under latch (Fig. 4 & 5).  

Exterior of Door

Figure 5

Interior of Door

"Top" of Drive Tube       

(marked BLACK)

Tailpiece 

horizontal

*

Posts are inserted in holes according to 

backset adjustment. (Refer to Fig. A under 

"Lock Preparation")

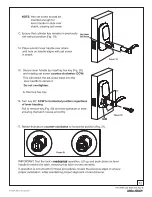
4.  Remove the interior mounting plate (with gasket) from the back (door side) of the interior 

escutcheon (Fig. 6).

A. Ensure that gasket on  
    interior mounting plate  
    is properly fitted (Fig. 7).   

Figure 7

Figure 6

Interior Escutcheon & Mounting Plate 

(with gasket)

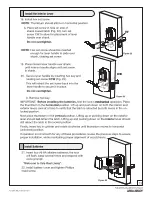
      5.  Remove the battery cover from the back of the interior escutcheon (Fig. 8) by           

           loosening the captive Phillips head screw, then lifting the cover up and out.                        

           Note tabs at bottom of cover.

Phillips Head 

Screw

Battery Cover

Figure 8

Содержание RealLiving YRT210

Страница 1: ......

Страница 2: ......

Страница 3: ...y compris l interf rence qui peut causer l op ration peu d sir e For the U4A YRHCPZB0 and 6982A YRHCPZB0 the following statement applies This equipment complies with FCC IC radiation exposure limits s...

Страница 4: ......

Страница 5: ...facing in while standing outside of the door NOTE Both latch face and strike have adhesive backed covers to prevent marring and should be removed upon installation IMPORTANT Latch bevel must match doo...

Страница 6: ......

Страница 7: ...marked BLACK Tailpiece horizontal Posts are inserted in holes according to backset adjustment Refer to Fig A under Lock Preparation 4 Remove the interior mounting plate with gasket from the back door...

Страница 8: ......

Страница 9: ......

Страница 10: ......

Страница 11: ......

Страница 12: ......

Страница 13: ......

Страница 14: ......

Страница 15: ...o connect with a network controller One Touch Locking When the latch is retracted activating the keypad will extend the latch during Automatic Re lock duration or when Automatic Re lock is disabled Wh...

Страница 16: ......

Страница 17: ...ctory default see the following The following procedure returns the lock to its factory defaults by deleting all user codes including the Master PIN code and returning all programming features to thei...

Страница 18: ......

Страница 19: ...amming Through Menu Mode Using Master PIN code 1 Touch the screen with the back of your hand or fingers to activate 2 Enter the 4 8 digit Master PIN code followed by the key Lock Response Menu mode en...

Страница 20: ......

Страница 21: ...r The same PIN code cannot be used for multiple users Registration management of PIN codes is set by the authority of Master PIN Code The Master PIN code must be registered prior to adding any users C...

Страница 22: ......

Страница 23: ...___ User ___ User ___ User ___ User ___ User ___ User ___ User ___ User ___ User ___ User ___ User ___ User ___ User ___ User ___ User ___ User ___ User ___ User ___ User ___ User ___ User ___ User _...

Страница 24: ......
Отзывы: