background image

68

69

1

2

3

4

5

6

7

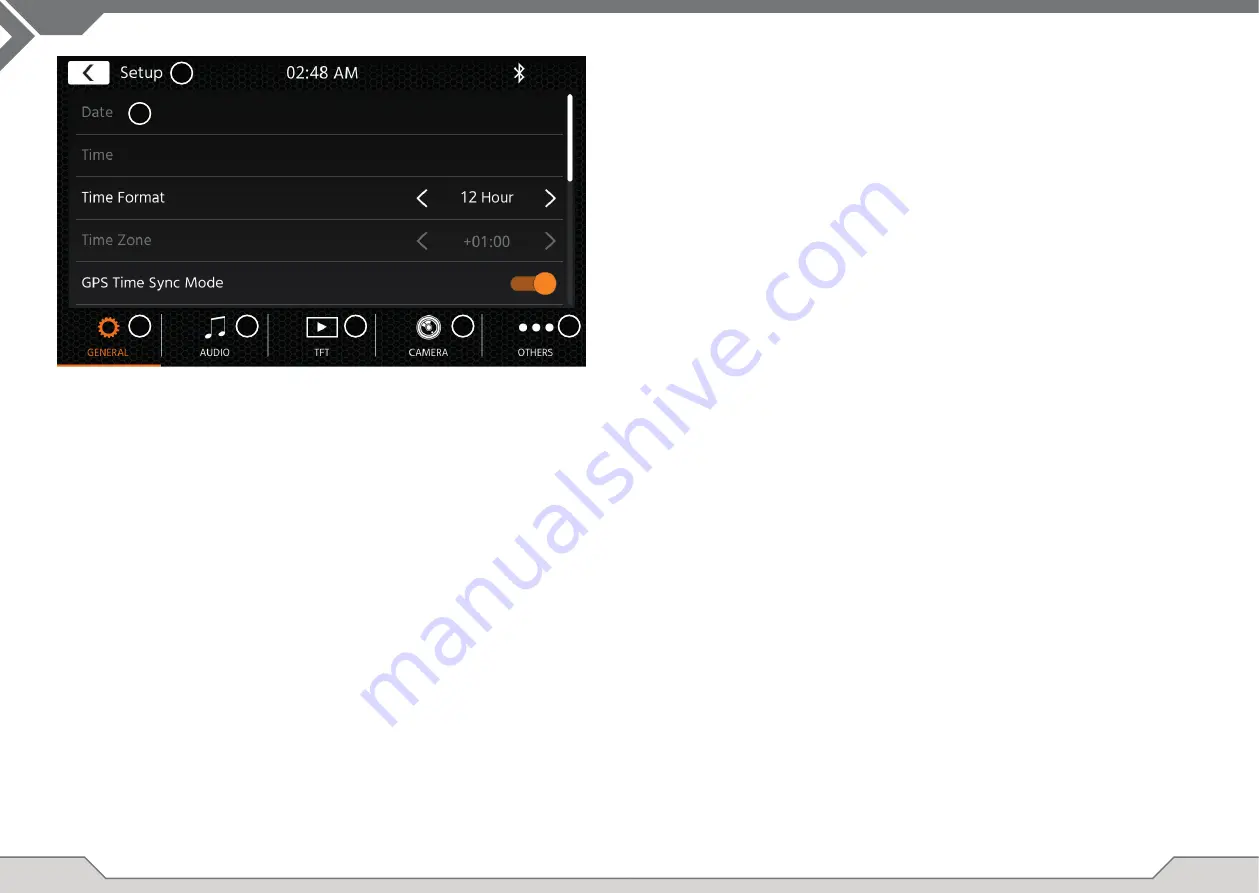
Pulsanti di funzionamento:

1.  Indietro 

Premere per tornare alla schermata iniziale.

2.  Area liste  L'area liste mostrata varia in base alla categoria selezionata in quel momento. 


 Per visualizzare altre impostazioni, è possibile scorrere la lista verso l'alto o il basso oppure 

selezionare una categoria diversa nell'area inferiore.

3.  Generale  Contiene impostazioni generali quali lingua, data e ora, assegnazione tasti FAV.
  

3(a) Lingua del sistema: Premere i tasti freccia per selezionare la lingua.


3(b) Modalità sincronizzazione ora (DAB+): Premere per attivare/disattivare questa impostazione.


3(c) FAV, pressione rapida: Premere i tasti freccia per assegnare una funzione diversa.


3(d) FAV, pressione a lungo: Premere i tasti freccia per assegnare una funzione diversa. 


3(e)  Segnale acustico: Premere per attivare/disattivare questa impostazione (la riproduzione di un 

segnale acustico a ogni pressione dei tasti).


3(f) Microfono: Premere il tasto freccia per cambiare il microfono selezionato.


3(g)  Illuminazione tasti: Premere il tasto freccia per scegliere tra l’illuminazione dei tasti colore blu 

ghiaccio o bianco.


3(h) Sfondo: Premere per selezionare uno sfondo diverso.


3(i)  Data: Premere per impostare una data manualmente (solo qualora la modalità Sincronizza 

fosse disattivata). 


3(j)  Ora: Premere per impostare l'orario manualmente (solo qualora la modalità Sincronizza fosse 

disattivata). 


3(k) Fuso orario: Premere per impostare il fuso orario manualmente.


3(l) Formato orario: Premere i tasti freccia per scegliere tra il formato a 12 o 24 ore. 


3(m) Connettività Apple: premere per modifi care la modalità

4.  Audio 

Contiene le impostazioni per regolare l'audio e i suoni.


4(a)  Bilanciamento: Premere i tasti freccia per spostare la posizione centrale a sinistra o a 

destra.


4(b) Fader: Premere i tasti freccia per spostare la posizione centrale in avanti o indietro.


4(c)  Equalizzatore: Toccare per aprire l’equalizzatore. Qui è possibile selezionare diverse impo-

stazioni predefi nite dell'equalizzatore o modifi care manualmente le bande di frequenza a 

piacimento.

Bilanciamento e Fader possono essere anche regolati visivamente oppure è possibile 

regolare i valori LPF, i livelli del subwoofer e l'intensità.

IMPOST. DISPOSITIVO


4(d) Intensità: Premere per attivare/disattivare l’intensità.


4(e) Alimentazione subwoofer: Premere per attivare/disattivare l’alimentazione del subwoofer.


4(f)  Guadagno Subwoofer: Premere il tasto freccia per modifi care il guadagno del subwoofer se 

la relativa alimentazione è impostata su ON.


4(g)  Navi Mixer: Premere per attivare o disattivare il mixaggio della voce del navigatore e 

dell'audio di sottofondo.


4(h)  Volume all'avvio: Premere il tasto +. Qui è possibile modifi care individualmente tutte le 

sorgenti disponibili a livello di volume all'avvio.

È possibile applicare l'ultimo volume utilizzato o impostare un volume fi sso da usare 

all'avvio.

5.  TFT 

 Qui è possibile regolare le impostazioni a livello di schermo, come la modalità Luminosità e i 

valori relativi.


5(a) Luminosità giorno TFT: Premere i tasti freccia per impostare il valore della modalità Giorno.


5(b) Luminosità notte TFT: Premere i tasti freccia per impostare il valore della modalità Notte.


5(c) Modalità Dimmer: Premere i tasti freccia per impostare questo valore.

 Auto: la luminosità viene regolata in modo automatico con l'attivazione dei fari anteriori del 

veicolo (Notte).
Giorno: la luminosità è costantemente impostata sul valore della modalità Giorno.
Notte: la luminosità è costantemente impostata sul valore della modalità Notte.


5(d)  StandBy automatico del touchscreen: Qualora sia impostato un tempo di inattività, lo 

schermo si disattiverà se non viene utilizzato (l'audio continuerà a essere riprodotto in 

sottofondo).

6.  Telecamera Consente di regolare le impostazioni della telecamera collegata per la visuale posteriore.


6(a) Telecamera retromarcia: Premere i tasti freccia per regolare questo valore.

Cam1: Utilizzerà l'ingresso Video Cam1
Cam2: Utilizzerà l'ingresso Video Cam2
 Cam1+Cam2: Utilizzerà la Video Cam1 in retromarcia e passerà automaticamente alla 

Cam2, dopo un brevissimo intervallo, quando viene disinserita la retromarcia.


6(b)  Disattiva telecamera retromarcia: Premere per modifi care il valore (Disattiva audio, Ridici 

audio, Off)


6(c)  Spegnimento posticipato della telecamera retromarcia: Premere i tasti freccia per modifi ca-

re il tempo del ritardo con cui la visuale della telecamera si chiude in automatico dopo aver 

disinserito la retromarcia. 


6(d)  Immagine da telecamera: Premere i tasti freccia per regolare questo valore (normale 

oppure orizzontale a specchio).


6(e)  Reticoli Telecamera 1: Premere per attivare e disattivare i reticoli della telecamera 1. Alla 

sorgente della telecamera, è possibile regolare la posizione dei reticoli, se la funzione è 

impostata su ON.


6(f)  Reticoli Telecamera 2: Premere per attivare e disattivare i reticoli della telecamera 2. Alla 

sorgente della telecamera, è possibile regolare la posizione dei reticoli, se la funzione è 

impostata su ON

7.  Varie 

 Qui si trovano informazioni sulla versione del software del dispositivo e sulle impostazioni di 

fabbrica.


7(a)  Versione software: Premere il tasto + per visualizzare la versione del software di sistema 

dell'unità.


7(b)  Installazione del software: Premere il tasto + per avviare l'installazione del software dalla 

porta USB-1. 

Se non vengono trovati i fi le, i pulsanti per procedere non verranno abilitati.


7(c)  Impostazioni di fabbrica: Premere il tasto + e confermare qualora si desideri riportare 

l'unità alle impostazioni di fabbrica. 


7(d) Licenza Open Source: premere per vedere il testo della licenza.

Содержание X-F285

Страница 1: ...X F285 USER MANUAL Car Specific Infotainer X F285 ARGO Series USER MANUAL MANUALE D USO USER MANUAL BENUTZERHANDBUCH MANUEL DE L UTILISATEUR...

Страница 2: ...ccidents can be huge Incorrectly mounted devices pose a serious risk for the driver and passengers during an accident Protect the unit from water and other liquids that could enter the housing A short...

Страница 3: ...ot for navigationssoftware optional not included in this set C MIC internal microphone for handsfree functions D IR IR eye for remote control E Release Notch Used for release keys to unmount the devic...

Страница 4: ...in a station change while a long press will change the active DAB ensemble During call handling the buttons functionality will change to Phone buttons 2 Phone These buttons are sharing the pickup and...

Страница 5: ...an change individually all available sources in regard of startup volume You can choose to apply the last used volume or set a fix volume on startup 5 TFT Here you can adjust settings in regard of the...

Страница 6: ...you also can directly tap to play 5 Preset This view shows the preset buttons that work like a quick select or favorite button To save the current station to a preset button press and hold it until th...

Страница 7: ...iPod can be accessed among other ways thru their home screen icon and BT music with a connected phone via the Bluetooth source to play audio BT USB iPod or video USB only Playing files is similar for...

Страница 8: ...function to look up a contact A contact can be operated like a folder and be tapped to open its containing numbers Tap on the line number to initiate a call attempt Use the orange back button on top l...

Страница 9: ...ows different icons and colors Gray SAT icon if no GPS signal available white SAT icon if no position possible green SAT Icon if position is OK green Gyro Icon if the DR system is active Navigation So...

Страница 10: ...duct is changed erased made illegible or removed The same applies if the receipt or invoice is incomplete and or illegible when presented Is XZENT liable for other defects or damage XZENT will repair...

Страница 11: ...GPS mode with active route guidance VOL 40 3 80 A 13 8 V operating voltage with front and rear 4 ohm loudspeaker connected to device Transmitters max power Bluetooth module 100 mW Transmitters freque...

Страница 12: ...Unf llen k nnen enorm sein Fehlerhaft montierte Ger te stellen bei einem Unfall ein ernsthaftes Risiko f r Fahrer und Beifahrer dar Sch tzen Sie das Ger t vor Wasser und anderen Fl ssigkeiten die in d...

Страница 13: ...zugewiesene FAV Langdr ckfunktion aus den Ger teeinstellungen auszuf hren siehe Kapitel Ger teeinstellungen A RESET Dr cken Sie um einen Power Reset durchzuf hren B MAP MicroSD Steckplatz f r Navigati...

Страница 14: ...r DAB Quelle beispielsweise f hrt die kurze Bet tigung zu einem Senderwech sel w hrend eine lange Bet tigung die aktive DAB Gruppe ndert W hrend eines aktiven Telefonats ndert sich die Funktion zu Tel...

Страница 15: ...en Sie die Taste Weitere Hier k nnen Sie alle verf gbaren Quellen in Bezug auf die Startlautst rke individuell anpassen Sie k nnen w hlen ob Sie die zuletzt verwendete Lautst rke verwenden oder beim S...

Страница 16: ...e als Schnellauswahl oder Favori ten Tasten fungieren Um den aktuellen Sender auf einer Presettaste zu speichern halten Sie diese gedr ckt bis die Taste mit den Senderinformationen aktualisiert wird 6...

Страница 17: ...chirm Symbol und BT Musik mit einem angeschlossenen Telefon ber die Bluetooth Quelle zugegriffen werden um Audio BT USB iPod oder Video nur USB wiederzugeben Die Wiedergabe von Dateien ist f r alle Qu...

Страница 18: ...chen Ein Kontakt kann wie ein Ordner bedient und mit Antippen ge ffnet werden um seine enthaltenen Nummern zu ffnen Tippen Sie auf die Zeilennummer um einen Anruf zu starten Verwenden Sie die orangefa...

Страница 19: ...tmen des XZENT um die CarPlay Quelle auszuw hlen Nach erfolgreicher Erstinbetriebnahme erscheint die CarPlay Benutzeroberfl che auf dem Bildschirm des XZENT ANDROID LINK NAVIGATIONS QUELLE ANDROID LIN...

Страница 20: ...ird keine Garantieleistung erbracht wenn die Modellnummer Seriennummer UUID Produktnummer auf dem Produkt ge ndert gel scht unleserlich gemacht oder entfernt wurde Gleiches gilt wenn die Quittung oder...

Страница 21: ...Modus mit aktiver Routenf hrung VOL 40 3 80 A bei 13 8 V Betriebsspannung mit angeschlossenen vorderen und hinteren 4 Ohm Lautsprechern am Ger Sender max Leistung Bluetooth Modul 100 mW Senderfrequenz...

Страница 22: ...instructions de montage et en utilisant les accessoires fournis pour le montage En cas d accident les forces d acc l ration peuvent tre tr s importantes Les appareils mal install s pr sentent un risqu...

Страница 23: ...appareil A R INITIALISATION Appuyez pour effectuer une r initialisation lectrique B CARTE Prise MicroSD pour le logiciel de navigation en option non fourni dans ce pack C MIC microphone interne destin...

Страница 24: ...pui court permet de changer de station alors qu un appui long permet de modifier l ensemble DAB actif Pour la gestion des appels les boutons deviennent des boutons de t l phone 2 T l phone Ces boutons...

Страница 25: ...z sur la touche Plus Ici vous pouvez modifier de fa on individuelle le volume au d marrage de toutes les sources disponibles Vous pouvez d cider d appliquer le dernier niveau sonore utilis ou d finir...

Страница 26: ...uton de s lection rapide ou un bouton favori Pour sauvegarder la station en cours sur un bouton de pr r glage maintenez le bouton enfonc jusqu ce qu il soit mis jour avec les informations de la statio...

Страница 27: ...an d accueil et la musique en BT gr ce un t l phone connect via la source Bluetooth pour permettre d couter de la musique BT USB iPod ou de lire des vid os USB uniquement La lecture des fichiers est l...

Страница 28: ...chercher un contact Un contact peut tre utilis comme un dossier et vous pouvez appuyer dessus pour afficher ses num ros Appuyez sur le num ro de ligne pour effectuer une tentative d appel Utilisez le...

Страница 29: ...pour revenir l cran d accueil Il est possible d acc der la source Navigation entre autres gr ce l ic ne de l cran d accueil ou gr ce la touche tactile NAV l avant Ins rez la carte microSD non fournie...

Страница 30: ...it a t modifi effac rendu illisible ou supprim Il en va de m me si le re u ou la facture sont incomplets et ou illisibles au moment de leur pr sentation XZENT est il responsable d autres d fauts ou do...

Страница 31: ...ode GPS avec guidage itin raire actif VOL 40 3 80 A avec tension de service 13 8 V et enceinte avant et arri re 4 ohms raccord es l appareil metteur puissance max Module Bluetooth 100 mW Fr quence de...

Страница 32: ...eguendo le istruzioni di montaggio e utilizzare esclusivamente gli accessori di montaggio forniti Le forze di accelerazione in caso di incidente possono essere enormi In caso di incidente i dispositiv...

Страница 33: ...elle impostazioni del dispositivo A RESET Premere per effettuare il ripristino B MAP Slot per scheda microSD per il software di navigazione facoltativo non incluso in questo set C MIC Microfono intern...

Страница 34: ...ssione lunga si cambia l insieme DAB attivo Durante una chiamata telefonica i pulsanti avranno la funzione di pulsanti del telefono 2 Telefono In base alla situazione questi pulsanti condivideranno co...

Страница 35: ...le modificare individualmente tutte le sorgenti disponibili a livello di volume all avvio possibile applicare l ultimo volume utilizzato o impostare un volume fisso da usare all avvio 5 TFT Qui possib...

Страница 36: ...e Per salvare la stazione radio in riproduzione come stazione preimpostata premere e tenere premuto fino a quando il pulsante verr aggiornato con le informazioni della stazione radio desiderata 6 FM P...

Страница 37: ...ncipale e musica BT con un telefono collegato tramite la sorgente Bluetooth per riprodurre audio BT USB iPod o video solo USB La riproduzione dei file avviene in modo simile per tutte le sorgenti ed p...

Страница 38: ...toccarlo per aprire e visualiz zarne i numeri che contiene Toccare il numero desiderato per avviare un tentativo di chiamata Utilizzare il pulsante Indietro arancione in alto a sinistra della schermat...

Страница 39: ...ne e colori diversi Icona SAT grigia se nessun segnale GPS disponibile icona SAT bianca se nessuna posizione possibile icona SAT verde se la posizione OK icona Gyro verde se il sistema DR attivo Aggio...

Страница 40: ...o stesso vale se la ricevuta o la fattura incompleta e o illeggibile al momento della presentazione XZENT responsabile per altri difetti o danni XZENT riparer o sostituir i prodotti solo se coperti da...

Страница 41: ...odalit GPS con guida a destinazione attiva VOL 40 3 80 A tensione di esercizio di 13 8 V con altoparlante anteriore e posteriore da 4 ohm collegato al dispositivo Trasmettitore potenza massima Modulo...

Страница 42: ...rettiva 2014 53 UE Il testo completo della Dichiarazione di conformit UE disponibile al seguente indirizzo Internet www xzent com vedere il collegamento Documenti di conformit del prodotto nella parte...

Страница 43: ...XZENT by ACR AG Bohrturmweg 1 Bad Zurzach Switzerland www xzent com...

Отзывы: