
VI. Function Setting Method
09
10
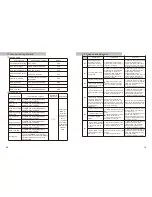
1. Function code
2. Setting method
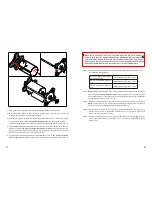
VII. Analysis and Solutions
Code/Function
Adjustable Parameters
Default
P-1 Temperature setting
80
℃
-200
℃
160
P-2 Counter locked
000:Disable,010:Enable
000
P-3 Hot-pres keep time
005-030,0.5s-3s
010
P-4 Start-sealing delay
time
00
0-030,0-3s Delay
010
P-5 Film scroll time
000,
Marked film, 001-060,
Blank film
000
P-6 Sleep mode
00
0: Disable,010:Enable
000
P-7 Temperature unit
℃
,
℉
℃
P-8 No cup tips
000
: Disable,010:Enable
000
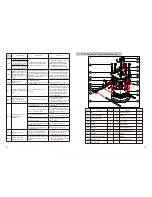
Code/Function
Under Starting-up State
Input Value
Adjustment
Setting End
P1 Temperature
setting
Press
SET
to display
P1
and then
display present set value.
△
or
▽
Then press
SET
to
enter the
next option
or wait for
10s to
automaticall
y save the
settings and
return to the
standby
state.
P2 Counter
locked
Press
SET
to display
P2
and then
display present set value.
P3 Hot-pres keep
time
Press
SET
to display
P3
and then
display present set value.
P4 Start-sealing
delay time
Press
SET
to display
P4
and then
display present set value.
P5 Film scroll
time
Press
SET
to display
P5
and then
display present set value.
P6 Sleep mode
Press
SET
to display
P6
and then
display present set value.
P7 Temperature
unit
Press
SET
to display
P7
and then
display present set value.
P8 No cup tips
Press
SET
to display
P8
and then
display present set value.
Setting end
Then, press
SET
to enter the next
option or wait for 10s to automatically
save the settings and return to the
standby state.
Fault
Code
Fault Status
Fault Cause
Solutions
E00
The heating indicator
lamp and the green
temperature-reaching
indicator lamp fails to go
on.
1. Temperature sensor fails.
2. Temperature sensor plug is
not properly inserted.
1. Open the panel, then, pull out
and insert the temperature
sensor plug again, and restart
the machine after confirmation.
2. Please contact the company.
E01
The heater fails or slow
heating rate.
1. The wire of heater is loosened.
2. Heater burn-out: 90/95/98
normal heater resistance
120V/about 50Ω, 220V/about
200Ω, 120 normal heater
resistance 120V/about 33Ω,
220V/about 130Ω
1. After opening the rear cover,
confirm whether HEAT at the
adapter plate is properly
connected and locked.
2. Measure HEAT resistance; in
case of abnormal resistance,
please contact the company.
E02
1. Appear during starting-
up
1. Upper sensor fails or poor
contact of upper sensor plug
2.Hot-pres keep motor fails.
1. Open the rear cover, then, pull
out and insert UP at the adapter
plate, and restart the machine
after confirmation.
2. Please contact the company.
2. While using, the upper
mold fails to rise up to the
located position.
E03
1. While starting-up, the
lower mold fails to extend
out.
1. External sensor fails or poor
contact of external sensor plug
2. Lower mold motor fails
1. Open the rear cover, then, pull
out and insert PUSH at the
adapter plate, and restart the
machine after confirmation.
2. Please contact the company.
2. While using, half of the
lower mold extends out, or
the lower mold fails to
extend out to the located
position or has abnormal
sound or works
inefficiency.
One or more of lower mold
bearing, cup-jacking rod, cup-
jacking rod spring, cup support
bracket bearing, jacking sheet
track, etc. is blocked.
Remove dirt, clean and scrub the
lower mold, and add lubricating
grease or sewing machine oil.
E04
1. Appear during starting-
up.
1. The film fails to pass through
the film photo sensor induction
point.
2. The transmitting lens of the
film photo sensor is dirty.
1. The sensitivity of the film
photo sensor is too low.
1.Correctly guide the film to pass
through the film photo sensor
induction point.
2.Clean the transmitting lens of
the film photo sensor.
3.Rotate the film photo sensor
adjustment shaft clockwise by
one or more circles.
2. The film is half sealed.
3. The film is always
rotated.
E05
1.During the film-sealing
process, the lower mold is
not sent to the located
position.
1. Internal sensor fails or poor
contact of internal sensor plug
2. Lower mold motor fails
1. Open the rear cover; then, pull
out and insert PULL at the
adapter plate, and restart the
machine after confirmation.
2. Please contact the company.
2.During the film-sealing
process, the upper mold
fails to move.
1.Upper sensor fails or poor plug
contact.
2. Upper mold motor fails
1. Open the rear cover, then, pull
out and insert UP at the adapter
plate, and restart the machine
after confirmation.
2. Please contact the company


