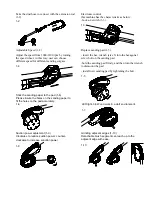
to sand the ceil [1-11]
grinding machine head lifted, tensile spring hook
head, so that the grinding easier
1-11
charge the dust hose [1-12]
–
Loosen the hoop by the screwdriver,
take out th dust hose [1-12]
–
counterclockwise rotation of the dust
hose [1-13]
1-12
1-13
Disassemble the extension rod [1-14]
When dissemble the extension rod, pls must press the limited knob, then take
out the extension rod
–
before operatint the machine, make sure every fastening handle is close
–
connect the machine to the main power supply
–
before switching on the machine, keep the sanding head slightly away from the work sufrace.
–
start the machine for necessary sanding work.
–
Operate the machine with short length in narrow and awkward area. Run the machine with medium
length for higherl walls. Use the machine with longest length for ceiling.
–
Do not over-press maniche so that to avoid overloading! Press with proper pressure for better
grinding effectsl Good grinding effects adn wuality are mainly decided by choosing the right
abrasive material.
–
Once finishing the sanding task, swith off the machine.
CARE AND MAINTANCE
Remove the plug from the socket before carrying out any ajustment, servicing or maintenance.
Your power tool requires no additional lubrication or maintenance. Always store your powr tools in a dry place.
it he supply cord is damaged, it must be replaced by the manufacturer, its service agent or similarly wualified
presons in order to avoid a hazard.
If a fault can not be rectified, return the mixer to an autorized dealed for repair.
Cleaning
Keep the safety devices, ventilation slots and motor housing as free of dirt and dust as possible. Clean the unit
by rubbing it with a clean cloth or blow it clean using low-pressure compresed air. We recommend that you
always clean the unit immediately after using it.
Clean the unit regularly by rubbing it with a damp cloth and a little soft soap. Do not use cleaners or solvents,
these will attack the plastic parts in the unit. You must laso ensure that water cannot get into the inside of the
unit.


