XTline XT106235 Скачать руководство пользователя страница 21

The holes of the sandpaper should be matched the holes on the based pad, attached the sandpaper 

onto the Velcro base plate carefully.

Disassemble and assemble the dustbox:

Disassemble the dustbox: turn the dustbox clockwise, pull and remove box from the sander.

Assemble the dustbox: insert the dustbox align with the lock button, and then turn the dustbox anti-

clockwisely to lock the dust box.

Clean the dust:

Pull the click part of the dust box to remove the cover of the box. Clean the dust, and then assemble 

the cover as shown on the picture.

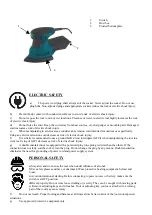
Avoid serious damage from sudden start-up:

Always place the switch in the “O” off position before using the machine and the power plug needs 

to be removed from the power supply.

Avoid serious damage from machine failure:

Do not use damaged machines. If abnormal noise or vibration occurs, please find out the cause and 

repair before using.

The condition of the machine needs to be checked before each use. Check the following points:

·

Is there hardware loose?

·

Are there any moving parts that are too tight or uncalibrated?

·

Is the power cord damaged?

·

Are any parts cracked or broken?

·

Or other situations affecting the safe use of the product.

After use, you need to clean the surface of the machine with a clean cloth. Warning: if power cord is

damaged, it must be replaced by a professional authorized service.

Question

Possible Causes

Solution

The machine is
not running

1. Power cord is not

connected

2. No power supply

3. Internal damage

1. Check if the power cord is

connected or not

2. If the line is out of power, turn

off the machine and check the
line problem

3. Check with technical service

Excessive or
abnormal noise

Internal damage or
wear

Check the machine at the technical
service office

Low efficiency of
sanding machine

1. Possible sandpaper

problem

2. Sandpaper may be

used with the
wrong number.

1. Check if the sandpaper is worn

or damaged

2. Fine sandpaper is large mesh

sandpaper (180), coarse
sandpaper is small mesh
sandpaper (80)

List of possible problems

Содержание XT106235

Страница 1: ...trick stroj byl navr en v souladu s EU 2006 42 EU 2009 127 EU 2012 32 EU 95 16 EC EU 2014 35EU EU 2014 30 EU EU 2011 65 EU EN 60745 EN 55014 EN 61000 TS 003 200W 12500 ot min 230V 50Hz 150x100 mm 1 2...

Страница 2: ...je li va e t lo spojen se zem c Nevystavujte elektrick n ad de ti vlhku nebo mokru Vnikne li do elektrick ho n ad voda zvy uje se nebezpe razu elektrick m proudem d Nepou vejte pohybliv p vod k jin m...

Страница 3: ...dnou na del lh t Kupuj c m e uplatnit reklamaci osobn nebo zasl n m zbo k reklamaci p epravn slu bou na vlastn n klady v bezpe n m balen Z silka mus obsahovat reklamovan v robek prodejn dokumenty podr...

Страница 4: ...od zdroje elektrick ho nap t 5 Po dokon en brou en odeberte za zen z povrchu obrobku a vypn te jej 6 Jakmile jste s prac hotovi odstra te v echny d ev n hobliny a prach pomoc vysava e a o ist te brou...

Страница 5: ...a p ed dal m pou it m jej nechte opravit Stav za zen mus b t kontrolov n p ed jeho ka d m spu t n m Dbejte na n sleduj c ch faktory Uvoln n rouby Po kozen pracovn deska Po kozen elektrick ho p vodn h...

Страница 6: ...15 lo isko lo isko o ysko Bearing 1 16 podlo ka podlo ka podk adka kontruj ca Countersunk head gasket 1 17 roub skrutka ruba Screw 1 18 z kladov deska z kladov doska stopa Baseplate set 1 19 smirkov p...

Страница 7: ...1 24 i 30 3 4 oe e ff 9 7 10 8 29 11 14 23 15 16 32 21 c 20 ROZKRES...

Страница 8: ...ch kryt vydan 2017 01 01 SN EN 55014 1 ed 4 Elektromagnetick kompatibilita Po adavky na spot ebi e pro dom cnost elektrick n ad a podobn p stroje st 1 Emise vydan 2017 10 01 SN EN 55014 2 ed 2 Elektr...

Страница 9: ...SK N VOD K POU ITIE XT106235 VIBRA N BR SKA DELTA TS 003 230V 50Hz 200W 12500 ot min 150x100 mm 1 2 kg Model Nap tie Pr kon Ot ky Ve k os br snej plochy Hmotnos...

Страница 10: ...a pohybliv ho pr vodu elektrick ho n radia mus zodpoveda sie ovej z suvke Nikdy ak mko vek sp sobom neupravujte vidlicu S n rad m ktor m ochrann spojenie so zemou nikdy nepou vajte iadne z suvkov adap...

Страница 11: ...n m pozri ni ie a uznan bezplatne oprav servis firmy XT line s r o Miestom pre uplatnenie reklam cie je predajca u ktor ho bol tovar zak pen Reklam cia vr tane odstr nenia vady mus by vybaven bez zbyt...

Страница 12: ...p tia 5 Po dokon en br senie odstr nenie zariadenia z povrchu obrobku a vypnite ho 6 Akon hle ste s pr cou hotov odstr te v etky dreven hobliny a prach pomocou vys va a a o istite br sen povrch istou...

Страница 13: ...hajte opravi Stav zariadenia mus by kontrolovan pred jeho ka d m spusten m Dbajte na nasleduj cich faktory Uvo nen skrutky Po koden pracovn doska Po kodenie elektrick ho pr vodn ho k bla Niektor asti...

Страница 14: ...PL INSTRUKCIA OBSLUGI XT106235 SZLIFIERKA OSYLACYJNA TS 003 200W 12500 rpm 230V 50Hz 150x100 mm 1 2 kg Model Napi cie Moc Pr dko Rozmiar powierzchni szlifowania Waga...

Страница 15: ...niejsza ryzyko pora enia pr dem g Podw jnie izolowane urz dzenie jest wyposa one w uziemion wtyczk jeden wtyk jest szerszy od drugiego Je li z cze nie jest w pe ni dopasowane do gniazda nale y przekr...

Страница 16: ...1 Upewnij si e prze cznik znajduje si w pozycji wy czonej i pod cz wtyczk do r d a zasilania Og lna instrukcja obs ugi 2 W cz prze cznik zasilania do pozycji I 3 Nie u ywaj zbyt du ej si y podczas sz...

Страница 17: ...ze ciernym nale y dopasowa do otwor w w podk adce ostro nie przymocowa papier cierny do p yty podstawy na rzep Zdemontowanie i zamontowanie pojemnika na kurz Zdemontuj pojemnik na kurz obr pojemnik w...

Страница 18: ...GB USER MANUAL XT106235 SHEET SANDER DELTA TS 003 200W 12500 rpm 230V 50Hz 150x100 mm 1 2 kg Model Voltage Power Speed Sanding surface size Weight...

Страница 19: ...jury b Prevent body contact with conductive surfaces to avoid a risk of electric shock injury c Do not expose the tool to rain or wet locations Presence of water in electric tool highly increases the...

Страница 20: ...ways turn off the power and unplug when changing the sandpaper 5 When the sanding is complete the sanding machine needs to be removed from the workpiece and power off 6 When finishing use sanding mach...

Страница 21: ...machine needs to be checked before each use Check the following points Is there hardware loose Are there any moving parts that are too tight or uncalibrated Is the power cord damaged Are any parts cra...

Отзывы: