background image


4.   

You are strongly advised to set the storage mode (the default is the Independent mode) before 
using the XL-RAID-213SA. 


5.   

The product allows the user to simultaneously utilize two hard drives manu factured by different 

companies. However, if the user expects better efficiency, we strongly recommend the users to 
use hard drives manufactured by the same manufacturer. 


6.   

Please make sure that the two hard drives are free from bad blocks or defects prior to 
installation in order to avoid system crashes or data loss. 


7.   

The actual storage capacity of 

XL-RAID-213SA 

series recognized by the system may differ from 

the total capacity stated on the hard drives combined once the drives have been formatted. 


8.   

Whenever turning off or unplugging the 

XL-RAID-213SA 

series from your computer system 

becomes necessary, always remember to safely remove it from your operating system before 
powering off the device. 


9.   

It is highly recommended for users to back up important data contained within the 

XL-RAID-213SA 

unit on a regular basis or whenever the user feels necessary to a remote or a 

separate storage device. Stardom will not be responsible for any lost of data caused during the 
use of the unit or the recovery of the data lost. 


10. XL-RAID-213SA complies with standard RAID Level 1 and RAID Level 0 definitions. 


Note

: 

Once the drive mode configuration has been completed, re-configuration using the same hard 

drives to set the drive mode will result in complete data loss. If you must change the drive 

mode, make sure to backup all data prior to the mode change. 


4. Hardware Installation Procedure


Please follow the instructions below to complete the hardware installation.


Step 1  Open the package and take out the product making sure that all the enclosed contents are 

not damaged or missing. Should you find damages or missing contents, please contact your 
supplier immediately.


Step 2  Place the system on a stable surface. Ensure that it is well ventilated without blockage to the 

vent and kept away from areas near water and damage prone areas.


Step 3  Use the key included in the accessory kit and inserted into the key access opening to eject 

the removable drive tray latch and extract the removable drive tray.


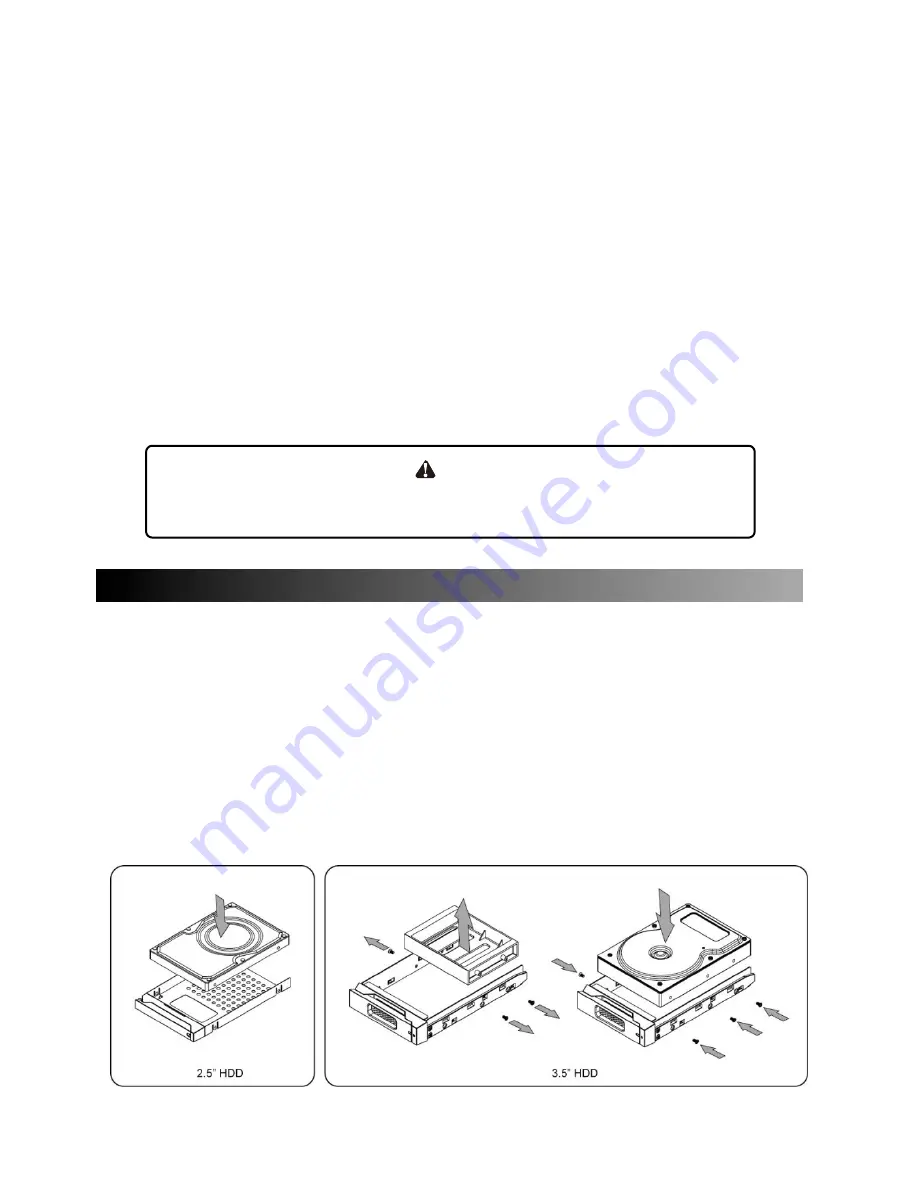
Step 4  Mount your hard drives onto the removable drive tray and secure it with the screws included 

in the accessory kit to avoid any damage to the hard drive due to accidental movements.


Содержание XL-RAID-213SA

Страница 1: ...XL RAID 213SA User Manual ...

Страница 2: ...the Hard Drive Array Mode 7 Computer Set Up 8 Hard Disk status on LCD screen 9 Data Rebuilding Operation 10 GUI Monitoring Software and Firmware Update 11 Frequently Asked Questions 1 Package Contents and Product Views Open the package and you should find the following XL RAID 213SA XL RAID 213SAx1 Internal RS232 Cable x 1 External RS232 Cable x1 SATA Cable x2 CD Rom x1 Accessories Kit bag User Ma...

Страница 3: ...near LCD display will flash yellow when the data is accessed from the hard drive 2 LED of Pri Sec HDD on the HDD tray will flash blue when the data is accessed from the hard drive 3 LED of failure alarm will light red when HD failed temperature is higher than 60 C or fan fails 4 Press Mute Button to turn on mute function to shut off the buzzer alarm just press the button again 2 Operating Informat...

Страница 4: ...e device Stardom will not be responsible for any lost of data caused during the use of the unit or the recovery of the data lost 10 XL RAID 213SA complies with standard RAID Level 1 and RAID Level 0 definitions Note Once the drive mode configuration has been completed re configuration using the same hard drives to set the drive mode will result in complete data loss If you must change the drive mo...

Страница 5: ...e Provides hardware status monitoring to industrial control system or IPC via RS232 2 We do not recommend users to disassemble the device without proper instructions and authorization The manufacture warranty will not cover the damages caused by unauthorized disassembling 3 To prevent the device from malfunction please make sure the device is connected with a direct and dedicated power connection ...

Страница 6: ...he hardware setup for XL RAID 213SA is complete you are now ready to turn the machine on 1 After the hardware installation is complete the XL RAID 213SA will be treated as one single hard drive Set the hard drive to AUTO in the computer s BIOS When the computer is turned on the system will retrieve the following information 2 In XL RAID 213SA the installed hard drive can be detected by the Device ...

Страница 7: ...drives from XL RAID 213SA as back up drive for data such as system operation file secured files seldom modified files or image and music files The user can periodically insert the hard drive back into XL RAID 213SA to execute automatic backup to protect the system from being hit by computer virus or to avoid risk of having both hard drives failing at the same time 2 During the Hard drive Failure W...

Страница 8: ...w hard drive if the hard drive is properly installed the LCD display screen will display the following messages 5 After few seconds of installing the new hard drive the LCD display screen will display the data rebuilding progress Pri Sec represents that the data in the original hard drive primary hard drive is copied to the new hard drive secondary hard drive XXX represents the rebuilding completi...

Страница 9: ...s not functional or rotates very slowly F will be displayed on the upper right hand corner of screen As shown in illustration 9 If the temperature is higher than the default setting a preset number typically 65 C or 149 F LCD shows T ...

Страница 10: ...lative information accordingly 2 Firmware Upgrade You may update the firmware via this GUI simply click on Load button to locate the firmware file to proceed After update is finished you may restart the power properly to operate with newly updated firmware Caution Any Random firmware updates may cause device in malfunction it is strongly suggested not to update device firmware if device is operati...

Страница 11: ...ert the passwords 3 When the configuration completed click on the OK button to save Device must be connected in operational states during configurations to take effects 3 2 HDD Fail Device Removed 1 Insert the e mail address of the receiver for notification and click on to add the inserted e mail address onto the notifying list Maximum up to 10 e mail addresses 2 Insert the error message and descr...

Страница 12: ...3 When the configuration completed click on the OK button to save Device must be connected in operational states during configurations to take effects 4 About Indicates GUI Management Software version ...

Страница 13: ... that are causing the longer than normal system down time Hard Drive Failure Q1 Under the mirror mode RAID 1 what will be the system s total storage capacity when adding a brand new hard drive A 1 The total storage capacity for XL RAID 213SA is determined by the storage capacity of the primary hard drive installed during the initial usage 2 The storage capacity will not increase after initial inst...

Страница 14: ...essed A If the XL RAID 213SA system is executing data rebuilding simultaneously while the computer system is saving the data the auto rebuilding process and the saving process will take longer than normal time This is because the XL RAID 213SA must divide it s resource between the normal system operation and the data rebuilding process However the priority for the XL RAID 213SA is to maintain the ...

Отзывы: