background image


XtendLan DVR-410AUTO User

‘s Guide   


60 


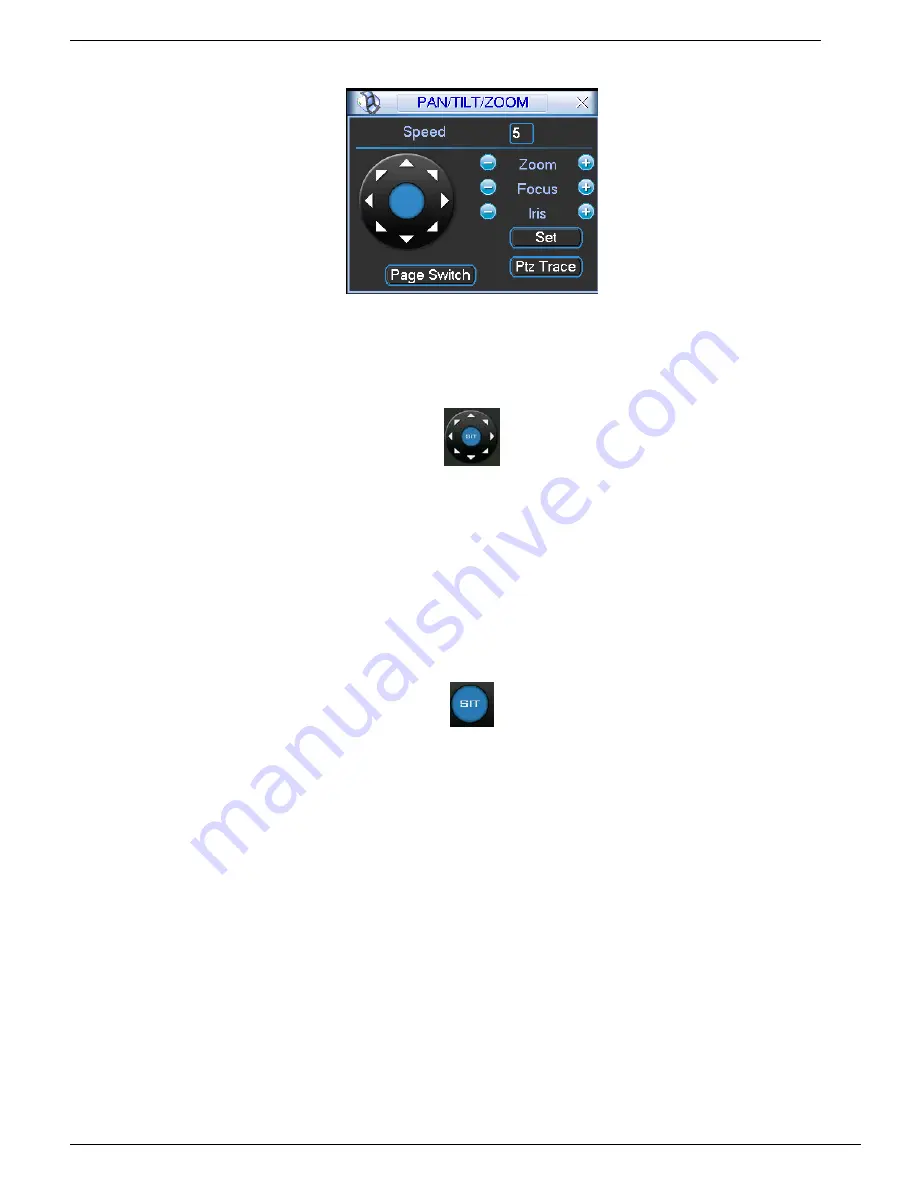
Figure 4-33 

 
In Figure 4-33, please click direction arrows (See Figure 4-34) to adjust PTZ position. There are total 8 

direction arrows. You can use the remote control to set. 


Figure 4-34 


4.8.3 3D Intelligent Positioning Key 

In the middle of the eight direction arrows, there is a 3D intelligent positioning key. See Figure 4- 

35.  Please make sure your protocol supports this function and you need to use mouse to control. Click 

this key, system goes back to the single screen mode. Drag the mouse in the screen to adjust section 

size.  The dragged zone supports 4X to 16X speeds. It can realize PTZ automatically. The smaller zone 

you dragged, the higher the speed. 


Figure 4-35 


4.9   Preset/ Patrol/Pattern/Scan 


In Figure 4-33, 

please click the ―set‖ button. The interface is shown as below. See Figure 4-36. Here 

you can set the following items: 

Preset 

Tour 

Pattern 

Border 

Содержание DVR-410AUTO series

Страница 1: ...DVR 410AUTO series User s Guide User s Guide version 02 2011...

Страница 2: ...2 Connecting Video Output 25 3 6 Connecting Audio Input Output Bidirectional Audio 26 3 6 1 Audio Input 26 3 6 2 Audio Output 27 3 7 Alarm Input and Output Connection 28 3 7 1 Alarm Input and Output D...

Страница 3: ...Tour Setup 62 4 9 4 Activate Patrol tour 62 4 9 5 Pattern Setup 62 4 9 6 Activate Pattern Function 63 4 9 7 Auto Scan Setup 63 4 9 8 Activate Auto Scan 63 4 10 Flip 63 5 Understanding of Menu Operati...

Страница 4: ...e Patrol 91 6 2 5 Pattern Setup 91 6 2 6 Activate Pattern Function 92 6 2 7 Border Setup 92 6 2 8 Activate Border Function 92 6 2 9 Flip 92 7 WEB OPERATION 94 7 1 Network Connection 94 7 2 Login 94 7...

Страница 5: ...128 7 3 3 5 Auto Maintenance 128 7 3 3 6 Snapshot 129 7 3 3 7 Abnormity 130 7 3 3 8 Vehicle Configuration 131 7 3 4 Additional Function 132 7 3 4 1 DNS 132 7 3 4 2 Auto Register 132 7 3 4 3 CDMA GPRS...

Страница 6: ...nual is designed to be a reference tool for the installation and operation of your system Here you can find information about this series DVR features and functions as well as a detailed menu tree Bef...

Страница 7: ...engineers We are not liable for any problems caused by unauthorized modifications or attempted repair 5 Environment The DVR should be installed in a cool dry place away from direct sunlight inflammabl...

Страница 8: ...sumption no fan construction standardized small dimension the standard 1DIN mobile CD dimension The modern appearance is suitable for embedded installation in the vehicle control panel The voltage val...

Страница 9: ...t various playback modes slow play fast play backward play and frame by frame play Support time title overlay so that you can view event accurate occurred time Support specified zone enlargement z Net...

Страница 10: ...orts this function z One button operation You can click just one button to realize record backup program upgrade which makes it suitable for the daily maintenance and operation in the vehicle z Dual s...

Страница 11: ...vehicle power Professional vehicle power design It is suitable for various voltages It has overload protection under voltage protection short circuit protection and overflow protection z High anti vi...

Страница 12: ...TSC 1f s to 30f s per channel Main stream Channel 1 D1 QCIF 1 25 30fps Channel 2 4 CIF QCIF 1 25 30fps D1 1 6 7pfs Extra stream CIF 1 6 7pfs QCIF 1 25 30pfs Main stream D1 HD1 2CIF CIF 1 25 30pfs Extr...

Страница 13: ...ode you can select any zone to activate partial enlargement function Backup function Backup Mode HDD backup Support peripheral USB backup device Flash disk portable disk and etc Support USB burner ext...

Страница 14: ...hannel amount alarm input and output amount system version and release date On line user Display current on line user User Management User Manageme nt Multi lever user management various management mo...

Страница 15: ...n light 3 Channel record status indication light It is on in normal status It becomes flashing when abnormal event occurred 4 Lock unlock indication light 5 Backup indication light 6 SD card indicatio...

Страница 16: ...put port 2 Audio video output 3 GPS antenna port Please note only the unit of GPS module supports this function 4 WIFI antenna port Please note only the unit of WIFI module supports this function 5 SI...

Страница 17: ...is not included in the accessory bag Figure 2 7 Serial Number Name Function 1 View Switch window 2 ID Click it to input device serial number so that you can control it 3 Number 0 to 9 Input password...

Страница 18: ...Zoom in button in the PTZ control Backward Previous Forvard Various slow play speed and normal speed play Focus button in the PTZ control Next Various fats play speeds and normal play speed Focus butt...

Страница 19: ...put For example click numeral 1 you can input or you can click the numeral in the on screen keyboard directly Double left click mouse Implement special control operation such as double click one item...

Страница 20: ...the cursor to the text column the text is shown as blue input button pops up on the right Click that button to switch between numeral input and English input capitalized and small Use or to shift bet...

Страница 21: ...ive film of the DVR Note Remote control is not a standard accessory and it is not included in the accessory bag 3 2 About Front Panel and Real Panel For detailed information of the function keys in th...

Страница 22: ...0AUTO User s Guide 22 Figure 3 1 2 Now you can see an interface shown as in Figure 3 2 Remove the four bolts from the HDD bracket and then draw out the bracket from the HDD box Pull out the cable from...

Страница 23: ...interface is shown as below after you removed the bracket Remove the four bolts from the HDD Follow the direction arrow in Figure 3 3 to install the HDD and secure the bolts Figure 3 3 4 Now the brack...

Страница 24: ...ure 3 5 Figure 3 5 6 Put the HDD cover back and then fix the bolts firmly Now the HDD installation completed 3 4 Connecting Power Supply Please check input voltage and device power button match or not...

Страница 25: ...compensation devices or use optical fiber to ensure video quality You should keep the video signal away from the strong electromagnetic interference especially the high tension current Keep connectio...

Страница 26: ...viation level port is shown as below It is to input the audio and video Figure 3 6 The audio input cable is shown as in Figure 3 7 Please use this cable when your camera is the general BNC port Figure...

Страница 27: ...ent Adjust the layout to reduce happening of the squeaking Please refer to Figure 3 8 It is for audio and video output Figure 3 8 Audio video output cable is shown as below See Figure 3 9 You can use...

Страница 28: ...output port and the load 3 How to connect PTZ decoder a Ensure the decoder has the same grounding with DVR otherwise you may not control the PTZ Shielded twisted wire is recommended and the shielded l...

Страница 29: ...arm input 4 White cable Connect it to the stop signal cable 5 Alarm input 5 White cable To be developed 6 Alarm input 6 White cable To be developed 7 Alarm input 7 White cable To be developed 8 Alarm...

Страница 30: ...Please parallel connect COM end and GND end of the alarm detector Provide external power to the alarm detector Please parallel connect the Ground of the DVR and the ground of the alarm detector Pleas...

Страница 31: ...stance Load Rated switch capacity 30VDC 1A 125VAC 0 3A Maximum switch power 62 5VA 30W Maximum switch voltage 250VAC 220VDC Maximum switch currency 1A Insulation Between touches with same polarity 100...

Страница 32: ...into one of the RS232 ports on the DVR or through network 3 9 RS485 When the DVR receives a camera control command it transmits that command up the coaxial cable to the PTZ device RS485 is a single d...

Страница 33: ...on port The extension port is shown as below See Figure 2 3 Figure 2 3 Please refer to the following sheet for detailed information SN Function 1 5V output 2 4 6 8 USB port 3 Remote control receiver 5...

Страница 34: ...ide 34 3 11 Cable Connection Sample Please refer to Figure 2 4 for cable connection sample Please ask your local retailer to use special mobile power supply sourcing Figure 2 4 Please refer to Figure...

Страница 35: ...low the device The recommended positions For the city public bus Use the chassis to install at the back of the driver seat For the passenger transportation bus Install at the front of the rack or in t...

Страница 36: ...bus No 2 camera It is at the left top of the driver seat It can clearly view the coin box the whole front door and the 1 meter area of the front door No 3 camera It is at the top of the middle roof t...

Страница 37: ...No 1 alarm button shall be installed at the left top of the driver seat so that the driver can activate the alarm in case of the emergency The No 2 alarm button shall be installed at the bottom of the...

Страница 38: ...in interface See Figure 4 1 System consists of four accounts z Username admin Password admin administrator local and network z Username 888888 Password 888888 Local administrator can not login the Web...

Страница 39: ...s shown as below See Figure 4 2 There are total six icons search information setting backup advanced and shutdown You can move the cursor to highlight the icon and then double click mouse to enter the...

Страница 40: ...nd replace battery regularly such as one year to guarantee system time accuracy Important Before replacement please save the system setup otherwise you may lose the data completely 4 2 Manual Record 4...

Страница 41: ...detection 4 Camera lock 5 LON longitude 6 LAN Latitude 7 SOG Vehicle speed 4 2 2 Manual record Note You need to have proper rights to implement the following operations Please make sure the HDD has be...

Страница 42: ...all selected channels will begin ordinary recording z Schedule Channel records as you have set in recording setup Main Menu Setting Schedule z Stop All channels stop recording Figure 4 6 4 2 2 3 Enabl...

Страница 43: ...g indication light in front panel will turn on Figure 4 8 z All channel manual record Please highlight ALL after Manual See Figure 4 9 When system is in manual recording all scheduled set up you have...

Страница 44: ...three file types z R Regular recording file z A External alarm recording file z M Motion detection recording file Figure 4 11 Please refer to the following sheet for more information Serial Number Fu...

Страница 45: ...itch to the corresponding channel video of the same time 4 3 2 5 Digital zoom When the system is in full screen playback mode drag your mouse in the screen to select a section and then left click mous...

Страница 46: ...rame Click pause button in normal playback mode you can use W and X to view frame by frame button to go to normal playback Note All the operations here such as playback speed channel time and progress...

Страница 47: ...u installed a HDD and one SD card You can set the SD card as the redundancy disk Please note only the unit of SD card module supports this function z Snapshot You can enable this function to snapshoot...

Страница 48: ...n 4 4 2 1 Schedule Snapshot In Encode interface click snapshot button to input snapshot mode size quality and frequency In General interface please input upload interval In Schedule interface please e...

Страница 49: ...ace please input upload interval z In Detect interface please enable snapshot function for specified channels Or in alarm interface please enable snapshot function for specified channels Please refer...

Страница 50: ...on setup interface Please click the Save button to save current setup 4 5 2 Motion Detect Detection menu is shown as below See Figure 4 17 z Event type from the dropdown list you can select motion det...

Страница 51: ...igure 4 20 click set button you can see an interface is shown as in Figure 4 21 Here you can set your own setup for business day and non business day z Anti dither Here you can set anti dither time If...

Страница 52: ...XtendLan DVR 410AUTO User s Guide 52 Figure 4 18 Figure 4 19 Figure 4 20...

Страница 53: ...loss occurs Please refer to chapter 4 5 2 motion detection for detailed information 4 5 4 Camera Masking When someone viciously masks lens the system can alert you to guarantee video continuity Camer...

Страница 54: ...XtendLan DVR 410AUTO User s Guide 54 Figure 4 23...

Страница 55: ...nd non business day z Anti dither Here you can set anti dither time z Show message System can pop up a message to alarm you in the local host screen if you enabled this function z Alarm upload System...

Страница 56: ...XtendLan DVR 410AUTO User s Guide 56 Figure 4 24 Figure 4 25 Figure 4 26 Figure 4 27...

Страница 57: ...e device includes USB burner flash disk SD card and portable HDD Figure 4 28 4 7 2 Backup Select backup device and then set channel file start time and end time Click add button system begins search A...

Страница 58: ...ated immediately For example if there are ten files when you click stop system just backup five files system only save the previous 5 files in the device But you can view ten file names 4 7 3 One butt...

Страница 59: ...lue is 9600 z Data bits select corresponding data bits Default value is 8 z Stop bits select corresponding stop bits Default value is 1 z Parity there are three options odd even none Default setup is...

Страница 60: ...Figure 4 35 Please make sure your protocol supports this function and you need to use mouse to control Click this key system goes back to the single screen mode Drag the mouse in the screen to adjust...

Страница 61: ...the control parameter You can define it as you require z You need to refer to your speed dome user s manual for Aux definition In some cases it can be used for special process z The following setups...

Страница 62: ...set to a patrol tour For each patrol tour you can input max 80 presets Figure 4 39 4 9 4 Activate Patrol tour In Figure 4 36 input patrol tour number in the No blank and click patrol button 4 9 5 Patt...

Страница 63: ...ft limit button Repeat the above procedures to set right limit Figure 4 41 4 9 8 Activate Auto Scan In Figure 4 37 click Auto Scan button the system begins auto scan Correspondingly the auto scan butt...

Страница 64: ...XtendLan DVR 410AUTO User s Guide 64 5 Understanding of Menu Operations and Controls 5 1 Menu Tree This series DVR menu tree is shown as below...

Страница 65: ...5 1 There are total six icons search Information setting backup advanced and shutdown Move the cursor to highlight the icon then double click mouse to enter the sub menu Figure 5 1 5 3 Setting In main...

Страница 66: ...French Spanish All languages listed here are optional Slight difference maybe found in various series z HDD full Here is for you to select working mode when hard disk is full There are two options sto...

Страница 67: ...ble the video audio z Overlay Click overlay button you can see an interface is shown in Figure 5 7 Please note the following overlay titles can not be in the same position Please note only the unit of...

Страница 68: ...XtendLan DVR 410AUTO User s Guide 68 Please highlight icon to select the corresponding function Figure 5 6 Figure 5 7 5 3 3 Schedule Please refer to chapter 4 4 schedule...

Страница 69: ...vious menu Figure 5 8 5 3 5 Network Here is for you to input network information See Figure 5 9 z IP address Here you can input IP address z DHCP It is to auto search IP When enable DHCP function you...

Страница 70: ...w a circle to enable corresponding function and then double click current item to go to setup interface Figure 5 10 5 3 5 2 IP Filter IP filter interface is shown as in Figure 5 11 You can add IP in t...

Страница 71: ...he sub net 224 0 0 4 DVMRP router 224 0 0 5 OSPF routek 224 0 0 13 PIMv2 router For example allowed is IP 235 8 8 36 PORT 3666 After you logged in the Web the Web can automatically get multiple cast a...

Страница 72: ...t start w32time to boot up NTP service NTP setup interface is shown as in Figure 5 14 z Host IP Input your PC address z Port This series DVR supports TCP transmission only Port default value is 123 z...

Страница 73: ...webtest htm e g http 10 6 2 85 DVR _DDNS webtest htm Now you can open DDNSServer web search page Figure 5 15 Please note NNDS type includes CN99 DDNS NO IP DDNS Private DDNS Dyndns DDNS and sysdns DD...

Страница 74: ...art program Serv U FTP Server Serv U Administator Now you can set user password and FTP folder Please note you need to grant write right to FTP upload user See Figure 5 18 Figure 5 18 You can use a PC...

Страница 75: ...utomatically create folders according to the IP time and channel User name and password is the account information for you to login the FTP File length is upload file length When setup is larger than...

Страница 76: ...25 digit The value may vary due to different series Please note all your modification here only applies to DVR local end You need to open web or client end to refresh channel name z Time display You...

Страница 77: ...interface is shown as in Figure 5 23 Please note all your modification here applies to local end only You need to refresh web or client end to get the latest channel name System max support 25 digital...

Страница 78: ...z General z Encode z Schedule z RS232 z Network z Alarm z Detect z Pan tilt zoom z Display z Channel name Please highlight icon to select the corresponding function After all the setups please click...

Страница 79: ...upports one HDD only For the unit of SD card module it supports one HDD and two SD cards which means you can see three HDDs here and you can also select the redundancy disk Here is for you to view and...

Страница 80: ...disk disconnection IP conflict and etc z Alarm output Please select alarm activation output port multiple choices z Latch Here you can set corresponding delaying time The value ranges from 1s 300s Sys...

Страница 81: ...alid character letter number underline subtraction sign and dot z System account adopts two level management group and user No limit to group or user amount z For group or user management there are tw...

Страница 82: ...of user account right it can modify password of other users Figure 5 32 5 5 5 2 Add Modify Group Click add group button the interface is shown as below See Figure 5 33 Here you can input group name an...

Страница 83: ...the corresponding rights for current user For convenient user management usually we recommend the general user right is lower than the admin account The modify user interface is similar to Figure 5 34...

Страница 84: ...drag slide bar to adjust each item After all the setups please click OK button system goes back to the previous menu Figure 5 36 5 6 Information Here is for you to view system information There are t...

Страница 85: ...ame or not Please go to setting then general to modify system time At last reboot the system to solve this problem After system booted up if there is any confliction system goes to HDD information int...

Страница 86: ...guration operation data management alarm event record operation log clear and etc Pleased select start time and end time then click search button You can view the log files Please page up down button...

Страница 87: ...system pops up a dialogue box for you to select See Figure 5 43 z Logout menu user Log out menu You need to input password when you login the next time z Shutdown Exit the system and then turn off pow...

Страница 88: ...XtendLan DVR 410AUTO User s Guide 88 Figure 5 43...

Страница 89: ...in the remote control The interface is shown as below See Figure 6 1 Figure 6 1 Click Pan Tilt Zoom the interface is shown as in Figure 6 2 Here you can set the following items z Zoom z Focus z Iris...

Страница 90: ...k to the single screen mode Drag the mouse in the screen to adjust section size Figure 6 4 6 2 Preset Patrol Pattern Border Function In Figure 6 2 click the set button The interface is shown as below...

Страница 91: ...Figure 6 6 please input preset number in the No blank and click preset button 6 2 3 Patrol Setup In Figure 6 5 click patrol button The interface is shown as in Figure 6 8 Input preset number and then...

Страница 92: ...hen please go to Figure 6 10 and click left limit button Repeat the above procedures to set right limit Figure 6 10 6 2 8 Activate Border Function In Figure 6 6 click auto scan button the system begin...

Страница 93: ...XtendLan DVR 410AUTO User s Guide 93 Figure 6 11...

Страница 94: ...t DVR IP address z System can automatically download latest web control and the new version can overwrite the previous one z If you want to un install the web control please run uninstall webrec2 0 ba...

Страница 95: ...min and password is admin Note For security reasons please modify your password after you first login Figure 7 3 After you logged in you can see the main window See Figure 7 6 This main window can be...

Страница 96: ...ou can view window switch button You can also select video priority between fluency or real time System monitor window switch supports full screen 1 window 4 window 6 window 8 window 9 window 13 windo...

Страница 97: ...is button and then left drag the mouse in the zone to zoom in right click mouse system restores original status z 2 Change show mode resize or switch to full screen mode z 3 Local record When you clic...

Страница 98: ...ick to select bidirectional talk mode There are two options DEFAULT G711a Please note the audio input port from the device to the client end is using the first channel audio input port During the bidi...

Страница 99: ...e interface is shown as in Figure 7 11 Figure 7 11 7 2 2 1 Direction key and 3D positioning key In Figure 7 10 there are eight direction keys In the middle of the eight direction keys there is a 3D in...

Страница 100: ...m supports eight level speed You can select from the dropdown list Speed 2 is faster than speed 1 7 2 2 3 Zoom Focus Iris Here is a sheet for you reference In Figure 7 11 click PTZ setup button you ca...

Страница 101: ...back to Figure 7 11 to implement camera operation Then you can click stop record button Now you have set one pattern 7 2 2 6 Preset In Figure 7 12 move the camera to your desired location and then inp...

Страница 102: ...igure 7 14 7 2 4 Picture Path and Record Path Click more button in Figure 7 14 you can see an interface is shown as in Figure 7 15 Figure 7 15 Click picture path button you can see an interface is sho...

Страница 103: ...in the system menu or the Web logged in user has no right to reboot the device system pops up a dialogue box to alert you 7 3 Configure 7 3 1 System Information 7 3 1 1 Version Information Here you ca...

Страница 104: ...tendLan DVR 410AUTO User s Guide 104 Figure 7 19 7 3 1 2 HDD information Here you can view local storage status and network status including free capacity and total capacity See Figure 7 20 Figure 7 2...

Страница 105: ...eter Function Type Log types include system operation configuration operation data management alarm event record operation user management log clear and file operation Search You can select log type f...

Страница 106: ...Guide 106 7 3 2 System Configuration Please click save button to save your current setup 7 3 2 1 General Setup Here you can set system time record length video format and etc See Figure 7 23 Figure 7...

Страница 107: ...e 7 25 Language You can select the language from the dropdown list Device needs to reboot to get the modification activated HDD Full There are two options stop recording or overwrite the previous file...

Страница 108: ...s shown as in Figure 7 26 Figure 7 26 Figure 7 27 Please refer to the following sheet for detailed information Parameter Function Channel Here is for you to select a monitor channel Channel Name Here...

Страница 109: ...lease note you can set video quality in VBR mode only Quality The value ranges from 1 to 6 The level 6 is the best video quality Bit Rate z In CBR the bit rate here is the max value In dynamic video s...

Страница 110: ...u can complete the whole setups and then click save button Click copy interface the interface is shown as in Figure 7 28 If you have completed the setup for channel 1 you can click 3 to copy current s...

Страница 111: ...record or snapshot type schedule snapshot motion detection snapshot and alarm snapshot z Please select date Current setup applies to current day by default You can draw a circle before the week to app...

Страница 112: ...ard Function Console is to upgrade the program or debug via COM or mini terminal software Keyboard COM control protocol You can use keyboard to control DVR via COM Data Bit The value ranges from 5 to...

Страница 113: ...Network user max amount The value ranges from 0 to 10 O means there is no user can access current device Remote Host Multiple cast group z Set MULCAST address and port z Enable MULCAST function PPPOE...

Страница 114: ...put server address and then enable this function SSL enable You can enable SSL encryption function to guarantee data safety Port Default value is 25 You can modify it if necessary User Name The sender...

Страница 115: ...pdown list and then enable DDNS function The private DDNS protocol means you use your self defined private protocol to realize DDNS function Server IP DDNS server IP address Server Port DDNS server po...

Страница 116: ...unt File length The file length you upload to the FTP When setup is larger than the actual file length system will upload the whole file When setup here is smaller than the actual file length system o...

Страница 117: ...3 The update interval ranges from 1 to 65535 Default value is 10 minutes Figure 7 36 You can refer to the following sheet for time zone information City Region Name Time Zone London GMT 0 Berlin GMT 1...

Страница 118: ...e your current setup The system can automatically upload the alarm message when the external alarm occurs Figure 7 37 Please refer to the following sheet for detailed information Parameter Function Se...

Страница 119: ...ollowing sheet for detailed information Parameter Function Event Type It includes local alarm network alarm Local alarm Device detects alarm from input port Network Device detects alarm from network A...

Страница 120: ...ccurs working with alarm activation function Please note current device shall be in auto record mode Chapter 4 4 Schedule Record Latch System can delay the record for specified time after alarm ended...

Страница 121: ...erface is shown as in Figure 7 40 Figure 7 40 Figure 7 41 Please refer to the following sheet for detailed information Parameter Function Event Type There are three types Motion detection video loss C...

Страница 122: ...output for specified time after alarm ended The value ranges from 1s to 300s Alarm upload System can upload the alarm signal to the centre Including alarm centre Record channel System auto activates m...

Страница 123: ...ddress Default value is 1 Please note your setup here shall comply with your dome address otherwise you can not control the speed dome Baud Rate Select the dome baud rate Default setup is 9600 Data Bi...

Страница 124: ...onfiguration from current PC Please refer to Figure 7 43 Please note system can not restore some information such as network IP address Figure 7 43 Please refer to the following sheet for detailed inf...

Страница 125: ...Please select the storage device first and then you can see the items on your right become valid You can check the corresponding item here See Figure 7 44 Figure 7 44 Please refer to the following sh...

Страница 126: ...the co contactor to realize the connection between the alarm output port and the load Please refer to the following sheet for detailed information Parameter Function Alarm output There are two output...

Страница 127: ...ameter Function Auto System enables auto record function as you set in record schedule setup Manual Enable corresponding channel to record no matter what period applied in the record setup Stop Stop c...

Страница 128: ...8 7 3 3 4 Account Here you can add remove user or modify password See Figure 7 47 Figure 7 47 7 3 3 5 Auto Maintenance Here you can select auto reboot and auto delete old files interval from the dropd...

Страница 129: ...are two modes Timing and activation Frame rate You can select from the dropdown list The value ranges from 1f s to 7f s Resolution You can select from the dropdown list For 16 series DVR Channel 1 an...

Страница 130: ...ction Normal Out The corresponding alarm activation output channel when alarm occurs There are three channels Latch The alarm output can delay for the specified time after alarm stops Then system disa...

Страница 131: ...to shutdown You can check the box to enable this function and then input the auto shutdown time Auto shutdown delay time Please input the auto shutdown delay time here No disk auto reboot You can chec...

Страница 132: ...132 7 3 4 Additional Function 7 3 4 1 DNS Here you can set server or local operator DNS address See Figure 7 52 Figure 7 52 DNS 7 3 4 2 Auto Register Auto register interface is shown as below See Fig...

Страница 133: ...o the following sheet for detailed information Parameter Function Enable Enable auto register function No Device management server number IP Device management server IP address Port Server port number...

Страница 134: ...410AUTO User s Guide 134 7 3 4 3 CDMA GPRS Please note only the unit of 3G module supports this function The CDMA GPRS interface is shown as below See Figure 7 54 Figure 7 54 CDMA GPRS Figure 7 55 Sc...

Страница 135: ...iod to connect to the 3G network System only enables wireless network dialup function during the specified period There are max six periods in one day Wireless network status Login status You can see...

Страница 136: ...ctivate The mobile user can send out message to activate the device to connect to the 3G network You need to check the box to enable current function Please note the contents shall not be capitalized...

Страница 137: ...age on to the device the device begins 3G dial up and then connect to the 3G network When the specified mobile number sends out the message off to the device the device disconnects the network and the...

Страница 138: ...files in the list Figure 7 57 Select the file s you want to download and then click download button system pops up a dialogue box shown as in Figure 7 58 then you can specify file name and path to dow...

Страница 139: ...detection record Local Search local record Snapshot Search snapshot file Card This function is not available in current device Item Begin time Set the file start time You can select from the dropdown...

Страница 140: ...stem begins download and the download becomes stop button There is a progress bar for your reference Open local record Select local record to play Multiple channel playback System supports playback on...

Страница 141: ...141 Playback device IP address and channel number Playback control bar Figure 7 61 7 5 Alarm Click alarm function you can see an interface is shown as in Figure 7 62 Here you can set device alarm type...

Страница 142: ...put device sends out alarm Operation Listen alarm System notifies web when alarm occurs you select from the above event type and then web can notify user Video When alarm occurs system auto enables vi...

Страница 143: ...43 Figure 7 64 7 8 Un install Web Control You can use web un install tool uninstall web bat to un install web control Please note before you un installation please close all web pages otherwise the un...

Страница 144: ...diagram like the following picture Mobile DVR can get the GPS information and show the coordinates of bus on the monitor You can use the inside 3G module or outside 3G router to put DVR on internet s...

Страница 145: ...dynamic IP to static IP just like the DDNS function but more simple And then you can use center management software DSS to manage all the devices DSS use the Server Client structure and after using D...

Страница 146: ...stable z Working environment is too harsh too much dust z Hardware malfunction 3 System can not detect hard disk There are following possibilities z HDD is broken z HDD ribbon is damaged z HDD cable c...

Страница 147: ...o when monitor There are following possibilities z It is not a power picker z It is not a power acoustics z Audio cable is damaged z DVR hardware malfunctions 9 There is audio when monitor but there i...

Страница 148: ...is not compatible with Windows VISTA control z ActiveX control has been disabled z No dx8 1 or higher Please upgrade display card driver z Network connection error z Network setup error z Password or...

Страница 149: ...rk There are following possibilities z Remote control address is not correct z Distance is too far or control angle is too small z Remote control battery power is low z Remote control is damaged or DV...

Страница 150: ...the power cable neat in case it obstacles the driver or the passenger z Please remove the negative end of the connection terminal before you configure the cable z Please unlock the key before you draw...

Отзывы: