background image

 User's Manual  

page 12


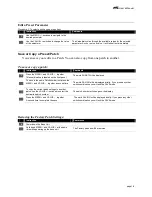
To recharge the WAG Ring: 


Instruction 

Comments 

1


Plug the AC adapter cord into the PWR jack of the 
Charger 


Plug the AC adapter into a 110 v power outlet. 


Insert the ring into the charger as shown above and 
close the lid. The ring must be positioned in the 
charger as shown. 

The ring will be illuminated by a blue LED if installed properly and 
charging. A green LED will light up at the front of the Charger 
when the ring is fully charged and ready for use. 


Tips 'N Tricks 

A short recharge of about 15 minutes can extend the use considerably. 

Waking the Ring 

The ring goes to sleep after about 3 minutes of non use. This will not likely happen while the 
ring is mounted on your finger. The longest wake up period should be about 20 seconds after 
putting the ring back on your finger. Closing your hand partially may help insure that the ring 
wakes up. 

Pausing/Un-pausing the Ring 

If you want to temporarily discontinue using the Wag Ring you can pause the ring 
communications with the Base Unit by touching the sensor area on top of the ring lid. The lid 
will light up briefly to acknowledge the request. To un-pause the ring, touch the ring lid a second 
time. When the ring is operating (not paused), the LEDs under the lid will flicker each time you 
close your hand. When paused, the LEDs will flicker at a fixed periodic rate. 

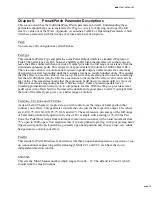
Making Connections 

As shown in the following figure, the 

WAG

 Base Unit currently provides 2 interfaces to external 

devices, via the rear panel.  These are MIDI OUT and Pedal Out. The Pedal Out simulates a 
standard 10K Expression Pedal (potentiometer). The MIDI Out sends MIDI CC and MIDI 
Program Change messages. 

Содержание The Wag

Страница 1: ...OM Version 1 04 13 2011 Xpresense LLC The OWNERS MANUAL The Power of Your Effects in the Palm of Your Hand by Copyright 2010 Xpresense LLC Virginia USA ...

Страница 2: ...ful interference and 2 this device must accept any interference received including interference that may cause undesired operation The Base Unit is a RECEIVE ONLY DEVICE NOTE This Radio equipment is intended for use in musical entertainment and similar applications Warning Changes or modifications not expressly approved in writing by Xpresense LLC may void the users authority to operate this equip...

Страница 3: ...Making Connections 12 Wireless Reception 14 Multiple Wag Systems on the Same Stage 14 Chapter 3 Using the Ring 15 Wearing the Ring 15 Using the Wag as an Expression Pedal 15 Limiting the Expression Zone 16 Using the Wag to Switch Effects 16 Chapter 4 Configuring the Base Unit 17 Load a Preset Patch 17 Edit a Preset Parameter 18 Save or Copy a Preset Patch 18 Chapter 5 Preset Patch Parameter Descri...

Страница 4: ...y you can use the Ring like an expression pedal to modulate volume WAH or other effect parameters You can also use the WAG to turn effects off and on using the MIDI interface Generally the WAG Ring continuously senses the opening and closing of the hand More specifically the WAG Ring has a proximity sensor that detects changes in the space around the ring band So the more CLOSED the hand position ...

Страница 5: ...erts that information into control signals that control your effects using the Expression Pedal Output and or Midi Output Wag Charger Charges the Wag Ring battery The Diagrams and Tables on the following pages describe the basic components of the system Wag Ring Table 1 Components of the Ring Item Description 1 Ring Continuously senses what you re doing with your hand and wirelessly sends that inf...

Страница 6: ...h number value for the currently selected menu item or a status message 3 Menu Buttons Use these buttons to select the parameter that you want to view or modify By default this is the current Patch number 4 Value Buttons Turn this to select the value for the currently selected menu item Patch number or configuration parameter 5 Save Press Value and Value together to save the current settings to a ...

Страница 7: ... the charger lid snap Table 3 Base Unit Rear Panel Components Item Description 1 Rear Panel Here is where you connect your effects gear and the receive antenna 2 Antenna Receives the wireless transmission from the Ring 3 MIDI OUT Connect this port to effects units that accept MIDI input for effects control 4 EXP OUT Connect a 1 4 stereo Tip Ring Sleeve TRS or Mono TS cable to effects units that ac...

Страница 8: ...g When the Green Led at the front of the charger illuminates the ring is fully charged and ready for use 2 Slip the Ring on the finger of your choice Typically the 3rd finger of your pick hand adjust the band and wait for the ring to wake up 20 seconds max The ring goes to sleep with non use to save the battery In PATCH view the cursor bar graph will move with hand opening closing In RADIO CHAN vi...

Страница 9: ... unit for expression pedal control This will depend on the capabilities of your effect pedal unit 5 Be sure that the ring is awake The bar graph cursor should move in PATCH view In RadioCh view the status should read SIGNAL 6 Opening and closing your hand should modulate the selected effect We recommend moving the last 3 fingers of your hand together rather than moving just the ring finger 7 Try e...

Страница 10: ...mplifier 2 Connect a MIDI cable from the WAG MIDI OUT jack to the MIDI input of an effects unit that uses MIDI for effects control For now don t connect the Pedal Output to anything 3 With the Menu knob set to PATCH use the Value knob to select a MIDI Patch 01 default See Patch Reference Appendix C If your equipment is not listed try using PATCH 02 which uses a standard MIDI CC value 007 for volum...

Страница 11: ...all Wart to the rear of the unit and then plug the power supply into 110 volt AC outlet When power is applied the LCD should light up and display PATCH 01 To turn off the Base Unit simply remove the connection or the power adapter from the wall Charging the Ring The WAG Ring is powered by a rechargeable battery lithium ion To ensure proper operation of the Ring you should recharge it after long pe...

Страница 12: ...p period should be about 20 seconds after putting the ring back on your finger Closing your hand partially may help insure that the ring wakes up Pausing Un pausing the Ring If you want to temporarily discontinue using the Wag Ring you can pause the ring communications with the Base Unit by touching the sensor area on top of the ring lid The lid will light up briefly to acknowledge the request To ...

Страница 13: ... Transports MIDI messages over industry standard 5 pin MIDI DIN port Pedal Out 1 4 Stereo jack Simulates 10k TRS Expression Pedals Can connect with a MONO TS cable if the effect unit only uses TS of Expression Pedal The wiper of the potentiometer is on the Tip lead of the jack Don t connect to effect units that put more than 3 5 volts on the TRS cable See our list of compatible effects units IMPOR...

Страница 14: ...m the Base Unit Radio Chan display The ring sends the selected channel over a dedicated channel which the Base Unit monitors when the Radio Chan function is selected The Base Unit will set its channel to match the Ring channel but only if the Base Unit is in this mode If you know what channel the ring is on you can set the Base Unit channel to match it manually using the Value switches on the Base...

Страница 15: ...ing the ring In fact just spreading your fingers apart laterally can be used with the right zone settings The range of hand motion that is required depends on how you configure the Base Unit settings But if you understand that the sensor is in the ring band and that it detects the amount of skin surrounding it you may think new ways to use it in your performance Using the Wag as an Expression Peda...

Страница 16: ...g of effects The sensitivity setting Sw Sens offers a tradeoff between how fast you want to switch e g rapid fire stutter effects and guarding against accidentally switching your effects With Latch operation closing your hand toggles the effect on Opening your hand part way then closing it again toggles the effect back off This is useful for slower switching operations such as between rhythm parts...

Страница 17: ...of the WAG Base Unit Load a Preset Patch For your convenience the WAG Base Unit provides 20 patches for you to save your configurations The patches have been configured at the factory for a number of popular effects units to help you get started If you edit the patches and save them you will lose these settings See instructions below for restoring the Factory Patch settings If you have changed any...

Страница 18: ...ation patch number The patch number will change on the display Press the MENU and VALUE together A second time to complete the save The word SAVING will be displayed briefly If you press any other switch combination you will exit the SAVE mode Restoring the Factory Patch Settings Instruction Comments 2 Power down the Base Unit Hold down MENU and VALUE at the same time while powering up the base un...

Страница 19: ...hat the expression pedal doesn t respond until it is moved a little ways and stops responding before it hits toe down Some expression pedals have a trimming potentiometer to allow you to compensate for this With the Wag we provide several pedal types with offsets built in Normal is the default and a good place to start You might find that one of the offset types gives you a better range of motion ...

Страница 20: ...nd reaches the open end of the selected zone RevLatSw Toggles between 0 and 127 each time the hand reaches the closed end of the selected zone See chapter 4 Using the Wag to Switch Effects for a description of momentary and latch switches For example CC1 could be configured to increase overdrive in an open direction and CC2 to increase wah wah pedal position in a closed direction Or CC1 could be u...

Страница 21: ... in the forward direction RevMom Momentary switching of patches in the reversed direction FwdLatch Latch Switching of patches in the forward direction RevLatch Latch Switching of patches in the reversed direction See chapter 4 Using the Wag to Switch Effects for a description of momentary and latch switches ProgChg1 and PrgChg2 These set the Program Change numbers 000 127 which select two effects ...

Страница 22: ...RevExp FwdMomSw RevMomSw FwdLatSw RevLatSw Sets the Mode of operation for CC2 Exp stands for expression mode versus switch mode In expression mode we send values 0 127 to provide expression pedal functionality like volume swells Fwd Rev sets the direction of hand motion MomSw stands for Momentary Switch LatSw stands for Latch Switch In switch mode we send midi values of 000 or 127 only Effects uni...

Страница 23: ... 0 100 Off 01 004 FwdExp 0 100 001 Off 0 100 Off Off High Off 10 GNXStomp GNX Stomp Box On Off Midi CC 022 Normal 0 100 Off 01 022 FwdExp 0 100 001 Off 0 100 Off Off High Off 11 GNXDelay GNX Delay On Off Midi CC 073 Normal 0 100 Off 01 073 FwdMomSw 0 100 001 Off 0 100 Off Off High Off 12 PODTweak POD XT Midi Tweak Control Midi CC 001 Normal 0 100 Off 01 001 FwdExp 0 100 001 Off 0 100 Off Off High ...

Отзывы: