background image

PAGE3

PAGE4

NOTES:
Barrel button functions can be customized. 
Stylus does not use a battery. 

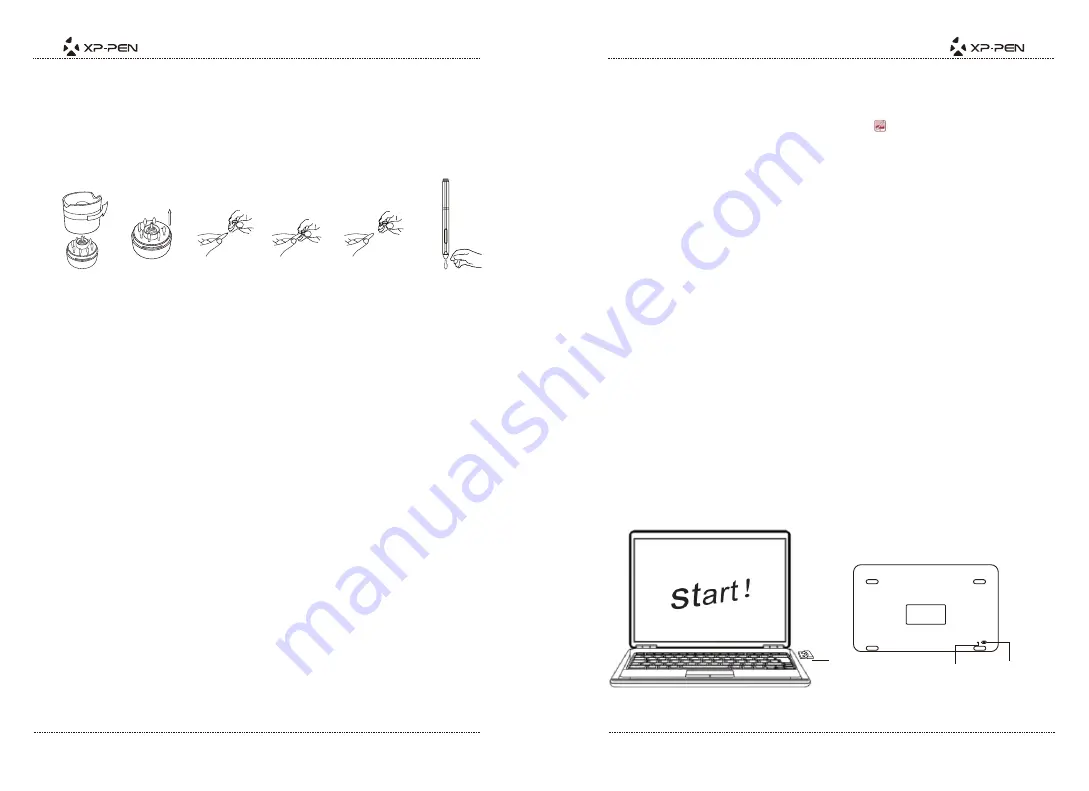
b.Replacing the pen tip

Image 2-2: Replacing the pen tip

3

1

2

4

(1). Hold the upper half of the pen stand and twist counterclockwise to remove it.
(2). Remove the pen clip located in the center of the lower pen stand.
(3). Use the pen clip to grip the pen tip and pull it out of the stylus.
(4). Push the new pen tip into the stylus.

{III. Driver Installation}

NOTES:
(1) Disable any antivirus or firewall software before beginning the
      installation.
(2) Uninstall any existing tablet software before attempting to install the Star
      05 driver. Other tablet drivers will conflict with the Star 05 driver or
      prevent installation entirely.
(3) You may install the Star 05 driver with the included CD or download the
      latest driver version from the XP-Pen website (www.xp-pen.com). If you
      choose to download the driver from the website, be sure to extract the
      .zip file contents before running “install.exe.”

a.Windows

(1). Connect the Star 05 to your computer using the included USB cord.
(2). Insert the included driver CD into your computer’s CD/DVD drive and follow
       the on-screen instructions. If setup does not begin automatically, open the
       disc contents manually and run “setup.exe” or “install.exe.”
(3). After a successful installation, the driver’s icon (      ) will appear on your
      taskbar. If the icon is not present, uninstall the driver, reboot, and repeat step 2.

b. Mac 

(1). Connect the Star 05 to your computer using the included USB cord.
(2). Insert the included driver CD into your computer’s CD/DVD drive.
(3). Open the CD’s file list. Open the “Mac Driver” folder, then run “PenTablet.pkg.”
(4). Follow the on-screen instructions, then reboot your computer.

{IV.Connecting the Star 05}

a.Wireless USB

(1). Insert the included USB wireless receiver into your computer’s USB port.
(2). Use a toothpick, needle, or other small object to press the reset button on the
       back of the Star 05. (Image 4-1)
(3). While continuing to press the reset button, slide the on/off switch to the right to
       turn on the tablet. (Image 4-1)
(4). If successful, the Star 05’s green wireless indicator light will light up and
       remain on. If the wireless indicator light does not light up, repeat steps 2 and 3.

on

off

reset

2

3

1

Image4-1: Wireless USB

Содержание STAR 05

Страница 1: ...Graphic Pen Tablet Star Manual 05 Windows 10 8 7 and Vista Mac 10 7 or above www xp pen com Please contact us with any questions...

Страница 2: ...gs UI a Windows b Mac VI Driver Uninstallation a Windows b Mac VII FAQ a I can t use the stylus to control the cursor b The Star 05 s response time is slow during wireless USB use c How do I know that...

Страница 3: ...tor light f On blue Tablet is connected and charging via corded USB g On red Tablet battery is low h On green Tablet is sufficiently charged 5 Touch keys 6 Working area 7 USB receiver 8 Reset button 9...

Страница 4: ...using the included USB cord 2 Insert the included driver CD into your computer s CD DVD drive and follow the on screen instructions If setup does not begin automatically open the disc contents manuall...

Страница 5: ...old the Hand touch key for 3 to 5 seconds Image4 3 Sleep mode 2 Turn the tablet off and back on with the power switch on the back on off reset Image4 4 Sleep mode V Driver Settings UI a Windows The St...

Страница 6: ...tions 180 rotation allows comfortable left handed use 3 Monitor Mapping The Monitor Mapping tab allows you to configure your tablet for use with single or dual monitors Image5 3 Example of a single mo...

Страница 7: ...ng area clicking the first barrel button will by default toggle between pen and eraser modes The current selected mode will briefly appear in the bottom middle of your display User defined actions 1 R...

Страница 8: ...ce between the on screen work area and the edges of the display You may type exact dimensions here Full area Selects the largest possible on screen working area Screen ratio Adjusts the tablet s on sc...

Страница 9: ...in will become zoom in zoom out Clicking will restore a function to its default settings When cycling through functions with the Handy Key the currently selected function will be briefly displayed in...

Страница 10: ...el buttons from a list You may also test the Star 05 s pen pressure and adjust its sensitivity Higher pressure creates a thicker line Lighter sensitivity means that digital pressure level will rise wi...

Страница 11: ...the K1 key s queue Image5 21 Slide Ring Switch Setting 2 Scroll down to Reset Customer Defined list for advanced settings User defined actions 3 Application The Star 05 s touch keys can be programmed...

Страница 12: ...exact dimensions here Full area Selects the largest possible on screen working area Screen ratio Adjusts the tablet s on screen working area to match your monitor s resolution Reserve edges Allocates...

Страница 13: ...ould be visible in the taskbar system tray Windows OS Pen input will control the cursor and pressure sensitivity will be functional in the driver UI s Pressure Pen tab d How do I determine if a proble...

Отзывы: