background image

  Wireless NVR System User Manual                                                                                                                     


10


2. Test the system before installation. Connect the NVR to a monitor/ TV via VGA or HDMI, connect it 
to power with included power adapter (bigger one is for NVR); mount antennas for cameras, connect 
cameras to power. If you see images from all cameras within minutes, you can go ahead to mount the 
cameras to where you want. If not, please follow step 

4.3.2

 to add the camera to system.


3.4 Camera Mounting Spots 

1. Mount the cameras anywhere within the Wi-Fi range, connect them to power with included power 
adapters (smaller ones are for cameras). 
2. The cameras should start to stream videos to NVR within 1 minute.   
3. If it does not display video on the NVR’s screen, the distance should be too long or there are too 
many obstacles. Please move the cameras closer to the NVR.   
 

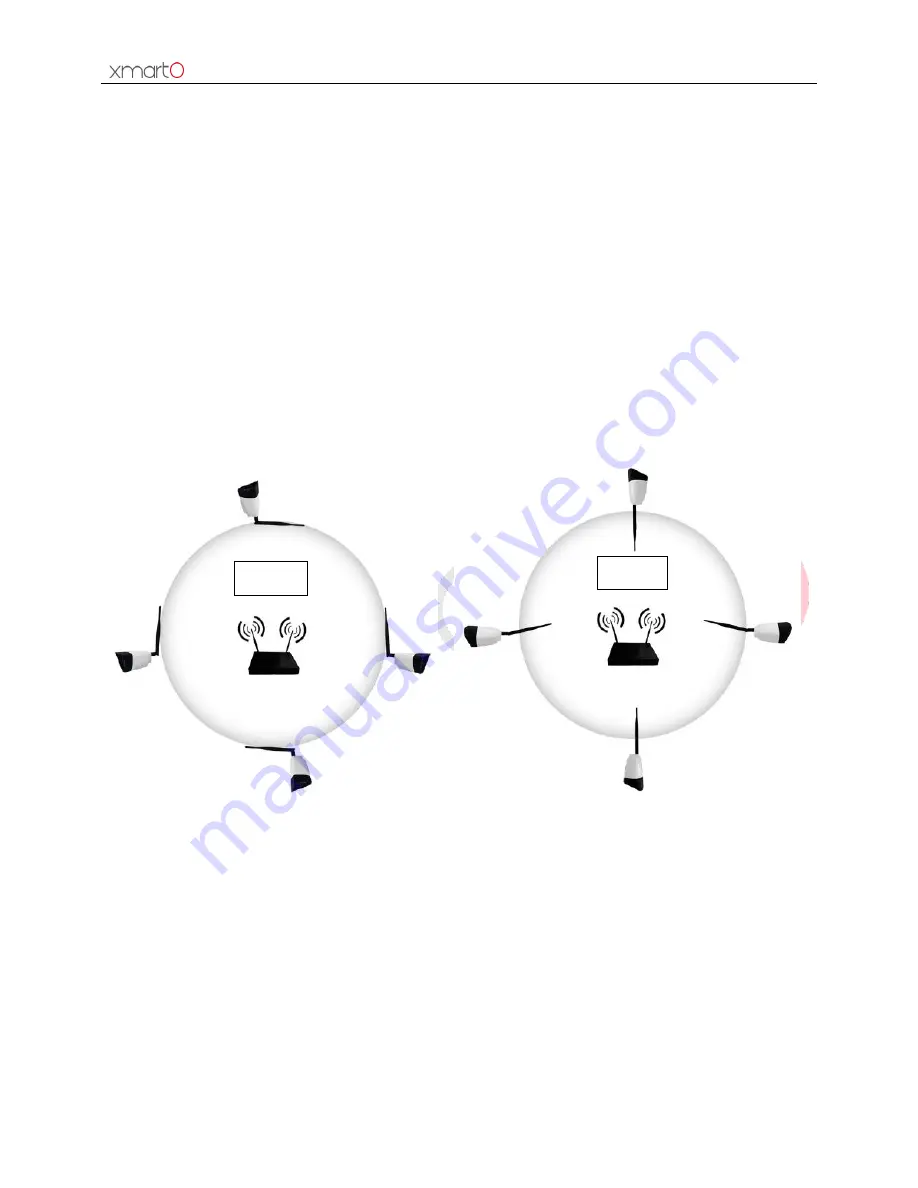
3.5 Antenna Mounting Tips 


  Image 5 


Image 6 

The NVR’s antennas radiate signal to all around. The signal pick-up is best while antennas are on same 
height and parallel. If the cameras cannot be at same height with NVR, please keep their antennas 
parallel.   

Wrong 

Correct 

Содержание WOS1388

Страница 1: ...Wireless NVR System User Manual 1 User Manual xmartO Wireless NVR System Ver 1 4...

Страница 2: ...r users reference We don t promise it s exactly the same with the products you purchase Detailed information is in accordance with the final products The accessories and parts mentioned in this manual...

Страница 3: ...9 3 3 Preparations before installation 9 3 4 Camera mounting spots 10 3 5 Antenna mounting tips 10 4 Operation system introduction 11 4 1 Starting up log in log out restart 11 4 1 1 Starting up 11 4 1...

Страница 4: ...rive settings 38 4 11 Device maintenance and management 39 4 11 1 System information 39 4 11 2 User management 41 4 11 3 Restore factory settings 44 4 11 4 System maintenance 45 5 Access system from w...

Страница 5: ...The xmartO WNO series network video recorder is our new generation of NVR It supports wireless WiFi network video input real time live view video codec and video playback The NVR system can be widely...

Страница 6: ...sability wireless easy pairing setup wizard frequently used function menu e seenet Support IPC with ONVIF N1 protocol Network services supported P2P DHCP DDNS PPPoE E Mail FTP etc Multiple alarm trigg...

Страница 7: ...uctions 2 1 Front Panel Image 1 1 POWER Power Indicator 2 HDD Hard Drive Indicator 3 Operation Indicator When IPC is connected to the NVR this indicator will blink green 2 2 Rear Panel Image 2 1 VGA V...

Страница 8: ...e click Zoom window 1 Switch between multiple view mode and single view mode 2 Add device Drag Set zone 1 Set motion detection zone 2 Choose digital zoom zone Middle button Scroll Change contents 1 Ch...

Страница 9: ...t at preview Text None Instructions Title name 2 5 2 Frequently used Button Description Name Icon Explanation Confirm Save and apply operation close window Cancel Cancel the operation Apply Save and a...

Страница 10: ...the location of NVR It is suggested to place the NVR at the center of monitoring area Avoid any avoidable obstacle between the cameras and the NVR 1 When there is no obstacle cameras can be mounted a...

Страница 11: ...g Spots 1 Mount the cameras anywhere within the Wi Fi range connect them to power with included power adapters smaller ones are for cameras 2 The cameras should start to stream videos to NVR within 1...

Страница 12: ...ng status or even damage the NVR If you have unstable power source in your area please use voltage stabilized power source Tips Before power on the NVR please connect the NVR to a monitor or TV Steps...

Страница 13: ...eave it blank without typing anything 3 Click OK you shall be logged in to the system Tips The password can be combined with numbers characters or The length should be less than 10 characters 4 1 3 Lo...

Страница 14: ...an set time zone time language and keypad type Click Next after finishing your selection Image 10 1 Hard drive settings Image 11 It displays list of current hard drives including the hard drive model...

Страница 15: ...ettings click Next to enter next settings Image 12 2 Network settings Image 13 You can choose to enable DHCP so the NVR gets IP automatically or allocate IP gateway and subnet mask DNS etc For beginne...

Страница 16: ...select the setup wizard and complete the settings Image 15 4 3 Video Management 4 3 1 Search Device Function Description Find all IP cameras in the same network segment Operation Steps Right click mou...

Страница 17: ...ra to any of NVR s LAN port right click mouse in your system choose IPC Add from the drop down menu as shown in Image 17 you should then be able to see interface showing information of your cameras ab...

Страница 18: ...deo Manage interface click Add One to add current IP Camera 4 Auto Add Auto Add is the same with Add One You ll need to connect IP Camera to NVR using a network cable to view image if you choose Auto...

Страница 19: ...monitor any more Figure 19 Tips Click Delete All button will delete all the IP Cameras that s added to the NVR 4 3 4 Edit Channel Function Description Edit channel information including protocols IP...

Страница 20: ...p you should then see below interface Figure 21 You can set all the stream information here Click Apply to save the settings and click OK to exit Figure 21 Tips 1 For Stream there are two options Main...

Страница 21: ...HCP to automatically obtain IP address Check Device ID to show the device ID which is used for remote access 3 Click Apply to save the settings or click OK to save and exit Detailed Feature List Name...

Страница 22: ...our system choose System setup Network setup DDNS you ll then see below interface as shown in Image 23 Image 23 2 Select Enable to enable DDNS 3 Enter the Domain Name Username and Password 4 Click App...

Страница 23: ...Password 4 Set Schedule and click Test to check if it is set successfully if yes click Apply to save the settings 4 4 4 E Mail Function Description Used for sending customers email alert when motion i...

Страница 24: ...k in default if failed on test then change to SSL Sender Full email address of sender Sendee Full email address of receiver Interval The frequency of receiving email Health Message Interval The freque...

Страница 25: ...he Username and Password provided by ISP Tips PPPoE Function for enable PPPoE allowing access internet via dail up for disable PPPoE 4 4 6 3G Function description this is to enable users who don t hav...

Страница 26: ...ers to change settings of the NVR s Wi Fi hotspot and password and some other router related settings ESSID the default Wi Fi hotspot name of the NVR Password the default password of the Wi Fi hotspot...

Страница 27: ...mage 28 Operation Guide as below Operation Target Function Description Channel Choose the channel you want to set PTZ Protocol Choose the correct protocol of this PTZ Device Address Enter the specifie...

Страница 28: ...5 3 PTZ Auto Cruise Setup Operation Steps 1 Right click mouse in your system choose System setup Channel Setup PTZ Control 2 Click at the right of Preset to enter the control interface to set presets...

Страница 29: ...in your system choose Manual record 2 Select the channels you want to record 2 If you want all the channels to record then click Enable All 3 If you want to disable the manual record of all channels c...

Страница 30: ...period will show in different color customers can easily double check to see whether the time settings meet their needs or not 4 6 3 Motion Detection Recording Function Description Set Motion Detecti...

Страница 31: ...33 4 6 4 Alarm triggered Recording Function Description Enable alarm triggered recording system will starts recording when any alarm input is detected Operation Steps 1 Right click mouse in your syste...

Страница 32: ...annel or all channels 4 7 Video Playback 4 7 1 Quick Playback Function Description Enable fast playback customers can quickly retrieval recent video data Operation Steps 1 Right click mouse in your sy...

Страница 33: ...earch conditions choose the one you want to playback 4 Click Video playback to playback the video Playback progress bar interface is shown as Image 37 Image 37 Video Playback Operation Steps Butto n F...

Страница 34: ...Set the Search time and click Search 5 Wait for about 30 seconds and you ll see a video list based on your search conditions 6 Choose the videos you want to backup and click Video backup as shown in...

Страница 35: ...ion time and select the alarm type 5 Set the stream type detailed operation steps as below 1 Choose System setup Channel Setup Video Manage Edit Channel 2 Choose Video Alarm in the drop down menu of s...

Страница 36: ...m setup interface 2 Choose Record setup Video detection 3 Choose Video Loss from the Detection drop down box as shown in Image 41 Image 41 4 Set the Alarm duration time and select motion detection out...

Страница 37: ...uage Choose different language accordingly Remote Control Choose whether to use remote control Boot Wizard Choose whether to show boot wizard when start up Display Device ID when Live View Choose whet...

Страница 38: ...ption Set the screen parameters Operation Steps Right click mouse in your system choose System setup General setup Screen setup you ll see below interface as shown in Image 44 Image 44 Operation Instr...

Страница 39: ...le 4 means display 4 channels at a time VGA resolution should match your screen resolution If your NVR outputs different resolution that your screen takes you may not get display on the screen Please...

Страница 40: ...elete old files Select Customize and set the days auto delete files of how many days before with a digital keyboard you can set up to 255 days Select OFF to disable this function 4 11 Device maintenan...

Страница 41: ...ight click mouse in your system choose System setup System Admin HDD Information you ll see below interface as shown in Image 47 Image 47 System log Function Description Customer can search and check...

Страница 42: ...ing hard drive will delete all log information Time type can be set as system starting up system shutdown system configuration change record alarm and more 4 11 2 User management Tips The default user...

Страница 43: ...trol the audio output volume Manual record Enable manual record anytime System setup Including normal setting record setting network setting channel setting and system management Split Screen Auto swi...

Страница 44: ...shown in Image 52 Image 52 Tips Administrator cannot be deleted Edit user Operation Steps 1 Right click mouse in your system choose System setup System Admin User management 2 Select any of the users...

Страница 45: ...word interface as shown in Figure 54 Figure 54 3 Enter your old password and set your new password 4 Click OK to save the settings Tips Administrator s password is none in default means empty Common u...

Страница 46: ...iption NVR maintenance is used for firmware upgrade for users Operation Steps 1 Copy the firmware ROM file to an USB flash disk s root directory connect the USB disk to NVR s USB port 2 Right click mo...

Страница 47: ...m power or else system will be damaged 5 Access system from webpage 5 1 Brief Introduction The NVR is embedded with WEB server and supports remote access through WEB Connect the NVR to your router ent...

Страница 48: ...nual 47 Image 60 6 If for first time use please download and run the WebClient exe control according to the prompt message as shown in Image 61 Image 61 7 Login again to live view your system as shown...

Страница 49: ...are cannot load automatically you ll need to do ActiveX settings Click Tools Internet Options Security Custom Level enable ActiveX control and plugins following Image 63 and click OK For IE9 users onl...

Страница 50: ...on Steps 1 Click Playback button in live view interface 2 Enter playback interface as shown below 2 Set the search time type and channel click Search 3 Choose the playback channel to playback recorded...

Страница 51: ...Tips The details of configure please refer to system function introduction Common user needs permission to remote configures Go to System Setup System Management User Management Edit User to check an...

Страница 52: ...s shown in Image 67 Image 67 Tips Get the device ID by go to System Setup Network Setting and check Eseenet P2P device will then be displayed To successfully remote access your system the device ID sh...

Страница 53: ...ID Operation Steps 1 Open your browser 2 Enter http www e seenet com choose Log in with Username as shown in Image 68 Image 68 3 User can follow the prompt message to create an account when first logi...

Страница 54: ...53 2 Add Device 1 Open your mobile app and click to add device 2 Input the system s connection information as shown in Image 69 Image 69 3 OK and go back to device list click the device name to view...

Страница 55: ...Wireless NVR System User Manual 54 Image 70 Stop Capture snapshot Record Video to mobile Settings 3 Remote Playback...

Страница 56: ...GB Tips Device capacity unit conversion is the same with hard drive suppliers adopt 1GB 1000MB 7 2 Recording Capacity Calculation 1 Video file size for a single channel A B 8 1000 3600 2 Video file si...

Отзывы: