XLT Ovens XLT TS3-S Standard Series Скачать руководство пользователя страница 20


              XD-9010-TS3-S    Rev A 04/2009 

 Installation & Operation Manual 

19 


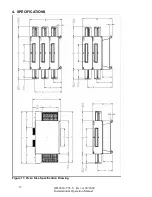
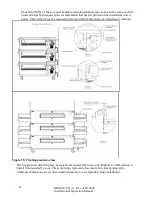
5.4. PHYSICAL LOCATION & SPACING REQUIREMENTS 

It is best to install ovens adjacent to a wall.  It is possible to install an oven in the middle of a 
room, but due to the routing of gas and electric lines, and ventilation hood performance, these 
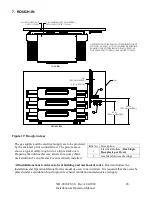
installations can be more costly.  See Section 7. Rough-In for gas and electrical connections, 
(page 28)  
 
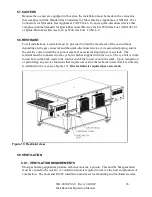
These ovens are suitable for installation on combustible floors. The minimum clearance from the 
back is 6" and is determined by the back wall standoffs that are included with the oven.  The 
standoffs are intended for use with either combustible or noncombustible walls.  The minimum 
side clearances are 6". See Section 7. Rough-In for gas and electrical connections, (page 28). 


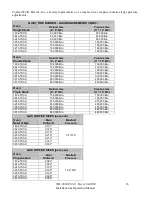
5.5. ELECTRICAL SUPPLY 

All XLT ovens require a 120VAC power supply.  See General Specifications Chart for the 
electrical power requirements. 


WARNING 

Electrical Grounding Instructions 


This appliance is equipped with a three-prong (grounding) plug for your protection against 

shock hazard and should be plugged into a properly grounded three-prong receptacle.  Do 

not cut or remove the grounding prong from this plug. 


When installed, the appliance must be electrically grounded in accordance with local codes, or in 
the absence of local codes, with the National Electrical Code, ANSI/NFPA 70, or the Canadian 
Electrical Code, CSA C22.2, as applicable. 

5.6. GAS SUPPLY 

The gas supply shall have a gas meter and regulator large enough to handle all of the gas 
appliances, such as the furnace, hot water heater, and oven(s), in operation at the same time.  Add 
up all of the Btu ratings to determine the total load. 
The installation must conform with local building codes, or in the absence of local codes, with 
the National Fuel Gas Code, ANSI Z223.1, latest version, Natural Gas Installation Code, 
CAN/CGA-B149.1, or the Propane Installation Code, CAN/CGA-B149.2, as applicable, 
including: 
 
1.


       The appliance and its individual shutoff valve must be disconnected from the gas supply 

piping system during any pressure testing of that system at test pressures in excess of ½-
psi (3.45-kPa). 

2.


       The appliance must be isolated from the gas supply piping system by closing its 

individual manual shutoff valve during any pressure testing of the gas supply piping 
system at test pressures equal to or less than ½-psi (3.45-kPa). 

Содержание XLT TS3-S Standard Series

Страница 1: ...concentrations of substances harmful to health in the room in which it is installed This appliance needs an unobstructed flow of fresh air for satisfactory combustion and must be installed in a suita...

Страница 2: ...ed inside the control box of the oven and on pages 31 33 of this manual Disconnect input power to the unit before performing any maintenance This unit requires a type II ventilation hood which has mak...

Страница 3: ...nd most importantly through an awareness that people are the central element in quality control Wolfe Electric Inc is dedicated to serving your needs Your complete satisfaction with your oven is our g...

Страница 4: ...RESPONSIBILITY 18 5 3 ASSEMBLY INSTRUCTIONS 18 5 4 PHYSICAL LOCATION SPACING REQUIREMENTS 19 5 5 ELECTRICAL SUPPLY 19 5 6 GAS SUPPLY 19 5 7 CASTERS 20 5 8 RESTRAINT 20 5 9 VENTILATION 20 5 9 1 VENTILA...

Страница 5: ...burner with a single right hand control box All models can have the optional split belt conveyor Figure 1 Examples of Single Double and Triple Stack Ovens Food product is placed on the stainless stee...

Страница 6: ...XD 9010 TS3 S Rev A 04 2009 Installation Operation Manual 5 Figure 2 TS3 S Front View Figure 3 Right Hand Control Box TS3 S models Figure 4 Left Hand Control Box 3270 TS3 S and 3870 TS3 S...

Страница 7: ...ontrol Box which is on the right side of the oven The oven switch with the operating instructions is shown in Figure 5 Also nearby are the temperature control the conveyor control and the fuse bank se...

Страница 8: ...number It is very important to use only the fuses listed Using larger or smaller fuses than what is labeled on the oven can cause serious damage to the operator and or the oven and will also void any...

Страница 9: ...Panel This panel houses the fuses for the equipment inside the left hand control box A second temperature control is also used for controlling the burner on the left half of the oven This allows for...

Страница 10: ...l Split Belt Conveyor TS3 S A popular option on the XLT TS3 S oven is the split conveyor belt This allows for 2 different conveyor speeds through the oven Figure 8 shows the right hand control panel w...

Страница 11: ...running see Figure 6 6 Adjust the conveyor controller to desired belt time see Figure 6 7 Allow about 30 minutes for the oven to reach desired operating temperature This oven is not capable of being...

Страница 12: ...desired temperature After Up or Down key press inactivity the display will blink once indicating that the set point temperature has been set The Func and Man keys are used at the factory to program t...

Страница 13: ...0 Conveyor Control Display These controls are factory preset at 4 00 minutes minimum and 14 00 minutes maximum If a belt time is desired that is outside these limits contact Wolfe Electric Inc for pro...

Страница 14: ...XD 9010 TS3 S Rev A 04 2009 Installation Operation Manual 13 4 SPECIFICATIONS Figure 11 Oven Size Specification Drawing...

Страница 15: ...XD 9010 TS3 S Rev A 04 2009 14 Installation Operation Manual...

Страница 16: ...S 6 3255 TS3 S 6 3855 TS3 S 6 3270 TS3 S 10 3870 TS3 S 120 VAC 10 Single 60 Hz Double Stack Volts Amps Phase Frequency 1832 TS3 S 12 2440 TS3 S 12 3240 TS3 S 12 3255 TS3 S 12 3855 TS3 S 12 3270 TS3 S...

Страница 17: ...180 000 Btu 3255 TS3 S 300 000 Btu 300 000 Btu 3855 TS3 S 300 000 Btu 300 000 Btu 3270 TS3 S 480 000 Btu 480 000 Btu 3870 TS3 S 480 000 Btu 480 000 Btu Oven Triple Stack Natural Gas 6 8 WC Propane Ga...

Страница 18: ...ssure see Figure 12 with all gas appliances such as furnace hot water heater oven s etc a off and b with all gas appliances on Figure 12 Gas Pressure Check Quiet Fire Direct Ignition Burner Contact Wo...

Страница 19: ...ce and make sure that it guards against transmission of strain to the gas line and electric cord 7 Test the exhaust hood using a smoke candle to determine the amount of combustion products removed 5 2...

Страница 20: ...into a properly grounded three prong receptacle Do not cut or remove the grounding prong from this plug When installed the appliance must be electrically grounded in accordance with local codes or in...

Страница 21: ...ect device or its associated piping and or the electric cord to limit the oven movement One restraint required per oven stack The restraint must be connected to the eye bolt which is supplied with the...

Страница 22: ...rculating air is desired If the exhaust fan removes too much air from the kitchen this will force the HVAC system to condition more air than necessary Conversely if the exhaust fan removes too little...

Страница 23: ...s the customer s responsibility to have the interlock system installed by a licensed electrician and that it meets all required local codes See oven rough in requirements for receptacle requirement Fi...

Страница 24: ...otection be installed as noted below This will provide the required protection without affecting oven function or cleaning Figure 15 Fire Suppression view Fire Suppression plumbing may be installed as...

Страница 25: ...ger store part number 4YD83 or 4YD84 Remember the cleaner the filter the cooler the control box components will be resulting in longer component life Figure 16 Filter element removal Contact Wolfe Ele...

Страница 26: ...ressure Generating fan filter Clean finger covers Clean bake chamber floor Clean bake chamber walls Clean bake chamber top Clean inside of face panel Clean control box sides and top Clean control box...

Страница 27: ...ty of toppings XLT ovens can be configured to cook a wide variety of food items This is accomplished by arranging the fingers to control the baking characteristics Generally speaking most cooking is a...

Страница 28: ...y the following items and then contact us before performing maintenance and repairs Electrical diagrams are located on page 31 33 and on the inside surface of the operator control panel lid 1 Oven is...

Страница 29: ...d the electrical supply are to be provided by the customer prior to installation The picture above shows a typical utility rough in for a triple stack oven Preparing the utilities this way allows for...

Страница 30: ...ines The electrical outlets Item 1 can also be located to the left of the gas line The oven electrical plugs are the NEMA 5 15 straight blade type with 8 foot long cords Figure 18 Gas Service view The...

Страница 31: ...uble 130 000 6 8 11 5 14 2440 TS3 S Triple 195 000 6 8 11 5 14 3240 TS3 S Single 90 000 6 8 11 5 14 3240 TS3 S Double 180 000 6 8 11 5 14 3240 TS3 S Triple 270 000 6 8 11 5 14 3255 TS3 S Single 150 00...

Страница 32: ...XD 9010 TS3 S Rev A 04 2009 Installation Operation Manual 31 8 ELECTRICAL DIAGRAMS 8 1 1832 TS3 S 2440 TS3 S 3240 TS3 S 3255 TS3 S 3855 TS3 S...

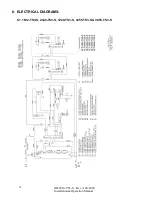
Страница 33: ...XD 9010 TS3 S Rev A 04 2009 32 Installation Operation Manual 8 2 3270 TS3 S 3870 TS3 S RIGHT HAND SIDE...

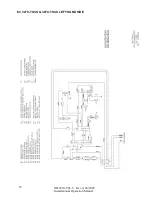
Страница 34: ...XD 9010 TS3 S Rev A 04 2009 Installation Operation Manual 33 8 3 3270 TS3 S 3870 TS3 S LEFT HAND SIDE...

Страница 35: ...nd returned to Wolfe Electric Inc to initiate and validate the warranty 6 Any part found to be defective during the warranty period will be replaced by Wolfe Electric Inc 7 Failure to call Wolfe Elect...

Страница 36: ...XD 9010 TS3 S Rev A 04 2009 Installation Operation Manual 35...

Отзывы: