background image

NVR User

’s Manual


61 


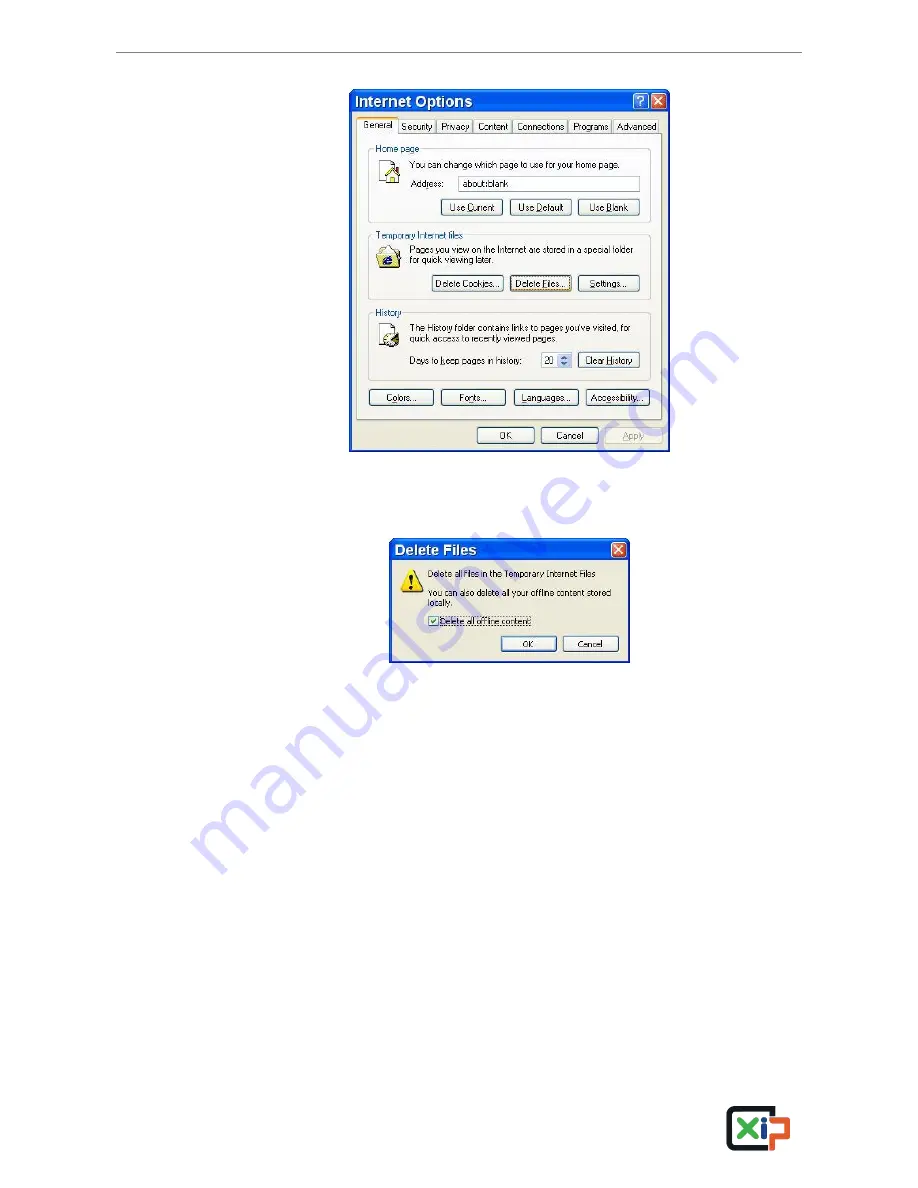
  Click the <Delete Files> button in the <Temporary Internet Files> field; the 

<Delete Files> screen displays as below. 


  Check the <Delete all offline content> box and click <OK>. 

  Now, enter the IP address of the NVR to make the connection again. 

Содержание NVR04 LION

Страница 1: ...Network Video Recorder XIP NVR04 LION User s Manual Version 1 3 ...

Страница 2: ...necessary shut down the system and unplug the unit from the outlet before uncovering the top cover Do not use liquid cleaners or aerosol cleaners Use only a damp cloth for cleaning Always shut down the system prior connecting or disconnecting accessories with the exception of USB devices This symbol intends to alert the user to the presence of important operating and maintenance servicing instruct...

Страница 3: ...future reference and if necessary warranty service When unpacking your unit check for missing or damaged items If any item is missing or if damage is evident DO NOT INSTALL OR OPERATE THIS PRODUCT Contact your dealer for assistance WARNING RISK OF EXPLOSION IF THE RTC BATTERY ON THE MAINBOARD IS REPLACED WITH AN INCORRECT TYPE DISPOSE THE USED BATTERIES ACCORDING TO THE INSTRUCTIONS ...

Страница 4: ... 3 4 1 Set Date time 17 3 4 2 Daylight Saving Time 18 3 4 3 Network Time Protocol Setup 18 3 5 IP Camera Setting 19 3 5 1 IP Camera Information 20 3 5 2 Connection Setup 22 3 5 3 Device Setup 24 3 5 4 Activated 24 3 5 5 Status 24 3 5 6 Copy Settings 25 3 6 Record Schedule Quality Setting 26 3 6 1 Schedule Setup 26 3 6 2 Preset Record Configuration 27 3 6 3 Advance Schedule Setup 27 3 6 4 Data Life...

Страница 5: ...ersal Function 44 4 6 System Log Exportation 44 5 Remote Monitoring Software 45 5 1 Remote Monitoring System Requirements 45 5 2 Software Installation 46 5 2 1 Change Internet Settings 46 5 2 2 Install Remote Monitoring Software 49 5 2 2 1 Log in Log off 50 5 2 2 2 Software Upgrades 51 5 3 Basic Operation for Monitoring Remotely 51 5 3 1 View Live Video 51 5 3 1 1 Select Display Mode 52 5 3 1 2 Op...

Страница 6: ... Snapshot 58 5 3 7 Health Status of HDD 58 5 3 8 Normal and Dual Streaming 59 5 3 9 Remote Software Upgrade Reboot of Connected NVR 59 5 3 10 Remote Monitoring Software Troubleshooting 60 Appendix A Keyboard Access Sketch 62 Appendix B Manual IP Camera Activation 63 ...

Страница 7: ...NVR for recording and live monitoring In addition the Full HD 1080P video at local monitor display presents high quality images The XIP NVR04 LION is pre installed with remote viewing and configuration software which is a Web browser plug in allowing users to view live or recorded video images and enables remote configuration The remote software is stored in the XIP NVR04 LION and deployed over a ...

Страница 8: ...ng environment is 40 C The unit utilizes heat conducting techniques to transfer internal heat to the case especially to the bottom side of the unit NOTE Be sure the rubber feet are not removed and always leave a space for air ventilation on the unit s bottom side 2 2 Connect Devices to the Unit This section lists some notices that should be given before making any connections to the NVR Connecting...

Страница 9: ...D lights up when an alarm is triggered 2 4 Rear Panel Connectors There are various connectors on the rear panel for the NVR installations The connectors are described as the followings Audio Out The NVR provides an Audio Out port for connection to an audio output device such as an amplified speaker VGA The VGA connector is for connection to a VGA monitor HDMI The HDMI connector is for connection t...

Страница 10: ...lows videos to be viewed over the LAN network or the internet via the IE browser USB Connectors The USB connectors are provided for users to connect external USB devices to the unit such as ThumbDrive or an USB mouse PoE Ports Each PoE port is for direct connection to an IP camera to provide power and network with just one RJ 45 cable Power Jack Connect the power supply cord and the power adaptor ...

Страница 11: ...hown as the following figure Title of the channel will be displayed on the top center of the gird either in full screen mode or in multiple window mode The current operation status and date time information will be displayed in the status bar at the bottom of the screen Move the cursor to any status bar icon and its description will be displayed Refer to the Setup Guide for a list of status bar ic...

Страница 12: ...or setting positions of all camera names at once In addition users can also connect an USB keyboard to help operating the NVR Refer to the appendix for key definition of the USB keyboard 3 1 2 Functional Keys Move the cursor to the right side of the screen and a Live Panel will be displayed This section describes the functional icons in the Live Panel Please refer to the Setup Guide for the graphi...

Страница 13: ... The video of latest 5 10 minutes cannot be played back because the video is still saved in the buffer SEQ Sequence This icon is for automatic sequence display of predetermined camera orders NOTE This function is only available for 8CH models MENU Click on this icon to enter the OSD setup menu DOME Click on this icon to enter Dome Camera Control mode Please refer to Section Dome Control for detail...

Страница 14: ...icon When an account is logged in its authority level number 1 8 will be shown Before completely logout other functions can still be accessed There are two ways to logout manually logout by clicking on the ESC icon in the Live Panel or auto logout when users have not accessed the NVR for a preset period of time default 5 minutes at Live Menu mode 3 2 1 User Management The NVR provides the option t...

Страница 15: ...inistrator account admin cannot be changed Permissions Setup Setup the allowed authority level for accessing the functions listed in this menu In accordance with users privilege level defined in Account Setup the authority level here also ranks from levels 1 8 with level 8 as the highest level Users will be able to access any function that is set to their equivalent or lower level Alternatively se...

Страница 16: ...g Rebooting Time Off AM 12 00 Power Off Select this item to shutdown the NVR Do not remove the power source until the NVR is completely off Reboot Select this item to reboot the NVR The login screen will be displayed after the NVR is completely restarted Auto Rebooting The NVR can be set to reboot automatically once a day week at a predetermined time in order to keep the NVR system more stable Sel...

Страница 17: ... took more than predetermined time 3hrs for 1TB HDD 6hrs for 2TB HDD etc the scanning process is treated as failed and will be automatically terminated The NVR will reboot Format HDD If the scanning process is failed users will be prompted to confirm format of the HDD with error When users confirmed to format the HDD with error login of an authorized account is required if password protection is e...

Страница 18: ...e or Time for adjusting the settings Click at the target position and click on the UP DOWN arrow buttons to change the value in the selected field NOTE The new date time setting applies to videos recorded after the change The date and time of previously recorded videos will not be altered NOTE If time settings have to be changed in any case it is strongly recommended to format the HDDs to avoid da...

Страница 19: ...aying back recorded video or searching video in the event list S indicates summer time and W indicates wintertime DST Start End These items are used to program the daylight saving duration Click at the target position and click on the UP DOWN arrow buttons to change the value DST Bias This item allows user to set the amount of time to move forward from the standard time for daylight saving time Th...

Страница 20: ... server is set select Yes for Manually Time Sync to sync the time immediately The time sync can also be updated periodically Select On for Automatically Time Sync and the time will be automatically synced once an hour 3 5 IP Camera Setting IP cameras can be connected via network For models with PoE ports when IP cameras with the Nx Series protocol are connected to PoE ports settings of the IP came...

Страница 21: ...e that the display in the remote monitoring software will also be hidden Otherwise select Off the live image will be shown on the monitor Enable PnP The preset is On that enabled the plug and play function via the PoE port connection Users need to select Off to be able to connect the IP camera via internet Device Search Select this item to automatically search for IP cameras installed in the same ...

Страница 22: ...he camera side before the connection The following describes the rules of setting the IP address of the IP camera If the software version of the NVR is before 0968m set the IP address of the IP camera as 192 168 50 XXX However if the software version is after 0968m set the IP address as 192 168 51 XXX The fourth set of numbers of the IP address is limited within a specified range for each PoE port...

Страница 23: ...ware Main stream is also for video export so that the exported video will be high quality Under this menu users can setup configuration for the main stream First choose streaming format from H264 or MJPEG If users will setup streaming index port and protocol manually set Advance Streaming Options to On and select preferred values from the corresponding menu items Otherwise keep Advance Streaming O...

Страница 24: ...rotocol manually set Adv Dual Streaming Options to On and select preferred values from the corresponding menu items Otherwise keep Adv Dual Streaming Options as Off and the NVR will automatically complete the setting Dual Stream Setup Dual Streaming Support Dual Streaming Recording Dual Streaming Format Adv Dual Streaming Options Dual Streaming Index Dual Streaming Port Dual Streaming Protocol Yes...

Страница 25: ... Take CH4 for example if the IP address of the NVR is 192 168 0 50 the IP address of CH will be 192 168 0 50 84 3 5 4 Activated Access this item and select Yes to activate the connection with the IP camera To deactivate the connection select No NOTE Once the connection with the IP camera is activated menu items Device Search Hostname IP Model Connection Setup and Copy Settings will be grayed out a...

Страница 26: ... camera to any other IP cameras Enter this menu and select one or more cameras to copy the settings Then click on Confirm to apply the settings Copy Settings Copy To 01 02 03 04 05 06 07 08 Select All Deselect All Confirm Cancel NOTE When an IP camera is already activated it will be grayed out and cannot be selected ...

Страница 27: ...t Quality On On 3 6 1 Schedule Setup The Schedule Setup is used to set the day and night time or weekend recording schedule NOTE This will be unavailable if the menu item Preset Config is set to Adv Schedule Schedule Setup Day Time Start Day Time End Night Time Start Night Time End Weekend Schedule Weekend Start Weekend End AM 06 00 PM 06 00 PM 06 00 AM 06 00 On Fri PM 06 00 Mon AM 06 00 Make pref...

Страница 28: ...he menu item Preset Config is set to Adv Schedule users need to further setup configuration of this submenu Advance Schedule Setup Schedule Table Recording Profile Setup Holiday Setup Schedule Table This menu allows users to setup self defined recording preset for the preset configuration Adv Schedule Users can assign recording type for days in a week by hour Moreover the recording type for pre de...

Страница 29: ...Profile2 30 2560 kbps 30 4096 kbps CH01 Profile3 30 2560 kbps 30 4096 kbps NOTE The setting items will be grayed out when the IP camera is not connected First select an activated IP camera Click on any pull down menu to change to the preferred value Users can copy the settings of the current selected IP camera to any camera Enter Copy Setting menu to select desired cameras Then click on Confirm to...

Страница 30: ... Day and By Channel When a specific mode is selected further settings of the other two items below will be grayed out and cannot be accessed Data Lifetime When data lifetime mode is set as General this item will be accessible Click on the UP DOWN buttons to set Data Lifetime The value ranges from 1 to 365 days Alternatively select 0 to disable this function Data Lifetime By Day When data lifetime ...

Страница 31: ...g function of the unit When it is set to On audio input is recorded and saved with the video When it is set to Off audio is ignored 3 6 7 Purge Data This item is used to delete the Normal or Event recording video In Record menu select Purge Data and the following menu is displayed Purge Data Purge All Data Purge All Event Data Purge Event Before Start To Purge No No 2000 01 01 No Purge All Data Th...

Страница 32: ...l cancel the deletion 3 6 8 Pre Alarm Recording When the NVR records both Event and Normal videos the time duration of pre alarm recording is 10 seconds However when the NVR only records Event video the time duration of pre alarm recoding will vary according to the number of the connected IP cameras bitrates and FPS Frame rate Per Second ...

Страница 33: ... multiple window modes The following figures show the available multiple window modes Click on Mode icon repeatedly to switch to the next available viewing mode NOTE 9 window mode is only available for 8CH models 4 1 2 Digital Zoom Users are able to view 2 zoom image in full screen live mode To view the zoom images follow the steps below Click on a channel to display full screen image and scroll u...

Страница 34: ...will start to resume playback of the recorded videos from last suspended point of record If it is the first time to initiate instant playback the NVR will playback from the very beginning of the database Alternatively users can also select videos via the Search menu to playback specific videos Refer to section Search Recorded Videos for further information Once the playback starts the playback con...

Страница 35: ... this icon to scale the time bar by 24 hour 12hr Click on this icon to scale the time bar by 12 hour 4hr Click on this icon to scale the time bar by 4 hour NOTE Users can also click and drag the time slider bar to select a preferred playback video time 4 2 Search Recorded Video The NVR is capable of searching and playing back recorded videos by date time or events To search by time select a specif...

Страница 36: ... selected time NOTE If there is no available recorded video that matches the specified time and date the NVR will start to playback from the next available video NOTE The date time information will be shown on the screen with a DST icon if the Daylight Saving Time function is enabled S indicates summertime and W indicates wintertime 4 2 2 Calendar Search Follow the steps below to search recorded v...

Страница 37: ...vent search Select the channels to be added to the event search Click on Event List to list event videos that met searching criteria above The Event List will be shown as below The list displays events by date time triggered camera and alarm type As some events are deleted others are displayed The latest recorded event video will be listed on the top Event List Date Time 2013 05 07 PM 01 56 50 201...

Страница 38: ...ort menu is shown as below Export Select Device Select Ch From To Select Events Data Type Export Format Digital Signature Begin Export Ch1 Ch2 Ch3 Ch4 All 2013 05 07 AM 11 50 05 2013 05 09 PM 03 09 18 Normal Original No No The exported videos will be named by the exporting date and time and be classified by the event types Each recorded video will be exported into four files if digital signature i...

Страница 39: ...d event video Export Format This item is for selecting exporting video format The options are AVI DRV and Original The DRV and AVI files are compressed video files while the original files are raw data of the NVR s recorded videos The DRV and original files can only be played back with the remote monitoring software and playback software These files can contain multiple channels in one file On the...

Страница 40: ...ar Search for information about normal video playback In Playback mode the playback control panel will be displayed Users can click on the COPY icon once to mark the starting point of the export video The playback continues Click on the COPY icon again to mark the ending point of the export video Then the confirmation message will be displayed as the figure below The information shown is read only...

Страница 41: ...ode users can click on a dome camera channel to display it in full screen Then click on the Dome Camera Control icon and the PTZ Control panel will be displayed Please refer to Setup Guide for the graphical illustration of the controlling buttons 4 4 1 PTZ Controlling Buttons The PTZ controlling buttons are Iris Close Open Focus Far Near Zoom Out In Preset ESC Pan Tilt Speed Direction buttons and ...

Страница 42: ...mera This function enables users to enlarge a certain area Preset Click on it to access the Set Go Preset function A numeral keyboard will be displayed and users can set preset points go to preset points and run dome camera tour Refer to the later section for instruction about the mentioned functions ESC Click on it to exit PTZ Control mode and return to live full screen viewing mode Pan Tilt Spee...

Страница 43: ...rd will be displayed as below 1 2 3 4 5 6 Set Preset 7 8 9 Go Preset Exit 0 Clear Run Tour Input a desired preset number Click on the Set Preset button to save the position Now the preset position is set and ready to be called 4 4 3 Call Preset Points Follow the steps to call preset points Click on a dome camera channel to display it in full screen Then click on the PTZ Control icon and the PTZ Co...

Страница 44: ...s the abbreviation for Universal Plug and Play which is a technology that integrates a universal protocol for widespread plug and play devices to ease the network implementation When a PC and a NVR both installed the UPnP function the PC can automatically recognize the NVR in the same local area network The advantage of this function is that PCs can connect to the NVR via the remote control softwa...

Страница 45: ...between the PC and the NVR will be transmitted back and forth by the router The router will need to setup port mapping forwarding before images from the NVR can be remotely viewed on the PC For each individual NVR the setting needs to be done individually Thus if there are tens or hundreds of NVRs the setting process will take a long time Fortunately if the NVR has UPnP NAT traversal function the ...

Страница 46: ... Remote setup of the NVR Remote control of dome cameras Alarm notification from the NVR Up to three connections to one NVR simultaneously including the preset admin and two other accounts NOTE The Menu function allows users to remotely access the NVR s OSD setup menu with some limitations Refer to the above sections or the OSD Setup Manual for setting configuration of the NVR 5 1 Remote Monitoring...

Страница 47: ... the Internet security settings appropriately Start the IE it can be started either by clicking on the desktop icon or by using the Start menu to access it NOTE If users wish to use the function Snapshot in the remote monitoring software users must run IE as administrator To run IE as administrator right click on the IE browser icon on the desktop and select Run As Administrator to launch IE NOTE ...

Страница 48: ...t will capture the screenshot of the window that is currently showing on the screen Uncheck Require server verification https for all sites in this zone Type the IP address of the NVR in field and click on Add to add the web site to the list Click OK to confirm the setting and close Trusted sites dialog ...

Страница 49: ...Security Settings screen is displayed Under ActiveX controls and plug ins set all items to Enable or Prompt Click on OK to apply the setting and close the Security Settings dialog Click on OK to close Internet Options dialog Now the installation can continue to the next step ...

Страница 50: ...t installation of the ActiveX plug ins The remote monitoring software plug ins will be downloaded and installed on the PC automatically NOTE Do not input any leading 0 characters in the address For example 192 068 080 006 should be input as 192 68 80 6 If the default trigger port 80 is changed to a different number such as port 81 the IP address should be input as 192 68 80 6 81 A version check st...

Страница 51: ...ng steps demonstrate procedures to connect and login to the NVR Start the remote monitoring software by entering the IP Address of the NVR in the Address bar of the browser Alternatively click on the Favorite entry for the unit if the IP address of the unit has been set Input username and password of the account The login username and password can be saved to ease future login The default username...

Страница 52: ...Operation for Monitoring Remotely When an NVR is successfully connected the main window of the remote monitoring software will be displayed Please refer to the Setup Guide for the graphical illustration of functional items The functions on the remote monitoring software will be described in the following sections 5 3 1 View Live Video View live video from the cameras connected to the NVR by clicki...

Страница 53: ... the camera will be automatically adjusted to show a clearer image Set Go Preset Run Tour The remote monitoring software allows its users to store up to 255 preset points according to the allowance of the supported dome cameras Use Direction buttons to pan tilt dome camera to an appropriate position Then click this button select Set Preset and choose a preferred number from the pull down list The ...

Страница 54: ...ia the digital zoom function Zoom in out can be easily controlled via the scroll wheel of the mouse Move the scroll wheel away from users to zoom in and move toward the users to zoom out On the upper left hand corner will show zoom in magnification The maximum magnification is X7 Also on the lower right hand corner will display the position of current viewing area shown as an inner white rectangle...

Страница 55: ...dow toolbar and click Local Playback tab Click Open to choose a recorded file Click OK to start playing the recorded video 5 3 3 Playback Video The remote monitoring software allows users to either view recorded video from the NVR or from the hard disk drive of the PC To access the Playback screen click Play button on the main window toolbar There are three tabs in the Playback screen Remote Playb...

Страница 56: ...ng the arrow buttons To type directly Click on day month and year of date field respectively and type the desired numbers directly Follow above steps to adjust the hour minute and second of time field To use the arrow buttons Click on the arrow button next to the date field to display the calendar then click the left and right arrow at the top of the calendar to change the date Use up and down arr...

Страница 57: ...deo playback begins the remote monitoring software is in Playback Mode The playback controls toolbar will emerge on the main window toolbar The Playback controls and indicators are described as below Icon Name Description Fast Backward Step Backward 1 Click to play the recorded video in backward direction Click repeatedly to select the backward playback speed 1 2 4 8 16 or 32 2 When playback is pa...

Страница 58: ...lip has not been altered 5 3 5 Search from Event List Click SEARCH the Event List appears The List contains information about the alarm events that the unit recorded and saved Up to 1024 events can be listed in the Event List The Event List displays each event by its number the date and time of the event the type of the event including Alarm In Motion Detection and Video Loss and the camera channe...

Страница 59: ...dministrator right click on the IE browser icon on the desktop and select Run As Administrator to launch IE 5 3 7 Health Status of HDD This function verifies HDD status of the NVR The information items shown in the chart are described as below Device Name This item shows the model name of the HDD Int Ext This item indicates whether the HDD is an internal or external device Total Size This item ind...

Страница 60: ...streaming at local NVR site and lower quality streaming but faster transmission for the remote monitoring site To select dual streaming click on the bandwidth icon and the icon will change color Then users can furthermore choose different bit rates to adjust for the best displaying quality 5 3 9 Remote Software Upgrade Reboot of Connected NVR Users can remotely perform software upgrade or reboot t...

Страница 61: ...t the NVR 5 3 10 Remote Monitoring Software Troubleshooting What happened if the server requests to upgrade the software every time the NVR is connected If the following screen displays repeatedly please follow the steps to delete the temporary internet files Select Tools from the main menu of the web browser then Internet Options and then click the General tab ...

Страница 62: ...ck the Delete Files button in the Temporary Internet Files field the Delete Files screen displays as below Check the Delete all offline content box and click OK Now enter the IP address of the NVR to make the connection again ...

Страница 63: ...NVR User s Manual 62 Appendix A Keyboard Access Sketch The following sketch shows the keys used to access and control the connected NVR ...

Страница 64: ...f an IP camera Step 1 Start an IE browser and input the IP address ex 192 168 6 183 of the IP camera Login with the administrator s username and password ex Admin 1234 Step 2 Access the System menu and click on Network Basic to find the management port and the RTSP port management port 80 and RTSP port 554 ...

Страница 65: ...ges in multiple window mode Step 4 At the NVR site click on the Menu icon in the function bar and select Menu Camera First choose a preferred channel next to IP Camera Select Disable the PnP function by setting Enable PnP to Off Camera IP Camera Select IP Camera Name IP Camera Covert Enable PnP Device Search Hostname IP Model Connection Setup Device Setup Activated Status Copy Settings CH03 CH3 Of...

Страница 66: ...am Setup Streaming Format Advance Streaming Options Streaming Index Streaming Port Streaming Protocol H264 On Stream1 554 RTP RTSP Step 8 If users wish to connect the IP camera via dual stream access the Dual Stream Setup menu to setup dual stream configuration Dual Streaming Support Yes Dual Streaming Recording Yes or No and Dual Streaming Format H264 If Adv Dual Streaming Options is set to Off t...

Страница 67: ...checks 1 Check if the target IP device is supported by the NVR Make sure that Streaming Port Streaming Protocol and Streaming Format are set correctly 2 Check the menu item Hostname IP Try to connect the IP camera via the browser directly and see if the video shows correctly 3 Make sure the settings of the items Account Password and Management Port in Connection Setup are correct Confirm items in ...

Отзывы: