background image

33

A1 – A2 Set Document Feeder Misfeed

When a misfeed occurs in the SDF, the red SDF misfeed indicator flashes
on the Copier Diagram, and an A1 or A2 status code will flash in the
display window.  The status code indicates the number of originals that
must be returned to the SDF after clearing the misfeed.

A1 status code- refeed the last original.
A2 status code- refeed the last 2 originals.

This code will disappear when copying is resumed or the clear key is
pressed.

Details for clearing misfeeds are given below.

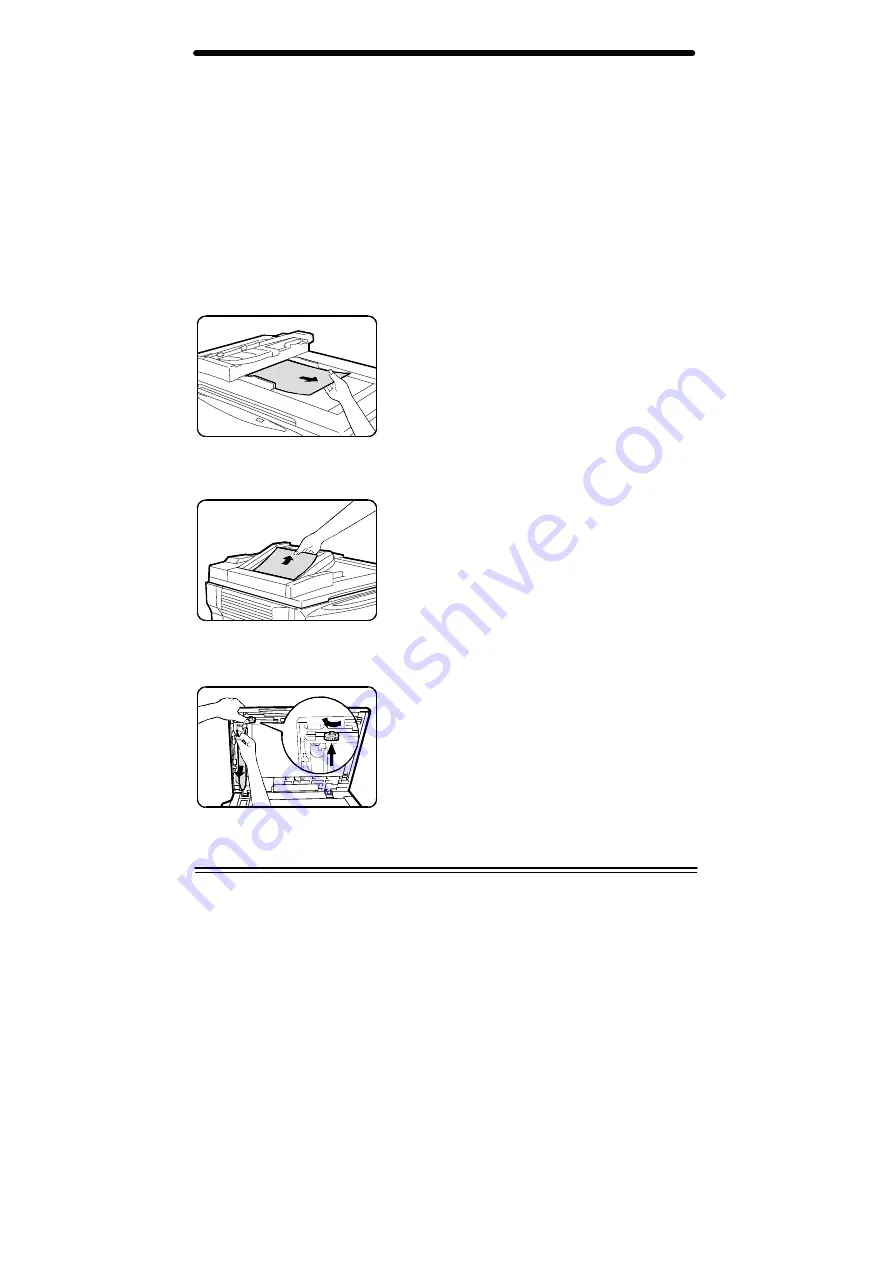
SDF Input Misfeed

1.  Pull the misfed original(s) toward the right

to remove them from the SDF input tray.
Refeed the number of originals indicated.

2.  Open and close the document cover to

clear the misfeed indicator.

3.  Press Start to continue copying.


SDF Exit Misfeed

1.  Remove all originals from the SDF exit

tray.  Refeed the number of originals not
copied.

2.  Open and close the document cover to

clear the misfeed indicator.

3.  Press Start to continue copying.


SDF Roller Misfeed

1.  Open the document cover and turn the

green roller rotating knob in the direction
of the arrow to remove any misfed
originals.  Refeed the number of originals
indicated.

2.  Open and close the document cover to

clear the misfeed indicator.

3.  Press Start to continue copying.

Содержание XC1033

Страница 1: ...XC811 XC822 XC830 XC855 XC875 XC1033 XC1044 XC1045 XC1245 ...

Страница 2: ...X and the identifying product names and numbers herein are registered trademarks of XEROX CORPORATION Xerox Canada Ltd is the licensee of all the trademarks All non Xerox brands and product names are trademarks or registered trademarks of their respective companies ...

Страница 3: ... Copy Quality 18 Reduction Enlargement 20 Copying Oversized Documents 21 Bound Original Copying XC822 XC830 XC855 XC875 XC1033 XC1044 XC1045 XC1245 21 Paper Tray Bypass XC811 XC822 XC830 XC855 XC1033 XC1044 22 Alternate Paper Tray XC875 XC1045 XC1245 23 Two Sided Copying 25 Customising Your Copier 26 Programmable Features 26 Programmable Feature Settings 0 9 and 12 28 Programmable Feature Setting ...

Страница 4: ...2 A1 A2 Set Document Feeder Misfeed 33 Toner Cartridge Replacement 34 Toner Cartridge Yield 35 Drum Cartridge Replacement 37 Problem Solving 38 Problem Solving Chart 38 Status Code Chart 40 Packing the Copier 41 Technical Data 43 ...

Страница 5: ...r purposes other than what they were intended Keep all supplies and materials out of reach of children DO NOT use this copier near water wet locations or outdoors DO NOT place this copier on an unstable cart stand or table The copier may fall causing personal injury or serious damage to the copier YOUR COPIER is equipped with a 3 wire grounding type plug i e a plug having a third grounding pin Thi...

Страница 6: ...nstallation unless proper ventilation is provided NEVER push objects of any kind into the slots of the copier as they may touch dangerous voltage points or short out parts that could result in a risk of fire or electric shock NEVER spill liquid of any kind on the copier NEVER remove any covers or guards that require a tool for removal There are no casual operator serviceable areas within these cov...

Страница 7: ...hazard However when the copier is performing below specification the ozone odor may be objectionable It is advisable to place the copier in a room of 1 000 cubic feet minimum or in a well ventilated room This equipment complies with Council Directive 89 336 EEC approximation of the laws of the Member States related to electromagnetic compatibility and Council DIrective 73 23 EEC ammended by Counci...

Страница 8: ...vi ...

Страница 9: ...orotron cleaner Toner cartridge Drum cartridge Transfer corotron Exit Tray Control panel Document cover Alternate Paper Tray Paper guides Release lever Paper Tray Bypass Document glass Power switch SDF Original Guides SDF Exit Tray SDF Input Tray Serial Number ...

Страница 10: ...Feeder XC811 250 sheets single sheet no no XC822 250 sheets single sheet yes no XC830 100 sheets single sheet yes no XC855 250 sheets single sheet yes yes XC875 250 sheets 50 sheets yes yes XC1033 250 sheets single sheet yes no XC1044 250 sheets single sheet yes yes XC1045 250 sheets 50 sheets yes yes XC1245 250 sheets 50 sheets yes yes ...

Страница 11: ...e the carton and packing materials They should be used to repack the copier if it has to be shipped for se rvicing Carton Starter Toner Cartridge Power Cord Packing material Copier User Guide Packing material Carton SDF Exit Tray ...

Страница 12: ...85 Place the copier on a flat level surface Avoid locations that subject the copier to Direct sunlight Extreme changes in temperature or humidity After selecting a location that meets the conditions listed above ensure that there is sufficient space around the copier XC811 822 830 855 1033 1044 copiers XC875 1045 1245 copiers Helpful hint Avoid placing clips or staples on any copier surface 737mm ...

Страница 13: ...rom alternate paper tray Unfold the tray 4 Remove all remaining pieces of tape from the copier 5 Remove the protective material and the shipping pins from the right and left sides of the copier Note A coin or other suitable object may be inserted into the screw slot of the shipping pins CAUTION The copier will malfunction if the two shipping pins are not removed 6 Store the shipping pins with thei...

Страница 14: ... Remove the toner cartridge from the bag Vigorously shake the cartridge to loosen the toner Thoroughly shaking the cartridge will assure maximum copies per cartridge A Starter Toner Cartridge is included Replacement toner cartridges will yield approximately twice the number of copies 10 Remove the toner cartridge cover ...

Страница 15: ...pier Store the pressure plate lock in the location shown Note Save the pressure plate lock It will be needed if the copier has to be shipped for servicing 15 Load copy paper into the tray Refer to the Loading Copy Paper section for additional information Do not fill above the max line 16 Push the paper tray firmly back into the copier Step 17 for XC855 XC875 XC1044 XC1045 XC1245 copiers only 17 In...

Страница 16: ...the copier and then into an earthed outlet 19 Turn on the power switch When the Ready Indicator lights copying is possible Note Save the carton and packing materials They should be used to repack the copier if it has to be shipped for servicing ...

Страница 17: ...restart When the copier enters the power shut off mode the Ready Indicator will flash and the other indicators will turn off To copy from the Power Shut off mode press Start select the desired features and press Start again The copies will be made automatically Auto Clear The copier returns to normal copy mode approximately one minute after a job is completed Unless otherwise programmed the normal...

Страница 18: ... 2 Copy Contrast Lightens or darkens copies while in the Text Photo or Toner Save settings The copy Lighter Darker feature is unavailable when Auto contrast is selected There are 5 contrast settings represented by 3 indicator lights Refer to Copy Quality section for more details 3 Bound Original Copying XC822 XC830 XC855 XC875 XC1033 XC1044 XC1045 XC1245 Makes copies from a bound document 4 Copier...

Страница 19: ...pies Press the right hand key to increase the quantity by one Press the left hand key to increase the quantity by 10 To display the number of copies requested during the copy run press the left hand key Press the Clear key to clear the selected quantity 12 Clear Press this key once to stop the copier while making copies or to clear copy quantity If the key is pressed twice all programming will be ...

Страница 20: ...t below gives you information about the types of paper that can be used Copy Paper Input Paper Tray 1 Alternate Paper Tray Bypass Tray Paper Sizes A5 to 216 356mm 89 140 to 216 356mm Paper Weights Optimum Range 80 gsm 56 to 90 gsm 80 gsm 52 130 gsm Paper Capacities Copy letterhead and predrilled XC830 XC811 XC822 XC855 XC1033 XC1044 XC1045 XC1245 XC875 80 gsm 100 sheets 250 sheets 250 sheets 250 s...

Страница 21: ...sh down on the shiny plate until it locks in position 3 Adjust the paper guides to the desired paper size Squeeze the side guide Lift and insert the rear guide When adding 216x356mm paper remove the rear guide and store it in the pocket in front of the side guide ...

Страница 22: ... indicator in the copier diagram will flash when the paper tray is empty paper has not fed all the way into the copier the paper tray is not closed properly If the paper has misfed open the paper tray and remove the misfed paper Do not reuse the misfed paper Ensure that the paper is under the corner snubbers Close the paper tray To cancel the flashing P without restarting copying press the Clear b...

Страница 23: ... the display and the green indicator in the copier diagram will flash Alternate Paper Tray XC875 XC1045 XC1245 1 Add paper if the Alternate Paper Tray is empty 2 If paper has misfed remove it by carefully pulling the edge of the paper in direction of the arrow 3 Press Start to continue copying ...

Страница 24: ...n the document glass 3 Close the Document Cover Note Leaving the Cover open while copying will affect copy quality and toner consumption 4 Select the desired copy features from the control panel 5 Select the number of copies 6 Press Start The number in the display window returns to 1 and advances as each copy is made ...

Страница 25: ...wing ranges Paper weight range 60 to 90 gsm Paper size range A5 A4 and 216 353 mm The SDF comes from the factory with the Auto Start feature enabled Refer to Customising Your Copier section of this User Guide for information about changing this setting 1 Select the required paper tray 2 Select the desired copy features from the control panel The maximum copy quantity is 1 Reinsert the originals in...

Страница 26: ...rom originals with a coloured background Note When Auto is selected the copier automatically varies the contrast of your copies Lighter Darker settings are not available Text Select Text to copy documents containing mostly text Photo Select Photo when the originals are photographs Toner Save Selecting Toner Save mode lowers the cost of copying by decreasing overall copy density Auto Auto Auto Auto...

Страница 27: ...tings are not available There are 5 contrast settings represented by 3 indicator lights The indicators light up one or two at a time to represent the selected setting Successive pushes of the key will change the indicators Darkest normal and lightest settings are depicted by one indicator When 2 indicators are lit the copy contrast will be mid point between the two settings ...

Страница 28: ... increase the percentage Any percentage from 70 to 141 may be selected The indicator above the key will light when a variable percentage is selected Display Window Preset or variable reduction enlargement percentages appear in the Display Window at the time selections are made After a few seconds the reduction enlargement percent is replaced by the number of copies selected Press the key to recall...

Страница 29: ...n be used to copy facing pages of a document onto separate sheets of paper The maximum size is B4 254x356mm 1 Align the centre of the document with the book symbol at the centre front of the document glass and the green arrow on the left registration guide 2 Select Bound Original Copying mode and any other features Reduction Enlargement is still possible 50 is the maximum copy quantity XC822 XC830...

Страница 30: ...rencies one sheet at a time Use labels and transparencies specifically designed for copiers Labels face up one sheet at a time 1 Place the original face down and align it with the registration guide on the document glass and close the document cover XC855 XC1044 copiers only The Paper Tray Bypass can only be used with the SDF if the SDF auto start has been disabled 2 Adjust the bypass guide to the...

Страница 31: ...t copy paper ranging in size from 89 140mm to 216 356mm Predrilled paper holes toward the front of the copier Letterhead paper face up with the top toward the left Transparencies one sheet at a time Labels face up one sheet at a time Use labels and transparencies specifically designed for copiers 1 Lower the alternate paper tray 2 Unfold the paper support extension 3 Adjust the guides to the width...

Страница 32: ...ert one sheet at a time 5 Press the Paper Supply button to select the alternate paper tray 6 Select other required features 7 Place the original on the document glass or in the SDF 8 Press Start Note When the Alternate Paper Tray runs out of paper the green indicator in the copier diagram flashes and the display will show a flashing P To continue copying add more paper and press Start ...

Страница 33: ...is not recommended for two sided copying 2 Select quantity required 3 Press Start to copy side 1 4 Place side two original face down on the Document Glass with the BOTTOM toward the LEFT Lower the document cover 5 Remove the copy of side 1 from the output tray and insert it face down BOTTOM toward the LEFT into the paper tray bypass alternate paper tray ...

Страница 34: ...n to the normal copy mode after a copy cycle is complete 1 0 Off 1 30 seconds 2 60 seconds 3 90 seconds 4 120 seconds Time out to Power Save This feature allows you to select the delay before the machine switches into Power Save mode 2 0 Off 1 45 seconds 2 90 seconds 3 2 minutes 4 5 minutes Time out to Power Shut off This feature allows you to select the delay before the machine switches into Powe...

Страница 35: ...f printed to the bottom 7 0 On 1 Off Paper Tray Bypass Auto Start When enabled the copier will begin to copy as soon as paper is fed into the paper tray bypass 8 0 On 1 Off Set Document Feeder Auto Start When enabled copying will begin when paper is placed in the SDF 9 0 On 1 Off Reduction Enlargement Preset This feature allows you to set a preset reduction or enlargement setting for the key 10 70...

Страница 36: ...t The lights within the Copier Diagram will flash 3 Press the left hand quantity key to select the Program Number of the feature to be changed You will not be given the choice to change an option if your copier does not have the feature 4 Press Start The current setting for that program will flash 5 Press the right hand quantity key until the option number you want is displayed 6 Press Start to st...

Страница 37: ... 4 to 6 seconds The light next to Auto mode will light The lights within the Copier Diagram will flash 3 Press the left hand quantity key until the number 10 is displayed 4 Press Start The current Reduction Enlargement setting will flash 5 Press the variable percentage keys until the desired percentage is displayed 6 Press Start to store the selection 7 Press the Clear key to continue making other...

Страница 38: ... water directly onto any part of the copier 1 Slightly dampen a soft lint free cloth or paper towel with water 2 Lift the document cover 3 Wipe the surface of the document glass until it is clean and dry 4 Wipe the underside of the white document cover until it is clean and dry 5 Close the document cover Additional Steps for XC855 XC875 XC1044 XC1045 XC1245 copiers only 1 Lift the SDF cover 2 Wipe...

Страница 39: ...y be dirty 1 Press the release lever to open the copier 2 Remove the green transfer corotron cleaning tool from inside the copier on the right hand side near the front and insert it into the transfer corotron unit 3 Wipe the corotron wire with the tool as shown in the figure 4 Replace the tool and close the copier ...

Страница 40: ...ot to touch the Fuser 1 Press the release lever to open the copier 2 Carefully remove the misfed paper Warning The fusing area is hot Take care when removing paper from the fuser area 3 Lift the fuser lever to remove a misfeed in the fuser area If the paper tears be sure to remove all the pieces of paper 4 Gently push down the upper half of the copier to close it Ensure that the misfeed indicator ...

Страница 41: ...ed 1 Pull the misfed original s toward the right to remove them from the SDF input tray Refeed the number of originals indicated 2 Open and close the document cover to clear the misfeed indicator 3 Press Start to continue copying SDF Exit Misfeed 1 Remove all originals from the SDF exit tray Refeed the number of originals not copied 2 Open and close the document cover to clear the misfeed indicato...

Страница 42: ...ntil the toner cartridge is replaced 1 Press the release lever to open the copier 2 Press down on the green lever 1 on the front of the old toner cartridge and pull the cartridge out 2 3 Shake the new toner cartridge horizontally four or five times and then remove the cover 4 Save the box and the cover to return the empty cartridge to Xerox for recycling 5 Slide the new toner cartridge in until it...

Страница 43: ...copies per cartridge decreases as the printed area increases Other factors which can affect the toner cartridge yield are The size of the document being copied Dark backgrounds Leaving the platen cover open The number of times the copier is switched on and off Double sided copying High humidity Low printed Medium High printed Very high printed area area area area ...

Страница 44: ... the document cover closed Leave the copier on during the day Switch off the copier at the end of the working day Copy with the exposure control set to Auto exposure unless you need to adjust for the background of your original Operate the copier in a dry environment whenever possible ...

Страница 45: ...will flash and the copier will stop operating until the drum cartridge is replaced 1 Press the release lever to open the copier 2 Press down on the toner cartridge lever 1 and pull out the cartridge 2 Note The toner cartridge must be removed before removing the drum cartridge 3 Pull out the drum cartridge 4 Remove the cover from the new drum cartridge 5 Slide the new drum cartridge in place making...

Страница 46: ...If the original is dark select the upper copy contrast position to lighten the background of the copies Smears lines marks or spots on copies If defects are on the original press the copy contrast key to lighten the background of your copies If no defects are on the original clean the document glass and underside of the document cover Refer to Copier Care If the above solutions do not help clean t...

Страница 47: ...e copier diagram are lit The machine is in the program mode Press the Exposure mode key to exit Toner yield is lower than expected and the Toner Indicator is on Remove the toner cartridge Shake the toner cartridge and tap along the top of the toner cartridge over a waste receptacle Take care not to touch the exposed toner on the left side of the cartridge Fewer copies from the toner cartridge than...

Страница 48: ...ps and the indicator begins to flash When this occurs the toner cartridge must be replaced When the drum cartridge replacement indicator appears the drum cartridge will need to be replaced within a 1 000 more copies Be sure to keep a replacement cartridge After a further 1 000 copies the Ready indicator will go out the drum cartridge indicator will flash and the copier will stop operating until th...

Страница 49: ...e 4 Close the copier 5 Open the paper tray and remove the copy paper 6 Attach the pressure plate lock Firmly close the paper tray Note The pressure lock storage compartment is just inside the open copier 7 Replace the shipping pins into the right and left sides of the copier Note The shipping pins are stored on the underside of the exit tray XC875 XC1045 XC1245 copiers only Insert foam between the...

Страница 50: ...42 Packing the Copier 8 Fold up and securely tape the exit tray alternate paper tray and close the document cover 9 Pack the copier by reversing the Unpacking instructions Refer to Installation ...

Страница 51: ...epth Height 510 470 245mm 510 470 270mm 550 470 310mm Machine Weight XC830 XC811 XC822 XC1033 XC855 XC875 XC1044 XC1045 XC1245 Includes Drum and Toner Cartridge 18 7kg 19 0kg 22 5kg Power Consumption Standby 5 Watts Power Shut Off Mode 35 Watts Power Save Mode 60 Watts Normal Running 390 Watts Max 1 1KW ...

Страница 52: ...44 ...

Страница 53: ...Multinational Professional Services Xerox Technical Centre Bessemer Road Welwyn Garden City Hertfordshire AL7 1HE United Kingdom 602P25100 1 1998 ...

Отзывы: