


Microsoft (NetBIOS over IP) Networks
WorkCentre 7425/7428/7435
System Administrator Guide
53
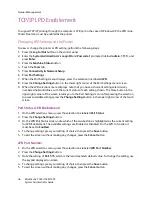
Viewing or Configuring the SMB Host Name or WINS Server
1. Open your Web browser and enter the IP address of the printer in the address field. Press
Enter
to
open CentreWare Internet Services.
2. Click the
Properties
tab.
3. Enter the system administrator User Name and Password (default
admin
,
1111
) if prompted.
4. Click the
Properties
Tab.
5. Click the
Connectivity
folder, then the
Protocols
folder.
6. Select
Microsoft Networking
in the directory tree.
7. The available selections include:
•
Transport
•
Maximum Connections
•
Workgroup Name
•
SMB Host Name
•
TBCP Filter
: (Displayed when PostScript is enabled).
•
An enabling check box for supporting
Unicode
(supplying the Host name and Workgroup name
in Unicode characters during SMB transmission).
•
An enabling check box for
Auto Master Mode
. When the master browser for the workgroup
cannot be found, if this box is checked, this host will become the master browser.
•
An enabling check box for
Password Encryption
(during SMB transmission).
•
WINS Server
: For using a WINS Server to resolve NetBIOS names (SMB host names) to IP
addresses.
8. Select
TCP/IP
from the Transport menu.
9. Accept the default value, or enter a value from 3 to 10, for maximum number of connections
allowed in Maximum Connections.
10. Accept the Workgroup name shown, or enter your own workgroup name.
11. Either accept the default SMB Host Name, which is automatically built by the printer to assure the
name's uniqueness, or enter your preferred name. Note that this will be the NetBIOS name that is
resolved by the Naming Server (DNS or WINS) to an IP Address for the printer.
12. If using a WINS server, enable the
WINS Server Address Resolution
check box. When enabled, the
printer will contact the DHCP Server for the IP Addresses of the Primary and Secondary WINS
(Windows Internet Naming Service) Servers. Note that two IP Address lines, with entry boxes, are
provided for manual entry (when DHCP is not selected).
13. To apply setting changes, click the
Apply
button, then click the
Reboot
button to reboot the printer.
To exit without making any changes, click the
Undo
button.
Note:
To use the printer's NetBIOS name over the TCP/IP Network, the DNS and WINS Servers must be
configured for NetBIOS name to IP address resolution. Also, make sure that the printer is informed of
the addresses of the DNS/WINS Servers. For more information see
TCP/IP Dynamic Addressing
on
page 48 and
Microsoft (NetBIOS over IP) Networks
on page 52.
Setting Up a Computer to Print Directly to the printer
See
Microsoft (NetBIOS over IP) Networks
on page 52.
Содержание WORKCENTRE 7428
Страница 8: ...WorkCentre 7425 7428 7435 System Administrator Guide 8...
Страница 9: ...9 1 General Information This chapter includes Resources on page 10...
Страница 11: ...11 2 Installation This chapter includes Installation on page 12 Print Driver Installation on page 13...
Страница 40: ...Administrative Tools WorkCentre 7425 7428 7435 System Administrator Guide 40...
Страница 168: ...Scanning and Faxing WorkCentre 7425 7428 7435 System Administrator Guide 168...
Страница 208: ...Troubleshooting WorkCentre 7425 7428 7435 System Administrator Guide 208...