Xerox DocuMate 510 Скачать руководство пользователя страница 44

DocuMate 510 Scanner User’s Guide

39

Scanning

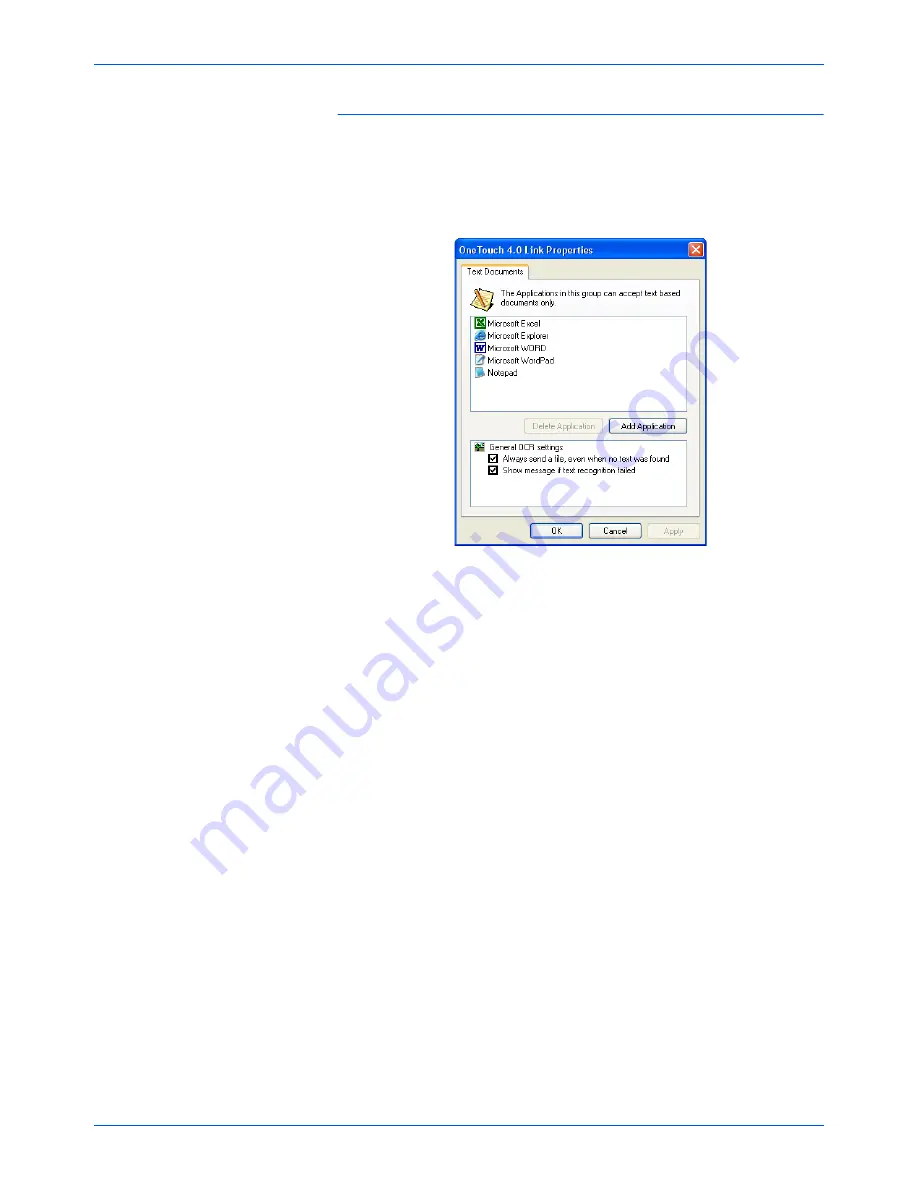
Text Documents Properties

These properties apply to Microsoft Word, Microsoft Excel

®

, and 

the other applications indicated by their icons in the list. The 
properties apply to the Optical Character Recognition (OCR) 
settings for the applications.

1. Click in the OCR settings boxes for the options you want.

The options will apply to all the applications in the group. 

Always send a file, even when no text was found

—The 

scanned file is sent to the OCR reader even if the image does 
not appear to contain text. This could occur if you scanned a 
photograph with a One Touch button set for text applications.

Show message if text recognition failed

—A message will 

open on the screen if the OCR reader does not detect text in 
the image.

Содержание DocuMate 510

Страница 1: ...DocuMate 510 installation guide scanner...

Страница 2: ...DocuMate 510 scanner installation guide...

Страница 3: ...istered trademark of ZyLAB International Inc ZyINDEX toolkit portions Copyright 1990 1998 ZyLAB International Inc All Rights Reserved All other products mentioned herein may be trademarks of their res...

Страница 4: ...gs Before Scanning 27 Using the One Touch Panel 29 About the One Touch Button Panel s Names and Icons 30 The Default One Touch Settings for Your Scanner 31 Configuring the One Touch Buttons 32 About t...

Страница 5: ...0 Scanning with the WIA Interface Fine Tuning Your Scans 108 Maintenance Clearing Paper Jams 110 Care and Maintenance 111 Cleaning the Scanner Glass 111 Cleaning the Automatic Document Feeder 111 Repl...

Страница 6: ...o make sure that all parts are included If any items are missing or damaged contact the dealer where you purchased the scanner WARNING Do not plug in the USB cable until after you have installed the s...

Страница 7: ...erox DocuMate 510 Scanner Glass Document Pad Reference Frame Document Cover ADF Cable Power jack USB Port ADF port Power On Off Switch Paper Stop Paper Guide Extension Paper Guide Automatic Document F...

Страница 8: ...omatic Document Feeder ADF Feeds a stack of pages onto the glass for scanning The ADF can hold up to 50 pages at a time Lock Locks or unlocks the scanning head located on the underside of the scanner...

Страница 9: ...Color 16 bit or True Color 24 bit or 32 bit Resolution set to at least 800 x 600 pixels To set your monitor s colors and resolution Open the Windows Control Panel Double click on Display then select...

Страница 10: ...n to proceed if that option is available Alternatively you can turn off the AntiVirus or AntiSpyware software before installing your scanner but if you do make sure to turn it back on again when insta...

Страница 11: ...ts to assemble the scanner are included in the box To assemble the scanner 1 Remove all shipping tape from the top and bottom of the scanner 2 Open the ADF cover and carefully remove any foam particle...

Страница 12: ...lide the Guide down into place The catch tabs C snap into place Refer to the picture on page 2 to see the location of the assembled parts NOTE The locking tab protects the scanner s scan head by holdi...

Страница 13: ...op onto the back of the scanner and slide it downward to snap its tabs into place 7 Plug the ADF cable into the ADF port Tighten the two locking screws on either side of the plug to make sure the ADF...

Страница 14: ...ive The CD automatically starts NOTE If the CD does not start check the following Make sure the CD drive s door is completely shut Make sure the CD was inserted in the drive in the proper direction la...

Страница 15: ...The PaperPort installation begins 1 The Select Language window opens Click the drop down menu arrow and select the language to use Click OK The first PaperPort Installation window opens 2 On the Paper...

Страница 16: ...your computer is running an AntiVirus or AntiSpyware application you may see messages asking you to allow installation Select the option to allow installation to proceed 7 On the Product Registration...

Страница 17: ...the scanner It also installs the scanning interface for the TWAIN driver Installing this option means that you can use several different methods to scan as explained in this User Guide TWAIN Only The...

Страница 18: ...ned items look good on your monitor Gamma controls the brightness of the midtones of colors That setting can be changed later as you re scanning 7 Select the option that looks best to you and click Ne...

Страница 19: ...ly 1 Plug the power supply into its power port on the scanner 2 Plug the power cord into the power supply and then into a wall outlet Now proceed to the next section Step 4 Connect the USB Cable and T...

Страница 20: ...tion to a USB 2 0 High Speed port provides optimum performance however your scanner will also connect to a USB 1 1 port The USB symbol as seen in the above diagram identifies the location of the USB p...

Страница 21: ...ice is plugged into a non HI SPEED USB hub Plug the USB cable into a USB 2 0 port if available or just disregard the message If you leave it plugged into the USB 1 1 port your scanner may scan a bit s...

Страница 22: ...a quick overview about accessing and navigating the One Touch Button Panel When you re finished reading the additional information return to the screen above and click OK The scanner s status light is...

Страница 23: ...Applications Available with Your Scanner Your scanner includes an additional free application on the Installation CD 1 Return to the Main Menu 2 Click Install Products Applications already installed...

Страница 24: ...ge its color tones remove red eye from pictures of faces and crop and resize the image PhotoImpression works with digital photos directly from a camera as well as photos scanned with your Xerox DocuMa...

Страница 25: ...e the User Guides you want The User Guides are in Adobe Acrobat PDF format The CD also includes a free copy of Acrobat Reader in case your computer does not have it already installed The Scanner Readm...

Страница 26: ...e file has late breaking news about your scanner 3 The SharePoint Mini Guide has information about a new feature in the One Touch 4 0 software to link to Microsoft s SharePoint application You can use...

Страница 27: ...or Online Updates from the pop up menu 3 Follow the instructions on the screen and register your scanner by entering your scanner s serial number and your email address The serial number is located on...

Страница 28: ...ams use it too so you can also scan from them as well as from PaperPort See Accessing the TWAIN Interface from PaperPort on page 82 Windows Image Acquisition WIA Interface This option uses the Microso...

Страница 29: ...de for the size of paper 3 Adjust the Paper Stop at the back of the scanner for the size of the paper Pull out the slide on the Paper Stop for letter sized pages Push it in for legal sized pages NOTE...

Страница 30: ...utomatic Document Feeder and will scan pages in it You must remove these pages prior to scanning from the Flatbed 2 Lift the scanner cover and place the document face down on the glass 3 Align the ite...

Страница 31: ...ows to cycle through the buttons to find the one you want to use for scanning 3 Click the button you want to use to scan For example to attach a scanned document to a blank email message click button...

Страница 32: ...w opens for you to view and change the settings before scanning This sample shows the current settings for Button 1 The One Touch Button Panel also opens with the description of the selected settings...

Страница 33: ...To Refresh the One Touch 4 0 settings click the Refresh button on the One Touch Properties window 3 When you re ready to scan just click not right click a button on the Button Panel NOTE The One Touc...

Страница 34: ...on the green arrows to navigate through the panel s three views To see the other scanning buttons click the arrows on the right hand side of the panel The Button View is your main scanner control pane...

Страница 35: ...e the button s name to Sketches and the Destination Application to Microsoft Paint or some other drawing program A folder icon for a button such as shown for Button 7 means that the button is set up t...

Страница 36: ...ttaches the scanned image to a new email message 5 Fax Fax Application Black White 200dpi Sends the scanned image to your fax application 6 OCR Microsoft Word Black White 300dpi Converts scanned text...

Страница 37: ...ttom right corner of the screen 2 Right click a button on the One Touch Button Panel REMINDER Remember that left clicking a button on the One Touch Button Panel starts the scanner scanning Right click...

Страница 38: ...open to display the scanned image for the selected button To configure the list of available applications click the Options tab and select the desired options See Selecting Options for a Button on pa...

Страница 39: ...ach type of Destination Application See Setting Destination Application Properties on page 37 Refresh button Updates the links between all your computer s Destination Applications and One Touch 4 0 Ne...

Страница 40: ...50 to display a full list of the Destination Applications that you can use with the scanner 3 From the Select Configuration list select a scan configuration To scan in color select one of the configu...

Страница 41: ...as bmp and jpg 5 Click OK to accept any changes and close the window To accept changes but keep the window open to work with other features click Apply Note that while the One Touch Properties window...

Страница 42: ...properties that you can select 1 On the One Touch Properties window click a Destination Application 2 Click the Properties button A One Touch 4 0 Link Properties dialog box opens for the type of Desti...

Страница 43: ...ting the folder to receive your scanned items 1 Select the PaperPort folder where you want the file of the scanned image to be located 2 Click OK 3 Click OK or Apply on the One Touch Properties window...

Страница 44: ...ns 1 Click in the OCR settings boxes for the options you want The options will apply to all the applications in the group Always send a file even when no text was found The scanned file is sent to the...

Страница 45: ...in Step 3 of the dialog box That is the icon that will appear in the One Touch Destination List 5 In step 4 of the dialog box select the file formats that the application will accept Refer to the doc...

Страница 46: ...a lower resolution bitmap images with a higher resolution may be too big to fit on the screen Converting the bitmap image to match the screen resolution ensures that the image fits on the screen Conv...

Страница 47: ...are saved in the root of the folder specified in the Storage Location Documents are put into folders by month week or type Folders are created based on your selection month week or type and the scann...

Страница 48: ...as scanning is finished but other email applications may not If you re using one of those applications such as America Online AOL you need to know which folder contains the scanned documents so you c...

Страница 49: ...ternet options applicable to AOL 4 Select the options for color document handling Convert Bitmaps using Screen Resolution Use this option to ensure that an image will fit on the computer s screen When...

Страница 50: ...if you want to do additional image processing such as photo touch up or color correction Both of those file formats tend to be larger than the JPEG format Because JPEG image files can be reduced in s...

Страница 51: ...PEG or PDF file size image quality independently for each button 4 Click OK or Apply on the One Touch Properties window Text Formats Selecting the text format option also selects OCR processing as an...

Страница 52: ...t for the text format Your selection of a file type pertains only to the button currently selected on the One Touch Properties window Other buttons that have a text option selected as the page format...

Страница 53: ...on with their text ready for editing and other text processing To select OCR settings 1 Select the Destination Application 2 Right click on a text format icon 3 Choose OCR options A dialog box of OCR...

Страница 54: ...k OK Note that the OCR options apply to all the Destination Applications for which OCR applies If you change them for one Destination Application those changes apply to the others as well Renaming a O...

Страница 55: ...nations This option selects all the Destination Application categories The list of Destination Applications available for the selected button will include all the applications on your computer that fa...

Страница 56: ...so you can select which application to use to continue scanning See Scanning with Event Forwarding on page 68 for details 4 After selecting a new category for the Destination Applications click the Mu...

Страница 57: ...e because it is set as Transfer to Storage with the Destination Application type set as Storage and CD R W Folder Copy Options This section of the dialog box sets the location for copies of your scann...

Страница 58: ...only add new configurations That way you will always have the original factory set configurations available To create a new configuration 1 Open the One Touch Properties window and make sure the Multi...

Страница 59: ...higher the dpi setting the sharper and clearer the scanned image However higher dpi settings take longer to scan and produce larger files for the scanned images Brightness and Contrast Sometimes an i...

Страница 60: ...The maximum size is 8 5 x 14 The units of measurement can be inches or millimeters Click the name of the units inches or millimeters to toggle between them Improvements and Settings Only the options...

Страница 61: ...re Patterns will limit or eliminate moire patterns in the scanned image This option is only available for the GrayScale or Color Mode at 300dpi or less Straighten Image Select this option to let the s...

Страница 62: ...d Settings tab are for the Color or GrayScale scanning mode Saturation is the strength or purity of a color hue is the color your eyes see as reflected from the image and gamma controls the brightness...

Страница 63: ...ge will automatically be cropped around its edges to fit on the page Center image on page The image will be printed in the center of the page instead of at the top right corner Maintain aspect ratio T...

Страница 64: ...month and week so you can keep track of when you scanned the documents By default the location of the archived documents is at C Documents and Settings your user name My Documents My One Touch Archiv...

Страница 65: ...nlocked NOTE Your scanner comes with a number of configurations pre set at the factory To ensure that your scanner will always have a set of correct scan configurations do not delete the pre set confi...

Страница 66: ...iguration Clicking it toggles between locking and unlocking the configuration The key icon indicates the configuration is unlocked 5 Edit the settings and click OK 6 Click OK on the One Touch Properti...

Страница 67: ...ct the scan configuration Configure Before Scan 3 Right click on Configure Before Scan and choose an interface to use for configuring before scanning TWAIN The TWAIN Interface opens for you to make ch...

Страница 68: ...cument Feeder choose this option to scan a stack of pages in the ADF Scan Reflective Using choose this option to scan a single page on the flatbed 5 Choose the Picture Type of Black White Grayscale or...

Страница 69: ...nned pages then select the correct Picture Type and restart the scanning No scanning stops but all pages scanned in this batch up to this point are not deleted and the TWAIN interface remains open You...

Страница 70: ...n to CD as the Destination Application The Burn to CD Destination Application is only available if you have a CD burner attached to your computer but you do not need to have a CD in the burner to sele...

Страница 71: ...ritten to the CD NOTE Until you click Burn to CD these files are stored in your computer at C Documents and Settings your user name Local Settings Application Data Microsoft CD Burning This is where W...

Страница 72: ...Touch software will automatically make sure the storage location is correct To create a custom configuration for CD burning select Burn to CD as the Destination Application then click the New button a...

Страница 73: ...o scan with event forwarding 1 Open the One Touch Properties window 2 Using the arrows choose a button to use for the event forwarding If the button does not have Still Image Client as a Destination A...

Страница 74: ...utton you selected for event forwarding A dialog box opens for you to select the application to use for scanning 7 Select the application in the box and click OK Now the application you selected opens...

Страница 75: ...scan and create an HTML web page 1 Open the One Touch Properties window 2 Using the arrows choose a button that has Microsoft Explorer as one of its Destination Applications such as Button 8 Custom If...

Страница 76: ...converted page 8 Choose Save As from the Internet Explorer File menu give the page a name and save it in the location you use for your web page files You may also want to write down the address shown...

Страница 77: ...ing stored 1 Load the documents you want to store into the scanner 2 On the One Touch Panel click the arrows to see Button 7 then click Button 7 3 The documents are scanned and stored in a folder They...

Страница 78: ...er to storage 1 Using Microsoft Windows create the folders that you want to use for storing scanned items Note that you can also create the folders later while creating the new scan configurations 2 O...

Страница 79: ...ich folder it is give the new configuration a name that indicates the folder name such as Storage for Business Receipts 7 Click the Scan Settings Page Settings and Advanced Settings tabs and select th...

Страница 80: ...k the Make New Folder button and type the name for the new folder 11 Click OK The selected folder will now be set as the Storage Location such as Business Receipts 12 Click Apply The new configuration...

Страница 81: ...ents In the example above it s Button 7 4 Select one of the configurations you created for storage 5 Click OK The One Touch Properties window closes 6 Now click the button on the One Touch Button Pane...

Страница 82: ...72 for the steps to select the Transfer to Storage options 2 On the One Touch 4 0 Link Properties window or the Scan Configuration Properties window click the Browse button The Browse For Folder windo...

Страница 83: ...ies window 2 Using the arrows choose Button 7 Archive or any other button if it is set up with Transfer to Storage as one of its Destination Applications 3 Choose a text format as the file format 4 Ch...

Страница 84: ...icon and choose Show Hardware from the pop up menu You can also click the scanner icon at the top of the One Touch Button Panel If the Hardware View of the panel is open you can also right click on th...

Страница 85: ...ge the time before the scanner powers down from 1 minute to a maximum of 10 hours 3 Click the arrows for the Lamp timeout setting and choose a time setting To turn the lamp on and off manually without...

Страница 86: ...s and imaging applications and scan from them as well Because the TWAIN interface is the same regardless of the software you use to open it you can still use the instructions in this User s Guide for...

Страница 87: ...PaperPort 1 On the Windows taskbar click Start point to Programs point to PaperPort then click PaperPort The PaperPort desktop opens 2 Click the Scan or Get Photo icon on the PaperPort command bar to...

Страница 88: ...e Scan Pane but you want to choose another one click Select to open the window 4 Select TWAIN Xerox DocuMate 510 The WIA Xerox DocuMate 510 option is for using the WIA interface 5 Click OK A Confirm S...

Страница 89: ...n button on the Scan pane The TWAIN interface opens You re ready to start scanning NOTE Please wait a few moments for your selection to become active This delay only occurs the first time you select a...

Страница 90: ...ed See Scanning from the TWAIN Basic Interface on page 86 Advanced Interface The Advanced Interface includes all the settings of the Basic Interface plus a wide range of more advanced settings such as...

Страница 91: ...he document on the Flatbed Auto Document Feeder Simplex Scans documents from the Automatic Document Feeder 2 Choose the color grey scale or black and white option from the Picture Type menu 3 Choose a...

Страница 92: ...into the ADF again if you re scanning a stack of pages Click Scan 8 When you re finished scanning items click Done to close the Basic Interface 9 The scanned images will appear in PaperPort or the oth...

Страница 93: ...to scan from the Auto Document Feeder Simplex or Reflective from the Flatbed Click an icon to select a configuration Color Grey Scale or Black White Clicking the sign in front of Custom shows Custom s...

Страница 94: ...ack and white material This setting produces the smallest file size for scanned items 5 Click the Preview button to preview the image before scanning 6 Review the image to determine if adjustments are...

Страница 95: ...1 On the left side of the Advanced Interface select a configuration for example Color Configurations 2 Click a setting in the list of settings or click its corresponding button on the right side of t...

Страница 96: ...nced Interface if you click the Scan Size setting in the list or click the Scan Size button NOTE The information in the scan settings list and the options you select on the various settings panels are...

Страница 97: ...et resolutions for typical scanned items click one of the options in the list For example to set the resolution for scanning a business card select Business Card That setting is preset to read small p...

Страница 98: ...scanned with the brightness and contrast set to be too light or too dark For example a note written with a light pencil may need to be scanned darker to improve legibility The following figure shows...

Страница 99: ...on is the strength or purity of a color and hue is the color your eyes see as reflected from the image The following figure shows the color options To adjust the color settings 1 Drag the Gamma Satura...

Страница 100: ...an also select other scan sizes or adjust the input size to scan only specific sections of an image For example if you re scanning a photograph and want to focus on one section adjusting the input siz...

Страница 101: ...the menu selection for the image size changes to Custom to indicate you are customizing the size The Scan Info box on the lower left portion of the Advanced Interface shows the information for the new...

Страница 102: ...across the top and down the side of the window cycle through centimeters inches and pixels The Scan Info Box The following figure shows the information on the Scan Info box Location of the top left co...

Страница 103: ...one of the preset profiles for example Black White Configurations Custom 2 Adjust the settings as required and then click the Save As button The Save Profile dialog box opens 3 Type a name for the ne...

Страница 104: ...evice Configuration 1 Click the Device Configuration button on the Advanced Interface The Device configuration window opens and shows the information about your scanner See the section Checking the Ha...

Страница 105: ...sn t you need to set up PaperPort to work with your scanner NOTE Setting up PaperPort is a one time only process for each option listed in the Available Scanners window Therefore you may have to set u...

Страница 106: ...rom PaperPort To set up PaperPort for your scanner 1 On the TWAIN Scan Pane click the Select button The Available Scanners window opens 2 Select one of the options such as Twain Xerox DocuMate 510 3 C...

Страница 107: ...ick Yes recommended then click Next The next window is for checking the connection between your scanner and the computer 6 Click Next After the Setup Wizard checks the connections the next window is d...

Страница 108: ...with the TWAIN Interface from PaperPort 7 If other tests are checked click in their boxes to uncheck them 8 Click Next The TWAIN Basic Interface opens NOTE If you are setting up PaperPort for the WIA...

Страница 109: ...he Scan button on the Basic interface Scanning begins and the Setup Wizard runs the scan test Then a window opens that says Basic scan test passed If the scanned image does not appear in the window cl...

Страница 110: ...rPort The final Setup window opens to let you know the setup process is finished 12 Click Finish PaperPort is now set up for your scanner and the scanning option you selected in the example above it s...

Страница 111: ...quiring images from scanners digital cameras and other digital devices This section shows how to use Microsoft Paint to scan using the WIA interface but you can use PaperPort and other Windows applica...

Страница 112: ...image is displayed on the right side of the window 6 Adjust settings of the previewed image as desired Change the button selection for the type of image Adjust the custom settings refer to the next s...

Страница 113: ...The scanned images will appear in Microsoft Paint or other WIA application you re using Fine Tuning Your Scans You can select new settings before you scan an item to fine tune exactly how you want to...

Страница 114: ...lack and White picture or text Resolution DPI Click the menu arrow and choose the dots per inch dpi of the resolution The maximum resolution is 600 dpi the minimum is 50 dpi The higher the dpi setting...

Страница 115: ...r Jams If your scanner stops scanning due to a paper jam in the Automatic Document Feeder a warning opens after a few moments To clear a paper jam 1 Open the Automatic Document Feeder cover 2 Remove t...

Страница 116: ...d in at the same time To clean the ADF 1 Wet a soft cloth with some Isopropyl rubbing alcohol 95 2 Open the ADF cover 3 Wipe the feed roller from side to side Rotate the roller to clean its entire sur...

Страница 117: ...wearing thin You received a replacement pad in the original scanner box and you can also order a new one See the Xerox DocuMate 510 Parts List on page 122 for ordering information To replace the ADF P...

Страница 118: ...worn roller can cause documents to feed in skewed at an angle or multiple pages to feed at the same time In both cases paper jams may occur A worn roller should be replaced to avoid damage to the sca...

Страница 119: ...ntil the locking tabs are free from the ADF cover 4 Gently slide the roller to the right until the left side is free from its mounting hole 5 You can now angle the roller assembly out and away from it...

Страница 120: ...n securely Are the scanner s status lights on Turn on the scanner s power If the status lights doesn t come on plug the power supply into another electrical outlet Is the scanner s locking tab in the...

Страница 121: ...nterfering with the installation and One Touch options and you need to remove those other drivers and re install your Xerox DocuMate 510 scanner Please see the documentation that you received with the...

Страница 122: ...rom touching the glass When that occurs the pages are unable to feed back out of the ADF and the pages can jam Problem The motor runs but doesn t feed the paper How can I fix it Make sure the paper is...

Страница 123: ...cable into another USB port on the computer If the problem persists replace the USB cable 5 The lamp in the scanner body has malfunctioned This usually occurs after a paper jam Turn the scanner off t...

Страница 124: ...emove message box opens and asks if you are sure you want to remove One Touch 4 0 from your computer Click Yes The One Touch 4 0 software is removed from your computer 5 Unplug the USB cable from the...

Страница 125: ...Add or Remove Programs icon Windows Vista Double click the Programs and Features icon c Select One Touch 4 0 then click on the Remove button d An Add or Remove message box opens and asks if you are su...

Страница 126: ...o 10 pages per minute 200 dpi B W ADF capacity 50 pages Light source Cold cathode fluorescent lamp Interface USB 2 0 Full Speed Scanner dimensions Height 7 5 inches 19 cm Width 12 inches 30 5 cm Lengt...

Страница 127: ...rt names and numbers when ordering replacements for your Xerox DocuMate 510 scanner Part Name Part Number Paper Guide 57 0097 000 Paper Guide Extension 57 0098 000 Paper Stop 57 0099 000 ADF Pad 57 01...

Страница 128: ...eproduction of the document is performed for lawful purposes Postage Stamps canceled or uncanceled For philatelic purposes Postage Stamps may be photographed provided the reproduction is in black and...

Страница 129: ...ilitary personnel or by members of the various Federal Departments such as FBI Treasury etc unless photograph is ordered by the head of such department or bureau Reproducing the following is also proh...

Страница 130: ...its completeness or accuracy In case of doubt consult your solicitor Federal Communications Commission FCC for USA This equipment has been tested and found to comply with the limits for the class B d...

Страница 131: ...industry to promote energy efficient personal computers monitors printers digital presses fax machines and copiers Reducing the energy consumption of this equipment will help combat smog acid rain an...

Страница 132: ...options 50 button settings 35 C CD ROM drive 4 Color 54 89 color hue 94 options 94 Color Document 35 color filter 57 computer specifications 4 Configure Before Scan 62 Contrast 54 93 109 D Destinatio...

Страница 133: ...options 45 page settings 55 page size 55 paper guide 3 7 paper jam 110 113 118 paper stop 3 8 PaperPort 81 help topics 81 Scan pane 83 PaperPort Properties 38 PDF 45 51 PDF file size 46 Picture type 1...

Страница 134: ...xt Documents Properties 39 Text Editors 51 text file format 46 Text Formats 46 TIFF 45 Transfer to Storage 72 TWAIN 62 69 TWAIN standard 81 U uninstall 119 USB port 3 15 W watermark remove 57 Web site...

Страница 135: ...05 0591 600...

Отзывы: