background image

DocuColor 7002/8002

User Guide

1-7  

Job Management

Job Status

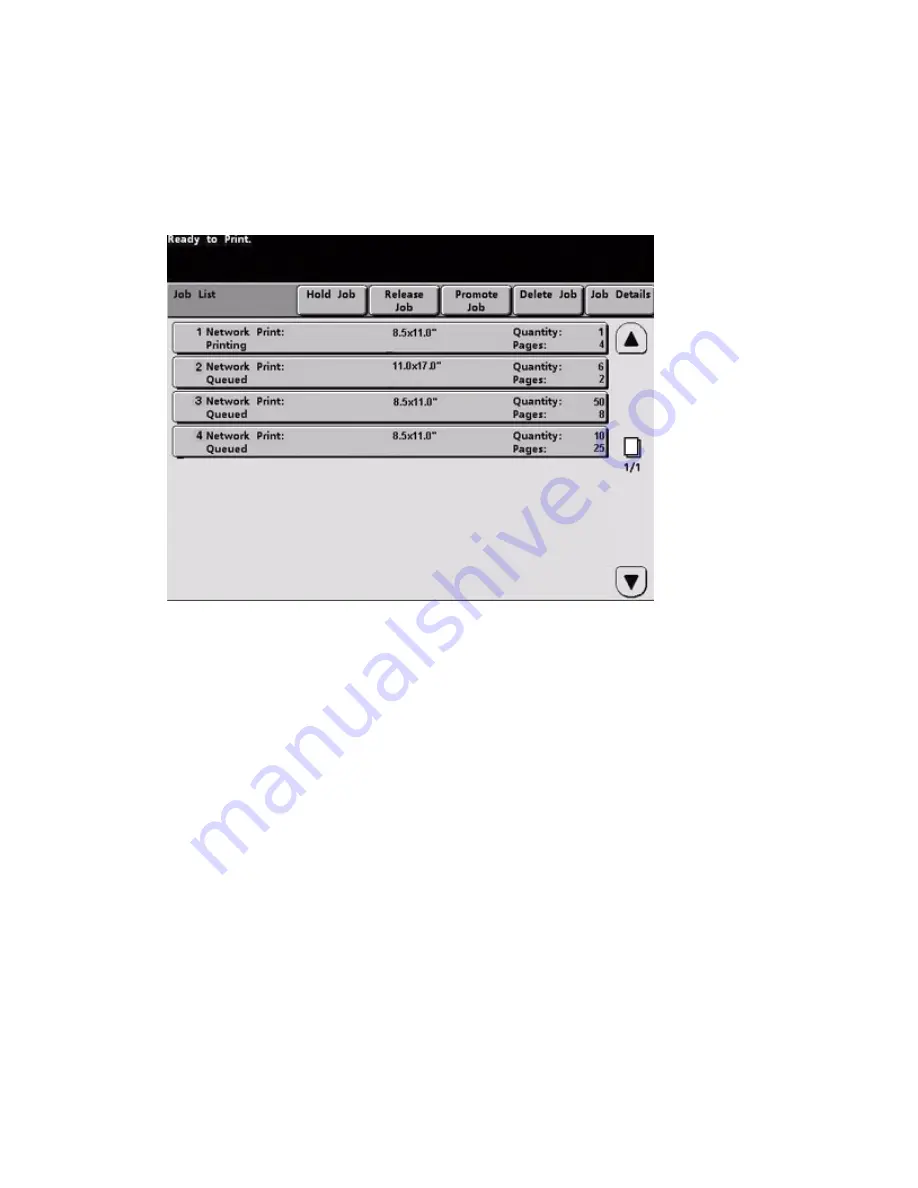
When you press the Job Status button, the 

Job Status

 screen is displayed.

The 

Job Status

 screen includes Job Type, Current Status, Paper Size, Output Quantity (refers to 

the output in sheets for a single page job and in sets or stacks for a multiple page job), and total 
Number of Pages.

Jobs are numbered in the order they are received for processing. 

Review the information that is provided for controlling the print workflow;

Job List

 - Shows all jobs submitted to the digital press.

Hold Job

 - Holds a job in the print queue until released.

Release Job

 - Releases a Hold Job to be printed.

Promote Job

 - Enables a job to be moved in front of other jobs in the queue.

Delete Job

 - Deletes a selected job.

Job Details

 - Shows the programmed options for a selected job.

Up/Down Arrows

 - Enables scrolling through job list.

For more information about help, refer to Machine Details located in the Appendix.

Содержание DocuColor 7002

Страница 1: ...DocuColor 7002 8002 User Guide Version 1 0 August 2009...

Страница 2: ...nder BQ 280x are trademarks of Horizon Interntaional Duplo SCC Nearline Booklet Maker System Duplo DC 645 Slitter Cutter Creaser and Duplo Ultra 145A UV Offline Coater are trademarks of Duplo USA Corp...

Страница 3: ...rence Documents 2 4 Loading Paper 3 1 Loading paper Trays 1 4 3 1 Paper Tray Guidelines 3 4 How to Clear Jams 4 1 Printer jam clearance 4 1 Paper tray jams 4 1 Upper Transport Area 4 2 Transport Modul...

Страница 4: ...Replacing Consumable Supplies 9 6 Replacing A Dry Ink Toner Cartridge 9 6 Adding Fuser Oil 9 8 Changing the Waste Dry Ink Bottle 9 9 Replacing a Corotron 9 9 When to replace a charge corotron 9 9 Whic...

Страница 5: ...city for different paper types and weights 11 13 Appendix 12 1 Machine Details 12 1 Maintenance tab 12 2 Help 12 4 Audio Tones 12 4 Alert Screens 12 5 Digital Press Technical Data 12 5 Electrical Powe...

Страница 6: ...Table of Contents DocuColor 7002 8002 iv User Guide...

Страница 7: ...l color black and white digital press operating at a speed of eighty prints per minute This chapter provides the location name and function of the various digital press components including External c...

Страница 8: ...eft to right are black cyan magenta and yellow Refer to the Maintenance Chapter of this manual for instructions on changing the cartridges 5 Offset Catch Tray OCT Receives completed print job Sets are...

Страница 9: ...ditions 1 Touch Screen 2 Control Panel Touch Screen Number Part Description 1 Message Area The message area at the top of the UI displays messages concerning the digital press status programming confl...

Страница 10: ...er Guide Control Panel Keypad Use the numeric keypad to enter your password for access to Tools Mode Use the keypad for certain Tools Mode features The keypad is also used by the service representativ...

Страница 11: ...ccesses the Paper Tray Machine Details Error Log and Maintenance screens Machine Status is where you find the serial number for the digital press the customer support phone numbers and the meters that...

Страница 12: ...e digital press is ready to print colors This feature provides the customer with the ability to calibrate the digital press from the Color Server without manually feeding calibration charts also known...

Страница 13: ...der they are received for processing Review the information that is provided for controlling the print workflow Job List Shows all jobs submitted to the digital press Hold Job Holds a job in the print...

Страница 14: ...found in this user guide Refer to the following chapters for more information Loading Paper How to Clear Jams Optional Accessories Specifications Appendix Finishing accessory Description Where to find...

Страница 15: ...igh quality professionally bound document The Document Binder120 D provides Inline thermal binder Binds 8 5 x 11 and A4 documents up to 120 pages in a variety of eye catching pre formed or custom cove...

Страница 16: ...vides Cutting and creasing operations in a single pass plus it has the unique Duplo feature of being able to automatically adjust and compensate for image drift The ability to manage heavier media and...

Страница 17: ...r more information GBC Fusion Punch II The GBC Fusion Punch II is a third party Document Finishing Architecture DFA device that provides in line printer punching that combines printing and punching in...

Страница 18: ...DocuColor 7002 8002 1 12 User Guide...

Страница 19: ...0 Telephone numbers For system support user help and service support call the appropriate number US 1 800 821 2797 Includes TTY Support Canada 1 800 939 3769 Xerox also provides web based customer sup...

Страница 20: ...ide How to find the machine serial number You can find the serial number two places 1 Press the Machine Status button on the Control Panel and then press the Machine Details tab or 2 Open the front do...

Страница 21: ...DocuColor 7002 8002 Where to Find Help User Guide 2 3 How to read the Billing Meters 1 Press the Machine Status button on the Control Panel 2 Press the Machine Details Tab 3 Press the Meters button...

Страница 22: ...mer Documentation CD Decurler Adjustment An adjustment to help correct decurling problems Found on the Customer Documentation CD Specialty Media Guide Provides specialty media recommendations hints an...

Страница 23: ...3 1 3 Loading Paper Loading paper Trays 1 4 1 Lift the handle and pull out the paper tray 2 Select the appropriate paper stock for your print job 3 Open the ream of paper seam side up and place it in...

Страница 24: ...t right corner of the tray 5 Do Not exceed the Max fill line 6 Squeeze the green levers and slide the Paper Guides until they touch the side of the paper 7 Press the button to select Non Standard or S...

Страница 25: ...s 7 16 to 12 6 inch Long Edge Feed LEF or 7 16 to 19 2 inch SEF 182 320 mm LEF or 182 x 488 mm Short Edge Feed SEF 8 Press the button to select Transparency or the appropriate paper weight The green l...

Страница 26: ...ight of the paper stock in the tray 11 Slide the tray back into the machine until it locks into place Paper Tray Guidelines For best results remember the following Do not store reams of paper in any o...

Страница 27: ...ou clear areas behind the Right and Left Front Doors last Clear all other jam areas first Paper tray jams 1 Open the tray with the jam 2 Carefully remove all jammed paper 3 Use the UI to determine if...

Страница 28: ...nly when the Second Feeder Module containing Trays 3 and 4 is connected 1 Pull out the Transport Area drawer above Tray 1 2 Lift up the handle 3 Remove all jammed paper 4 Return the drawer to its orig...

Страница 29: ...handles 3a 5 Lift up green handles 3b 6 Carefully remove all jammed paper and return handles 3b to the original position 7 Follow the UI messages and if required lift handles 7a and remove all jammed...

Страница 30: ...Module Note Refer to the video located on the Customer Documentation CD as needed Follow the instructions on the UI to clear jams from all the areas indicated in the Exit Module Follow the instruction...

Страница 31: ...Left Front Door areas 1 Open the Right and Left Front Doors when directed to by a UI message 2 Grasp handle 4 and move it in the direction of the arrow 3 Slowly pull out the Paper Transport module unt...

Страница 32: ...heat roll The heat roll is visible when handle 4d is up DO NOT attempt to remove this sheet of paper because the stripper fingers may be damaged if you attempt this procedure Call your Xerox service r...

Страница 33: ...nt Doors when directed to by a UI message 2 Lift handles 5 and 6 and clear any paper in the areas 3 Push the paper back until you see the front edge then remove the paper 4 Reposition handles 5 and 6...

Страница 34: ...d resume printing 1 Remove any paper from the Top Tray 2 Lift the HCS80 Top Cover 3 Lift the green handle or handles indicated on the UI and remove all paper in the Bypass area Remove paper only from...

Страница 35: ...ead the following steps for more information on how to clear a jam 1 Open the finisher Front Door There are three possible jam areas Handle 1 moves down handle 2 moves to the right and handle 3 moves...

Страница 36: ...How to Clear Jams DocuColor 7002 8002 4 10 User Guide...

Страница 37: ...al devices within the paper path called decurlers Your system has been designed with an automatic curl control system that uses information such as the amount of coverage on the page paper weight whet...

Страница 38: ...ls Mode press the Access button on the Control Panel The Access Password Screen appears 2 Use the keypad to enter your password 3 Press the Enter button 4 Press the Tools Pathway button to enter the T...

Страница 39: ...The default curl setting Paper Type for the selected paper will be displayed A D Type A is selected in the example screen 8 Select a different setting A D and run the job again Some experimentation m...

Страница 40: ...How to adjust Paper Curl DocuColor 7002 8002 5 4 User Guide...

Страница 41: ...ad 9 X 11 inch tab stock 228 x 279 mm in the paper tray with the tabs with the short edge of the tabs in the lead edge position Note If a jam ocurrs there is no recovery procedure You will need to man...

Страница 42: ...rd at the front of the tray The green light will indicate your selection 4 Press the button to select Coated or Uncoated The green light will indicate your selection 5 Enter Tools Mode Press the Acces...

Страница 43: ...r 7002 8002 How to Run Tabs User Guide 6 3 6 Use the keypad to enter your password 7 Press the Enter button 8 Press the Tools Pathway button to enter the Tools Mode 9 Press the Non Standard Paper Size...

Страница 44: ...How to Run Tabs DocuColor 7002 8002 6 4 User Guide 10 Select the appropriate Paper Tray and enter 11 in the X Axis box and 9 in the Y Axis box by using the up and down arrow buttons 11 Run the tab job...

Страница 45: ...tions are shown and explained in the illustration Single Paper Weight This setting optimizes the throughput speed for light weight or heavy weight papers according to the weight range that is set in t...

Страница 46: ...tivity Setting 1 Enter Tools Mode Press the Access button on the Control Panel The Access Password Screen appears 2 Use the keypad to enter your password 3 Press the Enter button 4 Press the Tools Pat...

Страница 47: ...DocuColor 7002 8002 Productivity Settings User Guide 7 3 6 Select the desired productivity setting 7 Select Close All jobs will run at the selected productivity setting until changed in Tools Mode...

Страница 48: ...Productivity Settings DocuColor 7002 8002 7 4 User Guide...

Страница 49: ...Stacker Stapler 80 HCSS80 Common Stacker Stapler CSS Trays 3 and 4 Second Feeder Module The Second Feeder Module SFM is an optional feeding device that contains Trays 3 and 4 This module holds the sam...

Страница 50: ...eets are purged after a paper jam When the Sample Set button is selected When selected as an Output Location Labels must be sent to the Top Tray Stacker Tray Cart Collated sets are transported to the...

Страница 51: ...ck the front door 4 Unload light Illuminates when the Stacker Tray has reached the down position and the front door can be opened 5 Wait light Blinks when the Stacker Tray is moving up or down 6 Fault...

Страница 52: ...when running paper that weighs 120 g m2 80 lb or greater Remember to switch off the fan after your job s finishes and when running paper that weigh less than 120 g m2 80 lb Unloading the HCS80 Stacker...

Страница 53: ...the securing bar on top of the stacked paper 4 Pull the Stacker Cart straight out Remove the securing bar 5 Remove the paper from the Stacker Tray 6 Push the empty Stacker Cart straight into the HCS80...

Страница 54: ...dual stapling output capabilities The finishers must be connected to the right end of the digital press replacing the Offset Catch Tray The finishers also have an Offset mode that provides separation...

Страница 55: ...icator is constant when the stapler is empty 3 Keypad The keypad including the C button is used only by the Xerox service representative 4 Message Display Shows the fault codes 5 Jam Indicator Area il...

Страница 56: ...place a staple in the bottom left corner of SEF sets only Dual Staple The finishers place two staples closer to the top bottom center of the sheets than a single staple Unloading the HCS80 CSS Finishe...

Страница 57: ...lever down with your left hand 3 Grasp the grey handle on the cartridge unit and pull it towards you until it stops Release the yellow level and the unit will lock into place 4 Grasp the yellow stapl...

Страница 58: ...002 8002 8 10 User Guide 5 Insert a new cartridge into the unit until you hear it click into place 6 Push the Cartridge in to the Stapler Unit 7 Push the yellow lever down and the cartridge unit autom...

Страница 59: ...Stacker Stapler 1 Open the Front Door of the Stacker Stapler 2 Pull the lever toward you and hold it in position while moving the stacker stapler a small distance 25 4mm 1in away from the press Releas...

Страница 60: ...Optional Accessories DocuColor 7002 8002 8 12 User Guide...

Страница 61: ...reen during the digital press warm up cycle at the start of each day 2 Remove all dust and fingerprints by wiping the screen with a clean lint free dry cloth CAUTION Do NOT use any other cleaners or s...

Страница 62: ...ing wand for each corotron fully and then push the wand back into place If it is not seated properly the User Interface will display the information on the screen Reseat the appropriate corotron 2 Aft...

Страница 63: ...he corotron assembly the User Interface displays the Interlock Open screen Close the Front Doors 4 After all the corotrons are cleaned and the front doors are closed the Maintenance Charge Corotron sc...

Страница 64: ...lor 7002 8002 9 4 User Guide 5 Select the Cleaning button 6 Select Yes Note After incrementing the counter for a specific Corotron s it is no longer selectable 7 Select the Close button to finish the...

Страница 65: ...r using handle 4 2 Clean the chute area with a lint free cloth that was supplied with the digital press Xerox Part Number 19K03610 3 Clean the Horizontal Transport Belts and the surrounding area with...

Страница 66: ...is displayed on the UI when a consumable item is nearing the replacement time Another message is displayed when you must replace consumable items The digital press will not run after this message is...

Страница 67: ...tridge Note Before installing a new cartridge vigorously shake the cartridge to ensure that the material is not compacted 4 To install the new cartridge insert it into the compartment with the arrow a...

Страница 68: ...Note Refer to the video located on the Customer Documentation CD as needed 1 Open the Right Front Door and place a drop cloth on the floor 2 Open the Reservoir Cap 3 Position the Filler Spout Cap on...

Страница 69: ...dispose of the bottle in accordance to local regulations 3 Install the new bottle and close the door Replacing a Corotron When to replace a charge corotron Unlike other consumable products for the di...

Страница 70: ...ustomer Documentation CD The output print will show banding in the color bar of the corotron that needs to be replaced Banding of multiple color bars means several corotrons need to be replaced Bandin...

Страница 71: ...e corotron handle and slowly pull the corotron completely out of the machine 3 Dispose of the corotron according to local regulations 4 Insert the plastic guide sleeve on the new corotron onto the gui...

Страница 72: ...are two messages for the Fuser Web Web is near empty can continue to use machine Web is empty must replace 1 Open the front doors and pull out the Paper Transport Drawer using handle 4 2 Pull open th...

Страница 73: ...the yellow tabs on the sides of the Fuser Web with the yellow marker on each rail and slide the web all the way into the fuser 6 Raise the web up until it clicks into place and rotate the yellow lever...

Страница 74: ...r Quantity Approximate Print Yield Carton Full Color Prints Dry Ink Toner Black 6R1435 6R1431 1 30K Dry Ink Toner Cyan 6R1436 6R1432 1 50K Dry Ink Toner Magenta 6R1437 6R1433 1 50K Dry Ink Toner Yello...

Страница 75: ...al number open the two main front doors The serial number label is in the center of the bottom frame of the digital press The charts on the following pages lists problems and suggested solutions that...

Страница 76: ...layed Ensure the proper paper refer to the Paper chapter of this manual and The Recommended Materials List is loaded correctly and not filled above the MAX line Turn the paper stack around and or over...

Страница 77: ...You can sometimes minimize curl problems by flipping the paper over in the tray and making the copies again If excessive curl is still present use a heavier paper Empty the output device when output...

Страница 78: ...ol Panel The Machine Serial Number Press the Machine Status button and then touch the Machine Details tab to read the serial number If the serial number is not displayed open the Right Left Front Door...

Страница 79: ...o check the Bypass area in the first HCS80 212 251 212 252 212 253 212 254 Stacker Problem Power off then power on 212 302 Top Cover open Close the Top Cover 212 540 Stacker Tray full Empty the Stacke...

Страница 80: ...t Module Open the Exit Module and clear any visible sheets Open and close the finisher door Clear any other areas indicated on the Touch Screen Fault Code 112 100 Jam indicated in finisher No visible...

Страница 81: ...d power on Fault Code 052 321 Connection problem Cancel or save the job Power off the digital press Wait 15 seconds and power on Fault Code 052 320 Unexpected connection Cancel or save the job Power o...

Страница 82: ...Basic Troubleshooting DocuColor 7002 8002 10 8 User Guide...

Страница 83: ...h humidity L85 g m2 coated media is not allowed Tray Capacity All paper trays have a capacity of 2000 sheets of 24 lb 90 g m2 paper Paper All Paper Trays Minimum Paper Size 182mm x 182mm 7 16 x 7 16 M...

Страница 84: ...You have to manually reassemble your originals and prints determine where the job left off and resume printing or cancel the job and start again The size of the tabbed insert should be 9 x 11 inch 229...

Страница 85: ...er Nonstandard size paper Nonstandard size paper is identified as any paper for which there is no paper guide setting within the minimum and maximum sizes for the trays 7 16 to 12 6 inch LEF or 7 16 t...

Страница 86: ...26 500 sheets Index pounds 25 5 x 30 5 500 sheets Bristol and Tag pounds 22 5 x 28 5 500 sheets 60 16 41 22 33 27 64 17 43 24 35 29 75 20 50 28 41 34 80 21 54 30 44 36 90 24 60 33 50 41 105 28 70 39 5...

Страница 87: ...58 37 48 106 135 29 36 71 90 40 44 59 75 49 62 136 150 37 40 91 100 45 55 76 83 63 67 151 220 41 59 101 149 56 81 84 122 68 100 221 300 60 74 150 189 82 110 123 166 101 128 Paper All Paper Trays Minim...

Страница 88: ...ited to 100 transparencies Coated paper lighter than 100 g m2 may not run as reliably as coated paper heavier than 100 g m2 Non standard papers longer than 305 mm 12 in the feed direction require 210...

Страница 89: ...B5 7 2 x 10 1 LEF Yes Yes Yes A4 8 3 x 11 7 SEF Yes Yes Yes Letter 8 5 x 11 SEF Yes Yes Yes 8 5 x 13 SEF Yes Yes Yes Legal 8 5 x 14 SEF Yes Yes Yes B4 10 1 x 14 3 SEF Yes Yes Yes 11 x 14 9 SEF Yes Ye...

Страница 90: ...240 Volt 10 amp 50 Hz service outlet The finisher requires a separate power source from the digital press Note Best machine performance is achieved when conditions are maintained between 20 25 C 68 77...

Страница 91: ...tack Tray 50 sheet maximum for Stapling Top Tray Name Inches MM Orientation 17 59 lb 60 220 g m2 Staple Position 17 75 lb 60 300 g m2 JIS B5 7 2x10 1 182 x 257 SEF Yes Portrait Yes A4 8 3x11 7 210 x 2...

Страница 92: ...ut Destination Inches MM Sheet Orientation Stack Tray 64 220 g m2 stapling Front cornerX Rear cornerY Dual Top Tray 64 300 g m2 no stapling 7 2 x 10 1 JIS B5 182 x 257 SEF Yes O x x Yes 8 3 x 11 7 A4...

Страница 93: ...Note Stapled sets of large paper A3 11 x 17in and greater may stack slightly skewed The stapled sets will be of high quality 10 5 x 15 3 Kai 8 267 x 388 Asian market size SEF Yes O x x Yes 10 5 x 7 6...

Страница 94: ...sition 1 Front Corner Staple Position 2 Rear Corner Dual Staple SEF LEF SEF LEF SEF LEF 7 2x 10 1 JIS B5 182x 257 8x10 203x 254 8x5x11 216x 279 A4 8 5x13 216x 330 8 5x14 216x 356 10 1x 14 3 JS B4 257x...

Страница 95: ...hat small staple set jobs do not exceed 50 sets Before you send a stapled print job to the machine enable the offset jobs feature this will improve tray capacity For information about technical data r...

Страница 96: ...Specifications DocuColor 7002 8002 11 14 User Guide...

Страница 97: ...rected from previous chapters in the User Guide Machine Details This screen provides the telephone number to call for support the machine serial number and access to the meter counts Meters keep track...

Страница 98: ...t the meters to zero touch the Resettable Meters button On the following screen touch the Reset button Maintenance tab Touch the Customer Replaceable Unit button on the Maintenance screen to display a...

Страница 99: ...s are red The cartridge is 1 2 full when two bars are red The cartridge 1 4 full when one bar is red For the other consumables such as the Waste Dry Ink Bottle each Corotron and the Fuser Web the foll...

Страница 100: ...are three audio tones Attention The Attention Tone sounds six seconds after a scan job has been completed to remind you to remove the document from the Scanner glass Button Selection A single tone in...

Страница 101: ...the instructions on the UI to resolve the problem and resume printing Digital Press Technical Data Electrical Power Specifications 200 240V 50 60 Hz Single phase Three wire plus safety ground Current...

Страница 102: ...Normal operation 0 to 2 500 meters 0 to 8 200 feet Operation between 2 000 to 2 500 meters 6 557 to 8 200 feet may require a field adjustment Illumination Normal function free from print quality defe...

Страница 103: ...for the weight of the paper you are using Selecting Single Paper Weight sets the Fuser temperature to 160oC which optimizes the throughput speed for light and heavy weight papers according to the weig...

Страница 104: ...ppm 50 ppm 25 ppm 70 ppm 35 ppm 187 220 g m2 50 ppm 25 ppm 40 ppm 20 ppm 70 ppm 35 ppm 221 300 g m2 35 ppm 17 5 ppm 35 ppm 17 5 ppm 70 ppm 35 ppm Transparencies 30 ppm 30 ppm 30 ppm DocuColor 8002 Sub...

Страница 105: ...ess with Exit Module and Offset Catch Tray is 114 8 inches 2916 mm W x 43 5 inches 1105 mm D x 55 6 inches 1413 mm H Digital Press Weight 2205 pounds 1000 Kg Floor Space Requirements Minimum space req...

Страница 106: ...DocuColor 7002 8002 12 10 User Guide...

Страница 107: ......

Страница 108: ......

Отзывы: