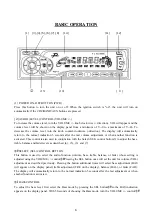
XENIA SCD-7000 Скачать руководство пользователя страница 10


10


¨ ê

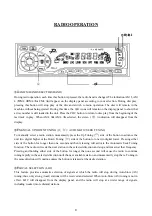
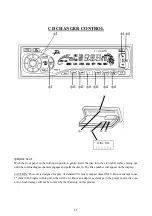
 PRE-SET SCAN (PS) / AUTO-STORE TUNING (AS) 

Press this button momentarily to scan the stations pre-set into each AM band and each FM band. The unit 

will stop at each pre-set station for 10 seconds before continuing to the next pre-set station (the pre-set 

station number on the display panel will flash during Pre-Set Scan operation). Press the button again 

momentarily to stop pre-set scan operation and remain on the selected frequency. Pressing and holding the 

button for longer than 2 seconds will activate the Auto-Store (AS) Tuning feature which will automatically 

scan and enter up to 6 local area stations into the pre-set memories on the band in use. LOC will be displayed 

during station selection. If you have already set the pre-set memories to your favorite stations and enter the 

new local ones. This feature is most useful when traveling in a new area where you are not familiar with the 

local stations. 


¨ ë

 STATION PRE-SET MEMORIES 

To set any the 6 pre-set memories in each band, use the following procedure. 

1. Turn the radio on and select the desired band. 

2. Select the first station to be pre-set using the TUNE/TRACK or Auto-Store (AS) Control. 

3. Press the pre-set button to be set and continue to hold it in for approximately 2 seconds. The pre-set 

number (CH 1-6) will appear on the display panel, indicating that the station is now set into that pre-set 

memory position. The station can now be recalled at any time by pressing that button. 

4. Repeat the above procedure for the remaining 5 pre-sets on that band and for the other 4 bands on the unit. 


Содержание SCD-7000

Страница 1: ...XENIA SCD 7000 ETR AM FM MPX 4CH HIGH POWER IN DASH 5 CD CHANGER WITH FLIP DOWN FULL FRONT DETACHABLE PANEL...

Страница 2: ...2 INDEX Installation 3 Connection 5 Basic Operation 6 Radio Operation 9 CD Changer Operation 11 Trouble Shooting 14 Care and Maintenance 15 Specification 16...

Страница 3: ...removed negative terminal Install Half sleeve Not needed for ISO DIN installation Half sleeve Support Strap supplied supplied 1 Install adapter of necessary Install half 2 Bend over tabs where possibl...

Страница 4: ...Reinstall any items you removed from the dashboard Bolt supplied Final Installation ISO DIN 1 Remove trim ring from front of radio 2 Mount factory brackets on new radio using existing screws from old...

Страница 5: ...tallation Use this diagram Color Function White black LF Speakers White LF Speakers Green black LR Speakers Green LR Speakers Gray black RF Speakers Gray RF Speakers Violet black RR Speakers Violet RR...

Страница 6: ...njunction with the Select SEL control button 3 to adjust the bass treble balance and fader levels as described 4 5 6 and 7 SELECT SEL CONTROL BUTTON This button is used to select the audio function vo...

Страница 7: ...tomatically return to the normal indication 5 seconds after the last adjustment or when another function is activated FRONT REAR FADER CONTROL To adjust the front rear speaker balance first select the...

Страница 8: ...eriod of time they may take longer to illuminate than under normal conditions In addition the visibility of the numbers on the LCD may slightly decrease The LCD read out will return to normal when the...

Страница 9: ...ce the unit two digital higher or the Down Tuning side of the button to tune two digital lower Pressing either side of the button for longer than one second and then releasing will activate the Automa...

Страница 10: ...during station selection If you have already set the pre set memories to your favorite stations and enter the new local ones This feature is most useful when traveling in a new area where you are not...

Страница 11: ...g mechanism engages and pulls the disc in The Disc number will appear on the display CAUTION This unit is designed for play of standard 5 12cm compact discs ONLY Do not attempt to use 3 8cm CD Singles...

Страница 12: ...me the Forward Track Select side of the button is pressed and released the next higher track number will be selected as shown on the display panel Similarly each time the Backward Track Select side of...

Страница 13: ...n will also select tracks in the random order instead of the normal progression The Random Play mode can be canceled by pressing the button again RDM indication will disappear from the display panel P...

Страница 14: ...akers operate display lights normally Speaker harness not connected Connect speaker harness Incorrect splices or connections Check all splices and connections Not all speakers operate Speaker wires sh...

Страница 15: ...ways remove the compact disc Do not leave an ejected disc sitting in the disc slot as this can expose it to sunlight and other causes of damage l Do not attempt to open the unit chassis There are no u...

Страница 16: ...s Output Wiring Floating Ground Type Designed for use with 4 Speakers Front and Rear Channels Cannot be combined Bridged for use with 2 Speakers Output Impedance Compatible with 4 8 Ohm Speakers Low L...

Отзывы: