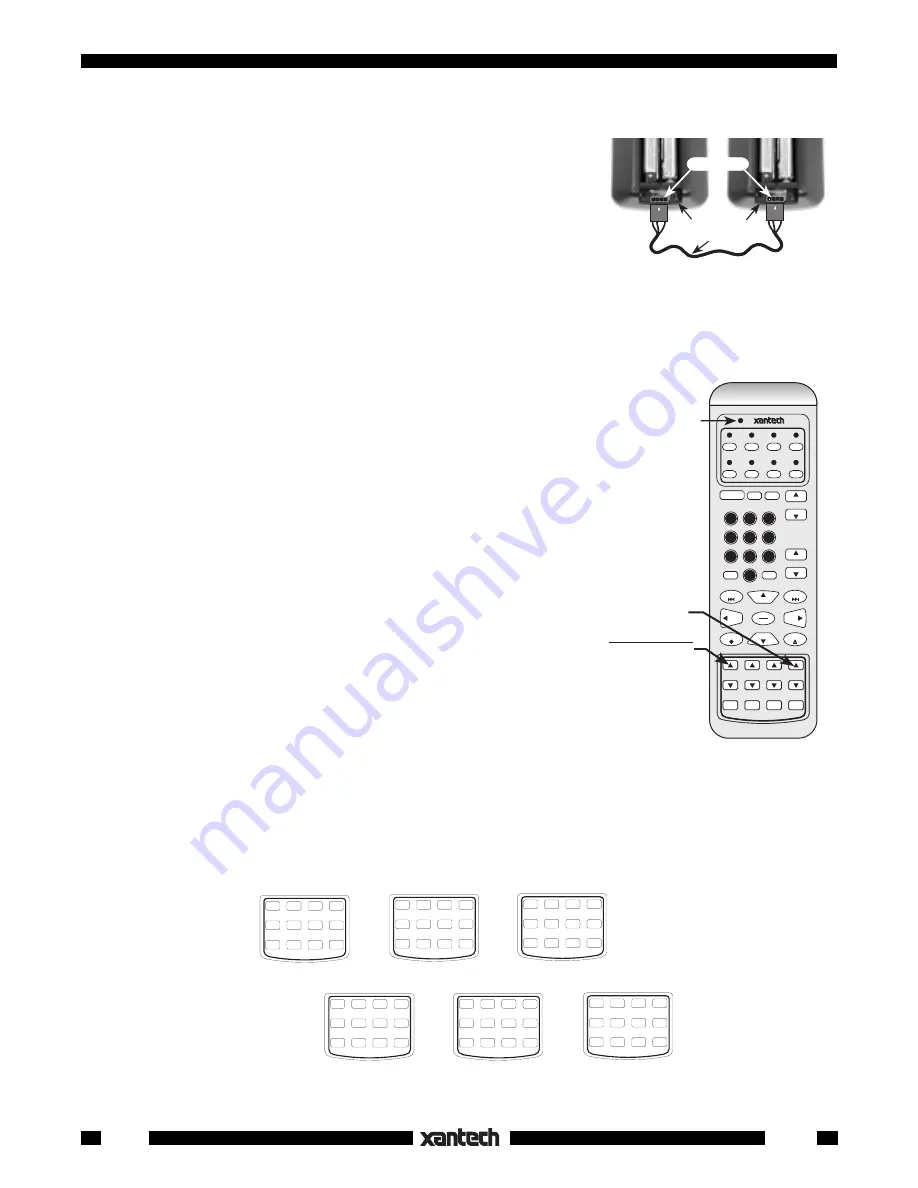
background image

8

URC-2

CLONING

When you have finished programming and have checked all commands
for proper operation, you are now able to copy (clone) the contents to
other URC-2's, if desired.  This will save you the tedium of repeated
programming when you want identical commands in additional URC-2's.
Refer to  Fig. 13 and proceed as follows:

1. Using a 3' COM Port cable (optional, see your dealer) , simply plug

it into the COM Port of each unit as shown in Fig. 13.

2. On the programmed unit, press both the PGM and the XFER keys

simultaneously, then release.  Refer to Fig. 14.

The Status LED will flash Green and Amber alternately on both units while a copy of the memory
contents is transferring to the unprogrammed unit.  You may "clone" as many URC-2's as desired by
repeating this process.

NOTE: If transfer does not complete or the Status and Source
LED's blink Red, remove a battery from each unit, reinsert and try
again.

USING THE SUPPLIED OVERLAYS

There are six overlays supplied that fit over the twelve lower "Custom
Use" keys on the URC-2 (Fig. 15).

• Overlay #1 is used specifically when programming, as explained

previously (Figs. 2 & 6).

• Overlays #2, #3, #4, & #5 may be used to identify IR commands

needed for advanced custom installation applications, or simply a few
keys you can use for extra commands you may want that cannot be
placed logically on other keys.

• When you have picked the overlay you want to use, peel off the

protective adhesive cover and press it into place over the 12 keys.

CAUTION: The Programming Overlay (#1) would not normally be
permanently attached, unless you have no intention of using the other
overlays at a later time. Also, be sure to keep the Programming
Overlay (#1) for future programming needs.

• Be careful to align the overlay accurately, so that it does not interfere with the operation of the keys.

COM Ports

3' cable (optional)

Programmed Unit

URC-2's

(Battery Covers Removed)

Un-programmed Unit

UP

UP

1

2

3

URC-2

TV

VCR

SAT

CBL

DVD

TNR

CD

AUX

POWER

T/V

ENTER

VOL

VOL

CH

CH

PR.CH

MUTE

4

5

6

7

8

9

0

PAUSE

STOP

REW

FF

INFO

EXIT

SEL

PLAY

MENU

GUIDE

A

B

C

D

The Status LED

will blink Green &

Amber on both

units during the

Cloning process.

PGM

CANCEL

DEL

XFER

SEQ

DELAY

EDIT

STEP

CLONING

Press

PGM and XFER

simultaneously,

then release

Fig. 14

Fig. 13

#6

Blank

Overlay

#2

Surround Sound

Overlay

SURR

MODE

SLEEP

TEST

REAR

CENTER

DELAY

SUB

#4

Audio Functions

Overlay

OFF

GLOBAL

OFF

ON

TREB

BASS

BAL

MUTE

MUTE

PGM

CANCEL

DEL

XFER

SEQ

DELAY

EDIT

STEP

Programming

Overlay

#1

#5

TV Functions

Overlay

DISP

SWAP

SLEEP

MODE

PIP

CH

FREEZE

OFF

#3

Scene Control

Overlay

OFF

OFF

DRAPE

2

DRAPE

1

LIGHTS

1

LIGHTS

2

ON

ON

Fig. 15

Содержание URC-2

Страница 1: ...systems as well 8 Source bank keys with LED status indicators Programming battery condition LED indicator 40 Function operational keys All 48 keys illuminate for ease of night viewing Auto wake up with motion always lights up the last active Source LED Auto sleep wake up of keypad lighting conserves battery power Programming can be accomplished on the unit itself or by using Xantech s DD4 Dragon D...

Страница 2: ... up CHannel down Function Keys For TV SAT AM FM etc sequential channel changing PR CH Function Key For previously viewed channel command of TV s SAT s etc Cursor Function Key cluster Use for sources that have menu driven on screen displays such as TV s SAT s etc Also use for CD TAPE etc commands Programming Custom Use Keys Select from the 6 supplied Overlays below for Programming and Customized Ap...

Страница 3: ... the same time Refer to Fig 6 The Status LED will blink Green and the Source LED will be steady Red 4 Press and release a Source Key twice or a Function Key once for the selected source under which you wish to place an IR command The Status LED will be a steady Green waiting for an IR signal NOTE It is necessary to press different Source Keys twice once to select the bank the next to select it as ...

Страница 4: ...s CANCEL and the active Source Key simultaneously to leave the Delete Mode or allow it to time out by waiting 30 seconds PROGRAMMING SEQUENCES Macros You can teach more than one IR command per key by using the Sequence Programming feature This permits several commands to be executed by one key press to carry out a macro of several system functions To teach a sequence of commands to a single key do...

Страница 5: ...ly between a Power ON command and a Play command for instance to operate correctly When programming sequences you can place delays between such commands so that sufficient time is given for all functions to execute The URC 2 allows the insertion of timed delays at any point within a sequence Proceed as follows 1 Enter the Sequence Mode and begin your sequences as described previously 2 Just before...

Страница 6: ...ems as you go Editing a Sequence 1 Press EDIT and a Source Key simultaneously This puts you in the EDIT Mode The Status LED will blink Green 2 Press the target key having the sequence you wish to edit if a different Source key press twice if a Function key press once The Status LED will be a steady Green indicating that the edit pointer insertion point will be at the first item in the sequence 3 P...

Страница 7: ...o any key presses If this occurs temporarily remove one battery then reinstall it This will reset the unit and restore operation No user programming will be lost Clearing all Memory If for any reason you wish to clear all programming from the unit press the PGM and the SEQ keys simulta neously thenrelease Within1second simultaneously press the DEL and EDIT keys and release Refer to Fig 12 The acti...

Страница 8: ...nstallation applications or simply a few keys you can use for extra commands you may want that cannot be placed logically on other keys When you have picked the overlay you want to use peel off the protective adhesive cover and press it into place over the 12 keys CAUTION The Programming Overlay 1 would not normally be permanentlyattached unlessyouhavenointentionofusingtheother overlays at a later...

Страница 9: ...elearn them Of the same type means that you can Copy Paste between Source Keys and between Function Keys but not between Source and Function Keys 5 Sleep Timeout The URC 2 turns off the lighted keypad and the active source LED to Sleep mode to conserve battery power As received from the factory the default setting for the URC 2 is 6 seconds beginning after the last key press Using DD4 the time out...

Страница 10: ...battery life can be extended considerably by turning it off so that it does not come on when moved or when a key is pressed Turning the Lighted Panel OFF Simply press the VOL Up and VOL Down buttons simultaneously until you see the panel turn OFF 5 seconds Turning the Lighted Panel ON Turn it back on at any time by pressing the VOL Up and VOL Down buttons simultaneously until you see the panel tur...

Страница 11: ... learn IR commands from certain brands and models of remotes a Because of the wide variety of IR coding and timing relationships there are no industry standards there are some IR commands that are not learnable by the URC 2 or the DD4 Dragon Drop IR system Be sure to test all components first to see that their IR command codes are learnable and executable by the URC 2 before selecting final compon...

Страница 12: ...sert and Delete Sequence macro Capability Commands per key limited only by memory COM Port 3 Pin RS232 Signal Compatible Cloning Via 3 Pin COM Port Sleep Mode Begins 6 seconds after inactivity for Normal Operation adjustable with DD4 Begins 30 seconds after inactivity when in Program Modes Wake up Activates with motion a key press or COM Port Connection Lighted Panel Turn ON OFF Time with simultan...

Отзывы: