background image

40 

USING YOUR DIGITAL 
MUSIC SERVER IN A 
MULTIROOM SYSTEM 

Your XMusic Digital Music Server is capable of playing 
different music in several rooms simultaneously.  This chapter 
explains how the remote control and front panel can be used 
to control different outputs of the  Digital Music Server. 

Multiroom Remote Control Use 

Your Digital Music Server remote control can be 
configured so that every button press indicates to the 
system which output is to be controlled.  This means that 
whenever infrared is received by the Digital Music Server 
the TV display will automatically switch to controlling the 
appropriate output. 

To configure the remote with a default output


• Press 

the 

HDD Audio 

and 

 buttons 

simultaneously; hold them down for 1 second. 

The 

HDD Audio 

button will remain lit for 20 seconds; the 

configuration process must be completed during this time. 

• 

Enter the 3 digit code corresponding to the output 
you would like to control (valid configurations are 
listed in 

Appendix A

).  For example, to set output 2 

as your default output press: 

0

0

2


• Press 

the 

HDD Audio 

button again. 

The 

HDD Audio 

button will blink twice to indicate that 

the configuration has been accepted.  If the 

HDD Audio


button does not blink twice begin the process again, 
taking care to enter the number correctly. 

If the Digital Music Server is switched on during the 
configuration process the 

Enter Standby? 

prompt will 

appear once configuration is complete; pressing any 
navigation key on the remote should now cause the 
Digital Music Server to switch to the correct output.  In 
the example above the top-right corner of your television 
screen will display the following: 

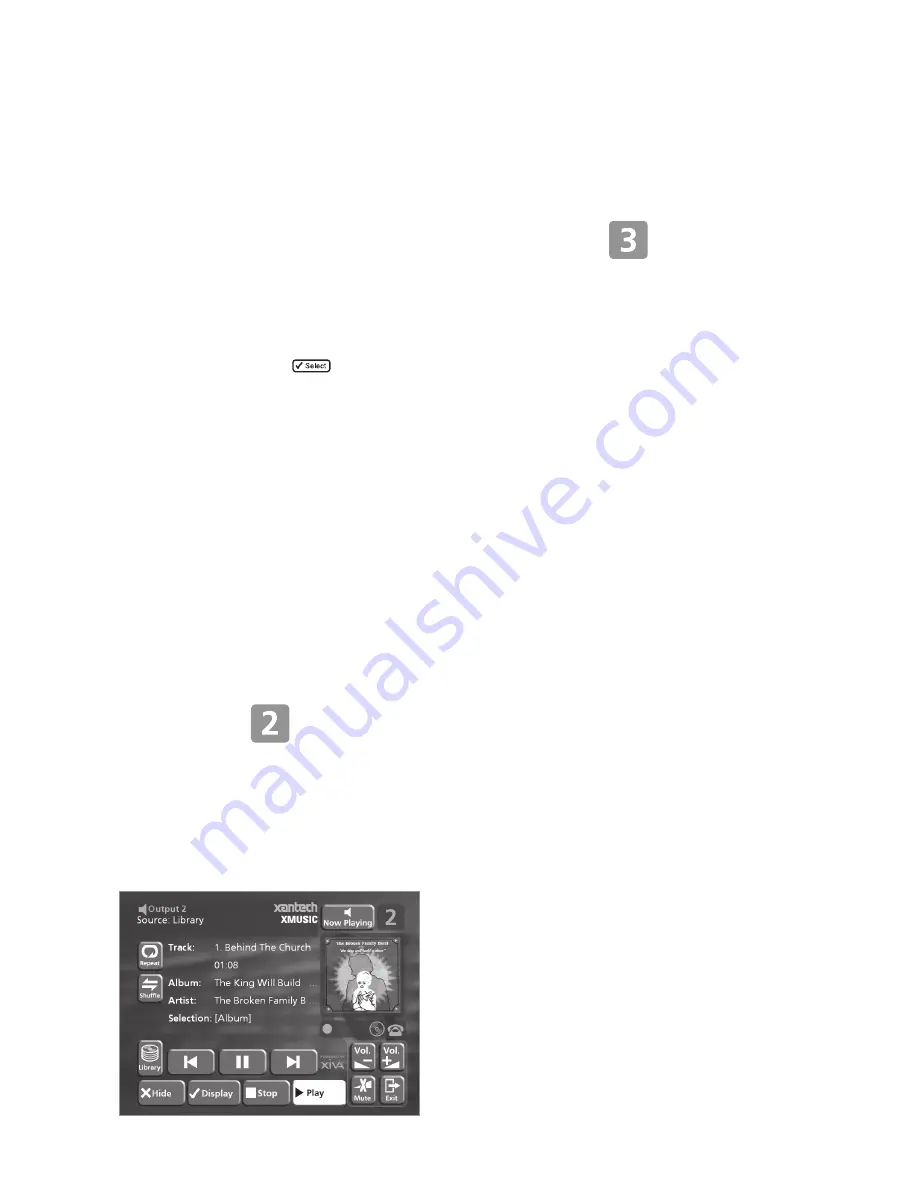
To change output using the remote control


The 

-

Output

 button on the Digital Music Server remote 

control allows you to display information about the 
music you are currently listening to.  It can also be used 
to select another output to control as follows: 

• Press 

the 

-


Output

 button on the Digital Music 

Server remote control. 

The following screen is displayed: 

The output screen indicates what is playing on the 
currently selected output. 

• Press 

the 

-


Output 

button again to switch to the 

next output. 

• 

Once the required output number is displayed, 
press the 

2

Hide 

key to hide the output display. 

In the previous example the television screen would now 
show: 

Any subsequent press on this remote will now control 
output 3. 

Press the 

Default o/p 

button at any stage to return to 

controlling your default output.  This button will also 
automatically display the 

Library

 menu. 

Direct Media Select 

The Digital Music Server remote control can be used to 
select music from the library without any reference to 
the TV user interface. 

This mode, called 

Direct Media Select

, may be used to 

select music from the library and control playback (e.g. 
play, pause, stop etc.) using simple infrared commands 
with no effect on the TV user interface.  To set your 
remote control in Direct Media Select mode follow the 
instructions in the previous 

To configure the remote with


a default output

 section selecting a Direct Media Select 

output from the settings listed in Appendix A. 

To select music from the library using Direct Media Select


mode


An album, artist, genre or playlist may be selected for 
playback using a “sequence” number.  The following 
examples show how to select music using this method: 

Example 1: selecting an album by the number assigned to 
it when it was recorded onto the unit: 

Album

5


will play album number five. 

Example 2: selecting an artist by its location in an 
alphabetical list: 

Artist

,

 7

7


will play all the tracks by artist number seventy-seven. 

Example 3: selecting a genre by its location in an 
alphabetical list: 

Genre

,

 2

,

 2


will select the 22nd genre (Rock) for playback. 

Example 4: selecting a playlist by the number assigned to 
it when it was created on the unit: 

Playlist

,

 8


will select playlist number eight. 

The simple commands used to select your music without 
reference to the TV User Interface may also be used by 
other “learning” remote controls and simple multiroom 
control systems.  The 

presets

 area of your library is ideal 

for an application such as this, allowing you to select 
from your current favourites at the touch of a button. 
Contact your local dealer for more information on 
installing this type of equipment. 

Содержание Digital Music Server XMusic

Страница 1: ...USER GUIDE D I G I TA L M U S I C S E RV E R...

Страница 2: ...U S Patents 5 987 525 6 061 680 6 154 773 6 161 132 6 230 192 6 230 207 6 240 459 6 330 593 and other patents issued or pending Services supplied and or device manufactured under license for followin...

Страница 3: ...rements in your area IMPORTANT for UK version only This apparatus is fitted with an approved moulded 13 amp plug To change a fuse in this type of plug proceed as follows 1 Remove fuse cover and fuse 2...

Страница 4: ...CTION Power supply cords should be protected from being walked on or pinched particularly at plugs convenience receptacles and the point where they exit from the product OUTDOOR ANTENNA GROUNDING If a...

Страница 5: ...t the equipment into an outlet on a circuit different from that to which the receiver is connected Consult the dealer or an experienced radio TV technician for help Changes or modifications may cause...

Страница 6: ...4...

Страница 7: ...ction keys Press the 1 key to display the main menu at any time Press the 2 key whenever this symbol is displayed on the TV screen or on the front panel to cancel exit or delete the current operation...

Страница 8: ...ey on the remote control PLAYING MUSIC Display the Main Menu by pressing the 1 key on your Digital Music Server remote control or the Menu action key on the front panel The Main Menu will be displayed...

Страница 9: ...cture de la musique sur la sortie s lectionn e La touche KEnregistrement est une touche d action utilis e avec certains crans de menu pour commencer un enregistrement ou modifier une liste de lecture...

Страница 10: ...z le Menu principal en appuyant sur la touche 1 touche 1 de la t l commande de votre Digital Music Server ou bien sur Menu touche d action du panneau avant Le Menu principal s affiche Appuyez sur les...

Страница 11: ...n anzeigen Dr cken Sie die 2 Taste wenn dieses Symbol auf dem Fernsehbildschirm oder auf der Anzeige auf der Vorderseite des Ger ts angezeigt wird um denaktuellenVorgangentsprechendden Informationenau...

Страница 12: ...SPIELEN Das Hauptmen aufrufen indem Sie die Taste 1 auf der Fernbedienung Ihres Digital Music Servers oder die Taste Menu Aktionstaste auf der Frontblende Das Hauptmen wird angezeigt Die Tasten 9 und...

Страница 13: ...se este bot n para controlar Digital Music Server 6 Botones de acci n del mando a distancia Pulse el bot n 1 para mostrar el men principal cuando lo desee Pulse el bot n 2 cuando este s mbolo se muest...

Страница 14: ...ulsando la tecla de 1 del mando a distancia del Digital Music Server o Menu tecla de acci n del panel fronto Se visualizar el Men Principal Pulse las teclas 9 y 8 para resalta Fonoteca Pulse 5Selecc t...

Страница 15: ...ndo Premere il tasto 1 per visualizzare il menu principale in qualsiasi momento Premere il tasto 2 ogniqualvolta sullo schermo TV o sul pannello anteriore compare questo simbolo per annullare uscire o...

Страница 16: ...asto 1 sul telecomando del Digital Music Server o il tasto d azione Menu sul pannello anteriore Viene visualizzato il Menu Principale Digitare i tasti 9 e 8 per evidenziare Libreria Digitare il tasto...

Страница 17: ...et you customise your Digital Music Server for each member of the family or for matching the music to the occasion or mood Instant access irrespective of your music collection Whether you select a tra...

Страница 18: ...on the display R E button When the button is pressed briefly during playback play restarts at the beginning of the current track A second brief press moves to the beginning of the previous track When...

Страница 19: ...TICAL IN High Quality recordings can be made onto the hard disk of the Digital Music Server using an optical connection from a suitable device such as Minidisc or DAT REAR VIEW DIGITAL OPTICAL OUT The...

Страница 20: ...d these buttons will select the next and previous channels O MUTE button If the TV or Amp device is selected this button mutes the volume of the TV Amp NVOLUME buttons If the TV or Amp device is selec...

Страница 21: ...n NUMERIC 0 to 9 buttons The numeric keys can be used as follows When browsing the track list these buttons allow you specify the track you wish to play When browsing the list of presets these buttons...

Страница 22: ...appropriate video channel to view the Digital Music Server TV User Interface display For Scart connection the red and black plugs are not required Reassigning volume control when using the Digital Mu...

Страница 23: ...mode Press the Standby key on the front panel or the LStandby key on the remote control The following prompt is displayed The front panel display shows Either Press the Stby action key on the front pa...

Страница 24: ...display In the example above the functions Menu Open Info and Play are available next to each option is a symbol indicating where a key on the Digital Music Server remote control may be used instead o...

Страница 25: ...up a connection later Press the 5 action key on the front panel or the key on the remote to select the option you have chosen If you have selected Use Ethernet follow the on screen instructions to spe...

Страница 26: ...ot using an Ethernet connection check that you have connected your Digital Music Server to a telephone line using the cable supplied Press the Regstr action key on the front panel or the button on the...

Страница 27: ...a CD in the tray select the CD option from the Main Menu to display the contents of the disc press the KRec CD to begin the recording process The following display then allows you to choose whether to...

Страница 28: ...the display shows the total remaining recording time available at the specified recording quality Press the 5Select key to confirm your selection CD information The CD information screen allows you t...

Страница 29: ...to press the 1 key on the Digital Music Server remote control and select music as normal For more information on selecting music for playback see the chapter called Playing Music p 30 At any time you...

Страница 30: ...action key to confirm your settings and return to the Line In Record screen Note If you have selected either the coaxial or optical digital input as your line in source the gain setting may not be alt...

Страница 31: ...y To record additional tracks Use the 9 or 8 keys if necessary to highlight the track name option and press the 5New action key A new track named Session Track 2 will begin recording The 5New option w...

Страница 32: ...ning with that letter PLAYING MUSIC This chapter explains how to play music on your XMusic Digital Music Server It also explains how to search for a track in a number of alternative ways PLAYING MUSIC...

Страница 33: ...enre To browse the library by playlist Playlists allow you to create your own selections of tracks and save them with a name of your choice such as Party Music For more information about creating a pl...

Страница 34: ...irst letter of its title using the alphanumeric keypad on your Digital Music Server remote control To select an album artist genre or playlist by name Display the appropriate library menu for the item...

Страница 35: ...lbum name and track name Artist name and track name CONTROLLING PLAYBACK Whether you are playing music from the library or directly from the CD you can pause stop and resume playback as well as seek a...

Страница 36: ...your XMusic Digital Music Server to help you organise the music in your music library including information about creating playlists of your favourite tracks programming preset stations deleting album...

Страница 37: ...the 9 or 8 keys to move the track up or down as required Press the 5Store key to confirm the new track position PRESETS Presets are simple playlists that can be used in the same way as a preset statio...

Страница 38: ...wing section called Entering and Editing Names to enter a new name album all the tracks by an artist all the tracks in a genre a playlist or all the tracks stored on your Digital Music Server For more...

Страница 39: ...action key Press the 5Clear action key to confirm your choice You will receive confirmation once the operation is complete Press the 5OK action key to continue ENTERING AND EDITING NAMES You can ente...

Страница 40: ...ls you will be given the opportunity to re transmit your updated registration information Internet Access Displays your Internet account details and allows you to edit them If you chose the Use Built...

Страница 41: ...hernet Settings Allows you to specify how your Digital Music Server obtains an IP address when connected to an Ethernet network The Mode option allows you to select whether the IP address is set Manua...

Страница 42: ...what is playing on the currently selected output Press the Output button again to switch to the next output Once the required output number is displayed press the 2Hide key to hide the output display...

Страница 43: ...layed press the 2Hide key to hide the output display The next time a key is pressed on the front panel the user interface will automatically switch to controlling this output MULTIROOM CONTROL SYSTEMS...

Страница 44: ...are using a Macintosh computer you can create a new network connection as follows Select Go from the Finder menu and click Connect to Server Click on the Browse button in the Connect to Server window...

Страница 45: ...ick the last track Press the Delete key to remove these tracks from the iTunes Library Click Yes to confirm your choice Repeat the import process described above to add back the Digital Music Server i...

Страница 46: ...97 CGE 138 024 010 048 158 097 077 CIE 098 001 002 003 004 005 006 007 009 013 014 015 016 079 CIHAN 009 CLARIVOX 108 033 047 CLATRNIC 017 CLATRONIC 001 002 003 004 005 006 007 008 009 119 013 014 015...

Страница 47: ...01 002 003 004 005 006 007 008 009 017 013 014 015 016 018 151 IMPERIAL 001 002 003 004 034 138 143 005 006 007 146 008 024 081 009 154 119 010 013 014 015 016 121 048 158 125 097 018 077 086 114 INGE...

Страница 48: ...021 PANASONIC 080 137 144 150 145 081 082 083 207 131 PATHE CINEMA 031 119 033 158 PATHE MARCONI 135 139 042 PERDIO 043 PHILCO 001 002 003 004 080 138 005 006 146 024 081 009 010 013 014 015 016 048...

Страница 49: ...8 TEKON 018 084 TELEAVIA 135 107 139 042 040 TELEFUNKEN 034 035 106 138 136 140 037 042 040 050 TELETENT 005 TELETECH 018 TELETON 088 041 109 081 010 TELEUNKEN 138 TELEVIDEON 031 021 081 119 206 TENSA...

Страница 50: ...23 122 129 106 124 031 KRELL 067 063 KYOCERA 020 LEXICON 006 LINN 057 LUXMAN 042 028 008 LXI 036 MAGNAVOX 064 MARANTZ 053 011 012 116 055 032 059 MERIDIAN 060 061 MITSUBISHI 130 131 MONDIAL 068 062 NA...

Страница 51: ...connection with your access to or use of or inability to use the Service or any software or content supplied to you in connection with the Service or in connection with any failure of performance err...

Страница 52: ...er or email address to third parties world wide for targeted services or marketing purposes without your consent And we also protect your privacy by limiting employee access to the use of customer dat...

Страница 53: ...antie im Hinblick darauf erteilt dass die Eingebettete Software fehlerfrei ist oder dass die Funktion der Eingebetteten Software ununterbrochen erfolgt Gracenote ist nicht dazu verpflichtet Ihnen irge...

Страница 54: ...date che userete i Dati Gracenote il Database Gracenote e il Software Embedded unicamente per il vostro uso personale non commerciale Concordate che accederete ai Dati Gracenote soltanto per mezzo del...

Страница 55: ...ct to these terms and conditions You may not impose any further restrictions on the recipients exercise of the rights granted herein You are not responsible for enforcing and charge for this service i...

Страница 56: ...WRITING WILL ANY COPYRIGHT HOLDER OR ANY OTHER PARTY WHO MAY MODIFY AND OR REDISTRIBUTE THE PROGRAM AS PERMITTED ABOVE BE LIABLE TO YOU FOR DAMAGES INCLUDING ANY GENERAL SPECIAL INCIDENTAL OR CONSEQUE...

Страница 57: ...sur le plan contractuel ou d lictuel par incurie obligation d origine l gislative ou autre de perte ou de pr judice r sultant de ou en lien quelconque avec ces conditions g n rales y compris mais sans...

Страница 58: ...irgendeiner Gesetzgebung oder Vorschrift Sie verpflichten sich jegliche Klagebehauptung zu bestreiten und s mtliche Kosten Sch den zuerkannten Schadensersatz Geb hren einschlie lich angemessene Anwalt...

Страница 59: ...lt sich das Recht vor in Claranets Website Einzelheiten ber Verst e gegen diese Gesch ftsbedingungen und diesbez glich ergriffene Ma nahmen einschlie lich des Namens des Kundenkontoinhabers zu ver ffe...

Страница 60: ...23 37 ETHERNET CONNECTION 17 39 F FRONT PANEL 16 Controls 16 Display 21 G GENRE BUTTON 19 31 GENRES PLAYING 31 GRID 23 37 H HDD AUDIO BUTTON 18 HOME BUTTON 18 I INFO BUTTON 18 INTERNET CONNECTION 23 3...

Страница 61: ...me 18 20 REPEAT 33 REPEAT BUTTON 19 S S VIDEO OUT CONNECTION 17 SELECT BUTTON 16 18 SETTINGS 38 SKIP BACK 16 19 SKIP FORWARD 16 19 SPECIFICATIONS 15 STANDBY BUTTON 16 18 21 STANDBY MODE 21 STATUS ICON...

Страница 62: ...PK00325 01 Copyright 2005 Imerge Ltd XANTECHCORPORATION 12950 Bradley Avenue Sylmar CA 91342 3829 phone 818 362 0353 fax 818 362 9506 www xantech com...

Отзывы: