background image

M A   3     S P E C T R O P H O T O M E T E R  

21


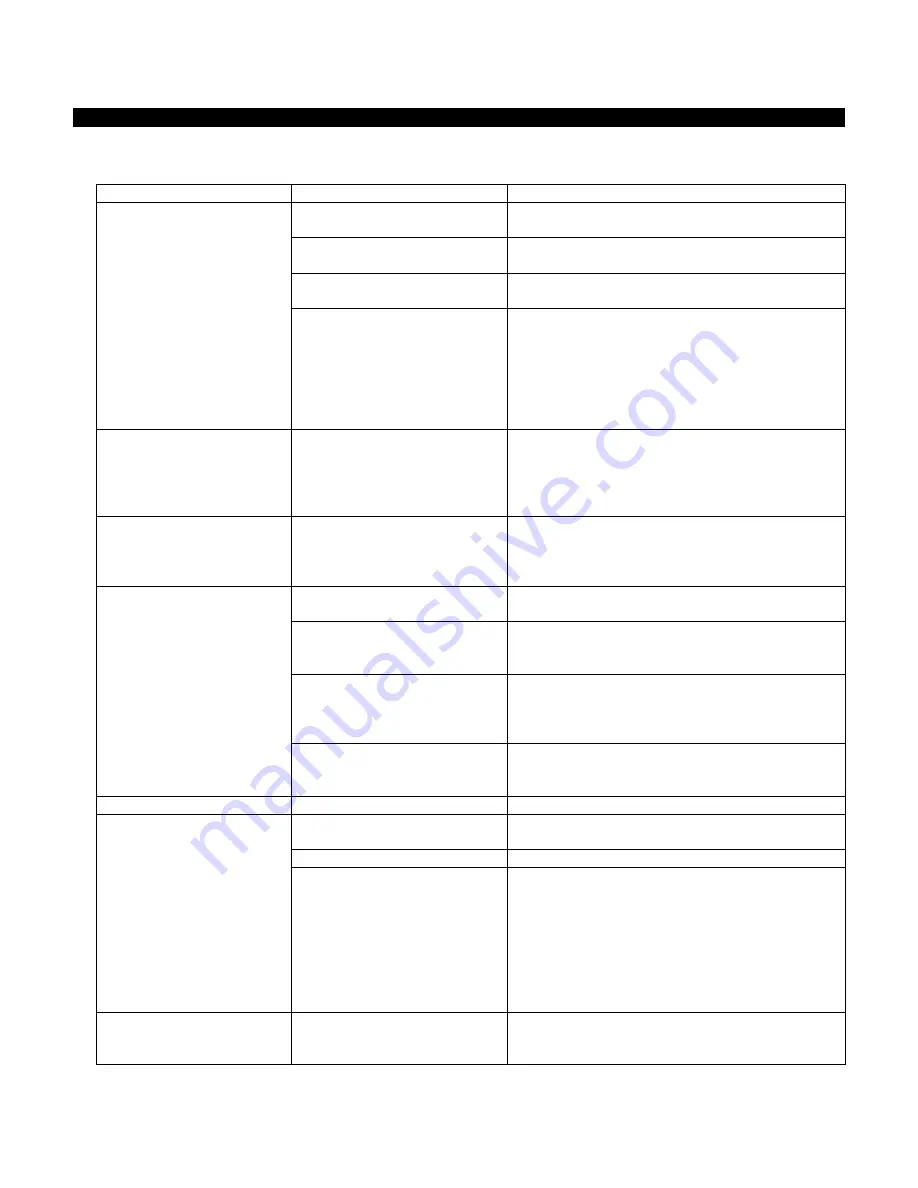
Troubleshooting 

Prior to contacting X-Rite support department for instrument problems, try the applicable solution(s) described 

below. If the condition persists, contact us using one of the methods listed in the Service Information section.  

Problem 

Cause 

Solution 

Instrument screen remains 

dark. 

Instrument is turned off. 

Turn instrument on by pressing the 

power/measure button. 

Instrument is in power down 

mode. 

Touch the screen. 

Battery is very low. 

Charge the battery min. 1 hour. After max. 5 

minutes the screen will turn on. 

Battery is defective. 

Charge the battery. If the screen does not turn 

on after max. 5 minutes check if the USB cable 

is correctly connected to the computer or power 

supply (USB ports on computer monitors and 

keyboards do not deliver enough power). If it 

still does not work the battery needs to be 

replaced. 

Screen is instable (turns 

on and off periodically) 

when the instrument is 

connected to a computer 

or power supply. 

Battery is defective. 

Battery needs to be replaced. 

Screen is frozen. 

Firmware is locked up. 

Disconnect USB cable. Press and hold the 

power/measure button for 10 seconds and then 

release. Instrument turns off. Instrument can be 

started normally. 

Measurement error or 

results appear inaccurate. 

Material being measured is 

damaged (e.g. scratched). 

Repeat measurement. 

Calibration was performed on 

a dirty calibration reference. 

Clean the calibration reference and repeat the 

calibration per procedure in the Calibration 

section. 

Instrument requires 

calibration. 

Perform calibration on calibration reference 

followed by a self test. If calibration and self test 

fails, the instrument is defective. Contact 

technical support. 

Instrument is defective. 

Perform a self test in the Settings menu. If the 

self test fails the instrument is defective. Contact 

technical support. 

Calibration procedure fails.  Instrument defective. 

Contact technical support. 

Instrument and software 

not communicating (USB 

connection). 

USB cable not connected. 

Connect the USB cable between the computer 

and the instrument. 

USB cable is defective. 

Exchange USB cable. 

Communication crashed 

between application software 

and the instrument. 

Unplug the USB cable, wait 1 second and 

connect the cable again. 

If the communication still does not work, close 

and restart the software application. Restart the 

instrument. If the communication still does not 

work, reboot the computer. 

Instrument will not 

measure or calibrate. 

Contact sensor(s) do not 

properly contact the sample 

surface. 

Lift the instrument and place it properly on the 

sample. Make sure that all 3 sensor indicators 

on the screen turn green. 

Содержание MA 3

Страница 1: ...MA 3 Spectrophotometer User Guide ...

Страница 2: ... approved by manufacturer name may void the FCC authorization to operate this equipment Industry Canada Compliance Statement CAN ICES 3 A NMB 3 A Equipment Information Use of this equipment in a manner other than that specified by X Rite Incorporated may compromise design integrity and become unsafe To avoid discomfort do not look directly into the measurement optics when the instrument is on No u...

Страница 3: ...d from this software without specific prior written permission DISCLAIMER THIS SOFTWARE IS PROVIDED BY ATMEL AS IS AND ANY EXPRESS OR IMPLIED WARRANTIES INCLUDING BUT NOT LIMITED TO THE IMPLIED WARRANTIES OF MERCHANTABILITY FITNESS FOR A PARTICULAR PURPOSE AND NON INFRINGEMENT ARE DISCLAIMED IN NO EVENT SHALL ATMEL BE LIABLE FOR ANY DIRECT INDIRECT INCIDENTAL SPECIAL EXEMPLARY OR CONSEQUENTIAL DAM...

Страница 4: ...not manufactured distributed or approved by X Rite Consumable parts and Product cleaning are also not covered by the warranty X Rite s sole and exclusive obligation for breach of the above warranties shall be the repair or replacement of any part without charge which within the warranty period is proven to X Rite s reasonable satisfaction to have been defective Repairs or replacement by X Rite sha...

Страница 5: ...nnect Icon 10 Header Bar 10 Settings Mode 11 Entering Settings Mode 11 Measurement Option 11 Dark Mode Option 12 Speaker Option 12 Self Test 11 Calibration 11 Language 12 Device Information 12 Power Off 12 Factory Reset Option 13 Calibration Mode 14 Calibration Reference 14 Calibrating the Instrument 14 Job List Mode 16 Measuring 16 Deleting Jobs 17 Appendices 19 Service Information 19 Cleaning th...

Страница 6: ... listed below If any of these items are missing or damaged contact X Rite or your Authorized Representative MA 3 instrument USB interface cabling Calibration reference Safety strap Screen protector Spare light seal Soft carrying case Powering On The power measure button is used to initiate the instrument from a power off state Simply press the button 1 for about one second to turn on the instrumen...

Страница 7: ...gged into the computer USB port however it will go into standby mode This is indicated by a blue pulsing LED A full charge from empty will take 6 hours connected to a computer USB port Alternatively a standard USB charger can be used The charging time will not be reduced with a standard USB charger A USB charger with at least 500 mA is required A standard charger with 1 A will not charge any faste...

Страница 8: ...used to return the screen to the previous view Settings and jobs are accessed by tapping the corresponding icon on the Home screen For this example the Settings icon was tapped to open the Settings screen Measure Button The measure button 1 is located on the side of the instrument This is the same button that is used to power on and off the instrument You can also tap the center of the screen 2 to...

Страница 9: ...ree indicators illuminate green If the required contact is not maintained for the duration of the measurement an error message will appear on the display and the measurement must be retaken Red Indicator the required contact is not being applied to the corresponding sensor Correct contact must be applied to achieve a green indicator condition The multi color LED located on the front of instrument ...

Страница 10: ...Operation section for information Settings Mode The settings mode is used to set and edit the instruments configuration options and to enter the calibration mode The settings options should be reviewed before you use your instrument for the first time Refer to the Settings Mode section for information Connect Disconnect Icon This icon is used to connect to WiFi or disconnect from WiFi not supporte...

Страница 11: ...sed from the main view Tap the arrow icons to view the additional settings 3 Tap the option required 4 When finished with the options tap the Left arrow at the bottom to return the screen to the Home view 5 Refer below for information on configuring each Settings option Calibration This option is used to activate the calibration procedure To access tap Calibration Refer to the Calibration mode sec...

Страница 12: ...et to Manual the instrument will display a message after the first measurement asking if you would like to turn on dark mode when a dark sample is detected Select Yes to turn on Dark Mode or select No to continue without the option being used Automatic When set to Automatic default setting the instrument automatically switches to dark mode after a dark sample is detected Speaker Option This option...

Страница 13: ...actory Reset Option This option is used reset the instrument to its factory default settings All stored sample will also be deleted when activated Select Yes to reset to the factory default settings or select No exit the setting without resetting ...

Страница 14: ...cedures Do not move instrument while taking a calibration measurement If motion is detected by the contact sensors an error message will be displayed and calibration aborted Make sure the USB cable is unplugged from the instrument before performing a calibration Calibration Reference The calibration reference is designed to keep the white tile free of dust and debris Calibrating the Instrument 1 S...

Страница 15: ...ge appears after white calibration try measuring the white tile again If an error still occurs clean the white calibration tile as explained in the Appendices 4 After calibration is completed remove the instrument from the calibration reference and close the reference case NOTE It is recommended to perform a Self Test after the Calibration Refer to the Settings screen Current calibration status ...

Страница 16: ... avoid discomfort do not look directly into the measurement optics when the instrument is on and measuring Do not move instrument while taking a sample measurement If motion is detected by the contact sensors an error message will be displayed and the measurement aborted Measurement performance may decline under certain condensing conditions Do not move the instrument on the sample surface with pr...

Страница 17: ...ements to complete the job 7 After the last measurement is completed the quality of the measurement is indicated with a 5 point system Five points indicates excellent measurement without variation between the readings 3 4 points indicates good measurement and 1 2 points indicates an acceptable measurement Tap the Left arrow on the Job data saved screen to return to the Job List screen 8 If the job...

Страница 18: ...ssage appears asking you to confirm that you want to delete the data or job Tap Yes to confirm or No to return to the Job List screen All Jobs 1 To delete all jobs tap Delete All Jobs in the Job list This option is located at the end of the job list 2 A message appears asking you to confirm that you want to delete the job Tap Yes to confirm or No to return to the Job List screen ...

Страница 19: ...any solvents to the clean the instrument this will cause damage to the cover and internal electronic components Compressed air should not be used to clean the instrument Cleaning the instrument with blown air can cause dirt on the outside of the instrument to enter into the device and contaminate optical components Cleaning the Calibration Reference The white tile in the calibration reference shou...

Страница 20: ...e panel and remove 3 Unplug the battery connector and remove the old battery pack 4 Plug in the battery connector and insert the new battery pack into the clip 5 Reattach the side panel insert and carefully tighten the 2 screws in the base plate with not too much torque ...

Страница 21: ...ed normally Measurement error or results appear inaccurate Material being measured is damaged e g scratched Repeat measurement Calibration was performed on a dirty calibration reference Clean the calibration reference and repeat the calibration per procedure in the Calibration section Instrument requires calibration Perform calibration on calibration reference followed by a self test If calibratio...

Страница 22: ...t change color Contact sensors are not working correctly Put the instrument into measure mode and place the instrument on a flat surface and then lift If one or more of the sensor indicators in the display do not change color when lifted there may be a problem with the contact sensor Contact technical support Shutter error Instrument defective Contact technical support Multiple error messages Inst...

Страница 23: ...pean Headquarters X Rite Europe GmbH Althardstrasse 70 8105 Regensdorf Switzerland Phone 41 44 842 24 00 Fax 41 44 842 22 22 Asia Pacific Headquarters X Rite Asia Pacific Limited Suite 2801 28th Floor AXA Tower Landmark East 100 How Ming Street Kwun Tong Kowloon Hong Kong Phone 852 2568 6283 Fax 852 2885 8610 Please visit www xrite com for a local office near you MA 3 EN ...

Отзывы: