background image

C I 6 2 L + R T L   S P E C T R O P H O T O M E T E R  

39


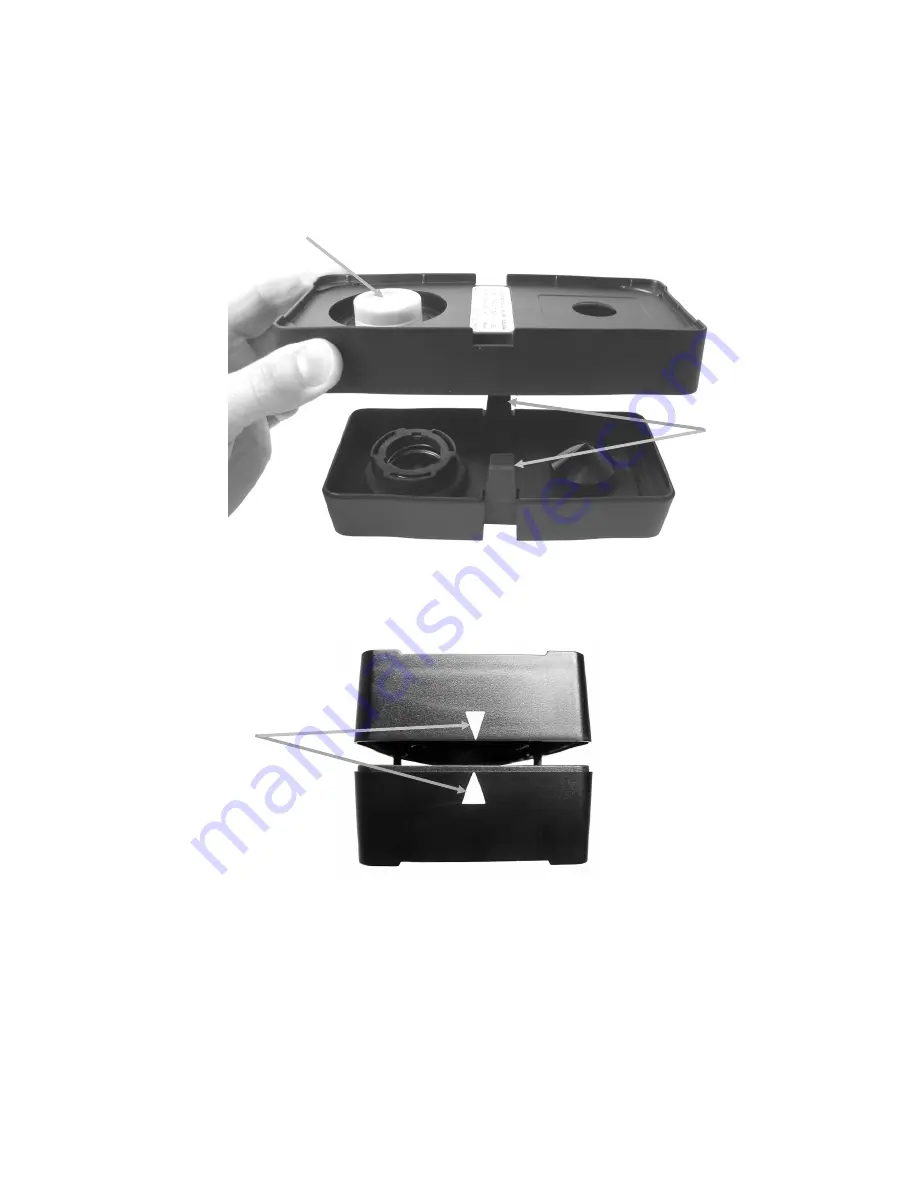
Black Trap Cleaning Procedure 

1.


Take apart the two sections by compressing the two locking tabs on both sides with your 
fingers and separating. 

2.


Clean with clean, dry air, or wipe clean with a lint-free cloth to remove any dust or 
contamination. 


3.


After cleaning, align the two arrows on the end before reassembling the sections. 
Note: The tabs will not lock correctly if assembled in the opposite direction. 


White ceramic plaque with 

protective cap 

Locking tabs 

Alignment arrows 

Содержание Ci60

Страница 1: ...Ci62L RTL Spectrophotometer User Guide ...

Страница 2: ......

Страница 3: ...ration of this equipment in a residential area is likely to cause harmful interference in which case the user will be required to correct the interference at his own expense Industry Canada Compliance Statement This Class A digital apparatus complies with Canadian ICES 003 Cet appareil numérique de la classe A est conforme à la norme NMB 003 du Canada Equipment Information Use of this equipment in...

Страница 4: ...s may cause harmful interference to radio communication However there is no guarantee that interference will not occur in a particular installation If this equipment does cause harmful interference to radio or television reception which can be determined by turning the equipment off and on the user is encouraged to try to correct the interference by one or more of the following measures Reorient o...

Страница 5: ...d specifications iii repair or service by anyone other than X Rite or its authorized representatives iv the failure of the warranted goods caused by use of any parts or consumables not manufactured distributed or approved by X Rite v any attachments or modifications to the warranted goods that are not manufactured distributed or approved by X Rite Consumable parts and Product cleaning are also not...

Страница 6: ...RITE BE LIABLE FOR ANY OF BUYER S MANUFACTURING COSTS OVERHEAD LOST PROFITS GOODWILL OTHER EXPENSES OR ANY INDIRECT SPECIAL INCIDENTAL OR CONSEQUENTIAL DAMAGES BASED UPON BREACH OF ANY WARRANTY BREACH OF CONTRACT NEGLIGENCE STRICT TORT OR ANY OTHER LEGAL THEORY IN ANY EVENT OF LIABILITY X RITE S MAXIMUM LIABILITY HEREUNDER WILL NOT EXCEED THE PRICE OF THE GOODS OR SERVICES FURNISHED BY X RITE GIVI...

Страница 7: ...u 14 Measure Mode 14 Calibration Mode 14 Configuration Mode 14 Display Screen Layout 14 Header Bar 15 Main Column 15 View Column 15 Content Area 15 Progress Column 15 Configuration Mode 16 Entering Configuration Mode 16 Measurement Trigger 17 Averaging 17 Language 17 Instrument Orientation 17 Date Format 18 Instrument Date Time 18 Delete All Samples or Standards 18 Restore Factory Settings 18 Cali...

Страница 8: ... Adding Standards to a Project 33 Deleting Projects Standards and Samples 34 Locking a Project 34 Editing Project Name 34 Appendices 36 Service Information 36 Cleaning the Instrument 37 General Cleaning 37 Cleaning the Optics 37 Cleaning the Calibration Reference 38 Replacing the Battery Pack 40 Troubleshooting 41 Screen Messages 41 Technical Specifications 42 Green Tile Color Check 43 ...

Страница 9: ...vigation control for easy screen selections measure button and power on off Packaging Your instrument packaging should contain all the items listed below If any of these items are missing or damaged contact X Rite or your Authorized Representative Ci62L RTL instrument Carrying case USB interface cable AC adapter X Rite P N SE30 277 and line cord Calibration reference On off power and navigation co...

Страница 10: ...ent and around your wrist The strap should not be used to carry the instrument 1 Feed the small looped end of the strap around the post at the back of the instrument 2 Insert the wrist strap end through the small loop 3 Pull on the wrist strap to secure to the strap post 4 Use the slide to tighten the strap around your wrist Small loop Wrist strap Strap post Tighten slide ...

Страница 11: ...agnostics test and displays a splash screen before the main menu screen appears Splash Screen Main Menu Locking the Navigation Control The power button is also used to lock the navigation control This is useful to avoid inadvertent contact with the control when taking measurements Pressing the power button toggles the navigation control to locked and unlocked A padlock icon appears in the header b...

Страница 12: ...up to 4 hours for full charge A charged battery pack may eventually lose partial charge if not used for an extended amount of time You should charge the battery from time to time and store in a cool environment when not in use to maintain battery performance Lifespan Expectations Lithium ion batteries typically decay to 80 capacity after 400 charge cycles see chart below A charge cycle can be defi...

Страница 13: ... the detachable line cord in the AC adapter and plug the line cord into the wall receptacle Connecting the USB Cable IMPORTANT You must install the software before connecting the instrument to your computer 1 Install the software application if not already installed Refer to the software documentation for additional information 2 Turn the instrument on and plug the square end of the USB cable into...

Страница 14: ... turning the instrument off and then back on will reset their operation Measure Button The Measure button is located at the front of the instrument The button can be configured to initiate a measurement or be used in conjunction with the read switch LED Indicators Multi color LEDs located at the front of the instrument provide visual feedback on the status of a measurement The LEDs will turn off a...

Страница 15: ...he same height as the item for the rest of the instrument s shoe to sit on Procedure 1 Clear the sample surface of any dirt dust or moisture 2 Position the target window over the sample to measure If possible place the entire instrument on the sample 3 Press the instrument firmly to the shoe and hold steady until the display indicates that the measurement is complete 4 Release the instrument and v...

Страница 16: ... measurement options Refer to the Measurement Mode section for information Calibration Mode The calibration mode is used to perform white reference and black trap calibrations Refer to the Calibration Mode section for information Configuration Mode The configuration mode is used to set and edit the instruments configuration options The configuration options should be set before you use your instru...

Страница 17: ...picts the current condition of the battery pack Indicates the battery pack is fully charged Indicates the battery pack has a sufficient charge for a substantial number of measurements Indicates the battery pack is low but measurements are still possible Battery pack should be charged soon Indicates the battery pack is very low and only a few measurements remain Battery pack should be charged immed...

Страница 18: ...ration icon in the Options column NOTE The arrow icon or at the end of the Options column indicates that additional options are available Move the highlight focus to the arrow icon to advance to the additional options 4 Tap the Right navigation button to enter the option settings area 5 For Option Selections Use the Up or Down navigation buttons to move the highlight focus to the desired setting a...

Страница 19: ...ger a measurement Pressure Shoe closing is required to take a measurement Button Measure button is required to take a measurement Pressure and Button Both the read switch and measure button are required to a take a measurement Averaging This option is used to set the number of measurements required for calculating a single measurement Measurements are taken at different locations on a sample to ac...

Страница 20: ...h 3 until the date and time are set 5 Tap the Right navigation button and highlight the checkmark icon in the Progress Column 6 Tap the Select button to save the date and time Delete All Samples or Standards This option is used to delete all samples or standards stored in the instrument To delete all samples or standards tap the Right side of the navigation control and select the desired delete op...

Страница 21: ...er to Appendices for calibration reference cleaning procedures The black trap should be cleaned periodically to remove any dust or contamination Refer to Appendices for black trap cleaning procedures Do not move instrument while taking a calibration measurement If motion is detected calibration will be aborted Important If the lamp signal in your instrument reaches a level that is 50 below the fac...

Страница 22: ...calibration reference 5 Position the instrument target window over the white ceramic plaque 6 Press the instrument firmly to the shoe and hold steady until the display indicates that the reading is complete Release the instrument 7 Reinstall the protective cap on the white ceramic plaque 8 Position the instrument target window over the black trap opening of the calibration reference Exit icon Cali...

Страница 23: ...rol to save the calibration and exit to the main menu 11 Store the calibration reference in a dry dust free area away from direct exposure to light NOTE If an error message appears during or after white calibration tap the Select control to clear the message and try measuring the white reference again If an error still occurs clean the white calibration reference as explained in the Appendices Bla...

Страница 24: ...he averaged measurements was close to the preset limits A red icon indicates the variation of the averaged measurements has exceeded the preset limits Compare Mode Icons A description of the icons found in the Compare mode is shown below Icon Description Toggle between L C h Gloss and Y data views Exits the averaging measurement sequence for the current standard or sample Toggle between the standa...

Страница 25: ... measurement the instrument displays Averaged 1 of 3 in the screen indicating two more measurements are required for results 8 Position the instrument on the second area of the standard and take a measurement After the measurement the instrument displays Averaged 2 of 3 in the screen indicating one more measurement is required for results 9 Position the instrument on the third area of the standard...

Страница 26: ...the instrument displays Averaged 2 of 3 in the screen indicating one more measurement is required for results 12 Position the instrument on the third area of the sample and take a measurement After the measurement the instrument momentarily displays Processing and then the averaged sample data values and difference values 13 Continue with additional sample measurements if required Measuring a Diff...

Страница 27: ...ress column 2 Use the Up or Down navigation buttons to select the Save Standard icon 3 Tap the Select button to open the confirm screen to save the standard 4 Tap the Right navigation button and highlight the Checkmark icon in the Progress Column 5 Tap the Select button to save the standard By default a saved standard is named Standard with the next available number e g Standard1 Standard2 etc NOT...

Страница 28: ...election and edit screen Arrow points to current standard selected Exits the averaging measurement sequence for the current sample Toggle between L C h Gloss and Y data views Toggle between the current standard and sample measurement screen QA Measurement To perform a QA measurement 1 From the Main screen use the Navigation control to move the highlight square to the Measure mode icon 2 Tap the Se...

Страница 29: ...e measurements are required for results 10 Position the instrument on the second area of the sample and take a measurement After the measurement the instrument displays Averaged 2 of 3 in the screen indicating one more measurement is required for results 11 Position the instrument on the third area of the sample and take a measurement After the measurement the instrument momentarily displays Proce...

Страница 30: ... P H O T O M E T E R 28 NOTE If an error occurs during a measurement try measuring the sample again If the error still occurs refer to the Troubleshooting section in the Appendices Sample data Difference data Measurement timestamp ...

Страница 31: ...nt to delete and move the highlight to the Progress Column 2 Highlight the Delete icon and tap the Select button to display the Delete Standard screen 3 Highlight the Checkmark icon in the Progress Column on the confirm screen 4 Tap the Select button to delete the selected standard Editing Standard Name To rename a standard 1 Select the standard if not already selected that you want to rename and ...

Страница 32: ...lect button 9 Continue until all characters for the name are set 10 Tap the Right navigation button and highlight the Checkmark icon in the Progress Column 11 Tap the Select button to save the name for the standard Editing Standard Tolerances Tolerances for newly created standards can be edited Up to six tolerances can be created for each standard The tolerance limit is the maximum allowable diffe...

Страница 33: ...line indicates that it is selected 4 Tap the Select button to access the option 5 Use the Up or Down navigation buttons to select the tolerance type 6 Tap the Select button to set the tolerance type 7 Use the navigation control to highlight illum obs SPIN SPEX or tolerance value NOTE Make sure the symmetric icon is displayed if tolerance attribute values are going to be set as the same value Highl...

Страница 34: ...the procedures that follow Selecting a Project To select a project 1 From the Measure screen use the Up or Down navigation buttons to move the highlight focus to the Project icon 2 Tap the Select or Right button to access the project selection area 3 Use the Up or Down navigation buttons to move the highlight focus to the desired project 4 Tap the Select button An arrow appears next to the selecte...

Страница 35: ...he Select button 9 Use the Up or Down navigation buttons as previously explained to set the character and tap the Select button 10 Continue until all characters for the name are set 11 Tap the Right navigation button and highlight the Checkmark icon in the Progress Column 12 Tap the Select button to save the name for the project NOTE To exit the name without saving highlight the Exit icon in the P...

Страница 36: ... Standards Delete All Samples or Delete This Project Tap the Select button to choose the option 4 Tap the Right navigation button and highlight the Checkmark icon in the Progress Column 5 Tap the Select button to delete the selected option Locking a Project After a project is created it can be locked to help prevent any inadvertently deleting of standards and samples To lock a project 1 Select a p...

Страница 37: ...6 Use the Up or Down navigation buttons to page through the alphanumeric list for the character location of the name NOTE You can also use the navigation control to rapidly scroll through a list by touching the control between the arrows and circle left or right 7 Tap the Select button set the character 8 Tap the Left or Right navigation button to move the two arrows to the next character space an...

Страница 38: ...ound the world You can contact us using one of the following methods To identify the X Rite service center nearest you please visit our web site at www xrite com For online help visit our web site www xrite com and click the Support link Here you can search for software or firmware updates white papers or frequently asked questions which can quickly resolve many common user problems Send an e mail...

Страница 39: ...d in water or mild cleaner NOTE DO NOT use any solvents to the clean the instrument this will cause damage to the cover Cleaning the Optics The optics should be cleaned once a week in a normal environment If the instrument is used in a dirty or dusty environment more frequent cleaning may be required Carefully lift the instrument open the shoe and blow short bursts of clean dry air into the measur...

Страница 40: ... remove the ceramic plaque from the base 3 Clean the plaque using a mild soap and warm water solution Thoroughly rinse with warm water and wipe dry with a lint free cloth Do not use solvents or cleaners of any kind 4 After the ceramic plaque is completely dry align the large tab on the side of the ceramic plaque with the large notch in the base Compress the spring downward with the ceramic plaque ...

Страница 41: ... with your fingers and separating 2 Clean with clean dry air or wipe clean with a lint free cloth to remove any dust or contamination 3 After cleaning align the two arrows on the end before reassembling the sections Note The tabs will not lock correctly if assembled in the opposite direction White ceramic plaque with protective cap Locking tabs Alignment arrows ...

Страница 42: ...access cover latch while lifting upwards on the cover to remove it from the instrument housing 3 Remove the old battery pack and dispose in a designated disposal location for recycling 4 Insert the new battery pack into the instrument with the battery contacts facing down and towards the back of the instrument 5 Reinstall the battery access cover by inserting the back edge first and then pressing ...

Страница 43: ...ration procedure fails Calibration reference is dirty or damaged Clean the reference per procedure in Appendix or replace if damaged Instrument and software not communicating Interface cable not connected Connect the interface cable between the computer and the instrument Close and restart the software application If this does not work reboot the computer Remove power from the instrument reapply p...

Страница 44: ...ab on any tile specular component included Short Term Repeatability 05 E ab on white ceramic standard deviation Lamp Life Approx 500 000 measurements Power Supply Removable Li ion battery pack 7 4 VDC rated 2400 mAh AC Adapter Requirements Input 100 240 VAC 50 60Hz Output 12 VDC 2 5 A Charge Time Approx 4 hours 100 capacity Measurements Per Charge 1 000 measurements typical Data Interface USB 2 0 ...

Страница 45: ...e color check 3 Remove the protective cap from the green tile in the calibration reference 4 Position the instrument s target window over the green tile 5 Press the instrument firmly to the shoe Hold steady until the display indicates that reading is complete 6 Release the instrument 7 Reinstall the protective cap on the green tile 8 Store the calibration reference in a dry dust free area away fro...

Страница 46: ......

Страница 47: ......

Страница 48: ......

Страница 49: ...dquarters X Rite Europe GmbH Althardstrasse 70 8105 Regensdorf Switzerland Phone 41 44 842 24 00 Fax 41 44 842 22 22 Asia Pacific Headquarters X Rite Asia Pacific Limited Suite 2801 28th Floor AXA Tower Landmark East 100 How Ming Street Kwun Tong Kowloon Hong Kong Phone 852 2568 6283 Fax 852 2885 8610 Please visit www xrite com for a local office near you P N Ci62L RTL EN Rev B ...

Отзывы: