background image

CAPSURE Cosmetic User Manual 


13


Using the CAPSURE Cosmetic Instrument 

General Use 

NOTE:

 Before procedure with a skin measurement, make sure to sanitize your hands and the 

measurement aperture of the instrument. Refer to the Sanitizing the Instrument in the 
Appendices for the procedure. 

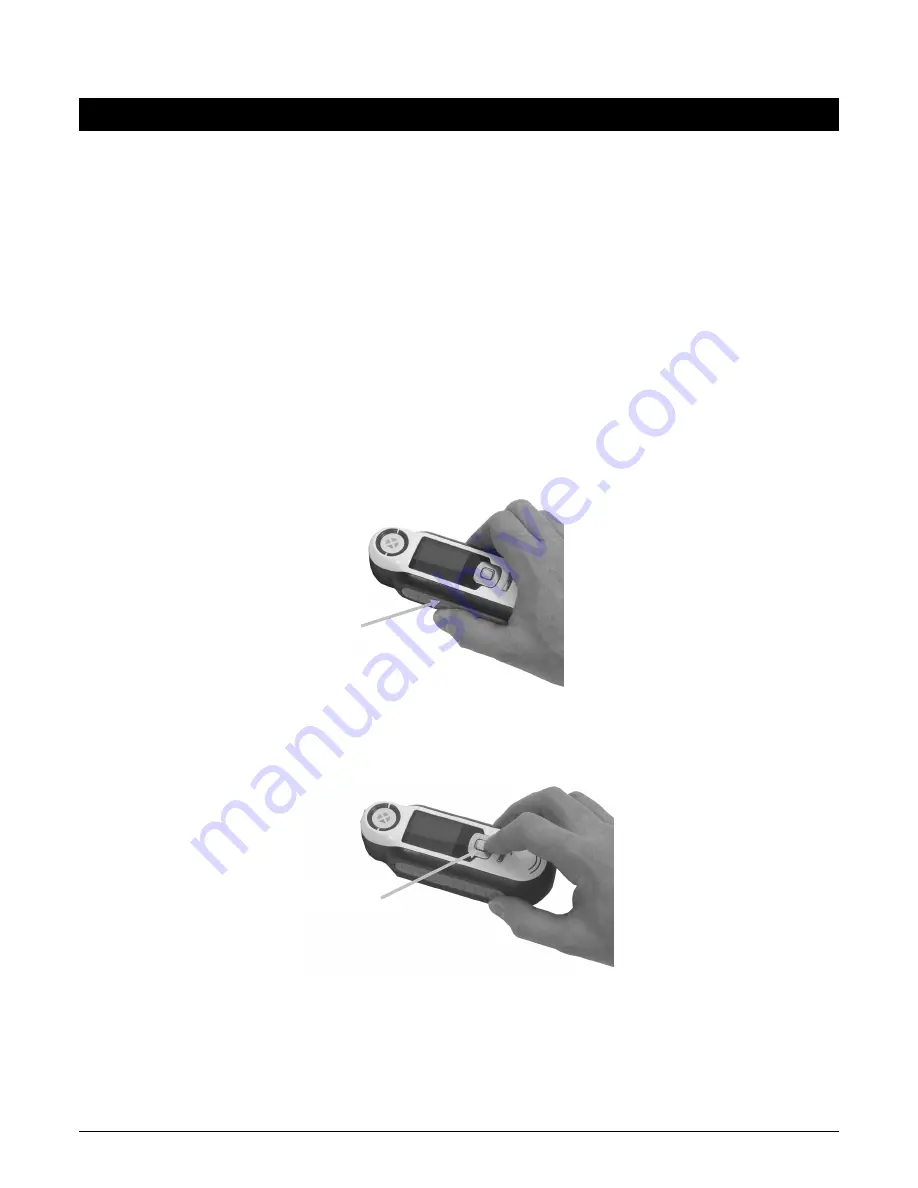
When holding the instrument by its sides, it should be easy to press the Measure button on the 
side with your thumb or index finger. 

To take a measurement, place the instrument optics flat against the customer’s skin. Lightly 
press the 

Measure

 button to enable an on screen preview for fine positioning. Hold the 

instrument steady and press the 

Measure

 button firmly and release. An audible “camera-click” 

sound indicates the start of the measurement. A progress bar appears at the bottom of the 
display to indicate the measurement status. It is important that the instrument is held steady 
for the duration of the measurement. When the progress bar reaches 100%, a match or filter 
results appear on the display. Refer to the Operation section later in this manual for additional 
details. 


Depending on the Collections selected in the Settings menu, additional filter options associated 
with the match can be displayed and selected using the Navigation control. 


Measure button 

Navigation control

Содержание CAPSURE Cosmetic

Страница 1: ...Cosmetic User Manual ...

Страница 2: ...uld you need to ship this device you may wish to consult published guidance documents by one or more of these organizations for advice on how to comply with the regulations IATA ICOA IMDG PHMSA The single cell battery contained in the CAPSURE device is 25g in weight 3 7V 1030mAh and complies with the UN 38 3 tests in effect the year it was originally shipped Instructions for disposal Please dispos...

Страница 3: ...8 EN 301489 17 V2 1 1 05 2009 EN 60950 1 2006 ITE General Requirement 2200 FCC Regulatory Information This equipment has been tested and found to comply with the limits pursuant to Part 15 of the FCC Rules These limits are designed to provide reasonable protection against harmful interference in a residential installation This equipment generates uses and radiates radio frequency energy and if not...

Страница 4: ...arranted goods caused by use of any parts or consumables not manufactured distributed or approved by X Rite v any attachments or modifications to the warranted goods that are not manufactured distributed or approved by X Rite Consumable parts and Product cleaning are also not covered by the warranty X Rite s sole and exclusive obligation for breach of the above warranties shall be the repair or re...

Страница 5: ...nd are copyrighted Any reproduction in whole or part is strictly prohibited Publication of this information does not imply any rights to reproduce or use this manual for any purpose other than installing operating or maintaining this instrument No part of this manual may be reproduced transcribed transmitted stored in a retrieval system or translated into any language or computer language in any f...

Страница 6: ...ked 17 Collections Locked 18 Measurement Setup Locked 19 Date and Time Locked 19 Reset Device Locked 19 BT Unpair Locked CAPSURE Bluetooth only 20 Volume 20 BT Standby Timer Locked CAPSURE Bluetooth only 21 Bluetooth on off Locked CAPSURE Bluetooth only 21 Security 22 Measuring 24 Filter 27 Navigator 29 Lighter Darker 30 Recalling a Saved Record 31 Delete All Records 32 Appendices 33 Troubleshooti...

Страница 7: ...ur device 2 Power on off Used to turn the instrument on and off 3 Measure button Two stage button press lightly to start preview and firmly to measure Lightly pressing this button always returns you to the Match screen 4 Navigation control Navigates the on screen menus and function bar in four directions Pressing on the left side moves the focus to the next available item to the left Pressing on t...

Страница 8: ...sual accuracy The color matches given by the instrument are meant to serve as guidelines only You should always visually confirm that the color specified by the instrument is an acceptable match X Rite is not liable and assumes no responsibility for inaccurate color identification by the instrument It is recommended that you refer to your Collections for final color acceptability Variables that ma...

Страница 9: ... A battery charging screen momentarily appears For the first time connection a language selection screen also appears Refer to the Initial Startup section on the following page for first time operation Note Some computers have low power USB ports which are typically located at the front It is recommended that CAPSURE Cosmetic is ONLY connected to high power ports During charging the instrument swi...

Страница 10: ... will need to press the Power button to turn on the instrument You can manually power down the instrument by pressing the Power button highlighting Yes from on the screen and pressing the Enter button Make sure to always position the white reference slider over the optics when powering down the instrument You will need to press the Power button to turn on the instrument when this power down method...

Страница 11: ...ol takes you back one screen 2 After the last Tutorial screen appears the calibration screen appears Instrument Calibration 1 Perform a calibration as described on the screen For additional information on calibration refer to the Calibration section later in this manual Press Enter to continue Press Right Nav Press Right Nav Continue with remaining Tutorial screens ...

Страница 12: ...and the title of the window Settings Filter Match Navigator Records Configure the instrument Select from a list of available matches Matched color and quality indictor Find alternative colors History of saved records Press Navigation control bottom Nav left Nav left Nav right Nav right Battery indicator gauge Active function Function bar active function is highlighted Performance indication Approx...

Страница 13: ... to enable an on screen preview for fine positioning Hold the instrument steady and press the Measure button firmly and release An audible camera click sound indicates the start of the measurement A progress bar appears at the bottom of the display to indicate the measurement status It is important that the instrument is held steady for the duration of the measurement When the progress bar reaches...

Страница 14: ...elected by pressing the left side of the Navigation control Select indicates that the option or item highlighted in the screen will be selected This is chosen by pressing the Enter button Exit indicates that the current screen will be closed and returned to the main match screen This is selected by pressing the right side of the Navigation control Screens that contain images of arrows indicate tha...

Страница 15: ...rence slider that protects the white reference when not in use 1 When displayed to do so move the white reference slider to the closed calibration position over the optics 2 Press Measure to initiate the calibration when the reference slider is positioned A progress bar appears at the bottom of the display to indicate the calibration status 3 After a successful calibration you are prompted to repo...

Страница 16: ...ng the left side of the Navigation control 2 Select the setting option from the list by pressing the up and down sides of the Navigation control 3 Press the Enter button to select the option Refer below for an explanation of each option Calibrate The calibration option allows you to manually initiate a calibration Refer to the Calibration section earlier in this manual for information on performin...

Страница 17: ...view the tutorial 3 Refer to the Initial Startup section earlier in this manual for information on viewing the tutorial Product Info This screen displays important instrument information Press the down side of the Navigation control to view additional information Region Locked The Region setting allows you to select a predefined product range that matches with products available in your locality V...

Страница 18: ... allowing for a color match to be found from the desired collections A Collection can also be set as a priority This allows the first match to be found to preferentially come from the priority Collection The priority Collection is highlighted with a star icon A list of the installed Collection is displayed with a red or green icon next to the name A green icon indicates that the Collection is acti...

Страница 19: ...he number 3 When finished press the right side of the Navigation control Exit to save your setting and return to the Settings window Date and Time Locked The date and time setting is used to set the current time date and format for the instrument 1 Press the left and right sides of the Navigation control to select the month day year hours minutes seconds and date format 2 Press the up and down sid...

Страница 20: ...PSURE Cosmetic Bluetooth device fails to pair or disappears from the available list of Bluetooth devices a BT Unpair may be required After unpairing repeat the connection process for Apple iOS or Andriod 1 Select the BT Unpair option from the list by pressing the up and down sides of the Navigation control 2 Press the Enter button to unpair the device An Unpair succeeded screen appears 3 Refer to ...

Страница 21: ...ess the Enter button to access the setting option 3 Press the up and down sides of the Navigation control to set the time 1 60 minutes 4 Press the Enter button to save your setting 5 Refer to the Bluetooth Device Pairing Procedure in the Appendices Bluetooth on off Locked CAPSURE Bluetooth only The Bluetooth on off option is used to turn Bluetooth on or off in CAPSURE Once on a gray Bluetooth icon...

Страница 22: ...y option can be made by selecting the security option from the settings menu 2 Press the Enter button 3 Enter the password default is 999 with the virtual keyboard using the Navigation control and Enter button 4 When finished highlight OK on the virtual keyboard and press the Enter button If the password you entered is correct the Security Deactivated message will display The device is now unlocke...

Страница 23: ...CAPSURE Cosmetic User Manual 23 5 To reactivate security press the Enter button on the highlighted menu item Activate Security your device is now locked ...

Страница 24: ...that the instrument is held steady for the duration of the measurement NOTE If averaging is activated in the Settings menu a simulated color patch for the measurement appears Continue with Step 3 for averaging information or advance to Step 4 if averaging is not used This screen indicates that two measurements are required If you want the end averaging Press the Enter Select button Continue with a...

Страница 25: ...here a sub type can be selected In this example for Coverage Matches Medium or Full type can be selected before displaying the Match screen results The measured match is shown on the top of the screen with the possible match shown on the lower portion of the screen 7 Press the up and down sides of the Navigation control to see alternative colors Colors are arranged with the closest match displayed...

Страница 26: ...ored bars in the title row of the display The bars indicate the performance of the match that was obtained One red bar indicates an ok match two yellow bars indicate a better match and three green bars indicate the best match No color bars would indicate no close match was found Best match Better match Ok match No close match The bars are for informational purpose only Three green bars is the best...

Страница 27: ...PSURE 1 With the Matches filter selected press the Enter button to view the match results 2 Press the up and down sides of the Navigation control to view each match The match results are displayed filtered in various categories After selecting a filter category you can view specific results based on that filter Matches are viewed for the filter by pressing the up and down sides of the Navigation c...

Страница 28: ...CAPSURE Cosmetic User Manual 28 Other characteristics without SPF with SPF etc Finish matte satin etc ...

Страница 29: ...es schemes for the matched color in the current Collection 1 Scroll through the available colors using the up and down sides of the Navigation control For each color a visual comparison is given against the active color and the alternate 2 To make the alternate color the active color press the Enter button All colors set as activate are saved to the Records NEW SCREEN HERE To exit without activati...

Страница 30: ...t the active color and the alternate 2 To make the alternate color the active color press the Enter button All colors set as activate are saved to the Records To exit without activating an alternate color press on the left side of the Navigation control Back to return to the Navigator screen or press the right side of the Navigation control Exit to go to the Match screen Active color swatch Altern...

Страница 31: ...rds icon in the function bar by pressing on the right side of the Navigation control 2 Scroll through the measurement records by pressing the up and down sides of the Navigation control 3 You can view more details for the selected record by pressing the Enter button to expand the record Set as active color This recalls the saved color and allows viewing of alternate colors Delete color Used to del...

Страница 32: ...ds on the instrument 1 Press the up and down sides of the Navigation control to highlight Delete all records 2 Press the Enter button You are asked to confirm that you want to delete all records 3 Highlighting Yes on the screen and press the Enter button All records are now deleted from the instrument ...

Страница 33: ...rea being measured Instrument requests a Recalibrate Recalibrate the instrument using the Calibrate function in the Settings menu Reference slider not closed continually displays after calibrating more than once You will need to perform seven calibration procedures in a row This will set a new reference point and correct the problem Screen Messages Screen messages can appear in the display during ...

Страница 34: ...not use anything other than a water dampened cloth for cleaning the exterior The measurement optics and calibration plaque should be kept clean from dust and dirt for the highest level of accuracy Cleaning the Optics The optics are recessed and therefore protected from dirt during normal usage However if the optics require cleaning follow the procedure below IMPORTANT If can air is used for cleani...

Страница 35: ...cs housing and set aside 3 Blow short bursts of clean dry air into the optics port This should remove any accumulated debris from the optics 4 Reposition the aperture over the optics housing and turn 45 clockwise to lock into place Aperture Canned air straw Optics port ...

Страница 36: ... The calibration tile is imbedded in the underside of the white reference slider 1 Opening reference slider to a halfway position 2 Blow short bursts of clean dry air onto the calibration tile This should remove any accumulated debris Calibration tile Canned air straw ...

Страница 37: ...Overvoltage Category II FAQs 1 How many color matches does the instrument store 500 color matches 2 How do I clean the instrument Please see the instructions in the Cleaning section 3 What should I do if the instrument doesn t power up If the battery is too low the instrument will not power up Charge the unit through its USB connection 4 How do I contact technical support Phone 800 248 9748 USA 41...

Страница 38: ...ps the Bluetooth connection is dropped The Bluetooth connection will automatically be remade when the CAPSURE Cosmetic awakes This process may take up to 20 seconds Preparing CAPSURE Cosmetic 1 Turn CAPSURE Cosmetic power On 2 If not already done turn the Bluetooth option on and set the Bluetooth Standby timer Refer to the Setting Menu section earlier in this manual 3 Calibrate the CAPSURE Cosmeti...

Страница 39: ...vice you must first unpair from the connected device Connecting an Android device 1 Open the Settings application 2 Touch Wireless networks Bluetooth settings 3 Check Bluetooth to turn it on Your tablet scans for and displays the IDs of all available Bluetooth devices in range If the CAPSURE Cosmetic you want to pair with isn t in the list ensure that the CAPSURE Cosmetic is turned on and Bluetoot...

Страница 40: ...ic User Manual 40 7 Once the pairing process is complete the RM200 XXXX will turn appear in your Paired devices indicating you have successfully connected your two devices The Apple or Android App can now be started ...

Страница 41: ...803 2705 European Headquarters X Rite Europe GmbH Althardstrasse 70 8105 Regensdorf Switzerland Phone 41 44 842 24 00 Fax 41 44 842 22 22 Asia Pacific Headquarters X Rite Asia Pacific Limited 36 th Floor No 169 Electric Road Hong Kong China Phone 852 2568 6283 Fax 852 2885 8610 Please visit www xrite com for a local office near you CAPSURE COSMETIC_EN Rev A ...

Отзывы: