


7
R
E
P
A
I
R
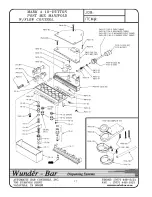
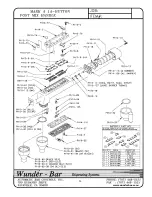
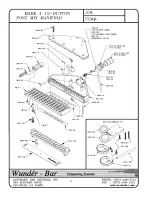
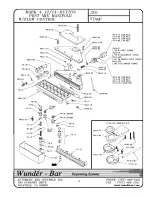
REPLACING VALVE PLUNGER ASSEMBLY
(product leaks thru nozzle
)
IMPORTANT: Confirm that all shut-offs are in the OFF (closed) position be-
fore replacing a valve stem (
Fig.16, page 6
). Press the buttons for all posi-
tions to be serviced, to relieve pressure between the manifold and handle.
Remove both button plate screws and the button plate and set them aside.
Remove all of the bottom plate screws and the bottom plate. NOTE: Refer
to the numbers printed on the locking hat plate to locate the valve plunger(s)
to be replaced. Remove the locking hat plate (
Fig.22
) and set it aside. Use
the locking hat plug tool (p/n PH10-126), or a small blade screwdriver, to
turn the desired locking hat plug 90 degrees (
Fig.23
). Remove the locking
hat plug (with spring) and O-ring for every valve plunger to be replaced
(
Fig.24
). Hold the dispenser in the palm of your hand with the nozzle point-
ing down. Push the desired plunger stem, from the top of the dispenser,
downward into the palm of your hand, using the tip of the metal stem on a
spare valve plunger stem (
Figs.25,26
).
Install a replacement (cream colored) Santoprene® rubber valve plunger
stem back into the valve cavity, all the way, up through the stem O-ring.
Position the locking hat plug, with spring and O-ring, onto the slotted end of
the locking hat plug tool (
Fig.24
). Position the hat plug, with spring and O-
ring, into the valve cavity (
Fig.27
). The spring should be positioned into the
hole in the bottom of the rubber valve stem.
TIP
: The o-ring can be seated easier by rotating the hat plug back and forth,
1/8th turn, as the hat plug is being inserted into the valve cavity (
Fig.27
).
Lightly push the hat plug, with o-ring, into the valve cavity and then turn the
locking hat plug 90° to the locked position (
Fig.28
).
Repeat this process for all valve stems to be replaced. Replace the locking
hat plug plate so that the numbers are readable while holding the handle
with the nozzle away from you (
Fig.29
). Install the bottom plate and screws
(
Fig.30
). DO NOT OVERTIGHTEN THE BOTTOM PLATE SCREWS.
Fig.22
MARK 4 MANUAL
www.wunderbar.com
Fig.23
Plug Tool
Locking
Hat Plug
Fig.24
Fig.25
Fig.26
Fig.27 Fig.28
Fig.29
Fig.30
Содержание Mark 4
Страница 15: ...15 15 www wunderbar com ...
Страница 16: ...16 16 www wunderbar com ...
Страница 17: ...17 17 www wunderbar com FR 73 ...
Страница 18: ...18 18 www wunderbar com ...
Страница 19: ...19 20 www wunderbar com ...
Страница 20: ...20 19 www wunderbar com ...
Страница 21: ...21 21 www wunderbar com ...
Страница 22: ...22 www wunderbar com 22 FR 73 ...
Страница 23: ...23 23 www wunderbar com ...
Страница 24: ...24 24 www wunderbar com ...
Страница 25: ...25 25 www wunderbar com ...
Страница 26: ...26 26 www wunderbar com ...


