11
10
Lawn mower
En
11
10
Position
Height of cutting
6
20mm
5
28.7mm
4
39.3mm
3
50mm
2
60.4mm
1
70mm
MOwING
For cutting convenience, it may be best to start
mowing at a point close to the power supply
and to work your way away from the supply.
Mow the lawn at a right angle from the power
supply and place the power cable to side
which has already been cut.
waRNING! when mowing do
not allow the motor to labour
particularly in heavy conditions. when
the motor labours the speed of the
motor drops and you will hear a change
in the motor sound, when this occurs
stop mowing, release the switch lever
and raise the height of cut. Failure to do
so could damage the machine.
MAInTEnAnCE
Remove the plug from the socket before
carrying out any adjustment, servicing or
maintenance.
Your power tool requires no additional
lubrication or maintenance.
There are no user serviceable parts in your
power tool. Never use water or chemical
cleaners to clean your power tool. Wipe clean
with a dry cloth. Always store your power tool
in a dry place. Keep the motor ventilation slots
clean. Keep all working controls free of dust.
Occasionally you may see sparks through the
ventilation slots. This is normal and will not
damage your power tool.
If the supply cord is damaged, it must be
replaced by the manufacturer, its service
agent or similarly qualified persons in order to
avoid a hazard.
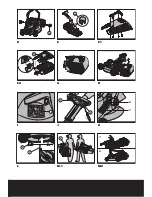
bLaDE MaINTENaNCE (See L)
Never carry out any assembly
operations or adjustments with the
power connected to the mower. Always
ensure that the power button is in the
off position and that the power plug is
disconnected from the supply. Always handle
the blade with care-sharp edges could cause
injury use gloves.
Follow these procedures to remove and
replace the blade. You will need garden
gloves (not provided) and a spanner wrench
(not provided) to remove the blade. Hold the
blade (13) and unscrew the blade bolt (7)anti
clockwise using a spanner wrench. Remove
blade and attach a new one to the blade bolt.
Ensure that the blade is properly positioned as
seen in Fig. L, and then firmly tighten the bolt.
DO NOT OVER TIGHTEN.
Renew your metal blade after 50hrs mowing
or 2 years ,which ever is the sooner-regardless
of condition.
If the blade is cracked or damaged replace it
with a new one.
STORAGE
Rotate the upper Handle knob to release
the lower pushing nod.
Clean the exterior of the machine thoroughly
using a soft brush and cloth. Do not use water,
solvents or polishes. Remove all grass and
debris, especially from the ventilation slots.
Turn the machine on its side and clean the
blade area. If grass cuttings are compacted
in the blade area, remove with a wooden or
plastic implement.
Store the machine in a dry place. Do not place
other objects on top of the machine.
Rotate the Upper Handle knob (4) to release
the handle joint ,it could be folded. You could
carry the mover by middle carry handle (11)
and front carry handle(12).(See M.1 ,M.2)
To aid storage loosen the wing nuts and fold
the handles.
Ensure cables are not stuck or entangled when
folding or unfolding top handles.
Do not
drop the handles.
Содержание WG711E
Страница 2: ......
Страница 3: ......
Страница 4: ...a b c...
Страница 5: ...18 16 1 1 2 6 4 14 13 7 D E F 1 F 2 G I H J K L M 1 M 2...
Страница 96: ...GR 96 1 2 3 4 5 6 7 L 8 9 10 11 12 13 L 14 15 16 D 17 18...
Страница 97: ...GR 97 220V 240V 50Hz 60Hz 1600W 3500 min 40cm 20 70mm 6 50L 18 3kg 83 dB A 96 dB A 85 dB A 5 0m s2 1 1 1 2 1...
Страница 98: ...GR 98 1 2 3 4 1 RCD 30mA 2 3 4 5 1 2 3 4 5 6 7 8 9 10 11 12...
Страница 99: ...GR 99 13 14 15 1 2 3 4 5 6 7 1 0mm2 10 8 9 Zmax 0 38 0 24JOHM...
Страница 100: ...GR 100 C D 17 C D 14 15 F 1 10 F 2 G 9 8...
Страница 101: ...GR 101 18 9 8 8 9 9 J J 2 1 1 20 mm 70 mm 6 6 20mm 5 28 7mm 4 39 3mm 3 50mm 2 60 4mm 1 70mm...
Страница 102: ...GR 102 L 13 7 L 50 2 4 11 12 M 1 M 2...
Страница 104: ......


