Operation
18
5. Use the AF13 open-ended spanner to tighten the screw so that the support foot
has been securely mounted.
6. Repeat steps 2 to 5 with the second support foot.
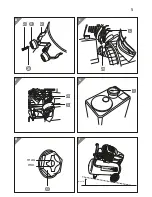
Inserting the oil plug
− Remove the transport cap from the oil fill opening
26
.
− Screw the oil plug
4
clockwise into the threading of the oil fill opening (see
Fig. E
).
Mounting the air filters
− Mount the air filters
5
by screwing an air filter into the threading of each air
inlet
25
in a clockwise direction (see
Fig. F
).
− Make sure that the two air filters are correctly and securely screwed onto the
threadings.
Operation
NOTICE!
Risk of damage!
Operating the compressor with long feed lines, extension cords or cable drums
could cause a voltage drop and prevent the motor from starting.
− If possible, do not use any long feed lines, extension cords or cable drums.
NOTICE!
Risk of damage!
If you set up the compressor in an unsuitable location or handle it improperly,
you could damage the compressor.
− Place the compressor on an easily accessible, level, dry and sufficiently stable
work surface. Do not place the compressor on the edge of the work surface.
− Avoid any build-up of heat by not setting the compressor up directly against
a wall or similar. Make sure that the vents are not obstructed. There must be
at least 1 m of distance between the compressor and the walls.
− Make sure that the compressor is not able to move from its position during
operation.
− Always place the compressor on the support feet feet during operation.
− Do not place the compressor on or near hot surfaces.
Содержание GPAC2200
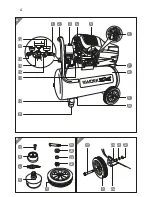
Страница 4: ...4 A B C 1 2 3 4 6 7 8 9 10 11 12 13 14 15 16 17 18 5 5 4 11 23 9 19 22 21 20 9 24 20 21 22 19...
Страница 5: ...5 D G min max H Max 10 I 23 11 12 20 3 13 F 25 5 E 26 4...
Страница 34: ......
Страница 35: ......

