background image

the collection bag or shredded material.

How do I replace the blades?

1. Ensure that the shredder is switched off and disconnected from the mains

supply.

2. Remove the top feed assembly by unscrewing the reamer knob securing it to

the body of the machine.

3. The blades have two cutting edges. When the blades become worn they can

be reversed to use the second cutting edge.

4. It is recommended that work gloves be used when replacing the blades.
5. Lock the blade disc using hex spanner. Unscrew the two inner hexagonal

headed screws and note the position of the cutting angle of the blade.

6. Remove the blade and rotate it through 180 degrees and fit the blade to the

blade disc ensuring that the ground cutting edge is facing downwards.

7. Repeat this for the other blade.          

When both cutting edges of the blade have become worn they must be replaced
as   a   pair.   The   blades   can   be   re-sharpened,   but   this   must   be   done   by   an
experienced person using an oil stone. We do not recommend this be done as the
weight of each blade is critical to maintain the balance of the cutting disc. Any
imbalance   could   cause   damage   to   the   machine   and   possible   injury   to   the
operator.

How do I maintain this product?

1.

Warning

:   During   maintenance   and   cleaning   ensure   the   machine   is

disconnected from the mains.

2. When  the  appliance   is  stopped   for  servicing,   inspection,   or storage,  or  to

change   an   accessory,   switch   off   and  pull  the  plug   from   the   mains  supply
before making any inspections, adjustments, etc.

3. If an extension cord is used it shall not be of lighter grade than the supply

cord already fitted to the appliance.

4. Check the supply and any extension cord regularly for damage or signs of

ageing. Do not use the appliance, if the cords are damaged.

5. When servicing the cutting means be aware that, even though the motor will

not start due to the interlock feature of the guard, the cutting means can still
be moved if the motor is turned by hand.

6. Never attempt to override the interlock feature of the guarding.
7. Remove deposited matter from the machine using a brush.
8. Always clean the machine after use. Clean the plastic body and plastic parts

using soap and a moist cloth. Do not use aggressive agents or solvents for
cleaning.

9. Never clean the shredder with a jet of water or by rinsing. Make sure that no

water is allowed to enter into the shredder.

10. Use only the recommended accessories and attachment for this shredder.

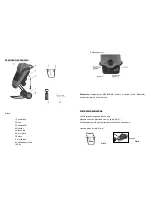
Hex spanner

Screwdriver

Rotate blade 180

°

Remove  2  hex 
headed screws

Fig.10

Содержание WPSH105

Страница 1: ...ar with the owner s manual before attempting to operate this equipment Preparation 1 Do not allow children to operate this equipment 2 Do not operate this equipment in the vicinity of bystanders 3 Do...

Страница 2: ...ember that operating the starting mechanism on engine powered machines will still cause the cutting means to move 10 Keep all guards and deflectors in place and in good working condition 11 Do not tra...

Страница 3: ...the machine itself e g changing parts repairs cleaning and adjustment WARNING Always wear safety glasses ear muffs and protective gloves WARNING Do not use the shredder in the rain or damp conditions...

Страница 4: ...ool Keep cutting blade sharp and clean for better performance Follow instructions for lubrication and changing accessories Inspect tool cable periodically and if damaged have it repaired by an authori...

Страница 5: ...heat oil and sharp edges Ensure that the cable is arranged so that it cannot be tripped over stepped on or have heavy weights rested on it Make sure the cable will not be subjected to any damage 7 Do...

Страница 6: ...ne over onto its head Insert the Axle through the pre drilled holes in the foot Fig 3 Select the support A and B which are identified by the letter stamped on the actual support Insert the foot into t...

Страница 7: ...des Please keep at safe distance 9 Ensure the shredded material can fall freely from the discharge chute 10 To make finer compost the shredded material can be shredded for a second time 11 Do not allo...

Страница 8: ...rea c Return the top section and tighten the reamer knob d Leave motor a few minutes to cool down e Reconnect to the power supply and press the circuit breaker button f When ready to start shredding p...

Страница 9: ...o the operator How do I maintain this product 1 Warning During maintenance and cleaning ensure the machine is disconnected from the mains 2 When the appliance is stopped for servicing inspection or st...

Страница 10: ...N VOD NA POU ITIE SLOVENSKY DRVI Z HRADN HO ODPADU...

Страница 11: ...zariadenia je potrebn by ve mi opatrn aby 21 Ak sa dostan cudzie predmety do plniaceho lievika alebo zariadenie za ne vyd va nezvy ajn zvuky alebo za ne vibrova zariadenie okam ite vypnite a nechajte...

Страница 12: ...c k bel nem iadne zn mky po kodenia pl a 7 D vajte pozor na nap jac k bel aby nedo lo k po kodeniu alebo n hodn mu vypnutiu 8 Nap jac k bel plne rozvi te aby nedo lo k prehriatiu UPOZORNENIE Pred pou...

Страница 13: ...Dlh vlasy je potrebn schova Pou vajte ochrann prostriedky Pou vajte ochrann okuliare t t a respir tor ak je potrebn Pri dlh om pou van zariadenia alebo zv enej hlu nosti pou vajte chr ni e sluchu Net...

Страница 14: ...lov v opa nom pr pade m e d js k nebezpe n mu ohrozeniu obsluhy Nepok ajte sa otv ra kryt motora Nap jac k bel zariadenia by mal by vymenen v autorizovanom servisnom stredisku al ie bezpe nostn pokyny...

Страница 15: ...cka 10 K 11 N sypn otvor Pozn mka Neprekra ujte MAXIM LNE rozmery drven ch vetiev Maxim lny priemer z vis aj od tvrdosti dreva ZOSTAVENIE ZARIADENIA Oto te zariadenie opa ne hlavou dole Nasu te osku c...

Страница 16: ...a s drven m Isti sa aktivuje v nasleduj cich pr padoch d Nahromaden drven materi l okolo rezn ho disku e Pokia je drven materi l v ako v kon motora f Ve k ho odporu proti rezn m no om V pr pade aktiv...

Страница 17: ...ry nikdy nesm by zakryt zbern m vakom alebo rozdrven m materi lom V mena rezn ch no ov 8 Vypnite zariadenie a vytiahnite z str ku zo z suvky 9 Uvo nite dr adlo krytu a odmontujte kryt 10 Rezn no e maj...

Страница 18: ...K 1 5 m s2 EC Declaration of conformity We declare under our sole responsibility that this product is in conformity with the following standards or standardizeddocuments EN 55014 1 A1 2009 EN 55014 2...

Страница 19: ...e opatren d tumom predaja pe iatkou pr slu nej predajne a podpisom pred vaj ceho ktor t mto potvrdzuje riadne prevedenie a funkciu v robku 4 Reklam ciu uplat uje u predajcu kde ste n radie alebo stroj...

Отзывы: