background image

FITTING THE DIVERTER VALVE AND CODE PLUG

6 720 645 222a (2012/05)

11

4.3

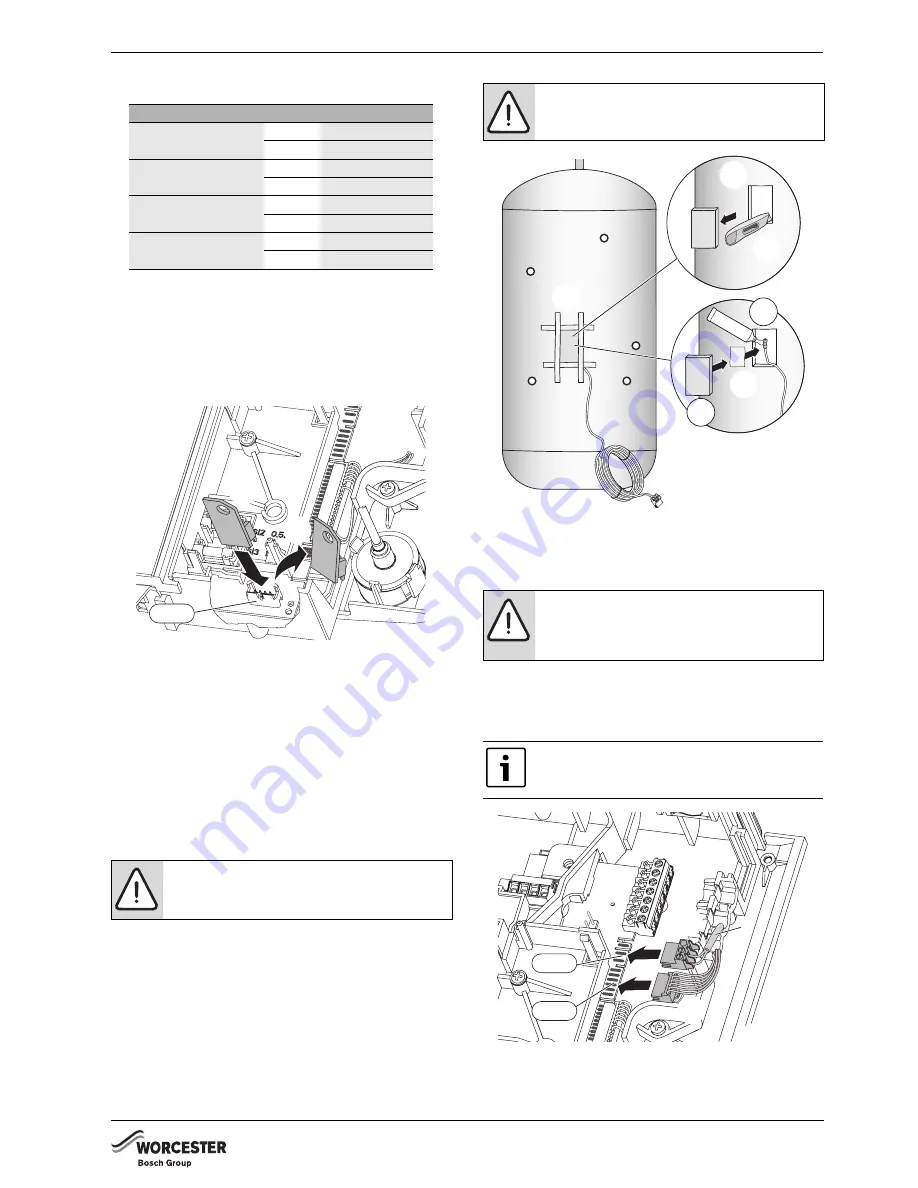
FITTING THE CODE PLUG

1. Refer to figure 14. Remove the code plug from the 

controller, cut the tie securing the plug to the boiler 

chassis and discard the plug and tie.

2. Fit the code plug from the kit making sure that code 

plug is secured to the boiler chassis with the new tie.

B

Confirm that the number on the code plug 

corresponds to the boiler type in the table above.

Fig. 14 Fitting new code plug

4.4

FITTING THE CYLINDER 
TEMPERATURE SENSOR

Refer to the cylinder installation instructions for the 

position of the sensor, there may already be a “sensor 

pocket” available. If no “pocket” is available, for foam 

insulated cylinders only with no metal jacket, follow the 

steps below.

1. Mark a rectangular hole of approximately 50 by 

100mm approximately one third of the cylinder length 

from the bottom of the cylinder.

1. Using a sharp knife, cut through the insulation, 

remove and retain the piece of insulation.

2. Apply heat conductive paste to the sensor and place 

the sensor on the cylinder body in the middle of the 

cut-out.

3. Hold the sensor in position with a piece of aluminium 

tape.

4. Replace the insulation material.
5. Secure the insulation in place with suitable cloth 

tape.

Fig. 15 Sensor connection to cylinder

4.5

DIVERTER VALVE AND SENSOR 
CONNECTIONS

1. Connect the Diverter valve motor harness to the edge 

connector ST17.

2. Connect the cylinder temperature sensor (1) to the 

edge connector ST15.

Fig. 16 Diverter motor and sensor connections

B

Replace the control panel cover.

B

Move the control panel to the up position and secure.

Boiler size

Gas

Code plug no.

12kW i System kit

NG

1118

LPG

1119

15kW i System kit

NG

1122

LPG

1123

18kW i System kit

NG

1126

LPG

1127

24kW i System kit

NG

1114

LPG

1115

CAUTION: 

Cut carefully!

B

Do not to pierce the wall of cylinder.

B

Do not cut any metal insulation jacket.

6720645222-10.1Wo

1.

2.

ST18

NOTICE: 

Figure 15 applies only to foam 

covered open vent cylinders.

NOTICE: 

Do not route low voltage cables 

alongside mains voltage cables.

This can cause interference on the low 

voltage cables.

If the ST15 connector and sensor is being 

used do not connect ST8 as well.

The link is not required.

6720645222-24.1Wo

6.

3.

4.

5.

2.

1.

1

6720645222-11.1Wo

1.

2.

ST15

ST17

Содержание Gas boiler

Страница 1: ...s contain 1 Copper return pipe 1 Brass service valve 1 15mm Compression nut 1 15mm Olive 1 Diverter valve motor 1 Diverter valve harness 2 Screws 2 Code plugs 1 Code plug tie Diverter valve kit numbers 12kW 7 716 192 566 15kW 7 716 192 567 18kW 7 716 192 568 24kW 7 716 192 409 Code plug numbers 12i System Natural gas 1118 L P G 1119 15i System Natural gas 1122 L P G 1123 18i System Natural gas 112...

Страница 2: ...RTER VALVE CODE PLUG 10 4 1 Fitting the diverter valve motor 10 4 2 Access to the code plug 10 4 3 Fitting the code plug 11 4 4 Fitting the cylinder temperature sensor 11 4 5 Diverter valve and sensor connections 11 5 ELECTRICAL 12 5 1 Internal diverter valve with a vented cylinder 12 5 2 Internal diverter valve with an unvented cylinder 13 5 3 Position of wired components 14 6 PRE COMMISSIONING C...

Страница 3: ...CHMARK CHECKLIST OR A CERTIFICATE CONFIRMING COMPLIANCE WITH IS 813 EIRE ONLY AND THE USER MANUAL WITH THE OWNER OR AT THE GAS METER AFTER INSTALLATION OR SERVICING THE BENCHMARK CHECKLIST CAN BE FOUND IN THE BACK PAGES OF THE INSTALLATION MANUAL ABBREVIATIONS USED IN THIS MANUAL Safety instructions in this document are framed and identified by a warning triangle which is printed on a grey backgro...

Страница 4: ...e COSHH Regulations Control of Substances Hazardous to Health Regulations 1988 COMBUSTION AND CORROSIVE MATERIALS Do not store or use any combustible materials paper thinners paints etc inside or within the vicinity of the appliance Chemically aggressive substances can corrode the appliance and invalidate any warranty FITTING AND MODIFICATIONS Fitting the appliance and any controls to the applianc...

Страница 5: ...r central heating systems BS6798 Installation of gas fired boilers of rated input up to 70kW net Irish Standards The relevant Irish standards should be followed including ECTI National rules for electrical installations IS 813 2002 for Domestic Gas Installations LPG Installations An appliance using L P G must not be installed in a room or internal space below ground level unless one side of the bu...

Страница 6: ...ith wall frame NOTICE Fitting the service valve B Refer to figure 2 B The service valve 7 from the Optional Diverter Valve Kit must be fitted and secured to the wall mounting frame with two screws 8 supplied before the wall mounting frame is fitted to the wall Further guidance on pipe routing can be found printed on the boiler template supplied with the boiler 1 2 3 4 5 6 6720645222 12 1Wo Functio...

Страница 7: ...liding it free from the flange on the clamping plate Make sure that the other brass bung assembly is retained in place 3 Remove the copper pipe from the Optional Integral Diverter Valve Kit and feed the flat end of the pipe through the rear of the boiler as shown 4 Before fitting the pipe check that the seal is in position on the plastic moulding Slide the flat end of the pipe under the flange on ...

Страница 8: ...ounting frame by the two brackets positioned left and right at the top rear of the appliance Do not lift the appliance by the air gas manifold There are two handling holes incorporated into the inner casing left and right in the lower section of the appliance Fig 6 Hanging the boiler CAUTION B ISOLATE THE MAINS GAS SUPPLY BEFORE STARTING ANY WORK AND OBSERVE ALL RELEVANT SAFETY PRECAUTIONS The bon...

Страница 9: ... the hydraulic manifold situated to the left of the pump B Remove and discard the plastic cap from the expansion vessel flexible pipe 1 Refer to figure 8 release the retaining clip 2 Remove and discard the orange plastic blanking plug 2 from the pressure vessel connection at the hydraulic manifold Fig 8 Blanking plug removal 1 Refer to figure 9 and insert the expansion vessel flexible pipe it to t...

Страница 10: ...et on the diverter valve motor 3 Slide the protective cover over the diverter valve motor Fig 11 Fitting Diverter motor and cover 4 2 ACCESS TO THE CODE PLUG 1 Referring to figure 12 unscrew the three screws in the control panel 2 Pull off the connections cover Fig 12 Removing the connection cover B Identify ST18 the code plug and connector Fig 13 Connector locations 1 6720645222 07 1Wo 3 2 1 6720...

Страница 11: ...e the sensor on the cylinder body in the middle of the cut out 3 Hold the sensor in position with a piece of aluminium tape 4 Replace the insulation material 5 Secure the insulation in place with suitable cloth tape Fig 15 Sensor connection to cylinder 4 5 DIVERTER VALVE AND SENSOR CONNECTIONS 1 Connect the Diverter valve motor harness to the edge connector ST17 2 Connect the cylinder temperature ...

Страница 12: ...ness from diverter valve motor to ST17 see following page Fig 17 NOTICE B Mains supply to the boiler must be through a fused double pole isolator situated adjacent to the appliance The isolator must have a contact separation of 3mm minimum in both poles External fuse rating 3A B When stripping wires always ensure copper strands do not fall into the control box B There should be no external wiring ...

Страница 13: ...not polarity sensitive CONNECTOR LOCATIONS Fig 19 Electrical connector information 6720645222 20 1Wo L NS N LS LR N blue brown green yellow live switched live neutral E 230V MAINS SUPPLY L Cylinder temperature sensor Twin Channel Programmer Room Thermostat HIGH LIMIT THERMAL CUT OUT HOT WATER CONTROL THERMOSTAT DUAL THERMOSTAT Frost Thermostat FS FR NP LP ST6 6720643895 43 1Wo 6720645222 09 1Wo ST...

Страница 14: ...ONS DT20 OR DT20 RF OR DT10 RF under blanking cover on fascia Live Supply Live Return Neutral Live Orange Blue Yellow Green Black Colour sequence Purple Purple Red Red Orange Orange Colour sequence 230V AC 9V 25V PRE WIRED LINK EMS BUS contacts for FX controls Outside sensor FW 100 B B 4 2 1 A F Wall plate contacts for FX controls B B EXTERNAL FROST STAT OPTIONAL ST15 Cylinder temperature sensor F...

Страница 15: ...pply check the gas pipework connections and rectify any leaks 3 Check that the condensate pipe has been connected to the syphon 4 Check pressure relief drain pipe is correctly fitted and securely tightened NOTICE If the boiler is not to be commissioned immediately then B after successfully completing all of the checks and any rectification work close the gas and water valves shut off the gas suppl...

Страница 16: ... across 7 and 9 If the HW now functions there is likely to be a problem with the cylinder stat or wiring to the stat FOR ALL BOILERS WITH INTERNAL OR EXTERNAL CONTROLS Burner lights then goes out in DHW or CH mode Does the boiler run normally with the front cover off and then fail when the cover is put back on If yes there is likely to be a flue problem either the air inlet is blocked or the inner...

Страница 17: ...d Fan modulation to achieve set temperature 40 82 C END OF BOILER DEMAND Gas valve OFF Pump run 3 minutes Fan run 30 seconds Over temperature shut down if water tempera ture is 5 C above set value Gas valve OFF Fan overrun 30 seconds 3 minute pump over run Spark ignition and gas 4 seconds NO YES Room thermostat and or mains programmer ON or link fitted at ST10 AND Facia mounted programmer if fitte...

Страница 18: ...d Internal boiler temperature rises above 12 C Central heating demand switches off Pump switches off after a 3 minute overrun period Central heating demand is activated Pump runs for 3 minutes to dissipate heat from the boiler into the system End of boiler demand central heating or domestic hot water AUTOMATIC INTERNAL FROST FUNCTION PUMP OVERRUN FUNCTION A central heating demand activated pump ru...

Страница 19: ...BOILER FUNCTION 6 720 645 222a 2012 05 19 NOTES ...

Страница 20: ... Worcester Bosch Group is a brand name of Bosch Thermotechnology Ltd worcester bosch co uk 6 720 645 222a 2012 05 WORCESTER BOSCH GROUP TECHNICAL SUPPORT 0844 892 3366 APPOINTMENTS 0844 892 3000 SPARES 01905 752571 LITERATURE 0844 892 9800 TRAINING 01905 752526 SALES 01905 752640 ...

Отзывы: