background image

40

FR

Informations générales

Merci d‘avoir acheté le Caméra Intelligente 
Woox.

Pour une installation et une utilisation 
cor rec tes de ce produit, veuillez lire 
attentivement ces instructions.

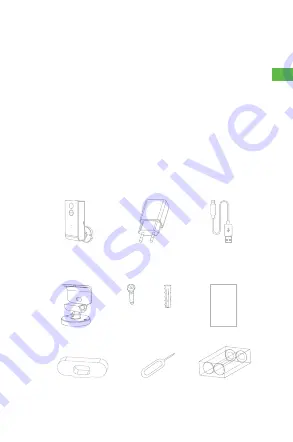
Qu'y a-t-il dans la boite


Caméra intelligente x 1         Alimentation x 1              Câble usb x 1


A x 2

B x 2


          Soutien x 1                   Vis (2 types)                      Utilisateur


                Caoutchouc                      épingle                         Boîte de batterie 

Содержание R4057

Страница 1: ...Version 1 1 20190404 R4057 User manual P1 Handbuch P21 Manuel utilisateur P40 Manuale utente P60 Manual de usuario P78 ...

Страница 2: ...Woox Smart Camera For the proper installation and use of this product please read these instructions carefully What s in the box Smart camera x 1 Power adapter x 1 USB cable x 1 A x 2 B x 2 Bracket x 1 Screws 2 kinds User manual x 1 Rubber Pin Battery case ...

Страница 3: ... EN Overview Install Lens Power Status Light Speaker Battery compartment Reset SD card slot Micro USB PIR Microphone 1 Fix the bracket to the wall 2 Install rubber NOTE remove the rubber before resetting ...

Страница 4: ...tatus Blinks in red Ready to setup or connecting to WiFi Lights up in solid blue Camera is on Lights up in solid red Network is abnormal 4 Adjust the camera s proper angle 3 Slide the camera slowly into the bracket in the direction of the arrow ...

Страница 5: ...router 2 4 GHz Woox home app Setting up the Smart Camera via the Woox home app 1 Connect your smartphone to the same WiFi network that you intend to connect the camera to 2 Install the Woox home app by searching Woox home in the Google Play Store for Android devices or the App Store for iPhone ...

Страница 6: ...the privacy policy Choose your region by selecting the Country Code Enter your email address or phone number and Tap Continue Enter the confirmation code sent to the email address or phone number you provided and assign a password Tap Add Home Enter your Home Name to assign a name to ...

Страница 7: ...our devices Choose a room e g Bedroom in which you want to use the device Tap Done to complete creating the profile 4 Setting up the Camera Tap Add Device or Tap the symbol in the top right corner of the app Tap on the Camera option Ensure the LED indicator is flashing in red ...

Страница 8: ...nds until the LED starts to flash There are two methods of WiFi connection QR mode net pairing and Wi Fi Direct mode The default setting of this product is QR mode net pairing mode To switch between QR mode net pairing and Wi Fi Direct mode click the other modes at the top right corner on Add device page ...

Страница 9: ...step to confirm if the indicator flashes rapidly in red Only 2 4GHz WiFi is supported Enter the WiFi password and confirm Scan QR code with the camera Hold the camera 15 to 20 cm in front of the mobile phone to make sure QR code can be scanned successfully ...

Страница 10: ... Smart Camera and Tap Save to confirm Allocate the Smart Camera to a room optional Tap Done to complete connecting the Smart Camera Congratulations you have now setup the Smart Camera for use with the app Wi Fi Direct mode alternitive method Select WiFi Direct in Other modes menu at the top right corner of Add device page Tap next step to confirm if the indicator flashes rapidly in red ...

Страница 11: ... register it to your account Assign a name to the Smart Camera and Tap Save to confirm Allocate the Smart Camera to a room optional Tap Done to complete connecting the Smart Camera Congratulations you have now setup the Smart Camera for use with the app If the installation is not successful restart the app and try again ...

Страница 12: ...11 EN Connect Smart Camera to Amazon Alexa Start the Alexa app Click button in the top left corner Click Skills Games Search for the Woox home skill Tap on the Woox home skill ...

Страница 13: ...12 EN Tap Enable Enter your Woox home app account and password then tap Link Now Tap Authorise ...

Страница 14: ...x home account is linked to Amazon alexa Tap DISCOVER DEVICES to link Smart Camera to Alexa Now your Woox home account is linked to Alexa All the smart devices in your Woox home account will now also be in the Alexa app ...

Страница 15: ...14 EN Connect Smart Camera to Google Assistant Start the Google Home app Tap button Tap Settings Tap Assistant and Home control Tap button in the bottom right Search Woox home action and tap it ...

Страница 16: ...15 EN Enter your Woox home app account and password then tap Link Now Tap Authorise Now your Woox home account is linked to ...

Страница 17: ...ion mode The LED indicator should be blinking in red Checking whether WiFi password is correct If your router is a dual band router meaning it supports both 5 0Ghz and 2 4Ghz networks be sure the SSID network name is different for each You will need your mobile device to be connected to the 2 4Ghz during setup the system only supports 2 4Ghz not 5 0Ghz Enable router s broadcasting function ...

Страница 18: ...t again 2 Smart Camera is offline Please remove the Camera and set it up again 3 Alexa can not find the Smart Camera Please try to disable Woox home skill and enable it again 4 SD card can not be identified It is recommended to plug in the SD card with the device powered down Confirm the SD card is formatted as FAT32 Maximum supported size is 128GB 5 Why is the camera still in the app after resett...

Страница 19: ...rly Check the wifi connection place the camera close to the router If this fails it is recommended to remove the device and add it again 7 Why I can t get the notifications with my cell phone App Please confirm that the App has been running on the phone and the relevant reminder function message notification and authority confirmation permission in the mobile phone system have been opened Tech sup...

Страница 20: ...nd tap Confirm in the pop up When the device has been removed the status LED will flash The Smart Camera has now been reset and is ready to be connected to a network again Please don t use reset button to reset the camera if it is already set up with Woox home app For security reasons the connected camera can only be removed from within the Woox home app ...

Страница 21: ... supply Micro USB port Resolution Two way audio Motion detection Micro SD card Audio WLAN Standard Encryption Operation conditions R4057 Battery DC 5V 1A 1920x1080P Support Support Max 128GB Built in Microphone 802 11 b g n 2 4GHz WPA WPA2 20 50 90 RH ...

Страница 22: ...schieden haben Lesen Sie diese Anweisungen sorgfältig durch um die korrekte Installation und Verwendung dieses Produkts zu gewährleisten Was ist im Paket Intelligente Kamera x 1 Netzteil x 1 USB Kabel x 1 A x 2 B x 2 Halterung x 1 Schrauben 2 Arten Benutzerhandbuch x 1 Gummi Stift Batteriefach ...

Страница 23: ...ren Linse Betriebs und Statusanzeige Lautsprecher Batteriefach Zurücksetzen SD Karten slot Micro USB PIR Mikrofon 1 Befestigen Sie die Halterung an der Wand 2 Gummi einlegen HINWEIS Entfernen Sie den Gummi vor dem Zurücksetzen ...

Страница 24: ... in rot bereit zu verbinden oder In Verbindung leuchtet in stark blau Kamera ist eingeschaltet Leuchten in stark rot Netzwerk ist nicht stabil 4 Stellen Sie den richtigen Ecke der Kamera ein 3 Schieben Sie die Kamera langsam in Pfeilrichtung in die Halterung ...

Страница 25: ...t router 2 4 GHz Woox home app Einrichten des Smart Kamera über die Woox Home App 1 Verbinden Sie Ihr Smartphone mit demselben WLAN Netzwerk mit welchem Sie den Smart Kamera verbinden möchten 2 Installieren Sie die Woox home app suchen Sie nach Woox Home im Playstore Android oder Appstore iphone ...

Страница 26: ... auf Weiter Geben Sie den Bestätigungscode ein welche Sie auf ihren email oder telefon bekommen haben und geben Sie ein Passwort ein Tippen Sie auf Familien hinzufügen Geben Sie Ihren Familiennamen ein um Ihrem Setup einen Namen zu geben Wählen Sie Ihren Familienstandort aus Definieren Sie den Standort Ihrer Geräte Wählen Sie einen Raum z B Schlafzimmer aus in dem Sie das Gerät verwenden möchten T...

Страница 27: ...mbol in der oberen rechten Ecke der App Tippen Sie auf Sicherheitskamera Stellen Sie sicher dass die LED Anzeige blinkt Wenn die LED am Smart Kamera nicht blinkt halten Sie die Reset Taste einige Sekunden lang ein gedrückt bis die LED beginnt zu blinken Es gibt zwei Möglichkeiten die Kamera ...

Страница 28: ...AN schnell verbinden modus Die Standardeinstellung dieses Produkts ist der Behalten Modus Um zwischen dem Behalten und dem WLAN schnell verbinden zu wechseln klicken Sie in der oberen rechten Ecke der Seite Gerät hinzufügen auf den anderen Methoden ...

Страница 29: ...tigen ob die Anzeige LED blinkt schnell rot Nur 2 4GHz WLAN wir is unterstützt Geben Sie das WLAN Passwort ein und bestätigen QR Code mit der Kamera scannen Halten Sie die Kamera 15 bis 20 cm vor das Mobiltelefon um sicherzustellen dass der QR Code erfolgreich gescannt werden kann ...

Страница 30: ...on wird in 30 Sekunden abgeschlossen Weisen Sie der Smart Kamera einen Namen zu und tippen Sie zur Bestätigung auf Speichern Weisen Sie die Smart Kamera einem Raum zu optional Tippen Sie auf Fertig um das Anschließen der Smart Kamera abzuschließen Herzlichen Glückwunsch Sie haben die Smart Kamera jetzt für die Verwendung mit der App eingerichtet ...

Страница 31: ...e auf Nachster Schritt um zu bestätigen ob die Anzeige LED blinkt schnell rot Only 2 4GHz WiFi is supported Nur 2 4GHz WLAN wir is unterstützt Geben Sie das WLAN Passwort ein und bestätigen Sie Die App sucht nun nach der Smart Kamera und registriert sie in Ihrem Konto Weisen Sie der Smart Kamera einen Namen zu und bestätigen Sie mit Speichern Weisen Sie die Smart Kamera einem Raum ...

Страница 32: ...das Anschließen der Smart Camera abzuschließen Herzlichen Glückwunsch Sie haben die Smart Kamera jetzt für die Verwendung mit der App eingerichtet Wenn die Installation nicht erfolgreich ist starten Sie die App erneut und versuchen Sie es erneut ...

Страница 33: ...E Verbinden Sie den Smar t Kamera mit Amazon Alexa Starten Sie die Alexa App Tip taste in das oben linker ecke Click Skills und Spiele Suchen Sie nach die Woox home skill Tippen Sie auf die Woox home skill ...

Страница 34: ...Jetzt Aktivieren Tip Autorisieren Jetzt ist ihren Woox home konto mit Amazon Alexa verbunden Tip DISCOVER DEVICES um ihren Smart Kamera mit Alexa zum linken Jetzt ist ihren Woox home konto linked mit Alexa Die Ganzen smart gerate im ihren Woox home konto sind jetzt mit das Alexa app und sprachen steuerung verbunden ...

Страница 35: ...ste Tippen Sie Einstellungen Tip Assistant und Smar t Home Steuerung Ttp knopf im das unten rechts Suchen Sie Woox home action und wähle es aus Suchen Sie n ach das Woox home action und tippen Sie das Geben Sie ihren Woox home app konto und Password ein tip auf Jezt verbinden Tip Autorisieren ...

Страница 36: ...r dass sich der Smart Kamera im Konfigurationsmodus befindet Die LED Anzeige sollte rot blinken Stellen Sie sicher das ihren WiFi password korrekt ist Bitte stellen Sie sicher dass Ihr Netzwerk 2 4 GHz ist Wenn Ihr Router über 2 4 GHz und 5 GHz verfügt deaktivieren Sie 5 GHz während Sie den Smart Kamera einrichten Nach dem Setup können Sie 5GHz wieder aktivieren Aktivieren Sie die Broadcast Funkti...

Страница 37: ...ut ein 2 Smart Kamera ist offline Stellen Sie den Kamera wieder her und richten Sie ihn erneut ein 3 Alexa kann den Smart Kamera nicht finden Bitte versuchen Sie die Woox Home Skill zu deaktivieren und erneut zu aktivieren 4 SD Karte kann nicht identifiziert werden Es wird empfohlen die SD Karte bei ausgeschaltetem Gerät einzustecken Stellen Sie sicher dass die SD Karte als FAT32 formatiert ist Di...

Страница 38: ...löscht werden 6 Das Gerät kann nicht in der Vorschau angezeigt werden Überprüfen Sie die Wi Fi Verbindung und platzieren Sie die Kamera in der Nähe des Routers Wenn dies fehlschlägt wird empfohlen es zu entfernen 7 W a r u m k a n n i c h k e i n e Benachrichtigungen über meine Handy App erhalten Bitte bestätigen Sie dass die App auf dem Telefon ausgeführt wird und die entsprechende Erinnerungsfun...

Страница 39: ...igen Pop up Wenn das Gerät entfernt wurde blinkt die Status LED Die Smart Camera wurde jetzt zurückgesetzt und kann erneut mit einem Netzwerk verbunden werden Bitte verwenden Sie die Reset Taste nicht um das Gerät zurück zu setzen Kamera wenn sie bereits mit der Woox Home App eingerichtet wurde Aus Sicherheitsgründen kann die angeschlossene Kamera nur aus der Woox Home App entfernt werden Technisc...

Страница 40: ...ile Micro USB Anschluss Resolution Zweiwege Audio Motion detection Micro SD card Audio WLAN Standard Encryption Operation conditions R4057 Batterie DC 5V 1A 1920x1080P Support Support Max 128GB Built in Microphone 802 11 b g n 2 4GHz WPA WPA2 20 50 90 RH ...

Страница 41: ...x Pour une installation et une utilisation correctes de ce produit veuillez lire attentivement ces instructions Qu y a t il dans la boite Caméra intelligente x 1 Alimentation x 1 Câble usb x 1 A x 2 B x 2 Soutien x 1 Vis 2 types Utilisateur Caoutchouc épingle Boîte de batterie ...

Страница 42: ...Lentille Affichage du fonctionnement et de l état Speaker Boîte de batterie Reset Fente pour carte SD Micro USB PIR Microphone 1 Fixez le support au mur 2 Appliquer du caoutchouc REMARQUE retirez le caoutchouc avant de réinitialiser ...

Страница 43: ...gnote en rouge Prêt à mettre en place ou Connexion au WiFi š allumé en bleu La caméra est allumée š allumé en rouge Le réseau est anormal 4 Définir le bon angle de la caméra 3 Faites glisser la caméra lentement dans le sens de la flèche dans le support ...

Страница 44: ...me application Configuration de Caméra Intelligente via l application Woox home 1 Connectez votre smartphone au même réseau wifi que celui auquel vous souhaitez connecter l caméra 2 Installez l application Woox home Scannez le code barres pour télécharger l application à partir du Google Play Store par exemple ou Apple store ...

Страница 45: ... Continuer Entrez le code de confirmation envoyé à l adresse e mail ou au numéro de téléphone que vous avez fourni et attribuez un mot de passe Appuyez sur Ajouter une maison Entrez votre nom de domicile pour attribuer un nom à votre emplacement Sélectionnez votre emplacement familial pourdéfinir l emplacement de vos appareils Choisissez une pièce par exemple une chambre dans laquelle vous souhait...

Страница 46: ...périeur droit de l application Tapez sur l option Caméra de sécurité Assurez vous que le voyant est allumé clignotant Si le voyant de la Smart Camera ne clignote pas en rouge maintenez le bouton de réinitialisation enfoncé pendant quelques secondes jusqu à ce que le voyant commence à clignoter ...

Страница 47: ...t le mode de configuration intelligente Le paramètre par défaut de ce produit est le mode de couplage réseau en mode QR Pour basculer entre le mode QR et le mode Configuration intelligente cliquez sur Autre méthode en haut à droite de la page Ajouter un appareil ...

Страница 48: ...si le voyant clignote rapidement en rouge Seul le wifi à 2 4 GHz est pris en charge Entrez le mot de passe WiFi et confirmer Scannez le code QR avec l appareil photo Tenez l appareil photo 15 à 20 cm devant le téléphone pour vous assurer que le code QR peut être numérisé avec succès ...

Страница 49: ...te La configuration sera complétée dans les 30s Attribuez un nom à la caméra intelligente et appuyez sur Enregistrer pour confirmer Attribuez la caméra intelligente dans une pièce facultatif Appuyez sur Terminé pour terminer la connexion de la caméra intelligente Félicitations vous avez maintenant configuré la caméra intelligente à utiliser avec l application ...

Страница 50: ...ante pour confirmer si le voyant clignote rapidement en rouge Seul le wifi à 2 4 GHz est pris en charge Entrez le mot de passe WiFi et confirmer L application va maintenant rechercher la caméra intelligente et l enregistrer sur votre compte La configuration sera complétée dans les 30s Attribuez un nom à la caméra intelligente et appuyez sur Enregistrer pour confirmer Attribuez la caméra intelligen...

Страница 51: ...yez sur Terminé pour terminer la connexion de la caméra intelligente Félicitations vous avez maintenant configuré la caméra intelligente à utiliser avec l application Si l installation échoue redémarrez l application et réessayez ...

Страница 52: ...51 FR Connectez Prise Intelligente à Amazon Alexa Lancez l application Alexa Cliquez sur le bouton dans le coin supérieur gauche Cliquez Skill et jeux Recherchez la compétence de Woox home ...

Страница 53: ...Link Now Appuyez sur Autoriser Maintenant votre compte personnel Woox est lié à Amazon alexa Appuyez sur découvrir des appareils pour lier caméra Intelligente à Alexa Maintenant votre compte personnel Woox est lié à Alexa Tous les appareils intelligents de votre compte personnel Woox seront désormais également dans l application Alexa ...

Страница 54: ...ation Accueil Appuyez sur le bouton Appuyez sur Paramètres Appuyez sur Assistant et contrôle de la maison Appuyez sur le bouton en bas à droite Recherchez l action Woox home et appuyez dessus Entrez votre compte et votre mot de passe Woox home app puis appuyez sur Link Now ...

Страница 55: ...puyez sur Autoriser Votre compte personnel Woox est maintenant associé à Google Assistant Tous les appareils intelligents de votre compte personnel Woox seront désormais également dans l application Google Home ...

Страница 56: ... et 2 4 GHz assurez vous que le SSID nom du réseau est différent pour chacun Vous aurez besoin que votre appareil mobile soit connecté à la fréquence 2 4 GHz lors de l installation Le système ne prend en charge que la fréquence 2 4 GHz et non la 5 0 GHz Activer la fonction de diffusion du routeur Configurez la méthode d autorisation WiFi du routeur en tant que WPA2 PSK et le type de cryptage en AE...

Страница 57: ...Essayez de désactiver les compétences de home Woox et de les réactiver 4 La carte SD ne peut pas être identifiée Il est recommandé de brancher la carte SD avec l appareil éteint Vérifiez que la carte SD est formatée en FAT32 La taille maximale prise en charge est de 128 Go 5 Pourquoi l appareil photo est il toujours dans l application après la réinitialisation Le périphérique de réinitialisation r...

Страница 58: ...r Si cela échoue il est recommandé de retirer le périphérique et de l ajouter à nouveau 7 Pourquoi je ne peux pas recevoir les notifications avec mon application de téléphone portable Veuillez confirmer que l application est en cours d exécution sur le téléphone et que la fonction de rappel correspondante la notification de message et l autorisation de confirmation d autorité dans le système de té...

Страница 59: ... dans la fenêtre contextuelle Une fois le périphérique retiré le voyant d état clignote La caméra intelligente a maintenant été réinitialisée et est prête à être connectée à un réseau N u t i l i s e z p a s l e b o u t o n d e réinitialisation pour réinitialiser l appareil photo s il est déjà configuré avec l application Woox home Pour des raisons de sécurité la caméra connectée ne peut être supp...

Страница 60: ...Port micro usb Résolution Audio bidirectionnel Détection de mouvement Carte Micro SD Audio WLAN Standard Cryptage Des conditions de fonctionnement R4057 Batterie DC 5V 1A 1920x1080P Soutien Soutien Max 128GB Microphone intégré 802 11 b g n 2 4GHz WPA WPA2 20 50 90 RH ...

Страница 61: ... Camera Per la corretta installazione e l uso di questo prodotto leggere attentamente queste istruzioni Cosa c è nella scatola Camera intelligente x 1 Caricatorex 1 Cavo USB x 1 A x 2 B x 2 Staffa x 1 Viti 2 tipi Manuale utente x 1 Gomma Perno Custodia della batteria ...

Страница 62: ...re Obiettivo Energia luce di stato altoparlante Compartimento della batteria Ripristino fessura della scheda SD Micro USB PIR Microfono 1 Fissa la staffa al muro 2 Installa la gomma NOTA rimuovere la gomma prima del ripristino ...

Страница 63: ... rosso Pronto per l installazione o Connessione a WiFi Si illumina in blu fisso La camera è accesa Si illumina in rosso fisso La rete è anormale 4 Regola l angolazione corretta della camera 3 Insesci la videocamera lentamente nella staffa nella direzione della freccia ...

Страница 64: ...2 4 GHz APP Woox Home Impostazione della Smart Camera tramite l app Woox Home 1 Connettere il tuo smartphone alla stessa rete WiFi a cui intendi connettere la videocamera 2 Per installare l app Woox Home si può cercare Woox home nel Google Play Store per dispositivi Android o nell App Store per iPhone ...

Страница 65: ...ntinua Inserire il codice di conferma inviato all indirizzo email o al numero di telefono che hai fornito e assegna una password Cliccare Aggiungi casa Inserire il tuo Nome casa per assegnare un nome alla tua posizione Selezionare Il Posizione per definire la posizione dei tuoi dispositivi Scegliere il Pièce ad esempio Camera da letto in cui desideri utilizzare il dispositivo Cliccare Fine per com...

Страница 66: ...lo in alto a destra dell app Clicca l camera de securite Assicurarsi che l indicatore LED lampeggi in rosso Se il LED sulla Smart Camera non lampeggia in rosso premere e tenere premuto il pulsante di ripristino per alcuni secondi finché il LED inizia a lampeggiare ...

Страница 67: ... modalità QR Net paring Per passare dalla modalità Codice QR alla modalità Configuration intelligente clicca le altrimenti nell angolo in alto a destra nella pagina Aggiungi dispositivo L a m o d a l i t à C o d i c e Q R m e t o d o predefinito Clicca Avanti per confermare se l indicatore lampeggia rapidamente in rosso È supportato solo il Wi Fi a 2 4 GHz ...

Страница 68: ...r assicurarsi che il codice QR possa essere scansionato correttamente Clicca Emesso Un Tono quando sentite il suono L app cercherà ora la Smart Camera e la registrerà sul tuo account La configurazione sarà completata in 30 secondi Assegnare un nome alla Smart Camera e clicca Salva per confermare Allinare la Smart Camera ad una stanza opzionale ...

Страница 69: ...ato la Smart Camera per l uso con l app La modalità configuration intelligente metodo alternativo Seleziona Configuration intelligente nel menu altrimenti nell angolo in alto a destra della pagina Aggiungi dispositivo Clicca Avanti per confermare se l indicatore lampeggia rapidamente in rosso ...

Страница 70: ...unt La configurazione sarà completata in 30 secondi Assegnare un nome alla Smart Camera e clicca Salva per confermare Allinare la Smart Camera ad una stanza opzionale clicca Done per completare connettere la Smart Camera Congratulazioni ora hai configurato la Smart Camera per l uso con l app Se l installazione non riesce riavvia l app e riprova ...

Страница 71: ...70 IT Connette la Smart camera all Amazon Alexa Avvia l app Alexa Clicca il pulsante nell angolo in alto a sinistra Cliccare Skills e giochi Cercare dell abilità di Woox Home ...

Страница 72: ...me poi cliccare Link Now Cliccare Autorizzare Ora il tuo account di Woox Home è connesso ad Amazon Alexa Cliccare scopri i dispositivi per connettere Smart Camera ad Alexa Ora il tuo account di Woox Home è connesso ad Alexa Tutti i dispositivi intelligenti nel tuo account di Woox Home ora saranno anche nell app Alexa ...

Страница 73: ...ssistente and Controllo demostico Cliccare il pulsante in basso a destra Cercare l azione Woox Home e cliccarsi Inserire l account e la parola d ordine dell app Woox Home poi cliccare Link now Cliccare autorizzato Ora il tuo account di Woox Home è connesso all Assistente Google Tutti i dispositivi intelligenti nel tuo account di ...

Страница 74: ... la password WiFi è corretta Se il router è un router dual band ovvero supporta le reti 5 0Ghz e 2 4Ghz assicurarsi che il SSID nome della rete sia diverso per ciascuna Avrai bisogno del tuo dispositivo mobile per essere connesso al 2 4 Ghz durante l installazione il sistema supporta solo 2 4 Ghz non 5 0 Ghz Abilita la funzione di trasmissione del router Configurare il metodo di autorizzazione Wi ...

Страница 75: ...t Camera non è in linea Rimuovere la camera e impostare di nuovo 3 Alexa non riesce a trovare la Smart Camera Si prega di provare a disabilitare l abilità di Woox home e abilitarlo di nuovo 4 La scheda SD non può essere identificata Si consiglia di collegare la scheda SD con il dispositivo spento Conferma che la scheda SD è formattata come FAT32 La dimensione massima supportata è 128 GB ...

Страница 76: ...o in anteprima correttamente Controlla la connessione wifi posiziona la camera vicino al router Se ciò non riesce si consiglia di rimuovere il dispositivo e aggiungerlo di nuovo 7 Perché non riesco a ottenere le notifiche con la mia app per cellulare Confermare che l app è stata eseguita sul telefono e che sono state aperte le relative funzioni di promemoria notifica dei messaggi e autorizzazione ...

Страница 77: ...ositivo e clicca Conferma nel pop up Quando il dispositivo è stato rimosso il LED di stato lampeggerà La Smart Camera ora è stata ripristinata ed è pronta per essere connessa nuovamente a una rete Si prega di non utilizzare il pulsante di ripristino per ripristinare la fotocamera se è già impostato con l app Woox home Per motivi di sicurezza la camera connessa può essere rimossa solo dall app Woox...

Страница 78: ...a Porta micro USB Risoluzione Due vie Audio Movimento Rivelazione Micro SD scheda Audio WLAN Standard Crittografia Operazione condizioni R4057 Batteria DC 5V 1A 1920x1080P Support Support Max 128GB Built in Microphone 802 11 b g n 2 4GHz WPA WPA2 20 50 90 RH ...

Страница 79: ...EN Para la instalación y el uso correctos de este producto lea atentamente estas instrucciones Contenido de la caja Camara Inteligente x 1 Adaptador de corriente x 1 Cable USB x 1 A x 2 B x 2 Soporte x 1 Tornillos 2 tipos Manual de usuario x 1 Goma Pin Caja de Bateria ...

Страница 80: ...l Instalar Lente Luz de estado y alimentación Altavoz Compartimiento de la batería Reset Ranura para Tarjeta SD Micro USB PIR Microfono 1 Fije el soporte a la pared 2 Instalar goma NOTA retire la goma antes de reiniciar ...

Страница 81: ...vo Parpadea en Rojo Listo para configurar o Conectando a WiFi Se ilumina en azul Cámara endendida Se ilumina en rojo La red es anormal 4 Ajuste el ángulo apropiado de la cámara 3 Deslice la cámara lentamente en el soporte en la dirección de la flecha ...

Страница 82: ...ión de Woox Home Configuración de la cámara inteligente a través de la aplicación de inicio de Woox 1 Conecte su teléfono inteligente a la misma red WiFi a la que desea conectar la cámara 2 Instale la aplicación de inicio de Woox buscando Inicio de Woox en Google Play Store para dispositivos Android o en App Store para iPhone ...

Страница 83: ...ontinuar Ingrese el código de confirmación enviado a la dirección de correo electrónico o número de teléfono que proporcionó y asigne una contraseña Pulse Añadir casa Ingrese su nombre de casa para asignar un nombre a su ubicación Seleccione su ubicación familiar para definir la ubicación de sus dispositivos Elija una habitación por ejemplo un dormitorio en la que desea utilizar el dispositivo Pul...

Страница 84: ...squina superior derecha de la aplicación Toque en la Cámara de seguridad Asegúrese de que el indicador LED esté parpadeando en rojo Si el LED de la cámara inteligente no parpadea en rojo mantenga presionado el botón de reinicio durante unos segundos hasta que el LED comience a parpadear ...

Страница 85: ...el modo conexion rapida de WIFI haga clic en los otros metodos en la esquina superior derecha en la página Anadir equipo Modo codigo QR método predeterminado Toque el Siguiente paso para confirmar si el indicador ES Parpadea rápidamente en rojo Sólo se admite WiFi de 2 4GHz Introduzca la contraseña de WiFi y confirme Escanear código QR con la cámara Sostenga la cámara de 15 a 20 cm frente al ...

Страница 86: ...scará la cámara inteligente y la registrará en su cuenta La configuración EN se completará en 30 s Asigne un nombre al enchufe inteligente y toque Guardar para confirmar Asignar la cámara inteligente a una habitación opcional Pulse Hecho para completar la conexión del cámara inteligente Enhorabuena ya ha configurado la cámara inteligente para usarla con la aplicación ...

Страница 87: ...r si el indicador parpadea rápidamente en rojo Sólo se admite WiFi de 2 4GHz Introduzca la contraseña de WiFi y confirme La aplicación ahora buscará la cámara inteligente y la registrará en su cuenta La configuración EN se completará en 30 s Asigne un nombre al enchufe inteligente y toque Guardar para confirmar Asignar la cámara inteligente a una habitación opcional Pulse Hecho para completar la c...

Страница 88: ...87 ES cámara inteligente Enhorabuena ya ha configurado la cámara inteligente para usarla con la aplicación Si la instalación no se realiza correctamente reinicie la aplicación y vuelva a intentarlo ...

Страница 89: ...88 ES Conecte el enchufe inteligente a Amazon Alexa Inicie la aplicación Alexa Haga clic en el botón en la esquina superior izquierda Clic Skills y juegos Busque el Skill de Woox Home ...

Страница 90: ...cular ahora Pulse Authorise Ahora su cuenta de Woox Home está vinculada a Amazon alexa Pulse DESCUBRIR DISPOSITIVOS para vincular el Enchufe Inteligente con Alexa Ahora su cuenta de inicio Woox está vinculada a Alexa Todos los dispositivos inteligentes en su cuenta de inicio de Woox ahora también estarán en la aplicación Alexa ...

Страница 91: ...e Asistente y control de casa Pulse botón en la parte inferior derecha Busca Woox casa ación y tócala Ingrese su cuenta y contraseña de la aplicación de Woox Home luego toque Vincular ahora Pulse Authorise Ahora tu cuenta de inicio de Woox está vinculada Asistente de Google Todos los dispositivos inteligentes en su cuenta de ...

Страница 92: ...seña de WiFi es correcta Si su enrutador es un enrutador de doble banda lo que significa que es compatible con redes de 5 0 Ghz y 2 4 Ghz asegúrese de que el SSID nombre de la red sea diferente para cada una Necesitará que su dispositivo móvil esté conectado a 2 4Ghz durante la configuración el sistema solo admite 2 4Ghz no 5 0Ghz Habilitar la función de difusión del enrutador Configure el método ...

Страница 93: ...fuera de línea Retire la cámara y configúrela de nuevo 3 Alexa no puede encontrar la cámara inteligente Por favor intente deshabilitar la habilidad de Woox en casa y habilítela de nuevo 4 La tarjeta SD no puede ser identificada Se recomienda conectar la tarjeta SD con el dispositivo apagado Confirme que la tarjeta SD está formateada como FAT32 El tamaño máximo admitido es de 128 GB 5 Por qué la cá...

Страница 94: ...rectamente Compruebe la conexión wifi coloque la cámara cerca del enrutador Si esto falla se recomienda quitar el dispositivo y agregarlo nuevamente 7 Po r q u é n o p u e d o re c i b i r l a s notificaciones con la aplicación de mi teléfono celular Confirme que la aplicación se está ejecutando en el teléfono y que se han abierto la función de recordatorio relevante la notificación de mensajes y ...

Страница 95: ...ntana emergente Cuando se haya retirado el dispositivo el LED de estado parpadeará La cámara inteligente ahora se ha reiniciado y está lista para conectarse nuevamente a una red Por favor no use el botón de reinicio para reiniciar Cámara si ya está configurado con la aplicación de inicio Woox Por razones de seguridad la cámara conectada solo se puede quitar desde la aplicación de inicio de Woox Te...

Страница 96: ...de alimentación Cable micro usb Resolución Two way audio Detección de movimiento Tarjeta micro SD Audio WLAN Standard Cifrado Condiciones de operación R4057 Batería DC 5V 1A 1920x1080P Apoyo Apoyo Max 128GB Micrófono 802 11 b g n 2 4GHz WPA WPA2 20 50 90 RH ...

Отзывы: