background image

Set Nail Heads

3

Install-3300-120423


Caution! Firmly attach the track to the structural header!

Sheetrock and many decorative materials do not provide adequate sup-

port


Important: Power Screw Drivers: 

Check the length of your #2 Phillips Bit. It needs to extend at least 1¼” past the chuck. 

Any shorter and the chuck may tear up the track or the screw won’t seat. It falls into the frustrating category when you 

have to order a new track.

Confirm the proper orientation of the door. See the door stacking illustrations at the top of Page 2. Position the track to ensure: it 

can be securely attached to the header and   the Mounting system can be securely attached to the wall or doorjamb.


Check it out! Move the door back and forth along the track looking for smooth operation. Most frequent problems in-

clude wheels sideways or debris in the track. 

After the track has been secured, drive the alignment pins across the joints with a hammer and the edge of 

a screwdriver.

Stack the door to one end of the track (either side of the opening is OK) and attach the 

other end of the track to the header. Use #8 x 1½” pan or truss head screws through the 

exposed holes at the end of the track. Seat the head of the screw firmly against the track.
If the screws didn’t go into a solid part of the header (soft stuff like sheetrock or acousti-

cal tile doesn’t count) at least ¾”, now would be a good time to go to the hardware store 

and get longer #8 pan or truss head screws.
Transfer the door to the attached end of the track. Finish attaching the track with #8 x 

1½” pan or truss head screws.

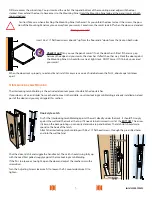
Attach the Sweep Moldings snugly against the Track with 8d (2½”) finish nails.  Set the nail heads 

slightly below the surface.

Содержание 3300 Series

Страница 1: ... contents should include Door Track Section s Interlocking Jamb Molding Aluminum extrusion a little less than the height of the door See Page 5 for description Hardware packet Screws etc These instructions Yes yes we know you had to find them if you re reading them but we like to be complete A copy of the shipping label and packing list with all the information you need if you have to call Woodfol...

Страница 2: ...le Ended DE Single ended SE or a Pair DE doors have Lead Posts at each end of the Panel set SE doors have a Lead Post on one end and a Mounting system on the other end Pairs are a set of SE that meet in the middle Verify that the track length is correct Dry fit the track in the opening The correct length will just fit If needed trim the track with a hacksaw Try to keep the metal filings from mixin...

Страница 3: ...ooking for smooth operation Most frequent problems in clude wheels sideways or debris in the track After the track has been secured drive the alignment pins across the joints with a hammer and the edge of a screwdriver Stack the door to one end of the track either side of the opening is OK and attach the other end of the track to the header Use 8 x 1 pan or truss head screws through the exposed ho...

Страница 4: ...ory pre attached to a piece of plywood Do Not Remove the plywood Push the door to the side that will be fastened permanently to the wall Let the door form its own plumb hang free and carefully mark the wall with a pencil at the edge of the mounting panel plywood near the top and bottom of the door Flush Mounting Find the 21 8 x 1 post in the shipping package Attach it to the wall jamb surface 1 be...

Страница 5: ... slides from each end to meet in the middle your Interlocking Jamb Molding is already installed on a lead post of the door and you may disregard this section Hook style catch Dry fit the Interlocking Jamb Molding against the wall directly under the track It should fit snugly against the wall and the track at the top If it needs to be trimmed trim it at the BOTTOM The arrow sticker on the back poin...

Страница 6: ... a petroleum jelly type material Do not use aerosol lubricants Care Cleaning Avoid exposure to excess or continued moisture As with all materials exposure to light will cause fading Regular cleaning of the Vinyl Acrylic Aluminum Veneer use mild soapy water then dry with a soft cloth or chamois Do NOT use household cleaners abrasive towels or scouring pads Wood veneer doors can be treated periodica...

Отзывы: