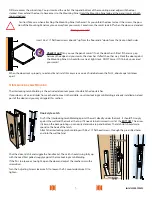
Adjustment Screw
Portions of Lead Post and Panel
cutaway for clarity
5
Install-3300-120423
Check it out!
Can you see the pencil marks? If not, the door has shifted. If there is a gap
between the edge and your marks, the door has shifted the other way. Stack the door against
the Mounting Panel; it should form a neat, tight stack. DON’T Force it. If it binds, you missed
your marks!
When the door stacks properly, re-extend it and install 2 more screws on each side between the first 2, about equal distances
apart.
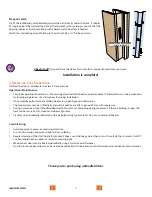
OK! Here comes the critical step. You just marked the wall at the top and bottom of the mounting panel edge with the door
stacked. Now, extend the door to have access to the Mounting Panel. Hold the Mounting Panel edge at the pencil marks at both
top and bottom!
Insert #6 x 1½” flat head screws about 8” up from the floor and 8” down from the track on both sides.
4 I
nterlockIng
J
amb
m
olDIng
The Interlocking Jamb Molding is the extruded aluminum piece into which the door latches.
If your door is a Pair, and slides from each end to meet in the middle, your Interlocking Jamb Molding is already installed on a lead
post of the door and you may disregard this section.
Hook style catch
Dry fit the Interlocking Jamb Molding against the wall, directly under the track. It should fit snugly
against the wall and the track at the top. If it needs to be trimmed, trim it at the
BOTTOM
. The arrow
sticker on the back pointing up can easily determine top and bottom. The latch slot should corre-
spond to the hook of the latch.
Attach the interlocking jamb molding with #6 x 1½” flat head screws, through the pre-drilled holes
and into the wall behind.
Shut the door, latch it and wiggle the handle a bit. The Latch should swing fully up
with the Lead Post pulled snuggly against the Interlocking Jamb Molding.
If the fit is too loose, or too tight, open the door and adjust the mechanism with a
screwdriver.
Turn the Adjusting Screw clockwise
to loosen the fit, counterclockwise
to
tighten.
Caution! Take care when attaching the Mounting Panel to the wall. As you unfold the door to insert the screws, the posi-
tion of the Mounting Panel may move away from your marks. Sometimes, the marks look “off” when the door is extended.
Trust your marks!


