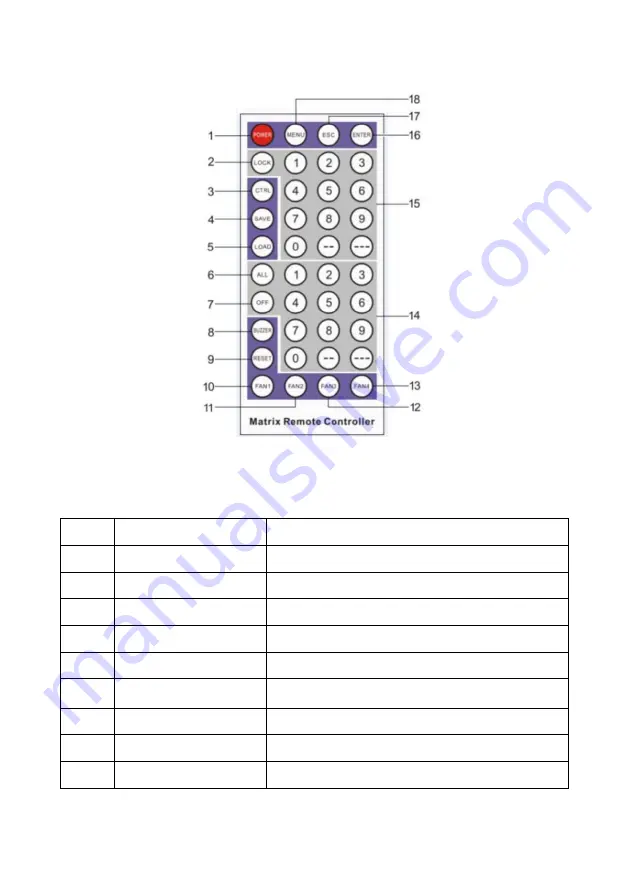
WolfPack HDTVHDMX0808 Скачать руководство пользователя страница 8

6

IR Remote Control

Figure 7.

IR Remote Control

Item

Button

Function

1

POWER

Turns On/Off the display screen

2

LOCK

Disable

3

CTRL

Disable

4

SAVE

Disable

5

LOAD

Disable

6

ALL

Select all the Output channels

7

OFF

Disable

8

BUZZER

Disable

9

RESET

Factory Reset

Содержание HDTVHDMX0808

Страница 1: ...All Rights Reserved WolfPack 4K 8x8 HDMI Matrix Router w Control4 Drivers MODEL NO HDTVHDMX0808 USER MANUAL...

Страница 2: ...2 4 Features 2 5 Connection and Operation 3 1 Matrix Connection 3 2 Front Panel Button Control 4 3 IR Remote Control 6 4 EDID Management 7 5 Factory Reset 11 6 RS232 Control 11 6 Technical Specificat...

Страница 3: ...device should be repaired and maintained by the professional and qualified personnel in the designated service center 15 Unplug the power of all the devices when you are connecting them up 16 Make su...

Страница 4: ...idential and educational audio video integration such as in houses offices digital entertainment centers control centers conference rooms school and corporate training environments etc Figure 1 Front...

Страница 5: ...Monitors HDTV Displays or Projectors 11 The front panel LCD screen can display the switching status input signal characteristics and other information of each channel which is clear and intuitive 12 C...

Страница 6: ...led 6 Control Buttons MENU CTRL ENTER ESC After pressing Input and Output buttons press ENTER button to execute the operation press ESC to cancel the operation Figure 3 Front Panel Review 2 Rear Panel...

Страница 7: ...ignal status on the LCD display indicates that the Input Channels are routed out to Output Channels that is 1 1 2 2 3 3 4 4 5 5 6 6 7 7 8 8 Figure 5 Matrix IN and OUT Status Display 4 Switching Displa...

Страница 8: ...IR Remote Control Item Button Function 1 POWER Turns On Off the display screen 2 LOCK Disable 3 CTRL Disable 4 SAVE Disable 5 LOAD Disable 6 ALL Select all the Output channels 7 OFF Disable 8 BUZZER D...

Страница 9: ...will automatically read the Sinks EDID information and then analyze all the Sinks EDID information combine a most suitable EDID and send it to the Inputs As long as the output ports has a plug in and...

Страница 10: ...set and can be selected by the Output buttons After selecting EDID mode and PORT press ENTER button to confirm the selection Below are 7 types of EDID modes 1 Mix Mode Press the Input button 1 to sel...

Страница 11: ...e In this mode the matrix EDID information is controlled by host PC software As shown below Figure 12 EDID 3 Rx PC Mode 4 4K Mode Press the Input button 4 to select 4K Mode As shown below Figure 13 ED...

Страница 12: ...de Press the Input button 7 to select 480P Mode As shown below Figure 16 EDID 7 480P Mode Each Input Channel Port can choose the same or different EDID Mode Just select the Input buttons to set it up...

Страница 13: ...ts RS 232 IN and RS 232 OUT See Figure 18 RS232 IN port connects with PC while RS232 Out port connects to other devices that require communication to PC through RS232 protocols This matrix can cascade...

Страница 14: ...12 Figure 20 RS232 IN Pinout Figure 21 RS232 OUT Pinout RS232 IN Port D SUB9F Function Description Pin Function 1 2 TXD 3 RXD 4 5 GND 6 7 8 9...

Страница 15: ...Steps 1 Connect the Matrix Switcher to the PC through the RS232 cable 2 Select the correct Serial Port in the Host Computer and control the Matrix Switcher by the Host Computer Software Or integrate R...

Страница 16: ...14 2 Matrix Switch Button Switch 3 Matrix Switch Map Switch...

Страница 17: ...e 4 RS232 Serial Port Control Protocols Baud Rate 9600 Data Bits 8 Start Bit 1 Stop Bit 1 Parity Bit None Matrix Compatible Protocols Protocols Examples IXOY I01O02 1 input 2 output XVY 01V02 1 input...

Страница 18: ...DMI Female Input Level 0 7Vp p Differential Impedance 100 Return Loss 30db 5MHz DC Compensation 5mV Max SIGNAL TYPE HDMI1 4 specification HDMI A all digital T M D S signal PROTOCOL Support HDMI1 4 Pro...

Страница 19: ...ting Maintenance 1 No Power 1 Check if the power cable is properly plugged into a power outlet 2 No Image 1 Check that the Input signal source devices are turned on and well connected to the Matrix Sw...

Страница 20: ...y period starts from the shipment delivery date as per the purchase order Proof of purchase in the form of bill of sale or receipted invoice which are evidences that the device is within the warranty...

Отзывы: