background image

~ 61 ~

Attention: in case of installation of the product with a minimum height we 
recommend to fix the rods after the installation of the product to the ceiling. 

Insert the support rod into the ceiling plate previously fixed and tighten it 
through the screws.  

Carry out the electric connection. 

Lift the ceiling cover and fix it by tightening the side dowel (Fig.6). 

WS21 (SILT2 1) Installation 
Place the fixing plate (Fig.1) into the ceiling, in a position which coincides with 
the centre of your cook-top, then drill the holes and fix the plate by using the 
screws and screw anchors supplied with the appliance. The power cord needs 
to pass through the plate hole, which is shown by the arrow in Fig.1. 

Remove the appliance from its packaging and place it in a suitable area, 
where it is not likely to be damaged.  

Fix the articulated rod to the product by inserting and tightening the fixing 
screw, as shown in Fig. 7. 

Adjust the height of the appliance , making sure a minimum distance of at 
least 65 cm is maintained between the lowest part of the hood and the cook-
top; height adjustment can be done by loosening the rod fixing screws , 
adjusting the appliance height and then by fastening them again. 

Insert the fixing plate cover from the rod upper part, as per Fig. 4. 

Hang the appliance to the fixing plate, and secure the plate by using the two 
screws supplied with the appliance, as shown in Fig. 8. 

Make the electric connection. 

Lift the fixing plate cover and secure it with the screws supplied with the 
appliance, as shown in Fig.6 

Содержание 21660079

Страница 1: ...Brugsanvisning DK NO Emh tte ventilator s 3 19 69 70 Bruksanvisning SE Fl ktk pa s 20 38 69 70 K ytt ohje FI Liesituuletin s 39 56 69 70 User guide ENG Cooker hood p 57 70 WS20 WS21...

Страница 2: ...2...

Страница 3: ...ortskaffelse af emballagen 3 Bortskaffelse af et gammelt produkt 3 Sikkerhedsanvisninger 3 Beskrivelse af emh tten ventilatorn 8 M lskitser 9 Installation 11 Betjening 14 Reng ring 16 Garanti 18 Servi...

Страница 4: ...erhed Hvis produkterne bortskaffes sammen med husholdningsaffaldet eller behandles forkert kan det skade den menneskelige sundhed og milj et Bortskaf derfor ikke det gamle produkt med husholdningsaffa...

Страница 5: ...retages af fagfolk Installation og reparation foretaget af ukyndige kan medf re betydelig risiko for brugeren og er ikke omfattet af reklamationsordningen Indbygning og montering af denne emh tte p et...

Страница 6: ...ilatorn Brug aldrig emh tten ventilatorn uden fedtfiltre da fedt og smudsaflejringer kan neds tte emh ttens funktion Filtrene skal reng res eller udskiftes med j vne mellemrum Et overm ttet fedtfilter...

Страница 7: ...hedsafstand Emh tten ventilatorn m ikke monteres over ildsteder hvor der bruges fast br ndsel Advarsel Risiko for forgiftning Hvis der i samme rum eller ventilationssystem anvendes b de emh tte ventil...

Страница 8: ...ble en automatisk indsugningsbl ser eller at bne en motordreven ventilationsklap n r emh tten ventilatorn t ndes eller automatisk at slukke for det ildsted som er afh ngigt af luften i rummet n r emh...

Страница 9: ...9 M lskitse WS20...

Страница 10: ...10 M lskitse WS21...

Страница 11: ...ing afpr ves og at installationerne i tvivlstilf lde gennemg s af en fagmand Producenten import ren kan ikke g res ansvarlig for skader der er opst et p grund af manglende eller afbrudt jordledning f...

Страница 12: ...e frit ved kogepladen og at betjene emh tten ventilatorn optimalt V r opm rksom p at emmen fra madlavningen opfanges d rligere jo st rre afstanden til kogepladen er Model WS20 Bor huller og monter fas...

Страница 13: ...ne Tilslut str mmen L ft loftafd kningen og fastg r den med sideskruen fig 6 Model WS21 Bor huller og monter fastg relsespladen fig 1 til loftet lige midt for kogepladen med de medleverede skruer El k...

Страница 14: ...reducere hastigheden Tryk to gange p knappen for at reducere hastigheden fra h j til 1 Tryk p knappen for at t nde eller slukke for lyset Tryk p knappen for at aktivere timeren 10 min Timerfunktion Ef...

Страница 15: ...der er n dknap p siden af emh tten ventilatorn verst hvor emh tten ventilatorn kan slukkes Ekstra sikkerhed Emh tterne er udstyret med et automatisk sikkerhedsstop 4 timer efter sidste indstilling Ny...

Страница 16: ...ne i henhold til nedenst ende Model WS20 Vip panelet ned med h ndtaget fig 11A Afmonter fedtfiltret via h ndtaget Model WS21 Afmonter panelet fig 10 ved at tr kke det nedad Det holdes fast med magnete...

Страница 17: ...brug af nedenst ende da disse beskadiger overfladen soda syre eller kloridholdige reng ringsmidler og reng ringsmidler der indeholder opl sningsmidler reng ringsmidler med skurende virkning f eks skur...

Страница 18: ...ed her i brugsanvisningen s De har dem ved h nden Det g r det lettere for servicemont ren at finde de rigtige reservedele Garantien d kker ikke Fejl og skader som ikke skyldes fabrikations og material...

Страница 19: ...af apparater der ikke skal bruges i en privat husholdning men anvendes til erhverv eller erhvervslignende form l restaurant caf kantine etc eller bruges til udlejning eller anden anvendelse der omfatt...

Страница 20: ...nsportf rpackning 21 Hantering av uttj nad fl kt 21 S kerhetsanvisningar och varningar 21 Beskrivning av fl ktk pan 26 M ttskisser 27 Installation 29 Betj ning 32 Reng ring 34 Garanti 37 Service 38 Il...

Страница 21: ...as p fel s tt kan det leda till h lsorisker eller skador p milj n L mna d rf r p inga villkor den uttj nade fl kten i hush llsavfallet L mna ist llet in uttj nade elektriska och elektroniska maskiner...

Страница 22: ...tallat r kontrollera installationen Fl ktens elektriska s kerhet garanteras endast om den ansluts till ett jordat eluttag som r installerat enligt g llande f reskrifter Det r mycket viktigt att denna...

Страница 23: ...montering av fl kten p uppst llningsplatser som inte r fasta t ex b tar f r endast utf ras av en fackman om det r s kerst llt att f ruts ttningarna p platsen medger en s ker anv ndning av den Samtidi...

Страница 24: ...a in en tilluftsfl kt eller ppna en motordriven tilluftsventil n r fl kten kopplas in automatiskt koppla fr n v rmek llor som r beroende av rumsluften n r fl kten kopplas in R der tveksamhet b r du v...

Страница 25: ...isk h ll 700 mm ver en gash ll Vid val av monteringsh jd m ste anv ndarens l ngd tas i betraktning Det m ste vara m jligt att arbeta fritt vid h llen och betj na fl ktk pan optimalt Det r inte till te...

Страница 26: ...extra tillbeh r Luften som sugits upp renas genom fettfiltren och sedan genom ett kolfilter innan den leds ut Luften leds tillbaka in i k ket genom ppningarna i spisfl ktens teleskop Vid cirkulationsd...

Страница 27: ...27 M ttskiss WS20...

Страница 28: ...28 M ttskiss WS21...

Страница 29: ...nstallationen Fl ktens elektriska s kerhet garanteras endast om den ansluts till ett jordat eluttag som r installerat enligt g llande f reskrifter Det r mycket viktigt att denna grundl ggande s kerhet...

Страница 30: ...ramisk h ll 700 mm ver en gash ll Vid val av monteringsh jd m ste anv ndarens l ngd tas i betraktning Det m ste vara m jligt att arbeta fritt vid h llen och betj na fl ktk pan optimalt Modell WS20 Bor...

Страница 31: ...r mmen Lyft takt ckskyddet och f st med sidoskruven fig 6 Modell WS21 Borra h l och montera f stplattan fig 1 till taket centrerad ver h llen med de bifogade skruvarna Elkabeln m ste g genom h let d r...

Страница 32: ...ill 1 Tryck p knappen f r att t nda eller sl cka ljuset Tryck p knappen f r att aktivera timern 10 min Timerfunktion Efter aktivering av timern blinkar LED indikatorn p den h gra sidan var 5 e sekund...

Страница 33: ...tade med automatiskt s kerhetsstopp efter 4 timmar efter sista inst llning Nya koder F r att g ra nya koder f lj nedanst ende procedur Tryck samtidigt p UPP STOPP och NED knapparna och h ll dem inne i...

Страница 34: ...atoset fett damm etc och f rhindrar att fl kten blir smutsig Reng ra fettfilter f r hand Reng r fettfiltren med en diskborste i varmt vatten med milt handdiskmedel i Anv nd inte koncentrerat handdiskm...

Страница 35: ...nom att alla hastighetsindikatorerna lyser samtidigt V lj timerfunktionen f r att terst lla Aktivt kolfilter extra tillbeh r Vid cirkulationsdrift m ste fettfiltren kompletteras med ett kolfilter Kolf...

Страница 36: ...tfritt h lje g ller ej f r betj ningspanel F r rostfria ytor l mpar sig ett reng ringsmedel f r rostfritt st l som inte repar F r att f rhindra att ytan snabbt blir smutsig rekommenderas v rdande mede...

Страница 37: ...fastst llas vid terf rsj larens leverans vid kunden r en sak mellan kund och terf rsj lare Om kunden sj lv arrangerar transporten f rpliktar leverant ren sig inte vid ev transportskador Omotiverade s...

Страница 38: ...38 Service GarantGruppen AB Bang rdsgatan 6 582 77 Link ping Tlf 013 15 45 10 Fax 013 15 45 07...

Страница 39: ...Pakkauksen h vitt minen 40 Vanhan liesituulettimen h vitt minen 40 Turvallisuusohjeet 40 Liesituulettimen kuvaus 45 Mittapiirustukset 46 Asentaminen 48 K ytt minen 51 Puhdistaminen 53 Takuu 55 Huolto...

Страница 40: ...tt mi koneiden toiminnan ja turvallisuuden kannalta T llaisten laitteiden h vitt minen kotitalousj tteen joukossa tai k sitteleminen muuten v r ll tavalla saattaa aiheuttaa vaaraa ihmisten terveydell...

Страница 41: ...s hk iskusta jotka ovat aiheutuneet puuttuvasta tai vioittuneesta maadoitusjohtimesta Laitteen asennus ja korjaaminen on annettava ammattitaitoisen s hk asentajan teht v ksi Asiantuntemattomat asennu...

Страница 42: ...a pannuja ja friteerauspatoja on tarkkailtava koko ajan My s lieden p ll k ytett v s hk grilli on valvottava koko ajan Ylikuumentunut ljy ja rasva voivat sytty itsest n palamaan ja sytytt my s liesitu...

Страница 43: ...seuraavia minimiet isyyksi Keraaminen liesitaso 650 mm Kaasuliesi 700 mm Asennuskorkeutta p tett ess huomioon on otettava my s k ytt jien pituus Heid n on voitava ty skennell vapaasti lieden rell ja...

Страница 44: ...nit jotka ottavat palamiseen tarvittavan ilman sijoituspaikastaan ja joiden poistoilma johdetaan ulos esimerkiksi savupiipun kautta Kun liesituulettimen kautta kulkeva ilma johdetaan ulos vaikka ulkop...

Страница 45: ...en tai moottoroituun tuuletusluukkuun joka avautuu liesituulettimen k ynnistyess tai kytkem ll se j rjestelm n joka sammuttaa huonetilan ilmaa k ytt v n tulisijan silloin kun liesituuletin k ynnistyy...

Страница 46: ...46 Mittapiirustukset WS20...

Страница 47: ...47 Mittapiirustukset WS21...

Страница 48: ...astaa laitteen tyyppikilvess annettuja arvoja j nnite ja taajuus Arvojen vastaavuus on eritt in t rke sill muuten tuuletin voi vaurioitua Ep selviss tilanteissa asia on tarkastettava ammattitaitoiselt...

Страница 49: ...e edellytt nyt suurempaa turvaet isyytt lieden pinnasta liesituulettimen alareunaan asennuksessa on noudatettava seuraavia minimiet isyyksi Keraaminen liesitaso 650 mm Kaasuliesi 700 mm Asennuskorkeut...

Страница 50: ...osittelemme teleskooppiputkien asentamista vasta kattokiinnityksen j lkeen Asenna kiinnityslevyn tuki ja kirist ruuvit Tee s hk liit nt Nosta kattosuojus paikalleen ja kiinnit se sivulta ruuvilla kuva...

Страница 51: ...utta Painikkeen painaminen v hent nopeutta Kaksi painallusta v hent nopeuden maksimista asentoon 1 Painikkeen painaminen sytytt ja sammuttaa valon Painikkeen painaminen aktivoi ajastimen 10 min Ajastu...

Страница 52: ...aan sammuttaa sen sivussa olevalla varakatkaisijalla Turvatoiminto Tuulettimissa on turvatoiminto joka sammuttaa laitteen 4 tuntia viimeisen painikkeenpainalluksen j lkeen Uudet ohjauskoodit Laitteill...

Страница 53: ...0 K nn paneeli alas k densijan avulla kuva 11A Ota rasvasuodatin pois k densijaa k ytt en Malli WS21 Ota paneeli kuva 10 pois vet m ll sit alasp in Paneeli on kiinnitetty magneeteilla Ota rasvasuodati...

Страница 54: ...voivat vahingoittaa liesituulettimen pintaa sooda happo ja klooripitoiset puhdistusaineet sek aineet jotka sis lt v t liuottimia hankaavia elementtej sis lt v t puhdistusaineet kuten hankausjauheet ja...

Страница 55: ...vest Kirjoittakaa mahdolliset muut tiedot t h n k ytt ohjeeseen silloin ne ovat saatavilla Huoltoasentajan on helpompi l yt oikea varaosa kun tietoja on enemm n Takuu ei kata Vikoja ja vahinkoja jotka...

Страница 56: ...set ovat ostajan vastuulla Osto yritysk ytt n Ostolla yritysk ytt n tarkoitetaan sit ett yritys ostaa laitteen eik sit k ytet yksityisess kotitaloudessa vaan yrityksess tai yrityst muistuttavassa toim...

Страница 57: ...57 Table of content Warnings 58 Uses 59 Installation 60 Dimensions 62 Working 64 Maintenance 66 Lamp replacement 66 Guarantee 67 Service 68 Illustrations 69...

Страница 58: ...other than electric power gas oil or coal stoves etc are used simultaneously The cooker hood when evacuating the sucked air could generate a negative pressure in the room which can t exceed the limit...

Страница 59: ...the product or on its packaging indicates that this product may not be treated as household waste Instead it shall be handed over to the applicable collection point for the recycling of electrical an...

Страница 60: ...ot likely to be damaged Remove the steel cover placed in the upper side of the appliance by unscrewing the fixing screws Fig 2 Install the telescopic rod with the biggest diameter inside the upper ste...

Страница 61: ...h is shown by the arrow in Fig 1 Remove the appliance from its packaging and place it in a suitable area where it is not likely to be damaged Fix the articulated rod to the product by inserting and ti...

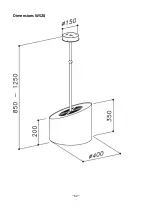
Страница 62: ...62 Dimensions WS20...

Страница 63: ...63 Dimensions WS21...

Страница 64: ...to the second one press the button To go from a high speed back to the first one press twice the button To give power to the lights or to shut them down press the button To set the timer up press the...

Страница 65: ...ing reset the emergency button The luxury products are endowed with an electronic device which allows the automatic switching off after 4 hours working from the last operation Generating a new transmi...

Страница 66: ...mote control will signal the filter saturation by the simultaneous lighting of led indicators to reset select the timer function when the cooker hood is off The metal grease filter can be washed by ha...

Страница 67: ...not been carried out If the installation has not been carried out according to this manual If unauthorized personnel has carried out installation or repair word Transport damages A transport damage ob...

Страница 68: ...l purposes e g in a restaurant caf etc or used to rent out or used for any other purpose including several users In case of commercial purchase no guarantee is granted on this appliance since this is...

Страница 69: ...69...

Страница 70: ...70...

Страница 71: ...71...

Страница 72: ...72...

Отзывы: