background image

PBC600

User Guide

I. Product Overview


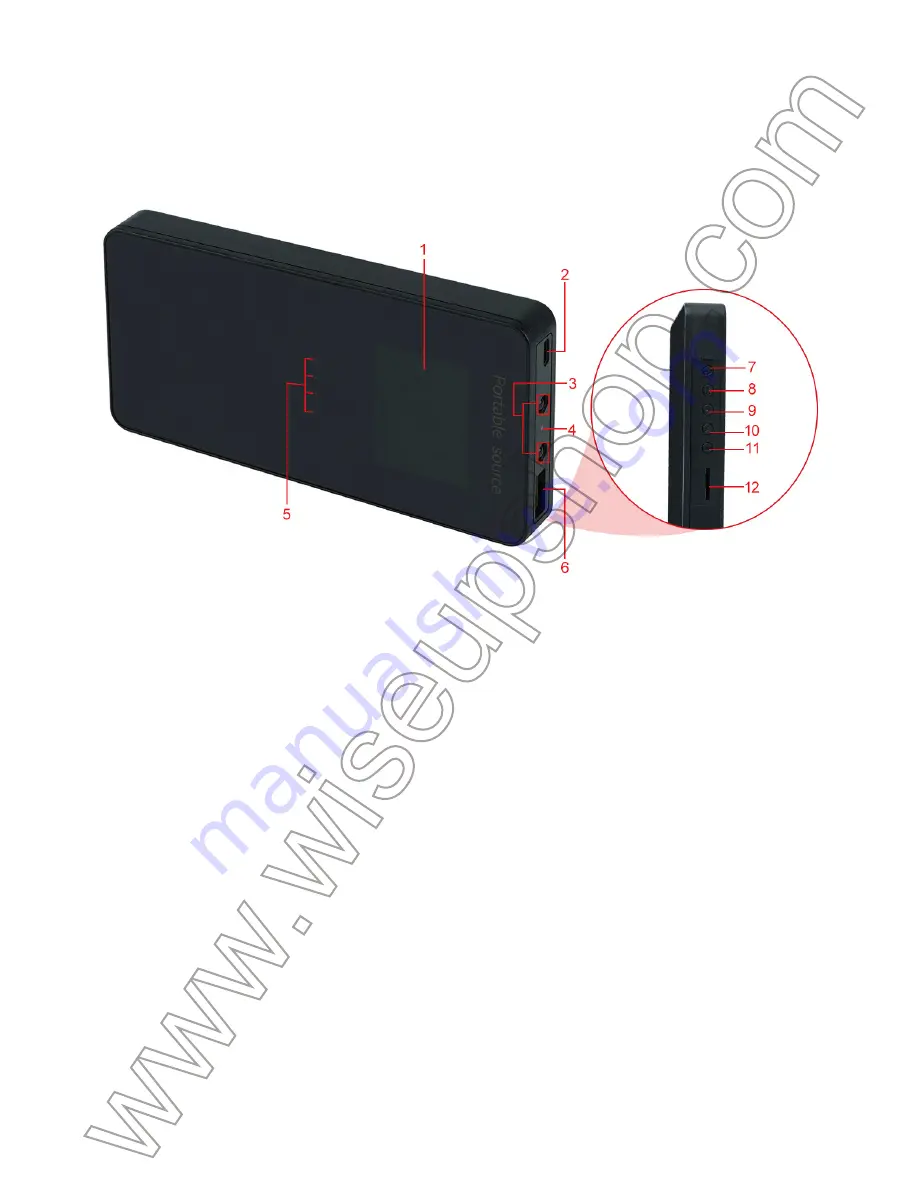
1. LCD Display
2. Power Input
3. IR LEDs
4. Camera Lens
5. Battery Life Indicator Lights
6. Power Output

II. What’s in the Box

-1× Power Bank Camera
-1× USB Cable
-1× AC110-230V to DC5V Power Adapter 
-1× 8GB Micro SD Card (fitted into the Micro SD card slot already)

III. Operation

>> Please make sure that the power bank camera is fully recharged.
>> All the buttons are hidden below the cover on the right side of the camera. You can slide it 
down to push the buttons.
>> If you want the camera to work 7/24 hours, please connect it to an AC outlet using the USB 

cable and power adapter provided.
>> Make sure the 8GB Micro SD card provided has been formatted already and is securely 
fitted into the camera’s SD card slot. If you want to use a larger Micro SD card, we recommend 
you to use SDHC Class 10 Micro SD cards.

3.1. POWER ON/OFF & VIDEO RECORDING

3.1.1. Power on the camera by pressing the Power Button for 2 seconds. The LCD display will 
show the live video and the camera will start video recording.
3.1.2. Press the OK Button once to stop video recording. The LCD display will still show the live 
video and the camera will enter into standby mode.
3.1.3. Press the OK Button once again to resume video recording.
3.1.4. Power off the camera by pressing the Power Button for 2 seconds. The LCD display will 
turn off.

[Note]:

1). The camera can record video for 9 hours continuously on a full charge.
2). Video Resolution: 1920x1080P, 1440x1080P, 1280x720P, 848x480 selectable
3). Video Format: AVI
4). Loop recording is supported.
5). Recording and charging at the same time is supported.

3.2. SCREEN SAVER

3.2.1. When the LCD display shows the live video, you can press the Up Button once to let the 
camera to enter into screen saver mode and the LCD display will turn off in 5 seconds.
3.2.2. The LCD display will turn on again by pressing any button once. 
3.2.3. When the LCD display shows the live video, you can press the Up Button once again to 
exit the screen saver mode. The LCD display will be illuminated all the time.

[Note]:


The camera will continue recording video when the LCD display turns off.

3.3. TURN ON/OFF IR LEDS

When the LCD display shows the live video, you can press the Down Button once to turn on/off 
the IR LEDs.

[Note]: 

The IR distance is 3 meters.

3.4. PLAY BACK VIDEO FILES

When the LCD display shows the live video and the camera stays in standby mode, you can 
press the Menu Button twice to access the files you got. Use the Up/Down Button to choose 

one and press the OK Button to play it.

IV. System Settings

4.1. When the LCD display shows the live video and the camera stays in standby mode, you 
can press the Menu Button once to enter system setting pages.
4.2. Use Up/Down Button to choose the functions and press OK Button once to enter the page 
and confirm your setting.
4.3. You can press the Power Button to exit system setting when all the settings are finished.

V. Video File Uploads

5.1. Using a Card Reader

Step 1: Power off the camera, remove the Micro SD card and insert it into a card reader.
Step 2: Insert the card reader into a PC computer USB port.
Step 3: The Micro SD card will be recognized as a removable disk drive.
Step 4: All the files can be accessed in the drive.

5.2. Using the USB cable

Step 1: Power off the camera and connect it to an outlet AC power socket using the USB cable.
Step 2: The LCD display will show Mass Storage and PC Camera, please choose the first one 
and press OK Button.
Step 3: The Micro SD card will be recognized as a removable disk drive.
Step 4: All the files can be accessed in the drive.

VI. Charging

6.1. Power off the camera and connect it to an outlet AC power socket using the USB cable and 
power adapter.
6.2. It will take 7 hours to obtain a full charge.
6.3. When the camera is fully recharged, the 4 blue indicator lights will stay illuminated.

7. Power Button
8. OK Button
9. Up Button
10. Down Button
11. Menu Button
12. Micro SD Card Slot

Содержание PBC600

Страница 1: ...icro SD Card fitted into the Micro SD card slot already III Operation Please make sure that the power bank camera is fully recharged All the buttons are hidden below the cover on the right side of the...

Страница 2: ...olution 1920x1080P 1440x1080P 1280x720P 848x480 selectable 3 Video Format AVI 4 Loop recording is supported 5 Recording and charging at the same time is supported 3 2 SCREEN SAVER 3 2 1 When the LCD d...

Страница 3: ...es can be accessed in the drive Function Resolution 1920x1080P 1440x1080P 1280x720P 848x480 selectable Turn on off loop recording and choose the desired file length Turn on off the motion detection fu...

Страница 4: ...one and press OK Button Step 3 The Micro SD card will be recognized as a removable disk drive Step 4 All the files can be accessed in the drive VI Charging 6 1 Power off the camera and connect it to a...

Страница 5: ...its in den Micro SD Kartensteckplatz eingebaut III Betrieb Bitte stellen Sie sicher dass die Power Bank Kamera vollst ndig aufgeladen ist Alle Tasten sind unterhalb der Abdeckung auf der rechten Seite...

Страница 6: ...nzeige schaltet sich aus Hinweis 1 Die Kamera kann Video f r 9 Stunden kontinuierlich auf eine volle Ladung aufnehmen 2 Video Aufl sung 1920x1080P 1440x1080P 1280x720P 848x480 w hlbar 3 Videoformat AV...

Страница 7: ...Aufl sung 1920x1080P 1440x1080P 1280x720P 848x480 w hlbar Ein Ausschalten der Loop Aufnahme und w hlen Sie die gew nschte Dateil nge Ein Ausschalten der Bewegungserkennung Audio Aufnahme w hrend des V...

Страница 8: ...nd schlie en Sie sie mit dem USB Kabel an eine Steckdose an Schritt 2 Das LCD Display zeigt Mass Storage und PC Kamera bitte w hlen Sie die erste und dr cken Sie die OK Taste Schritt 3 Die Micro SD Ka...

Страница 9: ...o SD mont sur l emplacement de la carte Micro SD d j III Op ration Assurez vous que la cam ra de la banque d alimentation est compl tement recharg e Tous les boutons sont cach s sous le couvercle sur...

Страница 10: ...o pendant 9 heures en continu sur une charge compl te 2 R solution vid o 1920x1080P 1440x1080P 1280x720P 848x480 s lectionnable 3 Format vid o AVI 4 L enregistrement en boucle est pris en charge 5 L...

Страница 11: ...Fonction R solution 1920x1080P 1440x1080P 1280x720P 848x480 s lectionnable activez d sactivez l enregistrement en boucle et choisissez la longueur de fichier souhait e activer d sactiver la fonction...

Страница 12: ...e USB tape 2 L cran LCD affichera le stockage de masse et la cam ra PC choisissez le premier et appuyez sur le bouton OK tape 3 la carte Micro SD sera reconnue comme un lecteur de disque amovible tape...

Страница 13: ...zione DC5V 1 8GB Micro SD Card inserito nello slot Micro SD card gi III Operazione Assicurarsi che la fotocamera della banca di potenza sia completamente ricaricata Tutti i pulsanti sono nascosti sott...

Страница 14: ...camera pu registrare video per 9 ore in continuo con una carica completa 2 Risoluzione video 1920x1080P 1440x1080P 1280x720P 848x480 selezionabili 3 Formato video AVI 4 La registrazione Loop supportat...

Страница 15: ...ione Risoluzione 1920x1080P 1440x1080P 1280x720P 848x480 selezionabile attivare disattivare la registrazione del ciclo e scegliere la lunghezza del file desiderata Attiva disattiva la funzione di rile...

Страница 16: ...resa di alimentazione AC utilizzando il cavo USB Fase 2 Il display LCD mostrer Mass Storage e PC Camera si prega di scegliere il primo e premere il pulsante OK Passo 3 La scheda Micro SD sar riconosci...

Страница 17: ...B Tarjeta Micro SD ya montada en la ranura para tarjetas Micro SD III Operaci n Aseg rese de que la c mara de bater a externa est completamente cargada Todos los botones est n ocultos debajo de la cub...

Страница 18: ...CD se apagar Nota 1 La c mara puede grabar v deo durante 9 horas continuamente con una carga completa 2 Resoluci n de v deo 1920x1080P 1440x1080P 1280x720P 848x480 seleccionables 3 Formato de video AV...

Страница 19: ...ci n Resoluci n 1920x1080P 1440x1080P 1280x720P 848x480 seleccionables Activar desactivar la grabaci n c clica y elegir la longitud de archivo deseada Activar desactivar la funci n de detecci n de mov...

Страница 20: ...e alimentaci n de CA con el cable USB Paso 2 La pantalla LCD mostrar el almacenamiento masivo y la c mara PC por favor elija la primera y Presione el Bot n de OK Paso 3 La tarjeta Micro SD ser reconoc...

Страница 21: ...PBC600 I 1 LCD 2 3 LED 4 5 6 II 1 1 USB 1 AC110 230V DC5V 1 8GB SD Micro SD III 7 24 USB AC 7 8 OK 9 10 11 12 SD...

Страница 22: ...SDHC Class 10 Micro SD 3 1 3 1 1 2 LCD 3 1 2 OK 1 LCD 3 1 3 OK 3 1 4 2 LCD 1 9 2 1920x1080P 1440x1080P 1280x720P 848x480 3 AVI 4 5 3 2 3 2 1 LCD 1 5 LCD 3 2 2 1 LCD 3 2 3 LCD LCD LCD 3 3 IR LED LCD 1...

Страница 23: ...IV 4 1 LCD 1 4 2 OK 1 4 3 V 5 1 1 Micro SD 2 PC USB 3 Micro SD 4 1920x1080P 1440x1080P 1280x720P 848x480 IR LED Micro SD SD...

Страница 24: ...5 2 USB 1 USB AC 2 LCD Mass Storage PC Camera OK 3 Micro SD 4 VI 6 1 USB AC 6 2 7 6 3 4...

Отзывы: