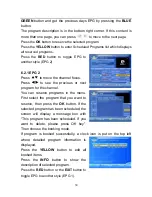
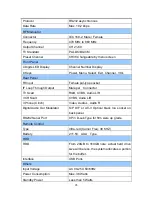
Wintal PVR-X2 Скачать руководство пользователя страница 30


30

GREEN

 button and get the previous days EPG by pressing the 

BLUE 

button. 

The program description is in the bottom right corner. If this content is 

more than one page, you can press 

  to move to the next page.


Press the 

OK

 button to reserve the selected program. 

Press the 

YELLOW 

button to enter Scheduled Programs list which displays 

all reserved programs. 

Press the 

RED 

button to toggle EPG to 

another style (EPG 2). 


6.2.1 EPG 2 

Press 

  to move the channel focus. 

Press 

 to see the previous or next 

program for the channel. 

You can reserve programs in the menu. 

First select the program that you want to 

reserve, then press the 

OK 

button. If the 

selected program has been scheduled, the 

screen will display a message box with 

“This program has been scheduled. If you 

want to delete, please press OK key”. 

Then choose the booking mode. 

If program is booked successfully, a clock icon is put on the top left 

where detailed program information is 

displayed. 

Press the 

YELLOW 

button to edit all 

booked items. 

Press the 

INFO

 button to show the 

description of selected program. 

Press the 

RED 

button or the 

EXIT 

button to 

toggle EPG to another style (EPG 1). 

Содержание PVR-X2

Страница 1: ...Good quality 132 4 PVRX2 to TV with component video cables Best quality 132 5 PVRX2 to TV or AMPLIFIER with LEFT RIGHT AUDIO 133 6 PVRX2 to TV or AMPLIFIER with OPTICAL AUDIO 134 OPERATION 18 1 Chann...

Страница 2: ...annel List 285 6 2 Program Guide 285 6 3 Recall the favorite channel 287 6 4 Audio setting 287 6 5 Switch AV TV 287 6 6 Open Teletext Subtitle Closed caption 287 6 7 Open Channel Bar 288 6 8 Time shif...

Страница 3: ...this manual 2 Features Fully DVB T MPEG 2 compliant Wide screen 16 9 and normal 4 3 Aspect Ratio Teletext and closed caption CC compatible 5000 Editable Channels Easy installation or detailed manual s...

Страница 4: ...e the unit from the power outlet Do not use device if the power cord becomes damaged in any way as it may cause fire or electric shock Contact your authorised repairer for assistance Do not cover the...

Страница 5: ...5 contact the sales outlet where this product was initially purchased...

Страница 6: ...6 OVERVIEW 1 REMOTE CONTROL...

Страница 7: ...layback mode Fast Rewind 1x 2x 4x 8x 12x or start timeshift Fast Forward 1x 2x 4x 8x 12x Slow Rewind 1 2x 1 4x 1 8x 1 12x or start timeshift Slow Forward 1 2x 1 4x 1 8x 1 12x Skip forward 1 minute in...

Страница 8: ...r favorite program list exit favorite program list Change PIP sub picture position Start Playing Release Pause Stop Recording Start Time shift or pause playback Start Recording Operation Within menu s...

Страница 9: ...9 2 FRONT PANEL NAME FUNCTION STAND BY Puts unit on stand by MENU Enter or exit main menu screen adjust volume up and down Adjust channel up and down OK Show channel list confirms selection...

Страница 10: ...logue audio output to TV AMP CVBS Standard definition video output connect to TV video input RS232 Serial port used for firmware upgrade 2 ANT IN Connect to separate terrestrial antenna or 1 loop out...

Страница 11: ...and then connect according to the diagrams below We have described connections into two steps picture and sound Picture Cable Description Quality of picture 1 RF antenna lead Antenna cable Poor inclu...

Страница 12: ...12 WARNING TURN OFF ALL DEVICES BEFORE MAKING CONNECTIONS FAILURE TO DO SO MAY RESULT IN ELECTRIC SHOCK...

Страница 13: ...hannel see TV manual for details on how to search RF IN OR 2 PVRX2 to TV with CVBS composite Video cable Moderate quality Connect the TV antenna to 1 ANT IN using an RF lead Connect any CVBS video out...

Страница 14: ...put on your TV e g SVHS1 AV2 Consult your TV manual for instructions on how to do this OR 4 PVRX2 to TV with component video cables Best quality Connect the TV antenna to 1 ANT IN using an RF lead Con...

Страница 15: ...VRX2 to either For audio through TV The L R in on the same AV input as you connected the video lead s Consult your TV instructions for more details or For audio through an amplifier The L R in on a fr...

Страница 16: ...16...

Страница 17: ...o assign SPDIF to the video channel you are using Consult your TV instructions for more details or For audio through an amplifier The SPDIF in on a free channel on your amplifier Select the channel us...

Страница 18: ...ssing the numeric keys 1 1 2 How to move the channel 1 After selecting the channel you want to move press RED and the focus will jump to the destination 2 Move the selected channel to the new position...

Страница 19: ...el you want to add to the list and then press OK 3 The selected channel will be shown in FAV1 list To delete a channel from favourites select the channel in the FAV1 list and press OK The deleted chan...

Страница 20: ...miss certain programs Press GREEN to add a scheduled recording When setting a Scheduled Recording there are a few parameters that need to be set Record Task The default value is set at open Record St...

Страница 21: ...imeshift Start Mode Select if you want Timeshift to start always never or only when you press the pause key Divide Record By EPG Event To split recordings when a new program starts according to the EP...

Страница 22: ...and Radio programs found will be added to the program list and arranged under categories 3 2 Manual search for advanced users Only Use Manual Search if you are familiar with the relevant parameters I...

Страница 23: ...and press RED This will add any channels found to the channel list 2 How to delete a frequency Select a frequency you want to delete and then press BLUE The selected frequency will be removed from the...

Страница 24: ...other PVRX2 3 4 2 Prepare sending data After selecting the data transfer type the STB is ready to send data Before starting transmission you can cancel sending 3 4 3 Sending data When the host STB is...

Страница 25: ...eric keys or select close Current Time displays current time Daylight time Turn on or off daylight savings time Time zone Change time zone specific for your area 4 2 Password setting You can adjust th...

Страница 26: ...26...

Страница 27: ...BOX or to crop the image but have the whole screen filled PANSCAN 4 3 7 Time out You can adjust the time the channel information box stays on screen after no buttons are pressed Time out values availa...

Страница 28: ...on 5 1 System Information This menu shows information regarding the unit such as model name release date version and HDD size of the PVR 5 2 Channel Information You can check current channel informati...

Страница 29: ...nnel list to favorite list by pressing the FAV button You can press the TV RADIO button to change from the TV channel list to the radio channel list You can exit from the channel list menu by pressing...

Страница 30: ...see the previous or next program for the channel You can reserve programs in the menu First select the program that you want to reserve then press the OK button If the selected program has been sched...

Страница 31: ...31...

Страница 32: ...and right only Select language in case of multilingual program 6 5 Switch AV TV Press the TV VCR button to switch AV TV 6 6 Open Teletext Subtitle Closed caption Press the TTX button to Open Teletext...

Страница 33: ...ange time shift speed After pressing or to change time shift speed a speed icon will be displayed on top left of screen 6 8 3 Play live service while time shift Press the PIP button to pop up the PIP...

Страница 34: ...ed service in PIP window 6 10 RECORDING 6 10 1 Start recording Press to start a recording a record icon is displayed on the screen The record icon displays recording details such as duration and recor...

Страница 35: ...ss to stop the recording You will be asked to confirm this 6 11 File playback 6 11 1 Choose file on HDD to play Press HDD to bring up file list You can use or numeric keys to select the file Press the...

Страница 36: ...ing You may playback another file while recording as per normal 6 11 11 Jump recording playback time In the playback progress bar you can use the number keys to input a time to jump to then press OK t...

Страница 37: ...shift File playback PIP All PVR Function Press OK to display topic Press EXIT MENU or HELP to Exit 7 2 Show help info Press OK key to switch display mode between manual and automatic In manual mode pr...

Страница 38: ...ost PC electronics stores Your PVR will display USB mode on screen and on your PC the following screen will appear Select cancel 8 2 Installing the software To install the software insert the provided...

Страница 39: ...ms folder Start All programs PVR player 1 01 There are two programs in the PVR suite fileman exe a handy file manager for retrieving the files off the PVRX2 PVR player 1 01 Media player for playing th...

Страница 40: ...where you have stored files for instance my movies in my documents click on the button to change this folder 2 Recordings These are the stored recordings in the directory Right click on any recording...

Страница 41: ...p down PVR recorded file list Also see 6 2 Transports Play fast forward rewind etc 3 Volume up down 4 Audio setting Click to change from stereo to mono 5 Full screen mode Press this to make the viewin...

Страница 42: ...m Rate 2 45 Msps SCPC MCPC Viterbi Decoding Rate 1 2 2 3 3 4 5 6 7 8 Reed Solomon Decoding FEC 204 188 t 8 Mpeg transport stream A V decoding Demultiplex According to ISO IEC 13818 1 Input Stream Max...

Страница 43: ...Through Output Male pal Connector TV Scart RGB CVBS Audio L R VCR Scart CVBS Audio L R 3 Phone Cinch Video Audio L Audio R Digital Audio Out Modulator S P DIF or AC 3 Optical black rca socket on back...

Страница 44: ...talled incorrectly Make sure the batteries are installed correctly Distorted TV picture Your hi speakers are to close to the TV Magnetic distortion can be caused if speakers are placed too close to a...

Отзывы: