


60
W
INNOV
C
BOX
H
ARDWARE
U
SER
G
UIDE
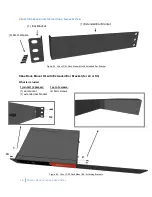
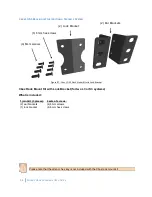
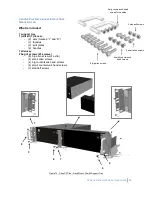
Attaching the Support Tray to the System:
1.
Screw the
left ear
(marked “L”) to the left side of the system with 2 small countersunk screws.
2.
Screw the
right ear
(marked “R”) to the right side of the support tray with 2 small countersunk
screws.
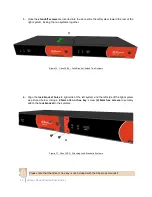
3.
Remove the front left allen screws from the system, then screw the
left façade
to the system with
2 big allen screws.
4.
Screw the
right façade
to the tray with 2 small allen screws.
5.
Screw 3 standoff screws to the left side of the support tray, then attach the left side of the support
tray to the right side of the system by inserting the standoff screws into the holes and sliding the
support tray toward the rear.
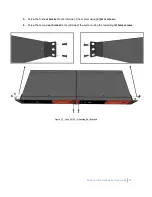
6.
Remove the front right allen screws from the system, then screw the left side of the
joint plate
to
the system with 2 big allen screws.
7.
Screw the right side of the
joint plate
to the support tray with 2 small allen screws.
8.
Line up the handle with the corresponding holes of the
left façade,
then screw 2 big countersunk
screws to the rear of the
left ear
.
9.
Line up the other handle with the corresponding holes of the
right façade,
then screw 2 big
countersunk screws to the rear of the
right ear
.
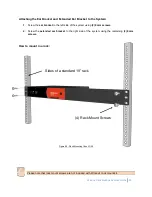
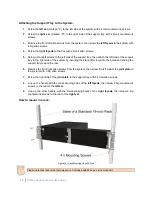
How to mount in a rack:
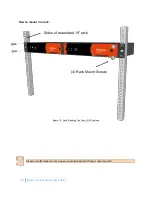
Figure 75 - Rack Mounting Cbox S3 Plus
Please note that rack mount
screws are not included with Winnov’s rack mount kit.
Содержание CBOX
Страница 1: ...CBOX HARDWARE USER GUIDE Version 2 0 4 Updated 4 26 2016 ...
Страница 2: ...2 WINNOV CBOX HARDWARE USER GUIDE ...
Страница 17: ...WINNOV CBOX HARDWARE USER GUIDE 17 2 CBOX P3 ...
Страница 26: ...26 WINNOV CBOX HARDWARE USER GUIDE 3 CBOX S3 PLUS ...
Страница 34: ...34 WINNOV CBOX HARDWARE USER GUIDE 4 CBOX S3 ...
Страница 42: ...42 WINNOV CBOX HARDWARE USER GUIDE ...
Страница 43: ...WINNOV CBOX HARDWARE USER GUIDE 43 5 CBOX L3 ...
Страница 51: ...WINNOV CBOX HARDWARE USER GUIDE 51 APPENDIX ...