background image

SH-6510 User Guide


------------------------ 

Installation 

 
Device Connection   


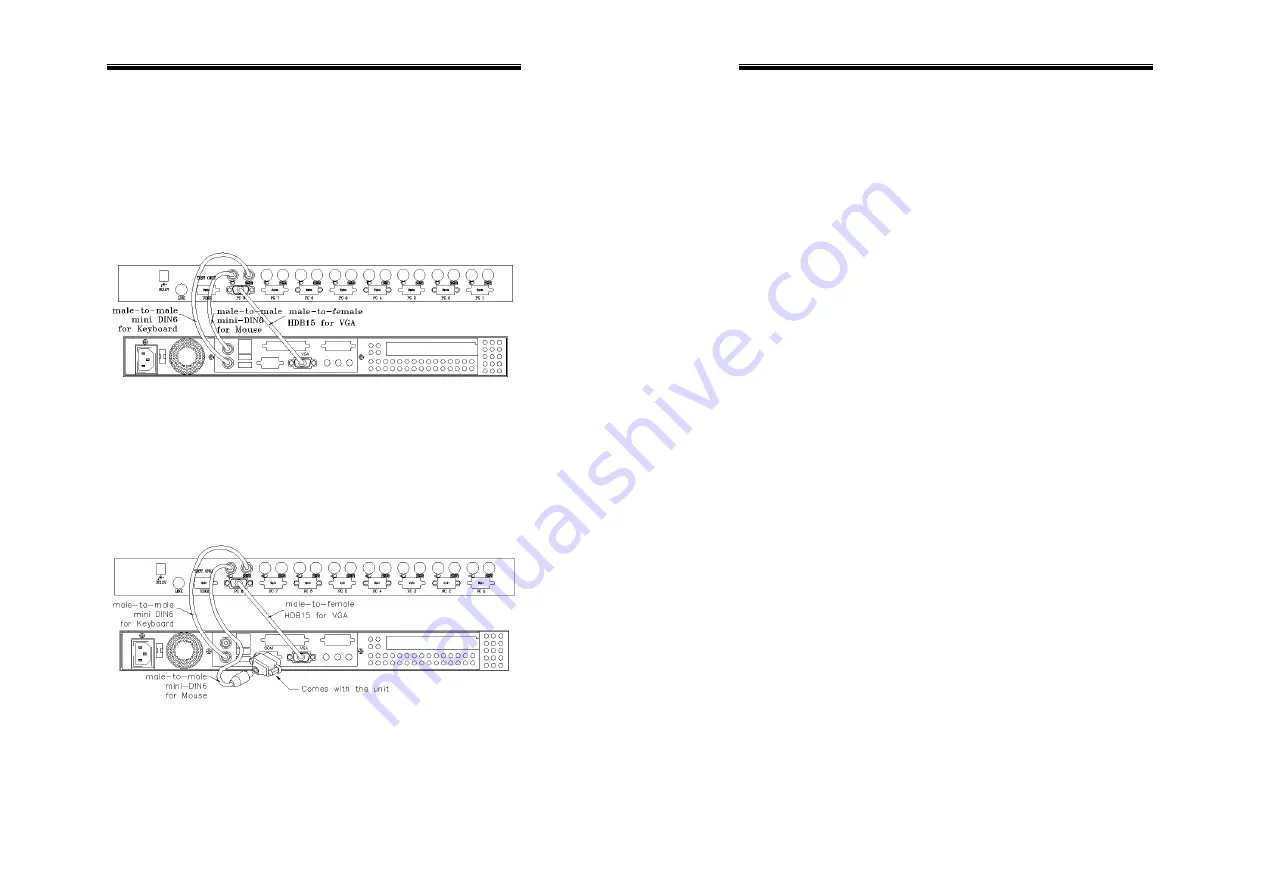
Determine the channel address of each computer.  For computers 
using PS/2 mouse, connect the computer's mouse and keyboard 
cables to the KVM Switches’s connectors marked with a mouse and 
keyboard respectively, as shown in figure 4. 


Figure 4: Master computer connection


For computers using serial mouse, connect the DB-9 to mini-DIN-6 
adapter (supplied with the KVM Switches) to the computer mouse 
port, then use PS/2 cables to connect the mouse to KVM Switches, 
see figure 5.  Connect the computer's monitor cable to the 
HD-DB-15 VGA connector.  Repeat above steps for all remaining 
computers to be connected to the KVM Switches.     


Figure 5: Adapter and serial mouse connection 

SH-6510 User Guide 


8

Initial Power-Up 

 
Make sure all computers and KVM Switches are powered down 
during installation.  You must power up the Master KVM 
Switches before turning on any other devices.


For single KVM Switches:

 1) Apply a power adapter to the 

Master

.  2) Turn on computers.  


For cascade:

 1) Apply a power adapter to the 

Master

.               

2) Apply power adapters to all 

Slaves

.  3) Turn on 

computers.  


Note: You may hot plug additional powered-down computer and 

Slave

 without turning any existing KVM Switches or computer off 

after initial power up.   


Replace Master Console Devices


You can replace a faulty keyboard or mouse of the 

Master


CONSOLE

 port at any time without powering down the Master, as 

long as your computers are booted with proper device driver for the 
new device. Should you encounter any difficulty, just activate 

K/M 

RESET

 by holding both front-panel ‘

1

’ and ‘

2

’ push buttons down for 

2 seconds.    


7

Содержание SH-6510

Страница 1: ...t is limited by Monitor so only up to Monitor resolution Advanced VGA circuit design guarantees smooth and flicker free switching from one computer to the other with distance up to 100ft 30M at both C...

Страница 2: ...gged at any time High VGA resolution 1600x1200 for KVM switch but limited by LCD DDC2B compatible Standard 1U 19 inch rack mounting Supports optional multimedia module for microphones and stereo speak...

Страница 3: ...or more KVM Switches to PC 1 PC 4 KVM104 or PC 1 PC 8 ports KVM108 of a Master unit Cascade configuration expands system ability allowing you to select computers connected to the Master or Slaves The...

Страница 4: ...connection SH 6510 User Guide 8 Initial Power Up Make sure all computers and KVM Switches are powered down during installation You must power up the Master KVM Switches before turning on any other dev...

Страница 5: ...igure 6 shows how to attach optional mounting brackets to the SH 6510 unit for standard 19 inch rack cabinet Figure 6 Attaching rack mount bracket Figure 7 Assembling rack cable support Then keyboard...

Страница 6: ...re Audio Stick When set to On A V module selection follows computer selection When set to Off A V module selection stops following computer selection It is useful if you want to listen to one particul...

Страница 7: ...is cascaded to a Slave the number at the left of the triangle mark shows the number of ports the Slave has i e 8 for KVM108 ENTER key brings you one level down and another screen pops up listing the n...

Страница 8: ...r a Slave can be locked by this function at a time Manual Scan Scan through power on computers one by one by keyboard control Scan Type F4 More Scan Type determines if scanned computers must also be e...

Страница 9: ...s displaying a list of hot key commands if the option is On The Hotkey Menu can be turned Off if you prefer not to see it when the left CTRL key is hit twice When you put down the display the display...

Страница 10: ...left side of the keyboard 1 8 are the number keys 1 8 at the upper row of the keyboard Do not use the keypad at the right of the keyboard J To select a computer by hot key command you must know its ch...

Страница 11: ...ny operating system left Ctrl left Ctrl F4 The KVM Switches generates 1 to 4 beeps corresponding to 10 15 20 and 30 characters sec respectively J Audio Stick An optional multimedia module can be LINKe...

Страница 12: ...abeled PC 1 PC 8 can be connected to either a computer or a Slave s CONSOLE port as shown in figure 10 A power adapter with DC 12V output rating must be connected to the Master Figure 11 Cascaded 8 po...

Страница 13: ...ides for up to 100ft 30M a definite plus for server room applications Now you can access all computers either in the server room when you have to physically access the computers such as software upgra...

Страница 14: ...nel remains lit indicating the KVM Switches is under user operation In the mean time keyboard LEDs Num Caps Scroll Lock of the other CONSOLE start to flash as its access is denied and the monitor is b...

Страница 15: ...m of 12V 2A output rating is firmly connected to the power jack for the SH 6510 Symptom Possible causes Recommended solutions No OSD screen No power to KVM Switches Establish power by turning on compu...

Страница 16: ...rranty or representation expressed or implied with respect to the contents or use of this documentation and especially disclaims its quality performance merchantability or fitness for any particular p...

Отзывы: